It takes up minimal space in our shed (which is always a benefit when it's already up to the roof), and can be easily stored when not being used. Ooni can make a cover for your oven that will fit into any available storage. You can carry it with you on trips to the beach, friends' houses, and even camping.
Unboxing everything, reading the instructions and setting it up took no more than 10 minutes – impressive stuff.
Ooni Fyra pizza grills are becoming the go-to garden accessory. It's simple to see how. Their promise of making delicious pizza in our own backyards, even though we aren't allowed to eat at restaurants, has made them one if the most desired items in the last 12 months.
After the dough had been rolled out, I laid the base on the pizza pan before adding the toppings. To avoid the pizza base sticking to the peel, flour it well. Toss your toppings on top of the pizza.
The Ooni Fyra can be cleaned easily - another plus point. Once the oven is cool down (which can take several hours), remove the grate, and then empty the ash. I like to wipe the pizza stones with a kitchen towel to get rid of any food residue. The exterior can be cleaned with a clean cloth and soapy water. It's that simple! It takes little effort.
I read the directions again and realized that it was necessary to rotate the pizza after about 20 to 30 seconds in order to cook evenly. This was solved quickly and I was soon creating deliciously cooked pizzas in no time at all. These pizzas got huge praise from my kids.
You can adjust the chimney vent to increase heat in the Ooni Fyra. The chimney vent can be opened and the chimney cap removed. This will increase the oven's internal airflow and raise the temperature.
It takes a certain skill to get the pizza off of the peel. You'll soon learn the art of gently removing the pizza from the peel.
Before you store it or cover it, wait until the oven cools completely.
Ooni Fyra accessories include pizza oven covers, serving boards, and pizza peels. There are many options, from thermometers to trolley tables to pizza cutters to topping stations that have compartments for all your favourite toppings.
The Ooni Fyra is a lot of fun, and for many potential buyers, the pros — especially the price — will outweigh the cons.
This pizza oven is a great product and I agree with it. It is easy to assemble, takes up very little space, and can be easily moved around the garden. This would work well on a small balcony or patio. The wood pellets are lightweight and don't require much storage space. You can cook your favorite pizza recipes quickly and easily with this wood pellet.
The viewing hole at the door allows you to keep an eye on the oven's performance and check how it's burning. After the first set of pellets has ignited and burned well, you can slowly add more pellets the the fuelhopper on top of your oven until it is full. The hopper automatically loads the pellet into your oven. To keep the oven at the right temperature, it is important to regularly top-up the hopper. A full hopper with pellets should last around 15 minutes.
Fyra 12 is not the oven for those who are looking to make large quantities of pie. This oven is only suitable for small groups. The ash buildup from three to four pies made it difficult for the oven to reach 500 degrees Fahrenheit. The result? Pizzas that were too slow to cook and that didn't have the right texture.
Easy to light, the Fyra 12 can be loaded with pellets. Once the fire starter is lit, you can add more pellets to the hopper. Finally, relax and enjoy a cold beverage. It also heats quickly. It takes the Fyra 12 about 15 minutes to reach the optimal temperature (900 to 945 degrees Fahrenheit), depending on the weather. Neapolitan pizzas require a temperature of 950 to 1,000 degrees.
After the dough had been rolled out, I laid the base on the pizza pan before adding the toppings. To avoid the pizza base sticking to the peel, flour it well. Toss your toppings on top of the pizza.
The compact packaging made it easy to transport the pizza oven to the garden. The packaging was small and compact. I couldn't believe that there was an entire pizza oven in it.
One thing to watch out for is that if you are removing the door on the oven to turn the pizza or remove it, a slight gust of wind can cause a small backdraft, and flames will flick out of the rear of the oven. There's no concern to anyone at the front of the oven who is cooking pizzas, but you might want to make sure the rear of the oven is pointed away from where children in particular could walk past.
I was able to see the directions again and realize that you need to rotate the pizza in oven after 20 or 30 seconds. This is to ensure the pizza cooks evenly. It was a simple problem and I was soon able to make delicious, beautifully cooked pizzas that were ready in 60-90 seconds. These pizzas were a huge hit with the kids.
Without a built in thermometer, it is difficult to determine when the pizza oven is at its highest temperature and ready for baking. However, I found that 15 minutes was sufficient for it to reach the heat point in most weather conditions. The best way to tell if it's ready is by looking through the viewing port. If you see rolling flames (where flames reach the roof of the oven), then it's likely ready for cooking.
We tested the Ooni Fyra portable pizza oven to determine if it can handle family pizza nights.
First, remove the chimney cap. Next, take off the chimney cap and fill it with hardwood pellets. To get started, I used approximately two dozen hardwood pellets following the instructions. Next, add a firelighter (I used Ooni firelighters which were provided), and light it. Finally, push the grate into place in the back of your pizza oven.
One of my favorite parts of cooking and eating outdoors is how little cleanup there can be. Not so with the Fyra 12, where soot buildup is a common occurrence (even with a well-oxygenated flame). There isn't just one thing to wipe down, either. The Fyra 12 has two chimneys — one for smoke, the other for pellet-loading — each with various removable parts, and all of them are filthy after a cook. Thankfully, the pizza stone itself stays relatively clean, requiring little more than a quick wipedown after use.
First, remove the main body from its box. Then, open the legs that support the main part. You then insert the grate before you place your pizza stone in its base. The main chimney (the larger, higher section at its front) is then inserted and locked into place. Next, the fuel hopper (the smaller, back-facing cylinder) is inserted. Finally, you can close the door with the chimney cap.
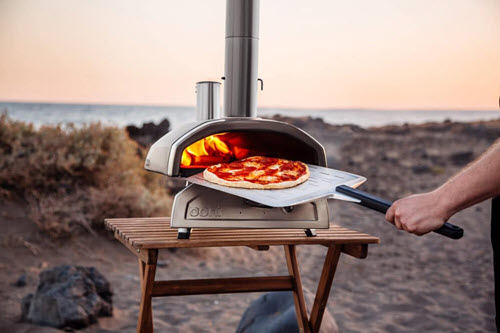
The Ooni Fyra model features the same foldable legs as every Ooni oven. Its compact and portable design is one of our favorites, as we mentioned before. It measures 27.17 inches by 18.9 inches by 10.24 inches. The unit is small enough to be placed almost anywhere.
The only additional drawbacks about the Ooni Fyra 12 are things I could have anticipated and ultimately felt I could live with. Cleaning the oven is a little fussy, for example. After waiting for it to cool entirely and disposing of the ashes, you can wipe the inside down with a dry cloth (no water can be used) and, as the company writes on their website, scrape off stubborn bits of food or debris from the cooking surface with a pizza brush. I needed to use a fish spatula and some elbow grease to really clean the baking stone, though by flipping it for the next cook (as recommended), I did find that the high heat helped burn any straggling bits off.
Read on to learn more about how the Ooni Fyra 12 wood pellet pizza oven works, where it is most successful, and the pizza oven’s biggest drawbacks.
The best wood for an Ooni Oven is the cooking logs made by Smoak Firewood. All of their wood is 100% free from preservatives, kiln-dried for maximum burning, and they offer the wood in five different varieties (white/red oak, maple, hickory, and cherry).
So how to clean a Ooni pizza stone? To clean a Ooni pizza stone, first let it cool down from use. Then scrub off food particles with the pizza brush and wipe the stone with a damp rag. Once you've cleaned the stone with a damp rag, let the pizza stone dry for several hours before storing it.