How Work Orders Are Created
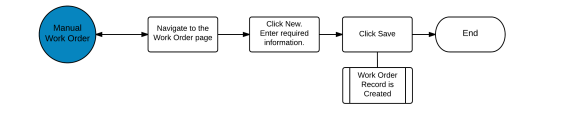
Manual Work Orders
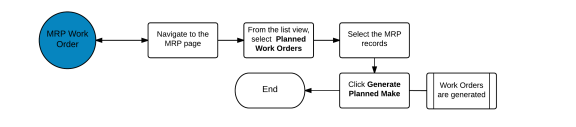
MRP Work Orders
The Kenandy work order flow keeps your manufacturing floor paperwork flowing smoothly, your books up to date with inventory transactions, and helps you stay ahead of material needs and potential pileups on the floor itself so your machines and people are working at optimal capacity.
Kenandy has two types of work orders:
You can create work orders manually. Kenandy also creates work orders automatically.
You can create manual work orders for:
Kenandy automatically creates work orders from:
Manual Work Orders
MRP Work Orders
Before you create or process work orders, you need to set up the following:
To create a new work order manually, follow these steps:
Note: If the assembly item includes a phantom subassembly component, the Company and Facility of the item specification for that phantom subassembly must match the Company and Facility you chose for this work order. The phantom subassembly must have a start date set on or before the start date of the work order.
If either of these conditions aren't met, the work order won't find the item specification for the phantom subassembly.
The Work Order Detail page is displayed, with the Status set to Draft.
While the work order Status is Draft, you can change any field in the work order header.
To release a single work order, follow these steps:
If you use MRP, use the Work Order Planner Workbench, do lots of repairs, or have separate people creating and releasing work orders, you can release lots of work orders all at once.
To release many work orders at once, follow these steps:
All the work orders you chose are released.
Kenandy does the following:
Your next step depends on your company's work order process and the needs of the specific work orders you're dealing with. Here's what you can do next in Kenandy:
Note: You can change the Order Quantity on a work order after it's released. Kenandy updates the material tracking quantities and operation tracking dates.
You can change the Order Quantity if the work order is set to Completed, but you can't change the Order Quantity to less than the Quantity Completed.
If you need to return a released work order to Draft status, follow these steps:
Or
Note: If you need to undo release a work order that has outside processing (subcontract) operations, you must cancel the POs for the outside processing before you click Undo Release on the work order.
To complete a released work order, follow these steps:
The work order Status changes to Complete when you record the full quantity for the work order either on the Record Operations page. Or you can scan barcode labels on finished items to complete work orders using the Kenandy Mobile companion app.
Kenandy does the following after you complete step 6:
To print a picklist for an operation, follow these steps:
The picklist prints and you return to the Work Order Detail page.
Viewing contents of a work order is only relevant if you complete work orders using Kenandy Mobile. If you don't use Kenandy Mobile, skip this section.
If you missed one or more cases when you were scanning finished cases to complete a work order, follow these steps:
Close a work order after it's marked complete, you've issued all components from WIP, and you think you won't have to make any changes or updates to it. Or close a work order you know you're not going to work on anymore.
You can close a work order only after it's released.
Note: You can reopen closed work orders if you need to make changes.
To close a work order, follow these steps:
Note: Make sure you've issued all the components in WIP. If Kenandy finds unissued components in WIP, it won't let you close the work order.
The work order status changes to Closed.
Cancel a work order only if you've got nothing recorded against it and you don't want to do anything else with it.
Note: You can't undo the canceling of a work order.
You return to the Work Order Detail page for this work order. The Status of this work order is set to Cancelled.
If you need to track a discrepancy in a work order, this SKID may contain the information you need.
To see the WIP SKID details, follow these steps:
To learn more about SKIDS, see SKIDs.
As you process work orders, Kenandy creates inventory change records. Inventory change records contain inventory transactions (and other information). Inventory transactions record information used by accounting.
| User Action | Inventory Change | Inventory Transaction Type |
|---|---|---|
| Kit Work Order | Work Order Kit | Work Order Component Issue |
| Dekit Work Order | Work Order Dekit |
Work Order Component Return Work Order Component Scrap |
| Complete Work Order |
Work Order Completion
|
Work Order Assembly Completion Work Order Component Issue Work Order Issue From WIP By-product Work Order Component Scrap |
| Uncomplete Work Order |
Work Order Uncomplete |
Work Order Uncomplete Work Order Component Return Work Order Return to WIP By-product Uncompletion |
If you need to investigate the movement of inventory related to a specific work order, you can review inventory changes for that work order.
To access inventory changes tied to a work order, follow these steps:
To learn more about inventory changes, see Inventory Changes
If you need to investigate inventory transactions for the assembly item for this work order, you can review the inventory transactions for that work order.
Note: To find inventory transactions for components, go to the Material and Operation Tracking page.
To access inventory transactions tied to a work order, follow these steps:
To learn more about inventory transactions, see Inventory Transactions.
The following table lists the fields that Kenandy provides. Your system administrator selects the fields that are displayed on your user interface.
| Field | Description |
|---|---|
| Assembly Item Specification |
The Assembly Item Specification contains all the information about components required to complete this work order. It can also include routings. An Assembly Item Specification of type Assembly is required for work orders of type Regular. For work orders of type Repair, Assembly Item Specification is optional. But if you specify one, it must be of type Repair. When you release the work order, Kenandy converts routings to operations and creates material tracking records for each component. |
| Item |
Links to the item record of the item you're manufacturing. Kenandy pulls the item record from the Assembly Item Specification you enter. |
|
Company |
The company that's manufacturing this work order. Your default company appears in this field. Click (lookup) to change the company. |
| Complete to Location |
The location in your facility where you store completed assemblies. The default Complete to Location comes from the facility record. You can change the Complete to Location to a different location here. |
| Default WIP Location |
The location in your facility where you're manufacturing the assembly item. The Default WIP Location comes from the facility record. You can change the Default WIP Location to a different location here. |
| Facility |
The facility that's manufacturing this work order. Your default facility appears in this field. Click (lookup) to change the facility for this work order. All components required for this work order must be stocked in this facility, in the correct locations. |
| MRB Location |
The Material Review Board (MRB) location where you store assemblies for inspection. This might be called QA Location or Inspection Location in your instance of Kenandy. The default MRB Location comes from the facility record. You can change the MRB Location to a different location here. |
| Order Quantity |
Enter the number of assembly items to be completed in this work order. Kenandy uses the Order Quantity to calculate the number of components the work order needs and the number of hours it will take to complete operations for the work order. After you've saved the work order, the Order Quantity appears in the Dates and Quantities section of the Work Order Detail page. |
| Notes | Optional. |
| Packaging UOM |
The UOM you use to keep track of this item in your warehouse. For example, if you make t-shirts and pack them into cases for storage in your warehouse, enter CS (case) into Packaging UOM for a work order for t-shirts. You can't change the packaging UOM after a work order is released. |
| Rework Reason | Optional. |
| Status |
Shows you where in the process your work order is. Draft: Not yet released. You can make changes to anything in the header. You can't check component availability, manage materials and operations, allocate materials, kit, record operations, or close a Draft work order. |
| Type | Choose Regular or Repair. |
| Field | Description |
|---|---|
| Start Date |
Enter or change the date you plan to start work on this work order. If the assembly item has a Lead Time set, the Start Date autopopulates when you enter the Need Date. When you do capacity planning and work order planning, Kenandy looks at the Start Date of existing work orders. |
| Need Date |
Enter the date this work order must be completed by. Kenandy uses the Need Date to calculate the Start Date and Earliest Completion Date if this item has a Lead Time set. When you do capacity planning and work order planning, Kenandy looks at the Need Date. |
| Earliest Completion Date | This is calculated by starting with the start date, looks at operations and manufacturing calendars, and tells you the earliest possible date you can complete the work order. |
| Release Date | The date you released this work order. |
| Date Completed | The date you completed this work order. |
| Close Date | The date you closed this work order. |
| Percent Complete | The percentage of items completed for this work order. |
| Quantity Complete |
The quantity of items already completed for this work order. This quantity appears in the packaging UOM for the assembly item. |
| Quantity to Complete |
The quantity of items not yet completed for this work order. This quantity appears in the packaging UOM for the assembly item. |
| Quantity Scrapped |
The quantity of items scrapped for this work order. This quantity appears in the packaging UOM for the assembly item. |
| Order Quantity (Stocking UOM) |
Each of these displays the same quantities as above, but in the Stocking UOM rather than in the packaging UOM. For example, you're manufacturing items for an order with a packaging UOM = Cases, and there are 6 Eaches to a case. But this work order is for only 4 items. In this example, look at the values in the Quantity (Stocking UOM) fields to determine how many items you need to manufacture. |
| Quantity to Complete (Stocking UOM) | |
| Quantity Scrapped (Stocking UOM) | |
| Quantity Complete (Stocking UOM) |
| Field | Description |
|---|---|
| Action | From here, you can Record, Unrecord, and Print Picklist for this operation. |
| Description |
A brief description of this operation. The description information comes from the item specification. |
| End Date |
The date you plan to finish working on this operation. The End Date is calculated by the system using the number of hours this operation takes to complete and your manufacturing calendars. Changing the End Date affects other operations in this work order, the work order as a whole, and capacity planning for the Work Centers and Work Center Resources working on this operation. |
| Operation Tracking |
The operation tracking record number for this operation. This number is automatically assigned when you release a work order and operations are generated. Click the link to see the Operation Tracking Detail page. |
| Percent Complete |
If you've recorded a partial completion of this operation, the system calculates the Percent Complete to date. This is calculated based on the hours, NOT the quantity. If this operation uses fixed hours, the Percent Complete equals the Hours Consumed divided by the standard hours. If this operation does not use fixed hours, the Percent Complete equals the Hours Consumed divided by the (standard hours times the order quantity for the work order). The Percent Complete is updated when you record hours for this operation. |
| Quantity Completed |
The number of items completed. The Quantity Completed changes when you record this operation (either partial complete or full quantity complete). |
| Quantity Scrapped |
The number of items that you had to scrap. |
| Quantity to Complete |
The number of items that haven't been completed . Order Quantity minus Quantity Completed minus Quantity Scrapped. |
| Sequence |
The place in the sequence of the work order where you complete this operation. Default sequence information comes from the routings in the item specification. The last operation in the sequence must be recorded last in Kenandy. All other operations can be recorded in any order, regardless of where they fall in the sequence. |
| Start Date |
The date you plan to start working on this operation. The Start Date for the first operation is entered when the work order is created. All the other operation Start Dates are calculated by the system using the number of hours the operations take (from the standard hours on the routings, if you use routings) and the manufacturing calendars. Changing the Start Date affects other operations in this work order, the work order as a whole, and capacity planning for the Work Centers and Work Center Resources working on this operation. |
| Work Center Resource |
The person or machine that performs this operation on your manufacturing floor. Default Work Center Resource comes from the item specification. You can change the Work Center Resource for an operation manually on the Manage Operations/Material page. |
| Field | Description |
|---|---|
| Actions | Do not use. These links don't work. |
| Item |
A component needed to complete this work order. Click the Item name to go to the Item Detail page for this component. |
| Material Tracking |
The Material Tracking record number for this component. This number is automatically generated when you release a work order and material tracking records are generated for each component. Click this link to go to the Material Tracking Detail page. |
| Quantity Completed |
The amount of byproducts completed in this work order. This value comes from the Byproduct Completion tab of the Record Operations page. |
| Quantity Issued |
The amount of this component that you've issued by kitting the work order or recording backflush components as part of an operation. |
| Quantity Per Assembly |
The amount of this component used in a single assembly item for this work order. For example, one bicycle assembly includes two wheels per assembly. The Quantity Per Assembly comes from the item specification. |
| Quantity Required |
The amount of this component needed to complete this work order. The Quantity Required equals the number of components required by the item specification times the order quantity of the work order. |
| Quantity Scrapped |
The amount of this component that you've recorded as scrapped in this work order. For backflush components, the Quantity Scrapped comes from the Component Issue tab of the Record Operations page. For kitted components, the Quantity Scrapped comes from the Dekit/Scrap page. |
| Quantity Short |
The amount of this component that needs to be issued to complete this work order. The Quantity Short is equal to the Quantity Required minus Quantity Issued. |
| Quantity Used |
The amount of this component that you've recorded as used by an operation. Backflush components are automatically recorded as used. |
| Type |
Tells you whether this component is Kit or Backflush or Byproduct. You issue Kit components before you complete a work order. The difference is how the components are accounted for in your inventory. |
To open a SKID, click its number.
To learn more about SKIDs and the fields displayed here, see SKIDs.
To open an inventory change, click its number.
To learn more about inventory changes and the fields displayed here, see Inventory Changes
To open an inventory transaction, click its number.
To learn more about inventory transaction and the fields displayed here, see Inventory Transactions.
To open an operation transaction, click its number.
_________________________________
To search the KnowledgeBase and documentation, ask a question, or log a case, please visit the Kenandy Community. To access our online training, visit the Kenandy Learning Center.
Version: Spring 2017