| Exercise 4 | Noise Control Laws Project (Crime Data Joins) |
| Data | Crime Statistics (CSV) |
| Overall Goal | Carry out a join between crime statistics and address features |
| Demonstrates | Attribute-Based Joins |
| Start Workspace | C:\FMEData2019\Workspaces\DesktopBasic\Transformers-Ex4-Begin.fmw |
| End Workspace | C:\FMEData2019\Workspaces\DesktopBasic\Transformers-Ex4-Complete.fmw |
As you know, city councillors have voted to amend noise control laws and residents living in affected areas were informed of these changes.
In the first part of the project, you created a workspace to convert addresses from Geodatabase to Excel, mapping the schema at the same time. In the second part of the project, you continued the workspace to locate all single-family residences within 50 meters of a major highway and filter out all others from the stream of address data.
Now a data journalist with a national newspaper is concerned that the relaxation of noise control laws may lead to more crime in the city. They have therefore requested recent crime figures for each of the affected addresses. They intend to compare this against future data to see if their theory is correct.
This request is a significant test of the city's open data policy, and there's no question of not complying. However, a crisis arises as the current datasets for crime (CSV, table data) is not joined to the address database in any way.
So, for the final part of this project, you must take the existing noise control workspace and amend it to incorporate crime statistics.
Pull this off, and you will be a data superhero!
1) Start FME Workbench
Start FME Workbench (if necessary) and open the workspace from Exercise 3. Alternatively you can open C:\FMEData2019\Workspaces\DesktopBasic\Transformers-Ex4-Begin.fmw
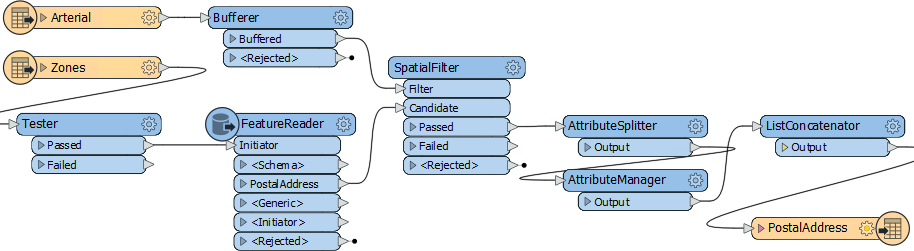
The workspace is already set up to read addresses, filter them spatially, and write them to an Excel spreadsheet.
2) Add a CSV Reader
Now let's start working with crime data. There is no benefit from using a FeatureReader, so add a reader to the workspace using Readers > Add Reader from the menu bar. Use the following parameters:
| Reader Format | Comma Separated Value (CSV) |
| Reader Dataset | C:\FMEData2019\Data\Emergency\Crime.csv |
| Reader Parameters | Feature Type Name(s): From File Name(s) Fields:Delimiter Character: , (Comma) Fields:Field Names Line: 1 |
Click OK to add the reader.
3) Inspect the Data
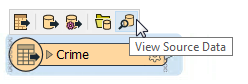
The next task is to familiarize yourself with the source data. Click on the Crime feature type to open the popup menu, then click on the View Source Data button.
The data will look like this in Visual Preview:
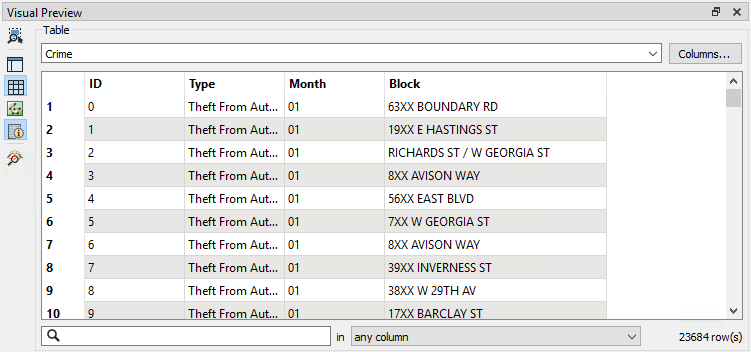
Notice how there is only data in the Table View, if you open the Graphics View it says that there is no geometry. We will need to use Block to spatially relate the crime data to our other data.
| FME Lizard says... |
| Since this is a crime dataset, the exact numbers are blocked out by Xs. Be aware that 7XX W Georgia Street means the seventh block on Georgia Street west of Ontario Street and covers building numbers 700-800. 7XX E Georgia Street would be 14 blocks away, the seventh block east of Ontario. |
You might have spotted that each address feature has a number (not a block ID like "7XX"), and that the road data is stored in Title case ("W Georgia St") in the roads dataset, whereas the crime dataset is upper case ("W GEORGIA ST").
Both of these will make it harder, but not impossible, to join the two sets of data together.
4) Add a StringReplacer Transformer
To merge the data we need to reduce the address number to a block number that matches the crime data in structure; for example, we need 74XX instead of 7445.
So, add a StringReplacer transformer and connect it between the ListConcatenator and the PostalAddress feature type:

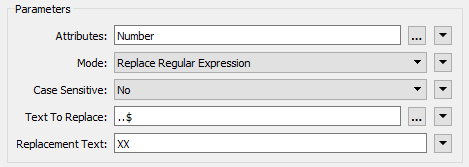
Set the following parameters:
| Attributes | Number |
| Mode | Replace Regular Expression |
| Text to Replace | ..$ |
| Replacement Text | XX |
The text to replace (two dots/periods and a dollar sign) means to replace the last two characters of the string, and they are replaced with XX to match the crime data.
Run the workspace (using Run to This on the StringReplacer) and inspect the caches to ensure the transformer is working as expected. Each of the features in the Number column should have XX at the end.
5) Add a StringCaseChanger Transformer
The other difference in crime/road data was in UPPER/Title case street names. This disparity can be fixed with a StringCaseChanger transformer.
Add a StringCaseChanger transformer after the StringReplacer and set the parameters to change the value of Street to upper case:
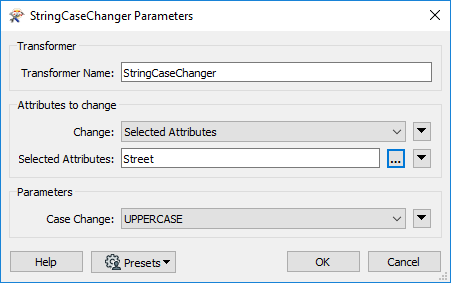
Now address street names will correctly match street names in the crime dataset.
6) Build Join Key
Having updated the attributes to match the crime data, we now have to construct a key out of them.
Add an AttributeCreator to the canvas after the StringCaseChanger. Create a new attribute called JoinKey. Open the Text Editor for the attribute and enter (select):
@Trim(@Value(Number) @Value(Street))
This will match the structure of the crime data (be sure to include a space character between the two attributes). The Trim function is there to ensure there are no excess spaces on those attributes.
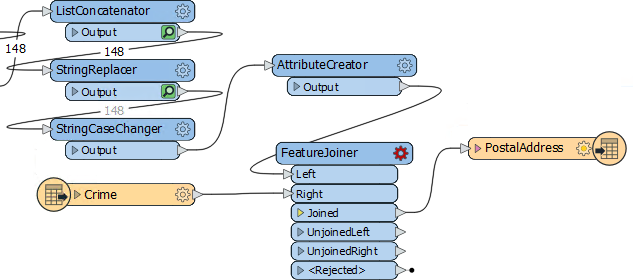
7) Add a FeatureJoiner Transformer
Now we've sorted out the structure of our join keys we can merge the data together with a FeatureJoiner.
Add a FeatureJoiner to the canvas.
Connect the address data (the AttributeCreator output) to the Left input port. Connect the crime data (the CSV reader feature type) to the Right input port.
Connect the FeatureJoiner:Joined output port to the PostalAddress writer feature type:
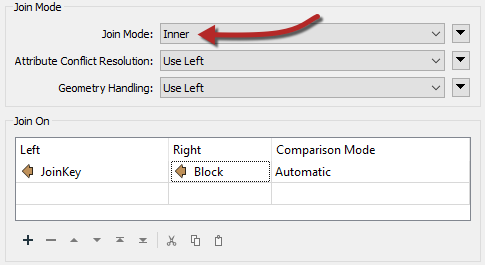
Inspect the parameters for the FeatureJoiner.
For the Join Mode select Inner. This means that we will only join features if there is a match in both streams, i.e. a crime at that address.
In the Join On parameters select the JoinKey attribute for the Left value, and the Block attribute for the Right value.
Run that part of the workspace to see what the results of this translation are.
8) Add a Aggregator Transformer
Look at the FeatureJoiner to see the Joined feature counts. Interestingly, although 148 addresses enter the FeatureJoiner, 197 emerge from it:
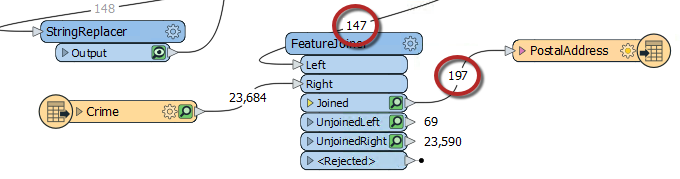
That's because there are multiple crimes per block and there were 197 matches with the data.
We can aggregate that data together using an Aggregator transformer. So place an Aggregator transformer after the FeatureJoiner:Joined port
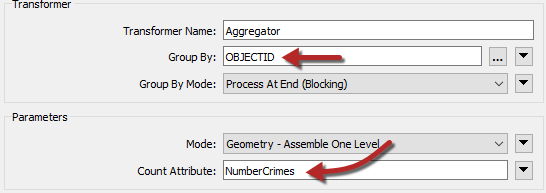
Inspect the parameters. We need to set the group-by parameter by selecting attributes that will group matches back into the original addresses. There is no ID for each address because we removed them in a previous step, so either:
- Return to the AttributeManager, undo the Remove option for OBJECTID by switching the Action to Do Nothing, and use OBJECTID as the Aggregator group-by
- Use UpdateDate as the Aggregator group-by (because each address will have received a unique timestamp)
Then set the Count Attribute to a value of NumberCrimes:
9) Anonymize Data
Before writing the data for the journalist, we need to check if there is any personal information that ought to be hidden. The one obvious attribute is the Owners field. We can hide that with an AttributeCompressor transformer.
So, place an AttributeCompressor transformer after the Aggregator. Open its parameters. Compress the Owners attribute and set an encryption type and password of your choice:
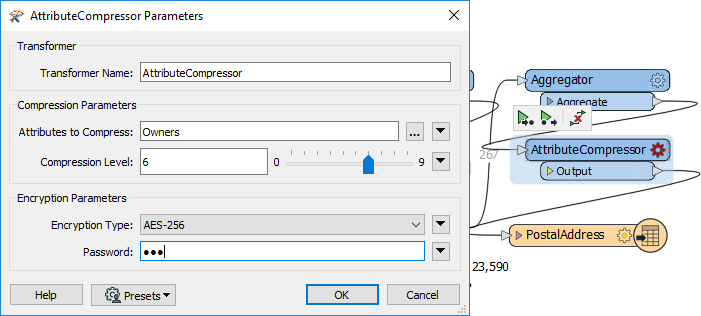
Now the Owners field is converted to compressed and encoded binary, that cannot be read without the appropriate password.
10) Write Data
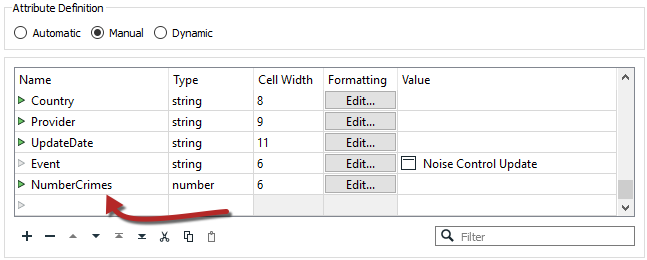
If you expand your attributes for the PostalAddress writer, you will notice that NumberCrimes doesn't appear.
To fix this simply add a new attribute called NumberCrimes here. Give it the type "number" and cell width 6. The data from the Aggregator will now have its attribute on the writer:
One other thing we could do is check the Owners field to see if it will support a binary value. Excel, sadly, has no binary field type, so it's unlikely we'd be able to read back that field, password or not. We'd need a proper database format to do that. But at least the owners' names are hidden.
Close the dialog, turn off feature caching, and rerun the entire workspace. View the written data in Visual Preview. The data will include the number of crimes, and the reworking of the attributes means that both names and individual addresses have been anonymized as well. This is important because this data is being made public.
| Advanced Exercise |
| This workflow was complex with data coming from multiple sources and lots of attribute changes. If you have time, it would be a good idea to add some bookmarks and annotations to tidy up the workspace before we wrap up this workspace, in case we need to come back to it in the future. |
| CONGRATULATIONS |
By completing this exercise you have learned how to:
|