Getting Started
- Navigation: Learning The Layout
- Ponies & You
- Creating Your First Starter, Understanding a Pony's Profile & Pedigree, Caring & Growth Cycle
- Stables & You
- Moving Your Ponies, Your Stable's Overview, Letters & Symbols, Expanding Your Stables
- A Pony Addiction!
- Purchasing New Ponies, Breeding New Ponies
- Site Currency
- Pony Gold, Bonus Points
- Account Renewals: Paying for Your Account
Navigation: Learning The Layout
My Island
The My Island section contains many key areas that you will need to navigate around your personal PonyIsland.

Island - This will take you to the over view of your island.
Stable(s) - This link takes you to your nursery where you can see the due date for pregnant mares, the expecting fathers, or baby images of any newborns if there are any waiting for you. Always remember that babies will disappear if not named within 7 days of their birth day and time.
Nursery - The Nursery link takes you in to your nursery where you can see the due date for pregnant mares, the expecting fathers, or baby images if there are any waiting for you. Always remember that babies will disappear if not named within 7 days of their birth day and time.
Inventory - This link takes you to your inventory where you can view your items by type, equipped, or unequipped. Here you can also set up items to be sold. Also, the Item Forge is located here.
Contests - This takes you to your contests where you can set up and run your own contests provided your have a Colosseum to use. You can also view any contests your ponies are currently signed up for and a history of contests your ponies have competed in for the past 3 months.
Quests - This takes you to your quests page where you can start a new quest or update a current one.
My Account
The My Account link will take you through all the important areas that affect your game play in minor, or major ways!

Profile - This is where you can change all your game play settings, edit your presentation and signature, add and remove Gadgets, purchase renewals, or find links to recruit new members to PI! You can also find your undeployed Bonus Points (BP) pool here as well.
Contact - This is where you will find your inbox and see both unread and read Private Messages(PMs). You can organize your inbox much like many other e-mail programs. You can also find your contact list here and compose a new private message.
Finances - This tab is where you can check your finances. You can also send or accept PG, make a deposit at the PI Bank, or check your financial history.
Gallery - This can be used to host images you wish to use on PonyIsland. Please remember that all images inside your gallery should be PI appropriate at all times. (** See the Artwork & Adoptable Rules for more information)
Toolbox - This feature is used for test-breeding potential pairs, capturing photos of ponies on your account, or creating clickable ponies that can be placed in your signature.
NotePad - The Notepad is a useful tool which can be used to store information that you may need on the site!
Gift Central - The Gift Central link will allow you to create new starters (provided you have the Bonus Points [BP] available). You can also generate resurrection scrolls and capture a pixie to aid you in caring for your ponies!
Classifieds
The Classifieds section is more of the business side to PonyIsland. Here you can find additional links that will help enhance your game play experience.

Pony Market - This is where all purchasable ponies are displayed for others to look through and buy. If you are a TRI, this link will take you to the Trial Market. However, as a USR, you will be shown ponies for sale by other USR's.
Store - This is where you can purchase goodies for your ponies such as snacks, items they can wear, additions to your stables, etc.
Real Estate - This is where you can go if you wish to purchase a second stable, purchase bigger stables, purchase a Colosseum or change your Island.
Next Contests - This is where you go if you wish to participate in an hourly contest that another user is hosting. This page only lists the contests that are taking place in the next hour.
Community
The Community section is where you can go if you want to mingle with other users on PonyIsland!

Forums - A large message board system designed to bring users together under different topics and themes.
Associations - This is where you can go to view all of the Associations on PonyIsland, what associations you are a part of, and what associations you own or co-own. When a club or group has a ton of supporters it has the chance to be made into an Association. These places have more private forums of their own, specific to those who are members. This is also where you would accept an invitation to join an association.
Events - A place where you can view upcoming site-wide games and contests.
Statistics - This gives all kinds of interesting facts about PonyIsland on a daily basis. You can come here to see how many users are online, who is online, which country has the most users, etc. It also gives you information on which pony has the most experience, which user has the most deployed BP, etc.
Search
The Search feature will allow you to look up various things on the site. Please be advised, however, that it does become disabled a few minutes before and after each hourly tick.

Ponies - Search for ponies by breed, gender, visible genes, name, color, for sale, for breed, birthday, level, etc.
Users - Search for users by current username, old username, sub off of, etc
Contests - Search for contests by the hour, user, day, etc
Items - Search for items by type, name, price, etc
Forums - Search for topics by date, title, forum, user, reply, etc
Help
The Help section is where all users should go if they need assistance with something on the site.

Manual - This will link you directly to the manual which contains a slew of vital information for your gameplay.
FAQ - Our in depth section of Frequently Asked Questions will hopefully cover all questions you may, or will, have about PonyIsland!
Rules - These rules are enforced site wide and should not be overlooked. Please make sure you take the time to review and understand them all.
Support - This feature takes you to our Ticket System. Here you can submit a Support Ticket that Moderators (MOD) and Administrators (ADMN) can access. Please use a Support Ticket if you need immediate help with something. Always remember to be thorough and precise with your inquiry as the more detail provided to the MOD team and ADMN, the better they can assist you.
Ponies & You
Creating Your First Starter
Your first pony is what we call a starter pony. A starter pony is a pony with no pedigree or history.
Upon creating your account, you are automatically taken to Gift Central where you can create your first starter.
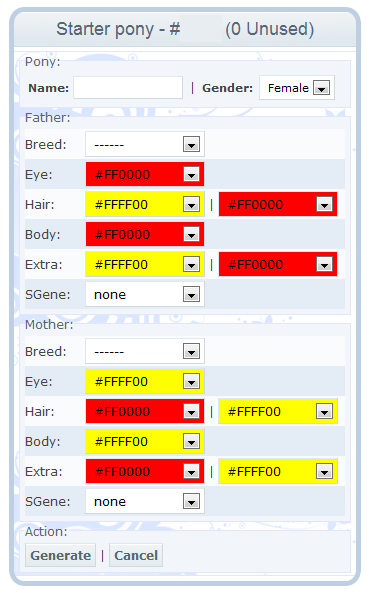
The first steps in this process will be choosing a name and gender for your new pony. Please be advised that if you choose to make your first starter a female, she will be able to have babies when she is an adult. However, if you choose a male, he will be able to be a stud for your ponies and female ponies when he is an adult.
Next, you will need to decide what your pony's parents will look like. You will start by selecting a breed for it. To learn more about the different pony breeds, please visit the Breeds tab. Each breed not only looks different from the next, but they all start will different skills and prefer different types of homes. If you want to be sure your new baby is a particular breed, make sure you pick the same breed for both parents, otherwise it is a 50/50 chance of what breed you will get for your new pony.
Once you have figured out what breed your pony will be, it is time to choose what colors it will be! Unfortunately, you cannot choose 100% what colors your pony will be. Instead you select which colors the parents will be. Please make sure that you choose carefully because the pony will end up as something in between its parents' colors.
Finally, press "Generate". A window will pop up asking if you are sure that this is the starter you want, review your selections, then press yes. Voila! You've got your first pony! It now resides in your stable or pool.
Understanding a Pony's Profile & Pedigree
Looking at your pony's profile for the very first time can be quite intimidating! There are many things on their profile and sometimes it's hard to understand what each thing means.
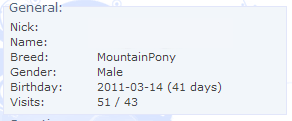
Starting at the top, here is a quick and easy guide for understanding the General section of your pony's profile:
 Nick: A nick name can be given to your pony. This is something that can be changed over and over again. To change your pony's nick name, simply click on the 'EDIT' at the bottom of their profile.
Name: This is the name you gave your pony when you created it. Names cannot be changed.
Breed: This tells you what type of pony it is.
Gender: This tells you if your pony is a boy or a girl.
Birthday: This tells you when your pony was created/born. It will also tell you how old the pony is by years and days.
Visits: This is a feature that let's you see how many times other users have clicked on your pony's profile. The number on the left shows the total number of visits, while the number on the right shows the number of visits from unique users.
Here is a quick and easy guide for understanding the Genetics section of your pony's profile:
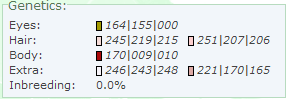 Eyes: This tells you in lettered (HEX) or numbered (DEC) code what color your pony's eyes are.
Hair: This tells you in lettered (HEX) or numbered (DEC) code what color your pony's hair sections are.
Body: This tells you in lettered (HEX) or numbered (DEC) code what color your pony's body is.
Extra: This tells you in lettered (HEX) or numbered (DEC) code what color your pony's extra slots are. Extra slot colors vary depending on the breed of the pony. Some breeds do not use their Extra 1 slots while other breeds do. Extra 2 will always be the color of a visible colorized gene. To learn more about genes, please visit the Genetics section of the Breeding tab.
Inbreeding: This tells you what percentage your pony is inbred. If your pony has no inbreeding, or less that 0.1% inbreeding, it will read 0.0%
Here is a quick and easy guide for understanding the Skills** section of your pony's profile:
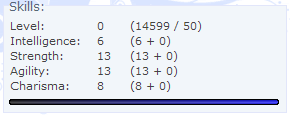 Level: This lets you know what level your pony is. All newly created starters begin at level 0, while babies you have bred can be born at a higher level depending on what level the parents are. The highest level a pony can reach is 1020. The pony is then considered 'maxed out'.
Intelligence: This lets you know what level your pony's Intelligence is.
Strength: This lets you know what level your pony's Strength is.
Agility: This lets you know what level your pony's Agility is.
Charisma: This lets you know what level your pony's Charisma is.
** When looking at the skills of a pony, you will often see a set of numbers in parenthesis. The first number in parenthesis tells you what number the skill was when the pony was first created/born - the initial skill point. The second number in parenthesis tells you how many points have been added to that particular skill, and the third number represents the number of additional skill points an item the pony is wearing attributes. When a pony has gained the maximum number of points available for a particular skill, the second number will be 255.
Here is a quick and easy guide for understanding the Action section of your pony's profile:
 Edit: Clicking on edit allows you to edit your pony's profile. You can change their nickname, put them up for sale or breed (if a male), move them from stable to stable or send them to a sub account. You may also write something about them in the 'Presentation' box. You can also Tattoo your pony by accessing his or her profile. For more information on Tattooing, please see the dedicated section. Clicking Update will save your changes, clicking Close will not.
Items: This allows you to enter an area where you can add items to a pony. All ponies can wear 5 items in different places - items usually cannot be over lapped, and if you try, you will receive a message saying it cannot be done.
Feed: This drop down box allows you to feed your pony between 1 & 10 units of food.
Vet: This drop down box allows you to give your pony between 1 & 10 points of health.
Caring & Growth Cycle
When a baby pony is born, it will be unnamed and in your nursery. If you want to name your pony, and keep it, all you need to do is name it. To do so, click on their name, "Unnamed" to enter their profile. Once you are in their profile, you can click on edit. Remember; giving the pony a name is a permanent thing, whereas a nick name can always be changed. When you are satisfied with a name, clicking 'update' will save what you just did inside their profile.
Unnamed babies will disappear, or die, if not named within 7 days of being born. This means you must give them a permanent name, not a nick name, before they are 7 days old.
All babies will grow into adults once they reach 20 days old. Between their time as a baby and an adult, you will still need to care for them as you would with an adult pony. If you remember from the overview above, you can go into a pony's profile to feed it and vet it. Ponies who have not been fed for a total of 30 days will die.
If you want a little extra help taking care of your ponies, you can capture a pixie by visiting the Gift Central (where you create starters!) and clicking on the Pixie tab. Once captured, a pixie will stay in your stable and let you know when your ponies need to be vetted or fed. In addition, they can help you feed or vet all of your ponies in your stable all at once! Some pixies even give you discounts on feeding and/or vetting fees.
Once a pixie is captured, you cannot remove it, but you can replace it with a different one.
Stables & You
Moving Your Ponies
Now that you understand a bit more about your ponies, it's time to learn about the stables your ponies live in. Each account is set up to hold a maximum of two stables, and each stable can hold a different amount of ponies.
There are two ways that you can move your ponies around your stables.
The first way lets you move your pony from one place in your stable to another place in the same stable. To do this, hold your cursor over the pony's image then click and drag the pony to a different spot within the stable itself.
The second way lets you move your pony from one stable to the other stable. You will only be able to do this if you have purchased a second stable for your account. To do this, go into the pony's profile by clicking their name, then edit, and selecting which stable you would like them in. If you have two stables that are named the same thing (example: Giant Brown Fortress), the top stable name is the first stable, and the bottom stable name is the second one.
Your Stable's Overview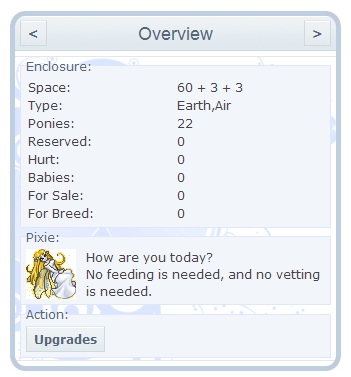
You will notice that, much like a pony's profile, your stable also has a profile. Below is a brief outline of what each section in your stable's profile means:
Space: This is the amount of total space you have for ponies in that stable.
Type: This tells you which element your stable is based on.
Ponies: This tells you how many ponies you have in that stable (not to be confused with Space).
Reserved: This tells you how many ponies you have bid on.
Hurt: This tells you how many ponies are in need of vetting.
Babies: This tells you how many of your total ponies are babies.
Sale: This tells you how many of your total ponies are for sale.
Breed: This tells you how many of your total ponies are up for breed.
Letters & Symbols
I'm sure by now you've noticed that ponies have letters/symbols on them in the upper corners of their images. These letters/symbols mean a variety of things and can be very useful to you as a new user! Below is a list of letters/symbols and what they mean:
[V] - Vet, this means your pony is hurt and needs to be vetted.
[S] - Sale, this means the pony is up for sale.
[B] - Breed, this means the pony is up for breed.
[P] - Pregnant, this means the pony will have a baby.
[L] - Level, this means your pony has an undeployed level or levels.
[M] - Mood, this means your pony's mood is less than 10.
[C] - Contest, this means your pony is entered in a contest
[C] - A red C means the pony has been entered in more than one contest.
[Q] - Quest, this means your pony is on a quest.
[!] - This symbol tells you that your pony has died and has negative experience from resurrection.
These notifiers can be turned on and off in your profile. To do so, go to My Account > Profile > Preferences
Expanding Your Stables
Have you run out of room? Need some more space to add more gorgeous ponies? There are two ways that users can expand their stables which will result in additional space for more ponies.
The first way is by purchasing a bigger stable. You can visit Classifieds > Real Estate to view all stable types available for purchase. The stables can be found on the Enclosures tab. Each stable holds different amounts of ponies and have different prices, depending on the number of spaces available for ponies and what type of stable it is. Each stable also lists the types of breeds it is more suitable for and some stables can only be purchased when you have a certain amount of Bonus Points deployed to your account.
If you look at the images for the stables, you'll notice some stables have small circles in the bottom right corner. These circles represent the number of upgrades you can add to your stable.
To purchase an upgrade, you can go to Classifieds > Store > Upgrades
On the Upgrades page you will see a selection of upgrades for your stable. Much like the actual enclosures, these also cost different amounts and can only be purchased when you have a certain amount of Bonus Points deployed to your account.
A Pony Addiction!
Purchasing New Ponies
Feel the need to add more ponies to your stables? Perhaps a trip to the Pony Market is in order for you!
To find the Pony Market, simply go to Classifieds > Pony Market. At the market you can search for ponies on sale by breed, gender, and price. If you happen to have a TRI account, the ponies here will be from a special Trial Market. Only TRI users can purchase ponies from there.
If you have a USR account, the ponies for sale in the Pony Market are owned by other users on the site and can only be purchased by those who have a USR account.
If you want to search for ponies on sale using more criteria(i.e. colors, sgenes, etc...) go to Search>Ponies.
USRs can also look for ponies for sale by visiting the Sell forum. The sell forum is where users can go to advertise ponies they are selling for other users to see. To find this forum, you can go to Community > Forums > Sell -- or you can click the Conversation Bubbles on the top of the layout navigation to locate the forums.
Breeding New Ponies
Thinking about getting in to a career breeding beautiful baby ponies? Uncertain on how to start? There are two simple ways to breeding your ponies, and below are instructions on how to go about it!
The first way can be done in the courtesy of your very own stable! First you will need to have two adult ponies; one male and one female. In order to breed the two, you will need to click on the male's name to enter its profile section. Once you are looking at his profile, you will find a section called BREED that has a drop down box:
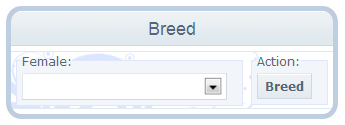 Simply select the female's name that you want to breed with this male. Once you have done so, a pop up box will appear asking if the choice you made is correct. Review your selection, then all you need to do is click OK and your breed is complete!
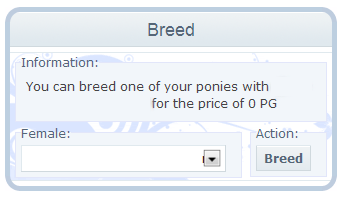
The second way can be done by visiting a male that is up for breed in another user's stable. This works very similar to the first way in the sense that you will need to click on the male's name to enter his profile, select your female from the drop down box, and click OK. Usually, other users will ask for a breeding fee to be paid in order to use their stud in your breeding. However, some times the breed could be for free!
Remember, all pregnant females will have their babies in 5 days time from when they are bred. To keep track of this, you can enter your Nursery to see when the babies are due! Once babies are born, you have 7 days to name them or they will disappear. Good luck!
Site Currency
Pony Gold
Here on PonyIsland we use a currency called Pony Gold which you will often see being referred to as PG.
Every account starts with 5,000 PG in the beginning, and at each 12:00 tick you will be given a salary of 1,000 PG plus 20 PG for each pony in order to purchase food for them.
Ponies, as well as items, on this site can be bought and sold for PG. PG can be moved around freely between accounts, other users, etc and there are a variety of ways that one can make more PG if they desire to.
Bonus Points
PonyIsland also has another set of currency called Bonus Points which you will often see being referred to as BP.
Unlike PG, BP can only be moved one time to another account - once it has been moved, or deployed, it cannot be undone. BP can be earned by purchasing renewals for your account, or by completing quests. If you would like to learn more about quests, please visit the Gameplay tab
Account Renewals: Paying for Your Account
As PonyIsland is a pay to play site, all accounts expire after a certain amount of time. You can avoid your account's expiration by purchasing one of two types of renewals: 6 Month Renewal ($14.00) or 1 Year Renewal ($23.00).
In order to do this, you can go to My Account > Profile > Payment
PonyIsland only accepts transactions done through the secure website PayPal. You will notice on the Payments screen that there are two drop down boxes; Type of Renewal, Account Information.
In the first drop down box you will be asked to select which type of Renewal you wish to purchase.
In the second drop down box you will be asked which account you want the renewal placed on. This box not only lists accounts you may have subbed to your main account, but it will also list the accounts you may have in your contact list. It is very important that you pay attention when selecting the account you are purchasing the renewal for.
Once you have made your selections, you can click on the PayPal logo - this will take you to PayPal's secure site where you can complete your transaction. After everything is said and done, you will be brought back to PonyIsland's main site where you should receive a PM stating that you have paid for your account.
Congratulations! You just purchased a renewal for your account!