Islands and Settings
- Discovering Islands: Moving from here to there!
- Real Estate & You
Understanding Your Options, Where does YOUR pony live?, Purchasing an Arena - Upgrading & You: Where to Go, What to Do!
- Your Account
An Overview of Information, General Information, Preferences Information, Presentation Information, Gadgets Information, Payment Information, Recruit Information
Discovering Islands: Moving from here to there!
Here on PonyIsland, users have the option to change their islands around. This means that if you and your ponies are not satisfied with the type of island they are living on, you can change it!
In order to change your Island, you will need to revisit the Enclosures tab. To visit here go Classifieds > Real Estate.
The third link, or tab, at the top will be labeled Islands. Clicking here will bring up an assortment of islands that you can choose from. Please be advised that certain islands can only be used if you have the necessary amount of BP deployed. When you have finally found the right island for you and your ponies, simply click the 'Move' link. A pop-up box will appear asking if you are certain about the change, simply click 'OK' and you are finished!
Real Estate & You
Understanding Your Options
Just like being able to move or change Islands, you can also change your stables as well! Users can purchase new stables, and view current stables for sale by visiting the Real Estate page just as you did for viewing different islands. To visit here, please go Classifieds > Real Estate.
Once you are on the Real Estate page you will notice three links at the top: Enclosures, Arenas, and Islands.
Where does YOUR pony live?
The first link is called Enclosures. Very simply put this where you can select which type of stable your pony will live in. You will notice 6 informative areas on each stable: Name, Type, Space, Slots, Price, & ReqBP. Below is a brief description of each one:
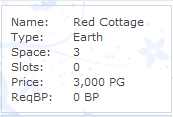 Name: This gives you the over all name of the stable type.
Type: This tells you which element the stable falls under.
Space: This tells you how many ponies the stable can hold.
Slots: This tells you how many 'upgrade' spots are available for the stable.
Price: This tells you how much the stable will cost.
ReqBP: This tells you if there is a required amount of BonusPoints that you will need to have deployed before you can purchase the stable.
When you have found the stable you would like, you can double click on the image. This will bring you to a page that shows you a slightly bigger image of the stable along with the information from the main page. On this page you should also notice a drop down box entitled action. This is where you can select whether or not to purchase the stable.
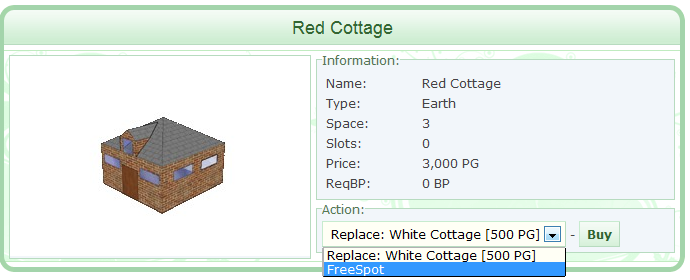
The drop down will allow you to do one of two actions;
Replace your current stable or replace your free spot.
Please note that if you are replacing an existing enclosure, you will receive a discounted rate on the new enclosure. 50% of the original price of your existing stable is deducted from the cost of the new stable you wish to buy. If you are replacing a free spot, you will be paying full price.
Once you have made your selection, you can click on Buy. A pop up box will ask if you are certain of this purchase. Clicking ok will ensure your new stable purchase, congrats, you're done!
Purchasing an Arena
Very similar to purchasing new enclosures or moving islands, you can also purchase an arena. An arena is where you can contest your ponies (Contesting will be discussed in the Contesting tab: LINK HERE). Arenas will take up a free spot on your island, but will never take up a spot specifically for stables.
If you are interested in purchasing an arena, please go to the Real Estate page: Classifieds > Real Estate.
As you can see, the arena page is very similar to the enclosures' page. Much like the stables' page, you will notice the same 6 informative areas on each arena: Name, Type, Space, Slots, Price, & ReqBP. Below is a brief description of each one:
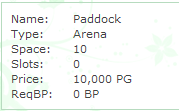 Name: This gives you the over all name of the stable type.
Type: This tells you which element the stable falls under.
Space: This tells you how many ponies the stable can hold.
Slots: This tells you how many 'upgrade' spots are available for the stable.
Price: This tells you how much the stable will cost.
ReqBP: This tells you if there is a required amount of BonusPoints that you will need to have deployed before you can purchase the stable.
When you have found the arena you would like, you can double click on the image. This will bring you to a page that shows you a slightly bigger image of the arena along with the information from the main page. On this page you should also notice a drop down box entitled action. This is where you can select whether or not to purchase the arena.
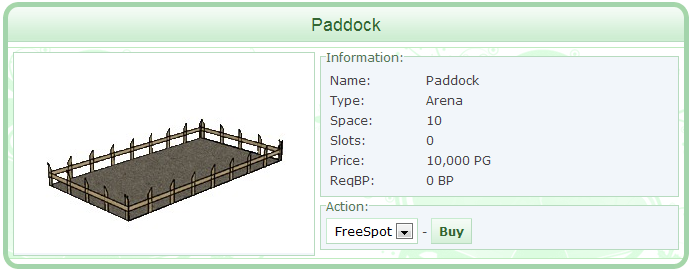
The drop down will allow you to do one of two actions;
Replace your current arena or replace your free spot.
Please note that if you are replacing an existing arena, you will receive a discounted rate on the new arena. 50% of the original price of your existing arena is deducted from the cost of the new arena you wish to buy. If you are replacing a free spot, you will be paying full price.
Once you have made your selection, you can click on Buy. A pop up box will ask if you are certain of this purchase. Clicking ok will ensure your new arena purchase, congrats, you're done!
Upgrading & You: Where to Go, What to Do!
Upgrades, when purchased, will fill the small circle on the stable image in your stables. As briefly touched during the overview of the Store, upgrades can be purchased for your stables. To view the options, please go to Classifieds > Store > Upgrades.
As you can see by viewing this, there are 5 upgrades available for your stables; Grey Tower, Hhigh Tower, Little Island, Tiny Cave and Tiny Pool.
The column called Properties will explain how many spaces an upgrade can either give, or take away, as well as which element the upgrade will boost (if any). As you can see, the Grey Tower will add 3 more spaces to your stable, however the High Tower will take away two spaces but will also boost the mood for your air ponies. You must be very careful about making your selection.
When you have finally decided, you can click Add on the right and follow the basic store purchasing procedures.
Once you have made your purchase, it is time to add the new upgrades to your stables!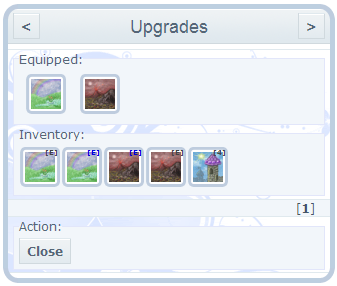
Inside your stables - where you are looking at all your ponies - you will see a link/button that says Upgrades. Clicking this will take you to an area very similar to adding items on to ponies, except you'll be adding items on to your stable! Please keep in mind you can only add on what you own - that means the upgrade item must be in your inventory.
Double click the image under Inventory to add the item, or double click the image under Equipped to remove it. When you are finished, you can click Close.
Congratulations! You just upgraded your stables!
Your Account
An Overview of Information
Much like changes that can be done to your pony's profile, you can also make changes to your account. To access this area of your account, go to My Account > Profile
First and foremost, when you enter your profile you will be on the first tab listed on the over head navigation; General. Other tabs include Preferences, Presentation, Gadgets, Payment, and Recruit. A brief over view of each link has been provided below:
General - Information regarding your account.
Preferences - Changeable features that you control.
Presentation - A place for you to update information about yourself (users will see this when they click on your username)
Gadgets - Features designed by the ADMN to help better game play.
Payment - Where you go to pay for your account, a sub account, or purchase gift certificates.
Recruit - Banners and buttons you can display on other websites to get people interested in PI.
Please see the sub-sections for more information on each tab.
General Information
The General tab is a place with common information regarding users, but it is broken down in to 5 separate sections; Information, BP Pool, Username and Email, Password, and Sub Account.
Information: This section contains basic information regarding yourself, as a user. On the left side of this section, you can select which country you are from, name your stables, list a homepage (if you have one!), and add comments to your comment box. You will also see on the right information regarding your user type, your post count, the number of people you've recruited, the name of the user who recruited you (if there is one!), your registered date, expiration date, and your date of birth.
There is also a section called Instant Messengers. Here you can add contact information if you'd like to allow people to contact you off of PonyIsland.
When you have updated this section to the best that you can, you can hit update - this will save any changes you made to the Information section.
BP Pool: If you have undeployed BonusPoints (BP), you will find it here!
When preparing to deploy available BP, you will select the account the BP is to be sent to by using the drop down box under Account. Please remember that this drop down will include your main account, any sub accounts, and all users listed on your contact list. Under the Amount field you will select the amount of BP you are deploying. When you are satisfied with the account you have selected, and the amount, you can click on 'deploy.' A pop-up box will ask you if this is correct and as long as you select OK, the BP will be deployed to the account you have selected.
Username and Email: Fairly self-explanatory, this section is where you can change the email attached to your account, and/or your username. Please be advised that you may only change your username once every 6 months. As a safety precaution, all users will be required to enter their password when making changes in this section. Once this has been completed, you can click Update to finish. Again, a pop up box will ask you if you wish to proceed, simply click OK.
It is highly recommended that you have an email address in the Email field that is current and active. This makes password recovery much easier should you ever forget your password.
Password: If you need to change the password on your account, you will come to this section. Passwords must be 4 to 16 characters long, and should not be something that is easy to guess. A mix of letters and numbers is highly recommended. If you are changing your password, you will be required to enter the original password first, followed by the new password twice. Once this has been completed, you can click Update to finish. Again, a pop up box will ask you if you wish to proceed, simply click OK.
Sub Account: The Sub Account feature is unique in the sense that it allows you to link your accounts together for easy maintenance. Sub Accounts were designed to link accounts owned by the same person. To make your account a sub account to another, simply type in the name of the account into the sub-off field, and click Update to save.
** Remember: Sub accounts should only be used to sub accounts owned by the same person together. It is not recommended to sub to people you do not know as they will be given access to your account.
Preferences Information
The information under this tab affects how you, the user, physically sees the game. Here you will find 4 main sections; Appearance, Notifiers, Avatar, and Forum Sign. Each section is defined briefly below to give you an idea of how to change your preference settings:
Appearance: This sections allows users to change how they view the game. Here you can make selections from which type of layout you want to use all the way to how many replies you'd like to see on the forums. Below is a quick over view for each sub section of Appearance:
Theme: Allows users to select which style layout they would like to use.
Ponies Profile: Allows users to change the quality of the pony's image when viewing it's profile.
Ponies Enclosure: Allows users to change the quality of the pony's image when viewing their stable, can also change the number of columns across the stable, and activate or deactivate any pony notifier.
Ponies Pedigree: Allows users to change the quality of the pony's image when viewing it's pedigree, also allows users to choose how many levels of a pedigree should be shown.
Forum: Allows users to change how many topics should be shown at once on the forums, and how many replies are shown on each page of a forum thread.
Gallery: Allows users to change the layout of their gallery in terms of how many columns and rows to show at a time.
Mail: Allows users to change how many pieces of mail to show per page when viewing your mailbox.
Color Display: Allows uses to change from DECimal color codes to HEXadecimal color codes when viewing ponies.
Forum Slider: Allows users to select how many new thread titles should be shown on the forum slider. Clicking edit here will also allow users to select which forums they want to have in their slider.
Animations: Turns on and off site-wide animations.
Emoticons: Turns on and off emoticons.
Pony Listing: Allows users to choose whether their stables are viewed in order of the ponies listed, or alphabetically when using a drop down menu (example: contesting, breeding, questing, etc). Users can also select if they would like the current level of their ponies to be shown when using the drop down features, and also if they would like their stables divided when using the same drop down features.
Once you have made all of your changes, you must select Update to save them.
Notifiers: This sections allows users to select what type of generic Private Messages notifications they are automatically sent by checking, or unchecking, the boxes next to each type of notifier. Once you have finished updating this section, you must click Update to save your changes.
Avatar: This section allows users to upload their own avatar from their computer to replace the generic pony avatar that comes with all accounts. As a reminder, avatars need to be saved in GIF format, must not exceed 20 KB as a saved image, and should always be 70 pixels wide by 100 pixels high. If the image you are trying to use is larger than 20 KB, does not fit the size, or is not a GIF image, you will receive an error message that it cannot be uploaded.
Forum Sign: This section allows users to create a signature for all of their forum posts. Users can use standard text, or images, here. Standard signature space is 50 pixels high, and 550 pixels wide.
Presentation Information
This tab is where you can create the first view for a visitor to your stables. It can be simple or complex, list a little bit about your stables or breeding projects or you.
Your Presentation is made using a programming language called HTML. This is the same language used to create a webpage and is different from the code used in the forums.
Below are some of the basic HTML codes, what they do, and how they are used. You can find more complete tutorials written by users in the Artwork forum, and there are entire books written on how to code an HTML page. (<div> tags, which are used to create text boxes and scroll boxes are not covered below, as they are far more advanced than these basic codes.)
To start, with few exceptions, every code that surrounds text has a "start" tag and an "end" tag. If you forget one of these, your browser will not understand when the command is supposed to stop, and your formatting will at best be off and at worst be broken.
Formatting Your Page
<body> </body> - This tag should surround the text that is the body of your page. You can add a background image to your page by adding the "background" attribute to the tag: <body background="Image URL">
You can change the background color (with or without adding an image) by adding the "bgcolor" attribute: <body bgcolor="RGB Color">
Formatting Your Text
<p> </p> - HTML does not recognize line breaks the same as the forums do. This code tells your browser that the text between the tags should be formatted as a paragraph and will insert a space after the text before the next <p> tag.
To align a specific paragraph, the "align" attribute is added: <p align="[Alignment]">, where [Alignment] is Left, Right, or Center depending on where you want the text to be aligned.
<br> OR <br/> - Placed at the end of a line to force the next word to start on a new line without a blank line in between them.
<b> </b> - This will bold the text in between the codes.
<i> </i> - This will italicize the text in between the codes.
Other Important Codes
<img src="Image URL"> - This code simply makes an image visible on your presentation. This will not add a background image to your presentation.
You can resize the image that's visible by adjusting the width or height with their respective attributes: <img src="Image URL" width="xxx" height="xxx"> where "xxx" is the width or height in pixels. You only need to use one attribute if you want the other to automatically resize proportionally.
<a href="URL Here"> </a> - This code will make the text between the tags a live link to another page.
By adding the "target" attribute to the code, you can force the page to open in a new window or tab: <a href="URL Here" target="_blank">
Gadgets Information
This section of your Profile is only available if you are using the new types of layouts - PONG layouts. Available gadgets can be found in one of two columns; Current and Available. Gadgets can be added or removed by dragging the gadget block from one side to the other.
Current gadgets are what you are currently using; these will appear under your user name & status box on the left side of your screen.
Available gadgets are what you are not currently using; these will not appear under your user name unless you drag them over while on the Gadgets tab.
The following are the currently available Gadgets as well as a brief description as to what they are:
Account Overview: The Account Overview gadget will allow you to view the accounts subbed to your main account. Here it will tell you if you have mail on the account(s), if there are unnamed babies in the nursery, if your account is expiring, if you have undeployed BP (and how much), if the account requires vetting, and if you have any pending transactions.
Bookmarks: The Bookmarks gadget will allow you to save thread links inside so you can easily find them later on. To save a thread to your Bookmarks, open the gadget inside the thread and click on Bookmark Page. A pop up box will ask you what you would like to title this page. Once you have selected a title, click OK. You can remove the thread by clicking the red button on the right of it's name.
Contacts: The Contacts gadget, when opened, will show you a list of everyone who is on your contacts list. Clicking on their username will take you to their presentation.
Minipad: The Minipad gadget works just like the normal notepad, except you can access this immediately from the left side of your screen. Once you have finished typing in it, you can hit Update. You can also access the Minipad by going in the regular Notepad as it will be listed there as 'Minipad.'
Pony Overview: The Pony Overview gadget will list your ponies in their order according to your stables. It will also list for you how many undeployed levels they have, their health, and their mood. Clicking the pony's name will take you to their profile.
Test Breeding: The Test Breeding gadget works precisely like the test breeding feature found under the Toolbox, except you can access it on the left side of your screen instead. It will list the ponies in your enclosure for you, and provides the image of the test breed below the two drop boxes.
Thread Spy: The Thread Spy gadget allows you to see whether or not a thread has been replied to without having to search it out on the forums. When you have a thread in the Thread Spy, a magnifying glass will appear to the left of the title - when a new reply has been posted, this image will change to a red flag. To add a thread, simply open the Thread Spy in the thread you wish to watch and click 'Spy on current thread.' You can remove the thread by clicking the red button on the right of it's name.
Payment Information
The Payment section of your profile is where you can purchase renewals for your account, your sub accounts, those on your contacts list, or gift certificates. There are four main areas to this section; Important Privacy Information, PayPal, Gift Certificate and History. Each section is briefly described below:
Important Privacy Information: This section should be read by everyone before they begin the payment process. Please make sure you review this before moving ahead.
PayPal: PonyIsland uses PayPal for their renewal transactions. In this section there are three options; Payment Type, For Account, and Pay.
Payment type allows you to choose whether you are purchasing a 6 month renewal ($14.00), or a 1 year renewal ($23.00).
For Account allows you to select the account from the drop down box that needs the renewal. Please be advised that this drop down box will list all of your sub accounts as well as any account listed on your contacts list.
Pay can be clicked once you have selected which renewal you are purchasing, and which account it is for. Once you have clicked pay, you will be taken to PayPal's site to complete the transaction.
The Gift Certificates section is also broken down in to two parts; Key which corresponds with Activate and Buy Gift Certificate.
If you have a gift certificate code, you can type it in to the correct spaces under Key and click Activate. This will activate the renewal that was purchased via the gift certificate.
If you wish to buy a gift certificate for someone, you can click on Buy Gift Certificate. This will lead you to a screen where you need to choose if you are buying a 6 month renewal, or a 1 year renewal. Once you have selected which type of renewal you are purchasing, you will be brought to a screen where you can select the layout for the gift certificate. Once more, you get to make the decision of which to pick - after doing so, you will be brought to PayPal's site to complete the transaction.
History will show you what type of renewal was purchased for your account, how much it cost, which paypal address it was purchased from and the date & time of the purchase.
Recruit Information
Word of mouth has always been the best form of advertisement for any company. If you love PonyIsland, why not pass the name along to a friend or two who you think might like it as well? The Recruit section of your profile is dedicated to helping you bring in friends that you think may like this game!
This section is separated into two parts; Recruit Links and Recruits. Below is a brief description for each:
Recruit Links: These are links, or banners, that you can display on other websites to advertise PonyIsland. Each banner is infused with your specific user ID code this way if someone joins PonyIsland off your recommendation, they become recruited by you!
Recruits: This will tell you how many people you have recruited to PonyIsland. It will display for you their username, how much BP is deployed to their account, how many forum posts they have made, their last log in date and also their registration date.
Recruiting people is also rewarding! Every time someone you recruited purchases a 6 month renewal, you receive 5 BP. Likewise, every time someone you recruited purchases a one year renewal, you receive 12 BP. Recruiting is rewarding all around for both you, and the person you bring here!