Getting Started
Overview
Welcome to Neutron 3 Elements! If you have never used an iZotope product or want to know more about Neutron, then this is the right chapter for you. The topics include:
- Authorization
- Neutron 3 Elements Interface
- Signal Flow
- Global Controls
- Workflows
- Optimizing Performance
Authorization
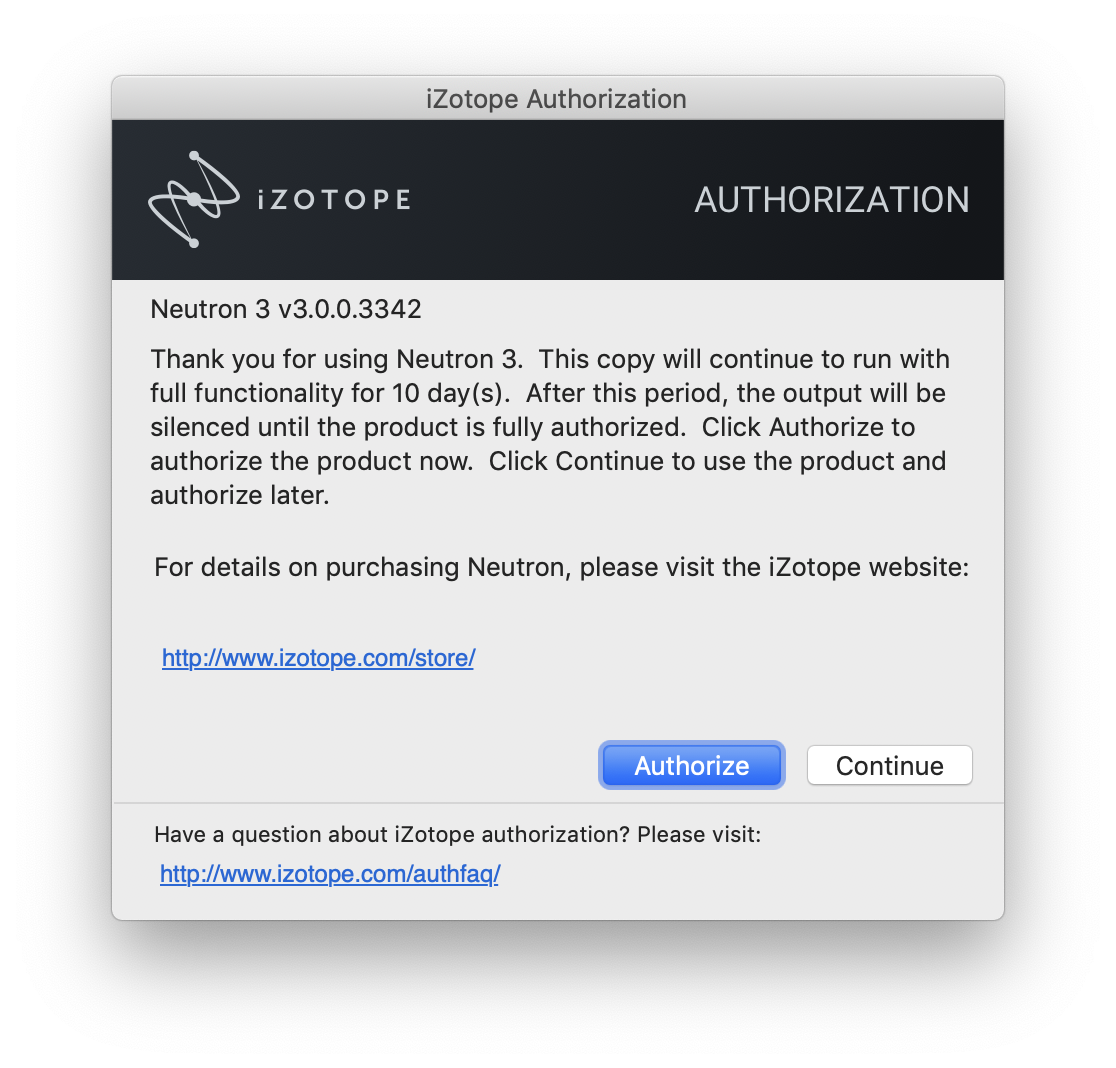
The first time you open the Neutron 3 Elements plug-in, the Authorization window will appear. The Authorization window allows you to:
- TRIAL: Start or continue a Trial period evaluation prior to purchasing.
- DEMO: Continue evaluating the product with Demo limitations (after the 10 day Trial period ends).
- AUTHORIZE: Authorize the product with a serial number.
Trial Mode
Trial mode allows you to evaluate Neutron 3 Elements over a 10 day trial period. The trial period begins when you first open Neutron 3 Elements in a DAW/NLE. The Authorization window will display the number of days remaining in your trial period. Click the Continue button to exit the Authorization window.
Demo Mode
After your 10 day trial period expires, you have the option to operate Neutron 3 Elements in Demo mode. To continue evaluating Neutron 3 Elements in demo mode, click the Demo button.
Demo Mode Limitations
Neutron 3 plug-ins will periodically output silence when operating in demo mode.
Authorization Methods
To disable Trial or Demo mode, you must authorize the product with a valid serial number. We offer three Authorization methods for Neutron 3 Elements:
- Online Authorization: Authorize Neutron 3 Elements on a computer that is connected to the internet.
- Offline Authorization: Authorize Neutron 3 Elements on a computer that is not connected to the internet.
- iLok Authorization: Authorize Neutron 3 Elements by storing your authorization on an iLok.
More Authorization Help
- For information about Authorization, please visit the iZotope website: https://www.izotope.com/authorization
- For additional help authorizing Neutron 3 Elements, visit iZotope Customer Care information on the iZotope website: http://www.izotope.com/support or contact our Customer Care department by sending an email to: mailto:support@izotope.com.
- More information about iZotope’s Customer Care department and policies can be found in the iZotope Customer Care chapter.
Neutron 3 Elements Interface
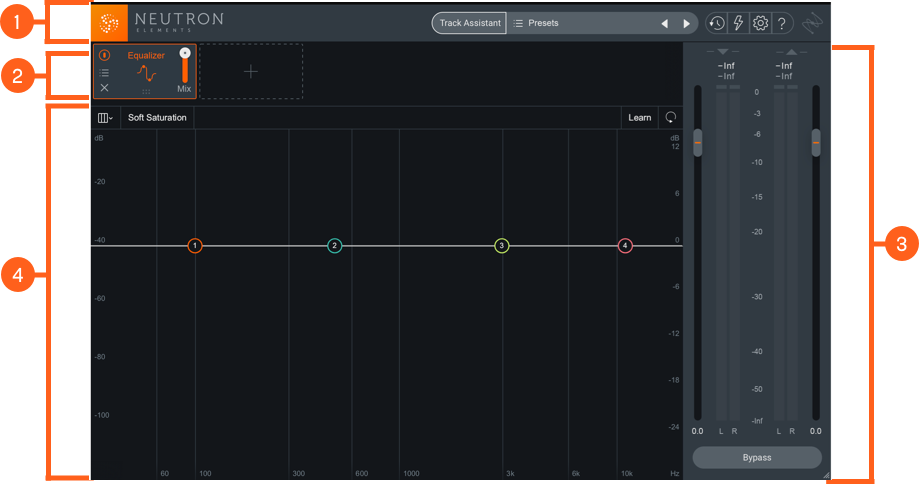
The Neutron 3 Elements plug-in interface has three main areas:
| Label | Control | Description |
|---|---|---|

|
Global Header | The global header area provides access to: the IPC plug-in name editor, Track and Mix Assistant features, the Preset Manager, Undo History, Zero Latency, Options, and Help. |

|
Signal Chain | The Signal Chain allows you to add or remove modules and adjust the processing order of modules included in the chain. The Signal Chain area is exclusive to the Neutron 3 mothership plug-in, Neutron 3 component plug-ins do not include the Signal Chain because they only include one processing module. |

|
I/O Panel | The I/O (Input/Output) panel area includes: global (I/O) gain controls, I/O metering, channel operations controls, and global bypass. |

|
Module Interface | The module panel area includes all controls and meters associated with a specific processing module. |
More information in General Controls
Learn more about the controls in the Global Header and I/O Panel in the General Controls chapter.
Signal Flow
The following diagram represents the overall signal flow of the Neutron 3 plug-ins.

- Input Gain
- Signal Chain
- Output Gain
Working with the Signal Chain
You can add, remove, and reorder modules in the Signal Chain area of the Neutron 3 mothership plug-in. By default, the Neutron 3 Signal Chain includes the Equalizer module.
Learn more about the Signal Chain
For more information about working with the Signal Chain, visit the General Controls chapter.
Workflow suggestions
There are a number of different ways to approach working with Neutron 3 Elements. We’ve included some workflow suggestions you can use if you aren’t sure where to start. These workflows are merely suggestions and any workflow is valid if it works for you.
Using Presets
Neutron 3 Elements includes a built in preset manager with a wide variety of factory presets to get you started. Open the Preset Manager by clicking the Presets button in the global header area of the plug-in. Load a preset by selecting it in the preset manager window or quickly try out different global presets by clicking the left and right arrow buttons directly to the right of the Presets button in the global header area.
Learn more about the Preset Manager
Learn more about working with the Neutron Preset Manager in the Presets chapter.
Module Presets in the Neutron Mothership Plug-in
The Neutron 3 Elements plug-in includes a global preset manager and a module preset manager. You can load presets that apply to a single module by clicking the Preset button in the module’s Signal Chain selector.
Using Track Assistant
Neutron 3 Elements offers the intelligent Track Assistant feature aimed at helping you find a starting point for your track based on an analysis of your audio.
Use Track Assistant to build a starting point for an individual track. You can access the Track Assistant feature by inserting the Neutron 3 Elements plug-in on a track and clicking the Assistant button to the left of the Presets button in the global header area.
Learn more about Track Assistant
See the Track Assistant chapter for more information about working with Track Assistant.
Optimizing Performance
We put a great deal of effort into improving the performance of Neutron Elements for the Neutron 3 Elements release. Some notable areas of improvement include:
- Improved memory usage: We improved memory performance of Neutron 3 plug-ins, allowing you to use more plug-ins before you have to worry about running low on RAM
- Start-up time optimizations: We took a look at what we were doing when a plug-in was instantiated and made some improvements to make our plug-ins load faster. As a result, you may see small pauses when first adding modules or using certain features in a given instance.
- DSP Optimizations: We have improved the overhead of processing each buffer. This means lower buffer sizes should be faster to process. Larger buffer sizes do not benefit as much from this.
There are many factors that contribute to performance. It can be very hard to nail down exactly what is causing performance issues. Some factors include:
- Computer specifications (CPU, RAM, etc…)
- DAW and session configuration (number of tracks or plug-ins, buffer size, sample rate, etc…)
- Individual plug-in settings
If you do start to reach the limits of your particular machine, here are some things you can do to improve performance:
- Remove any modules that are not in use from the signal chain.
- If possible, adjust the buffer size setting in your DAW.