Ozone Application
Overview
Ozone 8’s standalone application allows you to use its mastering tools outside of your digital audio workstation.

Ozone App Interface
- Transport Bar: Includes playback controls and transport counter information.
- Track Tabs: Each tab represents an audio file and its associated settings within the current Ozone project.
- Waveform Display: A graphical representation of the currently selected track.
- Module Chain: A fully customizable signal chain for Ozone modules.
- Module Control Panel: Contains the controls and metering for the selected module.
- Presets: Opens the Preset Manager.
- Master Assistant: Opens the Master Assistant panel.
- Input/Output Section: Contains Input/Output Gain controls & metering.
- Audition Section: Contains Global Bypass, Gain Match, Sum to Mono, Swap Channels, Reference, Codec Preview [ADV], and Dither.
File Menu
Ozone’s file menu contains the different commands you use to perform functions such as:
- Importing audio files into an Ozone project for processing.
- Saving the project.
- Exporting the processed audio files.
Importing Audio
You can import up to 16 audio files into an Ozone project using the following methods:
- Click on the File menu at the top of the screen, then “Import Audio Files.”
- Click on the “plus” icon at the top-left area of the interface.
- Use keyboard shortcut Cmd+I or Ctrl+I; A standard dialog box will appear where you can navigate to the desired file, then click “Open” to import it into the project.
- Drag and drop audio files into the Ozone interface.
Supported Import File Types
| FILE FORMATS | BIT DEPTH(S) | SAMPLE RATE(S) |
|---|---|---|
| .wav | 16-bit | 11,250 Hz |
| .aiff | 20-bit | 22,050 Hz |
| .mp3 | 24-bit | 44,100 Hz |
| .aac | 48,000 Hz | |
| 88,200 Hz | ||
| 96,000 Hz | ||
| 176,400 Hz | ||
| 192,000 Hz |
Sample Rates
- The project sample rate defaults to the sample rate of the first file that is loaded.
- If a file is loaded after with a different or higher sample rate, it is converted to the original sampling rate set for the project by the first file, or manually set before the second file is loaded.
- The conversion process will not convert previously converted/processed files (which are copied as working files upon load); Ozone will simply go back to the original files, create new copies, and then convert all files to the new sample rate for their new working copies.
Exporting Audio
You can export processed audio files from the Ozone application using the following methods:
- Click on the File menu, and then select “Export Audio Files.”
- Use the keyboard shortcut Command+E (Mac) or Ctrl+E (Windows).
A dialog box will appear, offering various options for the files you are about to export.
Current Track vs. All Tracks
- Click on “Current Track” to only export the audio file in the currently highlighted tab.
- Click on “All Tracks” to export separate audio files for each audio file loaded into the current project.
Current Track

Filename (Available on Current Track Only)
Type the desired name into this field; the exported file will be labeled with the name you have typed.
All Tracks
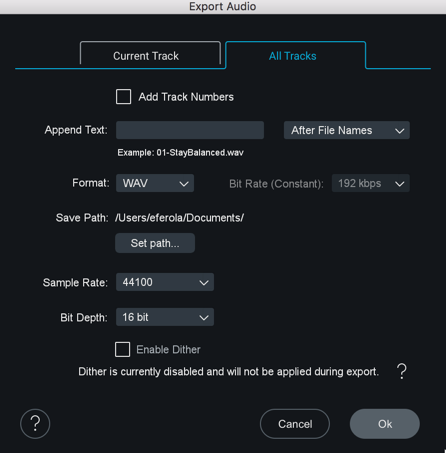
Append Text (Available on All Tracks Only)
Type in the desired text into the field; it will be automatically added to each of the exported tracks. You can also select whether to add the text before or after the file name. This function is useful for “tagging” the titles of a group of audio files with a common label; for example, you could append a group of files with a label such as “January 18th 2014 session.”
Add Track Numbers (Available on All Tracks Only)
You can add track numbers to your exports in the “All Tracks” section of the Export dialog. Select the “Add Track Numbers” checkbox and your exported files will be numbered in the order they appear in your Ozone project.
Format
Select the format of the exported file(s): WAV, AIFF, MP3, or AAC.
AAC & MP3 Codecs used by Ozone
For AAC Ozone uses Fraunhofer’s codec. For MP3 the LAME codec is used (www.mp3dev.org).
Bit Rate (Available on MP3 and AAC Only)
Set the bit rate for compressed file formats. Audio quality improves with increasing bit rate.
Save Path
Click on the Set Path button to select, through the resulting dialog box, where your exported audio file(s) will be saved.
- If the project is unsaved, the default save path is your Documents folder.
- If the project has already been saved, the default save path is an Exported Audio Files folder in the same location as the project.
Sample Rate
Select a sample rate to export your audio file. If you select a sample rate that differs from the original sample rate of the imported file, Ozone will apply high-quality sample rate conversion to the file.
Sample Rate when exporting to AAC or MP3 formats
Please note, if MP3 or AAC format is selected, files will be exported with a 44.1kHz sampling rate.
Bit Depth
Select a Bit Depth value for your audio file.
Enable Dither
Ozone processes files at 32-bit so dither is desirable for files being exported to values lower than 32-bit. When exporting to a bit depth lower than 32-bit, checking this box will apply high-quality dithering to the exported file.
This allows you to preserve the sound quality and dynamic range of a higher bit depth, when exporting the audio file to a lower bit depth.
For example, a common workflow is to record audio at 24-bit resolution, then import and process the audio in an application such as Ozone, which will process at a higher resolution of 32-bits.
However, if you are releasing the audio material on a commercial CD, it must be converted to 16-bit audio, the required bit depth of the “Red Book” CD audio format.
Help
Click this button to launch the help documentation for Ozone 8.
Cancel
Click this button to cancel the export process and return to the main interface.
Export
Click this button to begin the export process (or launch the Track Info screen for MP3 and AAC). A dialog box will appear that shows the progress of the export operation, which occurs faster than real time.
Track Info (Available for MP3 and AAC Only)
When MP3 or AAC is selected, the Track Info screen will appear after clicking Export. Here you can enter metadata for the encoded audio file that will used by MP3 & AAC players to display information about the file. MP3 will be tagged using ID3v2.3. AAC uses iTunes style tags.
Transport
Ozone provides Transport controls at the top of the interface, which allow you to easily navigate the playback functions of an imported audio file.
The transport bar includes the following functions:
Play
Start playback by clicking the Play button or pressing spacebar.
Stop
Click the Stop button to stop playback.
Return to Zero/Skip Back
The behavior of this button depends on the current position of the playhead:
- If the playhead is located more than two seconds into the audio file, clicking the button invokes a “return to Zero” function, moving the playhead back to the beginning of the current file.
- If the playhead is near the very beginning of the file, clicking the button acts as a “skip back” button, skipping back to the previous audio file.
Skip Forward
Click this button to skip to the next track tab in the project.
Playhead Follows Playback
Click this button to change the playhead behavior when playback is stopped.
When enabled, the playhead will stop at its current location on the timeline.
Loop
To loop playback of a specific section of audio, click and drag on the mouse and highlight a portion of the audio file; the section will highlight in blue and the “loop” icon in the transport bar will also highlight.
When you next press Play, the transport will loop playback repeatedly for the highlighted section only.
To stop looping audio, click on the Loop button again. The button will de-illuminate and looping will no longer be active, even though the area of the waveform will remain highlighted. The Loop button can be manually clicked again if you wish to again loop the audio.
Transport Readouts
Track Number
This number displays the track number of the currently selected track.
Time Counter
Displays the current time position within the audio file, displaying in minutes/seconds/milliseconds.
Total Time
This smaller display shows you the total length of all tracks in the project.
Multiple File Workflow
You can load up to 16 files into the same project and navigate to each file by clicking on the corresponding track tab.
Note
- Ozone only allows you to import a file once per project.
Re-ordering Tracks
Click and drag track tabs to change the order of tracks in the project.
Removing Tracks
You can remove tracks from a project using the following methods:
- Right-click on a track tab and select “Remove Track.”
- Click on a tab to highlight it, then click on the “X” button.
When removing a file, a dialog box will appear offering you three different options:
- Delete Removes the original file from the Imported Audio Files folder of the Ozone project directory.
- Keep Removes the track from the session, but retains the file in the Imported Audio Files folder of the Ozone project directory.
Saving Ozone Projects
An Ozone project contains the following components:
- An Ozone session file (.OZN).
- An Imported Audio Files folder.
- An Exported Audio Files folder.
Save Project As…
Creates a copy of the current project directory with a new name.
Ozone Session Files (.OZN)
An Ozone session file contains all of the session data including:
- Imported audio tracks
- Ozone module settings
- Track Trim & Fade settings
- Global I/O settings
Save (.OZN) As…
Saves a new copy of the session file within the current Ozone project directory. Useful for versioning your Ozone projects over time. Using this method will not create copies of the imported audio files, but instead will reference the files included in the Imported Audio Files folder of the current project directory.
Close Project
When closing a project, a dialog will appear with the following options:
- Cancel: Cancels out of the close operation; the current project will stay loaded.
- Don’t Save: All changes made since last save will be discarded.
- Save: All changes will be saved.
Create New Project
Creates a new Ozone project directory.
Open Project
Opens a previously saved Ozone project.
Edit Menu
Allows you to adjust Audio Device settings or open the Ozone Options window.
Audio Devices
Buffer Size
Adjusts the Buffer Size of the current Ozone session.
Output Devices
Selects the hardware device used by the Ozone session to play back audio.