Master Assistant
Overview
Master Assistant is the latest advancement in assistive technology, machine learning, and intelligence in Ozone 8 Elements, Standard, and Advanced. It is designed to give you a starting point that is intelligently tailored to your music to help you create a professional sounding master regardless of your experience level.
Master Assistant is included in the main Ozone 8 plug-in and Ozone 8 standalone application. The Master Assistant panel can be opened by clicking the “Master Assistant” button to the left of the preset display.
Genre Classes & Research Findings
Master Assistant utilizes target genre curves that were born from a mixture of internal discussion and research. We started by grouping a large variety of audio files into ten classes of musical genre. These genre classes were then analyzed for their spectral characteristics. Based on our research, we created ten genre target curves that represent the typical spectral characteristics for each genre class.
In addition to analyzing typical spectral characteristics, we also trained a neural net classifier to map incoming audio to a unique target curve that represents a mixture of the 10 genre classes.
Note: Though we are categorizing into 10 different genres, our research has shown that most curves fall within three broad categories. We included combination target curves that represent these three broad categories with the Tonal Balance Control plug-in.
These three representative categories are:
- Bass Heavy (EDM, Hip/Hop, etc.)
- Orchestral (Broad instrumental, etc.)
- Modern (Pop, Rock, etc.)
See the Processing Steps section below for more information on how these curves are used during Master Assistant processing.
Workflow
Master Assistant is available in the main Ozone 8 plug-in and the Ozone 8 application. You can open the Master Assistant panel by clicking on the “Master Assistant” button to the left of the preset display.

Target Selection
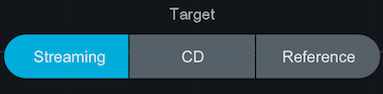
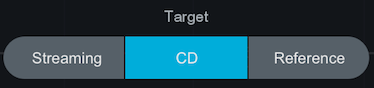
Before running Master Assistant, select your Target output in the first screen that appears.
Streaming
- Informs the Maximizer Threshold in order to meet a loudness target value (in LUFS).
- The Streaming option will set the target loudness to -14 LUFS by default. This target value is based on the typical loudness value used by popular streaming services.
- This value can also be customized in the General tab of the Ozone Options menu.
CD
Informs the Maximizer Threshold setting in order to achieve the loudest possible output for the selected Intensity option.
CD: Intensity

Informs the Maximizer Threshold value by specifying how often the limiter will be triggered by the incoming audio.
Reference
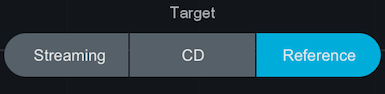
- Allows you to choose any reference track that is currently loaded in the Reference panel as your target.
- When this option is selected, the target loudness and target EQ curves will be calculated from the loudness and EQ curve of the selected reference track.
These Target choices influence the analysis and results of Master Assistant in different ways. The steps below explain how the Target selection affects a given processing step.
Playback Audio
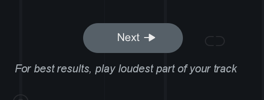
After selecting a target, hit Next to run Master Assistant.
Useful Tips
- Master Assistant needs audio input: Make sure you are playing back audio in the Ozone 8 application and/or your host application.
- For best results, we recommend running Master Assistant on the loudest portion of the track.
- Master Assistant needs approximately 30 seconds of audio during analysis. If you want Master Assistant to analyze a section that is less than 30 seconds long, we recommend looping playback prior to running Master Assistant.
Notes about Reference Target selection
- You need to have a Reference track loaded in the Reference panel in order to run Master Assistant with Reference selected as the target. You will need to exit Master Assistant and load a reference file in order to proceed.
- Note that Reference files need to finish loading completely before being available to select in the Master Assistant Reference track dropdown menu.
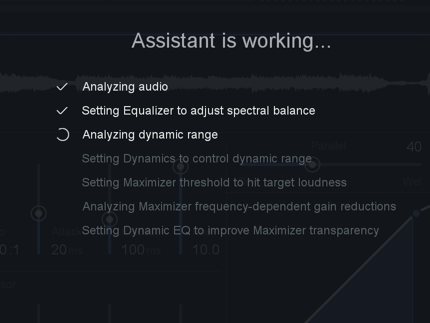
Processing Steps
Below is an outline of the steps Master Assistant works through after making a target selection and clicking on the ‘Next’ button.
Analyze Audio
After clicking the “Next” button Master Assistant will listen to the incoming audio for roughly 5 seconds.
Waiting For Audio screen
If Master Assistant is not receiving audio a “Waiting for audio” screen will appear. To dismiss the Waiting screen, simply playback audio.
Generate Unique Target Curve
After listening to your audio for a few seconds, Master Assistant will generate a unique target curve to use in the EQ processing step (explained below).
How does master assistant generate unique target curves?
- During the initial listening pass, Master Assistant will analyze your audio and determine how similar it is to the 10 predetermined genre class curves (these curves are explained in the Genre Classes section above).
- A percentage of similarity is assigned to each genre class curve.
- Master Assistant will then create a unique target curve that is based on the genre class percentages detected in your audio.
- For example: if Master Assistant classifies your track with the following percentages: 60% Pop, 30% Rock, and 10% Country. The resulting unique target curve will be a mix of 60% of the Pop target, 30% of the Rock target and 10% of the Country target.
Target curve is based on Reference audio
- When “Reference” is chosen as the Master Assistant Target, the unique target curve is derived from the selected Reference track and not by calculating the genre classes of your input audio.
Apply Preset
After generating a unique target curve, Master Assistant will load a preset that is based on the genre class we detected with the highest percentage of similarity. These presets are used to provide starting points for the modules utilized in Master Assistant processing and will set parameters that are not learned from your input audio, such as: IRC Mode in the Maximizer, Attack & Release times in Dynamics, etc. The Master Assistant presets are more subtle than the presets used in Neutron’s Track Assistant processing.
Module chain contents after running Master Assistant
- The modules included and their order in the signal chain will always be the same after running Master Assistant.
- In some circumstances (depending on your input audio) Master Assistant will bypass the Dynamics module. Keep reading the steps below for more information on how this decision is made.
- To reiterate: The modules in the signal chain after running Master Assistant are meant to function as a suggestion or starting point for your master. Ozone has a wealth of processing modules available and we encourage you to add or remove modules to suit your track.
EQ
After applying a preset, Master Assistant will modify the settings in the EQ module.
Master Assistant will intelligently modify the EQ settings by comparing the input audio to the unique target curve generated in the first processing step. EQ nodes are adjusted with the goal of modifying the EQ curve to more closely match your incoming audio to the unique target curve.
EQ band settings
- Master Assistant will always enable Low Shelf & High Shelf filters on Bands 1 & 8 (respectively).
- Master Assistant will add up to 6 Peak Bell filters in Bands 2-7 in order to match the target curve.
Dynamics
After setting the EQ module, Master Assistant will modify the settings of the Dynamics module. Applying some light low-end compression to overly dynamic audio will allow the Maximizer to operate more transparently. Master Assistant measures the Crest Factor of your incoming audio in order to determine if applying Dynamics processing will positively affect the output of the Maximizer.
If the detected genre class falls under the broad “Orchestral” category, crest factor will be calculated based on the full bandwidth of your signal. Otherwise, Crest Factor will be calculated for the low band of your input audio.
If the Crest Factor measurement is higher than a predetermined cutoff value (this cutoff was determined as a result of our internal research) we will enable the Dynamics module. If the Crest Factor measurement falls under our pre-determined cutoff value, the Dynamics module will be disabled.
What is Crest Factor?
Crest Factor is a measurement of peak amplitude value divided by the RMS value of a waveform. This measurement is used to indicate how extreme peaks are in a given waveform, which can be equated to the dynamic range of a signal. The total Crest Factor range used by Master Assistant is -1 to 14 and the “ideal” Crest Factor range is 3 to 10. If the Crest Factor measurement is lower than 3, it can be considered “too compressed.” If the Crest Factor measurement is higher than 10, it can be considered “too dynamic.”
The Compressor threshold values are learned based on the average level of your input audio to ensure that the Compressor is affecting your audio.
Maximizer
After setting the Dynamics module, Master Assistant will move on to adjusting the settings in the Maximizer.
Ceiling
The Ceiling value is set based on the Target selection you made in the first screen of Master Assistant.
- Streaming: -1dB
- CD (for all Intensity values): -0.3dB
- Reference: -0.3dB
Threshold
The Threshold value is set based on your input audio and the learning behavior defined by your Master Assistant Target selection.
Streaming
- Target loudness value for the Maximizer Threshold is set to -14 LUFS (common loudness for popular streaming services)
- Loudness Target can be manually set in the Options > General tab
CD
- Sets the Maximizer Threshold to give you the loudest possible master based on your input audio and Intensity selection.
CD: Intensity
Determines how often the Limiter should be engaged when learning the Maximizer Threshold.
- Low: Limiter is engaged 0% of the time
- Medium: Limiter is engaged 1% of the time
- High: Limiter is engaged 2% of the time
Reference
- Target loudness value (in LUFS) for the Maximizer Threshold is calculated from the loudness of the selected reference track.
Note
- If your track is louder than the Target Loudness value, Master Assistant will not make it any quieter than the difference introduced by the Ceiling value.
Important Note
It is important to play the loudest portion of your track when running Master Assistant. Learning the Maximizer Threshold on a quiet portion will maximize the loudness for that portion of the track. This has the potential to introduce distortion in louder sections of the track because the Threshold was learned for lower level signals.
Dynamic EQ
Master Assistant will compare the input and output signals of the Maximizer to determine which frequencies are hitting the Limiter the hardest.
Dynamic EQ nodes are placed at peak frequencies to reduce potential distortion introduced by the Maximizer. The Threshold values are learned based on the input audio to the Dynamic EQ bands.
Accept/Cancel
When Master Assistant has finished, you can Accept or Cancel the changes.
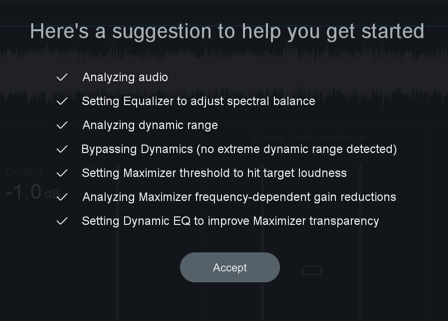
- Accept will dismiss the Master Assistant panel and retain all settings modified by Master Assistant.
- If you Accept changes and decide to revert them, you can undo Master Assistant changes in the Undo History window.
- Cancel will dismiss the Master Assistant panel and revert your settings to the state they were in prior to running Master Assistant.