EQ
Overview
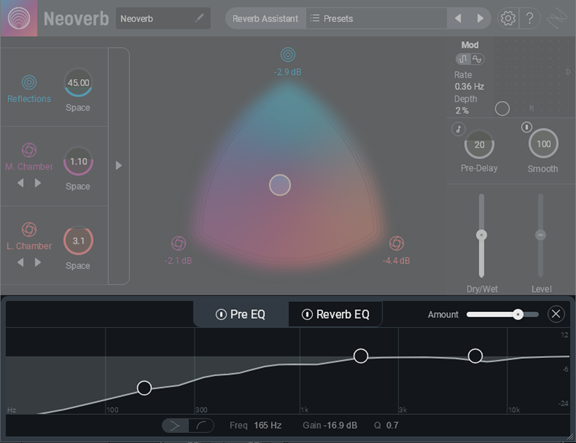
Neoverb has two 3-band EQ modules, one before the reverb (Pre EQ), and one after (Reverb EQ). EQ before and after reverb can optimize the overall sound, as described below.
Pre EQ
Use the Pre-EQ section to:
- Intelligently listen (via Auto Cut) to your incoming audio and carve away mud, resonances, and harshness in the signal before it enters the reverb.
- Roll-off low frequencies (such as in a kick drum) before the reverb so that the source doesn’t create an excessive amount of low-frequency reverb, which can muddy the sound.
- Roll-off highs (such as in bright vocals or distorted electric guitar) going into and coming out of the reverb.
Pre EQ Usage
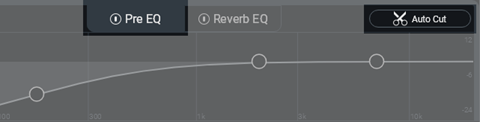
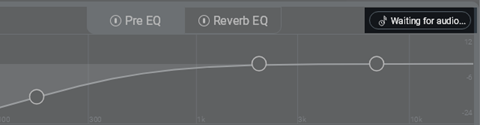
- Click on the Pre EQ tab (make sure its Power Button (I) is on), then click on Auto Cut.
- The Auto Cut label changes to “Waiting for Audio.”
- Choose a section of audio that covers a wide range of frequencies, then start playing back the audio you
want Neoverb to analyze. “Waiting for Audio” will change to “Listening.” The spectrum analyzer in the
background will display the audio as it plays.
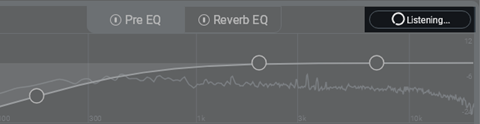
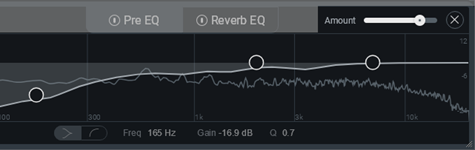
- Neoverb shows a suggested EQ curve after completing its analysis. The Amount slider scales the amount of
cutting EQ. The higher the number, the greater the cut.
Shortcuts
Shift+click anywhere along the slider to jump to that setting. Double-click to set to 100%.
To reset the Auto Cut function, click on the X (close button) to the right of the Amount slider.
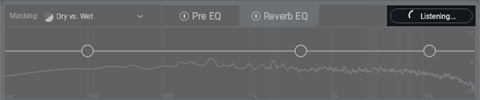
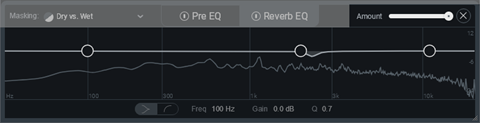
Reverb EQ
Use the Reverb EQ section to intelligently listen (via Unmask) to your incoming audio and minimize masking effects occurring between the dry and wet signal.
- Click on the Reverb EQ tab (make sure its Power Button (I) is on). Choose Dry vs. Wet to visualize
what Unmask is seeing.
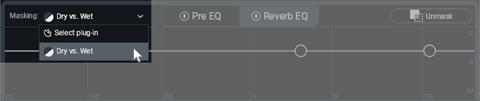
- Click on Unmask.
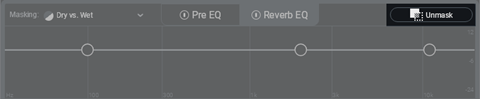
- The Unmask label changes to “Waiting for Audio.”

- Choose a section of audio that covers a wide range of frequencies, then start playing back the audio you
want Neoverb to analyze. “Waiting for Audio” will change to “Listening.” The spectrum analyzer in the
background will display the audio as it plays.
- After the analysis process, if Neoverb detects masking, it applies a tuned EQ curve to reduce the masking.
If there’s no significant masking, the display shows “No significant masking detected,” and the reverb
remains as it was. The Amount slider sets how much influence the EQ settings have over the sound. The
higher the number, the greater the influence.
Shortcuts
Shift-click anywhere along the slider to jump to that setting. Double-click to set to 100%.
To reset the Unmask function, click on the X (close button) to the right of the Amount slider.
Masking Meter
Easily keep track of reverb build-up with an intuitive meter that highlights areas you may want to cut from your reverb. Masking Meter also communicates with other iZotope plug-ins (via Inter-Plugin Communication) to show you where your reverb is masking other tracks in your session. Neoverb can communicate over Inter-Plugin Communication with the following iZotope plug-ins: Other Neoverb instances, Neutron 3, Nectar 3, VocalSynth 2, and Relay.
- Click on the Reverb EQ button
- Select a source to measure masking against. The options are: Dry vs Wet (of your current track) or select
an instance of another iZotope plug-in in your session.

- Play audio, preferably looped.
- You will observe white flashes across the spectrum. These highlight frequency ranges where masking has been
detected.
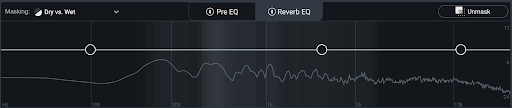
- You can manually EQ regions that have a brighter intensity of flashing (where significant masking is occurring) or press the “Unmask” button to automatically cut in the highlighted problem areas.
Editing the EQ sections manually
Neoverb’s intelligent EQ setting may produce exactly the sound you want. But, there are also three manually adjustable nodes:
- Click on an EQ node to select it, and then drag horizontally to change the frequency the EQ will affect, and/or drag up or down to change the amount of boost or cut at the selected frequency.
- Click on the EQ node handles to the side of the selected node, and then drag right or left to change the filter resonance (or “sharpness”).
Shortcuts
Double-click on a node to return it to the default frequency, with no boost or cut, and a nominal Q setting.
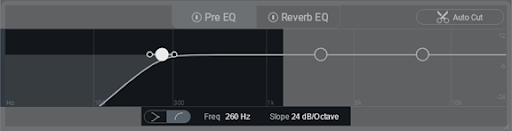
Low Band
Choose a Low Shelf or Low-Cut filter response with the Filter Shape Selector switch (located in the lower left of the highlighted section below).
- The Low-Shelf shape starts boosting or cutting below the selected frequency. This eventually levels
off to a constant amount of boost or cut. The EQ node handles determine the shelf’s steepness before it
levels off. The image below shows the shelf cutting low frequencies by -10.8 dB, with the attenuation
starting at 260 Hz.

- The Low-Cut shape progressively attenuates the audio level below the selected frequency. The EQ node
handles set the slope, or how rapidly the audio level falls off below the selected frequency. The slope
options are 6, 12, 24, and 48 dB/octave. Note that the filter can only attenuate, not boost, with this
shape.
Mid Band
The Mid stage is a parametric EQ, with three parameters.
- Frequency sets the specific part of the audio spectrum where boosting or cutting occurs.
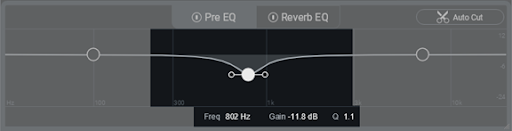
- Gain (peak/dip) determines the amount of boost or cut at the selected frequency. The image below shows the EQ cutting by -11.8 dB, at a frequency of 802 Hz.
- Q determines the sharpness of the boosting or cutting action. Higher settings affect a small range of the audio spectrum, while lower settings process a broader range.
High Band
Choose a High Shelf or High-Cut filter response with the Filter Shape Selector switch (located in the lower left of the highlighted section below).
- The High-Shelf shape (left) starts boosting or cutting the highs above the selected frequency. This
eventually levels off to a constant amount of boost or cut. The EQ node handles determine the shelf’s
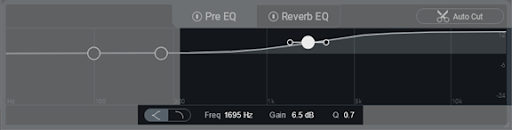
steepness before it levels off. The image shows the shelf boosting 6.5 dB, with the boost starting around
1,695 Hz. The Q is fairly broad.
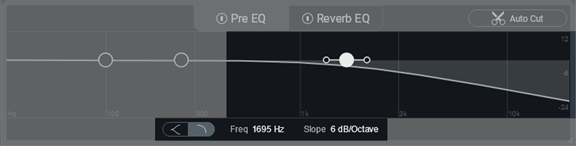
- The High-Cut shape progressively attenuates the audio level above the selected frequency. The EQ node
handles set the slope, or how rapidly the audio level falls off above the selected frequency. Note that the
filter can only attenuate, not boost, with this shape; the image shows a cut with a 6 dB/octave slope,
starting at 1,695 Hz.