Effects
Table of Contents
Overview
Stutter Edit 2 includes 11 different signal processors. Although many of these have familiar names, they go far beyond what conventional effects can do. This isn’t just because many of them offer unique parameters, but because of unique Time-Variant Modifiers in Stutter Edit 2.
Stutter Edit 2 takes effects to an entirely new and creative level because you can modulate every parameter of every effect‚and modulate them rhythmically. This offers options for motion and dynamics in all the effects and blurs the boundary between being signal processors and instruments.
The Effects Section interface has three major elements. The user interface image at the beginning of the manual showed these, but let’s explore them in more detail. We’ll start with the Signal Chain, and the available effects.
Signal Chain
This column on the left shows all available signal processors. You can enable as many effects as your computer, or your sanity, can handle.
- To enable an effect, click the hexagon to the left of the effect name. When selected, it lights white.
- To select an effect for editing, click on its name. The associated parameters show up in the other related interface sections, while a partial outline around the hexagon confirms the currently selected effect.
- To change an effect’s order in the chain, click on the bars to the right of the effect’s name, then drag and drop the effect into place.
As we cover the various available effects, you’ll note they offer a wide variety of parameters. However, the way Stutter Edit 2 handles these parameters is far from traditional, so before getting into the effects, let’s look at the Time-Variant Modifiers, why they’re important, and why they’re not as daunting as they may look at first.
Basic TVM Control Adjustments
To make it easy to adjust TVM parameters, Stutter Edit 2 incorporates a new, simplified control method. The TVM Controls Panel consolidates an effect’s Slider and Rotary controls within a panel. Most controls have three modes: Locked, Split, and Custom.
Locked Mode
In Locked mode: a single handle varies the parameter value. This is how most traditional effects adjust parameters.
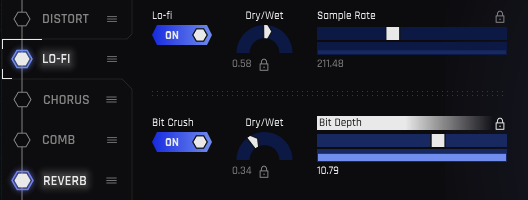
The controls for the Dry/Wet, Sample Rate, and Bit Depth parameters are locked, as shown by the lock symbol. A single handle sets the parameter value.
Split Mode
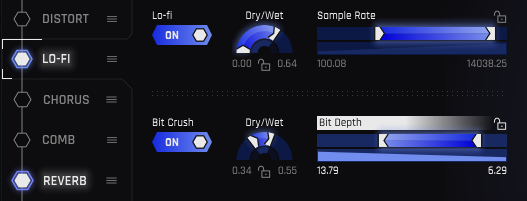
In Split mode, a control or slider has two independent handles, which set the higher and lower parameter values. What’s more, they have Arrows that indicate direction. This is important because when sweeping a parameter, you can start at a lower value and sweep to a higher value, or start at a higher value and sweep to a lower value.
Sample Rate modulation covers the range between the two handles. The slider arrows point right, which means a sweep will go from the lower to the higher parameter value. The Bit Depth slider arrows point left, so a sweep will go from the higher to the lower parameter value. The rotary controls both sweep from the lower to the higher value.
Custom Mode
Locked and Split modes are the quickest way to adjust parameter values. However, far more sophisticated control options are available in the TVM Graphical Editor. You can customize exactly how sliders will respond, create novel shapes, and more.
When editing in the TVM Graphical Editor, a control or slider represents the customizations you’ve made by changing the lock icon in the upper right into an icon that represents the TVM Graphical Editor and displaying lines at node points you’ve edited.
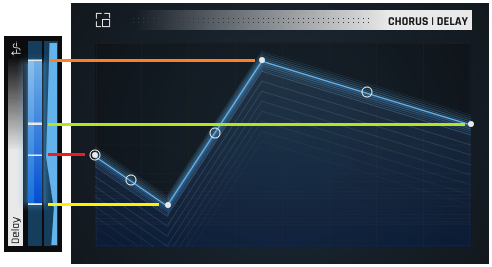
The lower part of a slider in Custom mode displays a thumbnail of the TVM curve.
If you imagine turning the control on its side, it’s easy to see how the nodes in the TVM Graphical Editor correspond to the lines in the control. Although the lines are more for display, you can still adjust the TVM Graphical Editor’s left-most and right-most nodes using the corresponding lines in the control. However, it makes more sense to do your edits in the TVM Graphical Editor Magnifier window itself, as described later.
Effects
The following sections describe the parameters available in each of the effect panels.
Distort
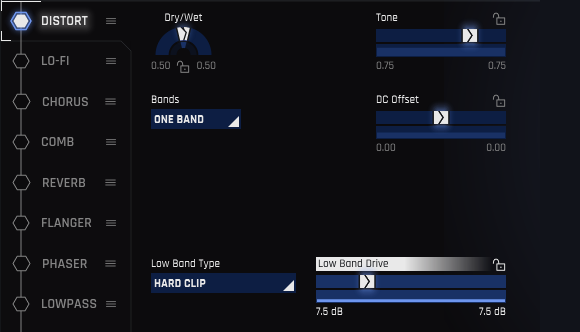
- Dry/Wet: Varies the balance of dry and distorted sound.
- Tone: Lower numbers reduce the level of the high frequencies.
- DC Offset: Audio is like a wave, with a crest (positive-going audio) and a trough (negative-going audio). Distortion flattens the top of the crest and the bottom of the trough. With DC Offset, higher numbers flatten the crest more than the trough. Lower numbers flatten the trough more than the crest. With a setting of 0, flattening is equal for the crest and trough.
- Bands: Traditionally, distortion affects all frequencies equally (One Band). Choosing Two Bands splits the audio into high- and low-frequency bands, with independent distortion for the two bands.
- Low and High Band Type: Choose among 19 different distortion characters—soft, hard, spiky, crunchy, and everywhere in between. With Two Bands selected, an additional Type control appears for the High band.
- Low and High Band Drive: Higher numbers increase the distortion’s intensity by forcing higher levels of audio into the Distort effect. With Two Bands selected, an additional Drive control appears for the High band.
Lo-Fi
Digital audio created the potential for nasty, filthy forms of distortion you can’t get with analog technology.

- Dry/Wet: Varies the balance of dry sound, and the processed sound that has undergone digital destruction.
- Sample Rate: Lowering sample rates (this parameter is calibrated in Hz) into the audio range produces foldover distortion, a type of distortion so unsociable it needed its own name. But really, it’s just misunderstood. Treat it nice, and it will do cool sci-fi sounds for you.
- Bit Depth: Lower bit rate values reduce the audio resolution. It’s the audio equivalent of watching a YouTube video over AT&T DSL compared to seeing it in 3D IMAX. Lower bit rates are also kind of like vintage digital, because in the ‘70s and ‘80s, digital audio didn’t have the refined resolution we enjoy today.
Chorus
The Chorus effect copies the sound at its input, modifies its pitch and timing somewhat to differentiate it from the input sound, then mixes the two sounds together. This creates a thicker, more animated overall sound.

- Dry/Wet: Surely you’ve figured out what this does by now.
- Delay: This sets how much later the copied sound starts compared to the input signal.
- Sweep Rate: The sweep function changes the pitch of the copied signal, in conjunction with the next two parameters. Lower numbers mean a slower rate of change.
- Sweep Width: This sets the extent of the pitch change. More width varies the pitch over a wider range.
- Sweep Waveform: You can choose among six periodic waveforms: sine, triangle, rising (positive-going) sawtooth, falling (negative-going sawtooth, etc.), square, and warbly sine (sine wave with a light vibrato effect imposed on it). A random waveform is also available.
- Feedback: Mixing some of the output back to the input creates feedback. With a value of 0, there’s no feedback and no change to the sound. As the values get more negative, the amount of negative feedback increases, which makes the sound progressively more hollow-sounding. More positive values make the sound progressively sharper, with a more whistling timbre.
- Spacing: The chorus effect generates peaks, and this parameter determines the (very short) delay between the peaks.
- Stereo Spread: Lower values convert the audio to mono, while higher values widen the audio image to exaggerate the stereo effect.
Comb
A comb filter’s sound is somewhat similar to a flanger or phaser, but more nuanced. Unlike a flanger it doesn’t use time delays, so it may be ideal when you want a flanging sound and don’t want the initial delay time a flanger requires.

A comb filter gets its name from creating a frequency response that looks like a comb, as shown in the spectrum analyzer display.
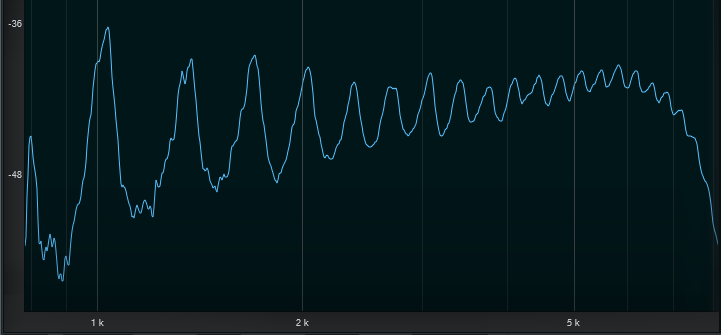
- Frequency: Being a filter, the Comb effect can be set to different frequencies. The frequency becomes more apparent as you increase the amount of feedback.
- Comb Spacing: This offsets the delay between the left and right channel, so it changes the perceived stereo width. If a sound using this will be collapsed to mono, check it in mono to make sure there’s not excessive signal cancellation.
- Feedback: Mixing some of the output back into the input increases the sound’s resonance.
Reverb
Reverb re-creates the sound of acoustic spaces and, traditionally, is a relatively static effect. Stutter Edit 2 re-defines reverb by being able to apply TVM to all reverb parameters.

What makes this reverb amazing is that the room size, shape, reflectivity, pre-delay, and more can vary independently in real time (sort of like a modular synthesizer paradigm). If you’ve seen the movies Inception or Dr. Strange, this reverb is the audio equivalent of the 3D spaces that fold back in on themselves and change dynamically.
- Dry/Wet: Sets the balance of dry to reverberated sound.
- Cut on Release: The reverb tail normally extends for its natural duration. Enabling Cut on Release mutes the reverb upon stopping the note that triggered the Gesture, so that a long reverb tail won’t spill over into the next Gesture you select.
- Size: Changes the cubic volume of the virtual space. Bigger sizes create more reflections.
- Feedback: Mixing the reverb output back to the input imparts a sense of pitch and a more “focused” reverb sound.
- Width: Increasing Width gives the illusion that the sides of the virtual space, as you “face” it, are expanding outward.
- Damping: Increased damping reduces the high-frequency response, and sustain, of the reverb as it decays.
- Pre-Delay: This is not the same as traditional pre-delay. The dry audio passes through the reverb, then you hear the dry audio passing through the reverb again, with the delay between the two based on the pre-delay time. Longer values give longer delays. Feedback also affects this parameter by creating repeats of the reverb sound. Note that both of these intentionally create pitch artifacts so you can pitch bend your reverbs.
- Post-Delay: The dry audio passes through the reverb, then you hear the reverb sound only, with the delay between the initial sound and the delayed reverb based on the post-delay time. Longer values give longer delays.
- Post-Feedback: The Post-Delay creates a single delay of the reverb sound. Post feedback repeats the delayed sound, with higher Post-Feedback values giving more repeats before they ultimately fade out.
- LFO Amount: The low-frequency oscillation, or LFO, modulates the reverb’s character. LFO Amount determines how much variation in the character the LFO creates.
- LFO Waveform: The LFO modulation can be one of six periodic waveforms: sine, triangle, rising (positive-going) sawtooth, falling (negative-going sawtooth, etc.), square, and warbly sine (sine wave with a light vibrato effect imposed on it). A random waveform is also available.
- LFO Rate: This sets the modulation’s speed, with higher values giving more rapidly changing modulation effects.
- Brightness: Increasing brightness reduces the reverb’s low frequencies. This is often helpful when feeding audio with a heavy low-frequency component, such as bass or drums, into reverb. Without trimming the lower frequencies, the sound can seem “muddy.”
Flanger
Flanging reached its peak of popularity in the ‘60s, where it was used to create the “jet airplane” audio effect used by the Beatles, Byrds, Jimi Hendrix, Led Zeppelin, Mandrake Memorial, the Small Faces, and many others.
The Flanger effect copies the sound at its input, modifies its pitch and timing somewhat to differentiate it from the input sound, then mixes the two sounds together. This sounds similar to the Chorus, however, the Chorus is designed to provide a more diffused, doubling-kind of effect, while flanging optimizes the pitch and timing variations to produce a more dramatic “whooshing” sound.
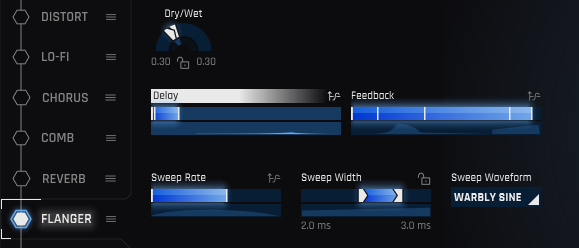
- Dry/Wet: The most dramatic flanging effect usually occurs with an equal balance of dry and wet audio. However, with high feedback settings, increasing the Wet amount gives a more resonant sound.
- Delay: This sets how much later the copied sound starts compared to the input signal. Shorter delays accentuate the flanger effect more. Longer delays sound more like a very short echo than flanging.
- Sweep Width: This sets the extent of the delay. More width varies the delay over a wider range; varying from shorter to longer delays produces the traditional flanging effect.
- Sweep Rate: This controls how long it takes for the flanger sweep to vary between the highest and lowest settings. Lower numbers mean a slower rate of change.
- Sweep Waveform: You can choose among six periodic waveforms: sine, triangle, rising (positive-going) sawtooth, falling (negative-going sawtooth, etc.), square, and warbly sine (sine wave with a light vibrato effect imposed on it). A random waveform is also available.
- Feedback: Mixing some of the output back to the input creates feedback. With a value of 0, there’s no feedback, although you’ll still hear a flanging effect. As the values get more negative, the amount of negative feedback increases, which makes the sound progressively more hollow-sounding. More positive values make the sound progressively sharper, with a more resonant timbre.
Phaser
The Phaser effect sounds similar to flanging, but it uses filtering instead of time-based processing.
The Phaser copies the sound at its input, alters its phase to differentiate it from the input sound, then mixes the two sounds together to create peaks and notches in the response. Varying the frequencies of these peaks and notches simultaneously can result in a thick, lush modulated effect compared to flanging’s sharper, more focused sound.
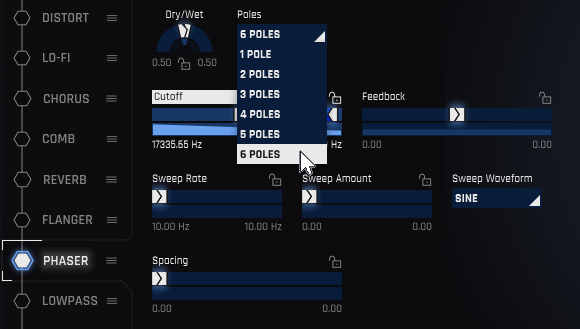
- Dry/Wet: The most dramatic phasing effect usually occurs with an equal balance of dry and wet audio.
- Poles: This sets the number of notches with negative feedback, or the number of peaks with positive feedback, using the drop-down menu shown above. The more poles, the less subtle the effect.
- Cutoff: The cutoff frequency sets a base frequency. Sweeping varies the cutoff above and below this base frequency.
- Feedback: Mixing some of the output back to the input creates feedback. With a value of 0, there’s no feedback, although you’ll still hear a phasing effect. More negative values give a “hollower” phasing effect, while more positive values make the sound sharper. The more extreme the value (negative or positive), the greater the apparent resonance.
- Sweep Rate: This controls how long it takes for the flanger sweep to vary between the highest and lowest settings. Options are 1/8 note, 1/32 note, 1/64 note, or for audio rate modulation, C1 or F#1.
- Sweep Amount: Higher values cause a greater variation between the Phaser’s lower and higher cutoff frequencies.
- Sweep Waveform: You can choose among six periodic waveforms: sine, triangle, rising (positive-going) sawtooth, falling (negative-going sawtooth, etc.), square, and warbly sine (sine wave with a light vibrato effect imposed on it). A random waveform is also available.
- Spacing: The pole frequencies are spaced at an equal distance from each other. Spacing determines whether these frequencies are closer together, or further apart. Closer spacing gives a somewhat more intense effect over a narrower part of the frequency spectrum, while further spacing gives a somewhat more subtle effect, but over a wider range of frequencies.
Lowpass
The lowpass filter attenuates frequencies above the cutoff frequency. The higher the frequency is above the cutoff, the more it’s attenuated.

- Dry/Wet: Determines the balance between the dry and lowpass filtered sounds.
- Cutoff: A Lowpass filter passes frequencies below a specified cutoff frequency and reduces the level of frequencies above the cutoff.
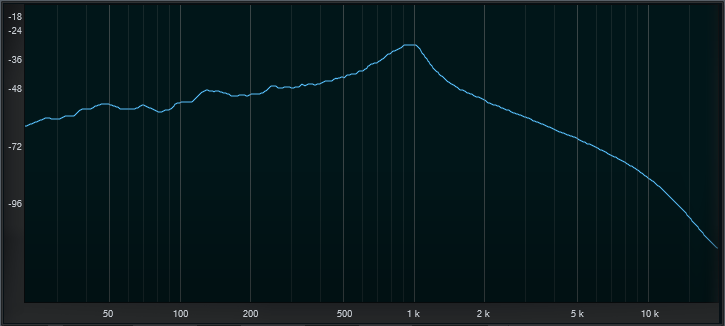
- Resonance: Increasing Resonance adds a peak at the cutoff frequency. The following image from a spectrum analyzer shows how Resonance affects the lowpass filter response, which would otherwise just roll off higher frequencies, without any added boost.
Tapestop
The Tapestop effect slows audio down over a certain period of time.
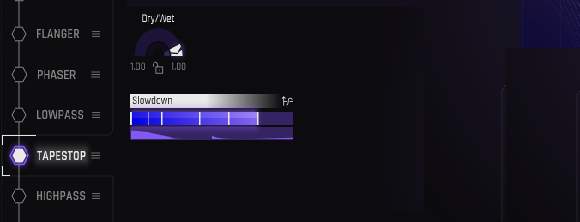
The Tapestop effect sounds like when tape is rolling and you press stop, or when you disconnect a turntable’s motor, and the RPMs go from 33-/1/3 or 45 down to nothing.
- Dry/Wet: Sets the balance between the dry and tapestopped sound.
- Slowdown: Higher values create a steeper downward pitch change until, at the highest value, the audio comes to a complete stop.
Highpass
The highpass filter attenuates frequencies below the cutoff frequency. The higher the frequency is above the cutoff, the more it’s attenuated.

- Dry/Wet: Determines the balance between the dry and highpass filtered sounds.
- Cutoff: A highpass filter passes frequencies above a specified cutoff frequency, and reduces the level of frequencies below the cutoff.
- Resonance: Increasing Resonance adds a peak at the cutoff frequency, similarly to how the Lowpass filter adds a peak at the Cutoff frequency.
Note
Combining the Lowpass and Highpass filter in series can create a bandpass response if the Lowpass frequency is lower than the Highpass frequency. Your trivia for the day: The original Moog modular synthesizers didn’t have filters with a bandpass response, so you had to use both Highpass and Lowpass filters. The following image shows what happens when set this way, with resonance turned up for both filters. The Lowpass and Highpass filters, when placed in series, produce a bandpass response that rolls off both high and low frequencies. In this instance, both filters have added resonance at their cutoff frequencies.
Delay
This stereo delay provides the kind of echo effects you’d expect, but also includes optional filtering, the ability to create delays in the audio range, and the option to “tune” delays.
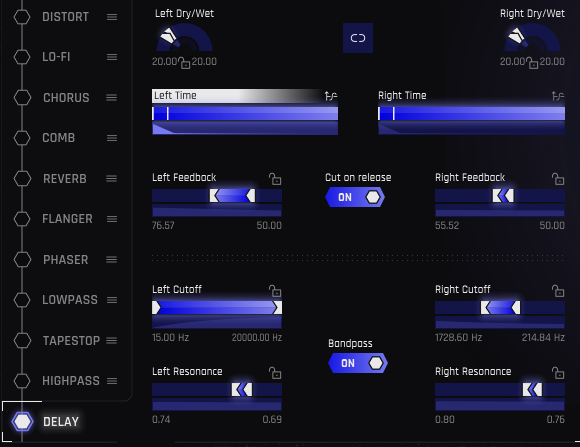
The controls have the same functionality for both the left and right channels, so we need to describe only one set of parameters.
- Link Button: When enabled, the two channels are linked together so that they both have the same delay settings. Otherwise, the left and right channels can have independent settings.
- Dry/Wet: Sets the blend of unprocessed and delayed sounds.
- (Delay) Time: Although you can set any delay time you want, note that you can choose delays with specific rhythmic values in the TVM window. Note that delays can even go into the audio range, which creates tuned delays and other effects that meld pitch and time. For more information on how audio frequencies relate to delay time, see Snapping to Rhythms in the section on Snapping in the TVM Magnifier Window.
- Feedback: This control recirculates the echoes so that after one appears at the output it returns to the input and is echoed again. Higher values create a series of echos that fade out over time; the more feedback, the more echoes, and the longer it takes for them to fade out.
- Cut on Release: The echoes normally extend until they fade out. Enabling Cut on Release mutes the echoes upon stopping the note that triggered the Gesture, so that a long trail of echoes due to higher Feedback settings won’t spill over into the next Gesture you select.
- Bandpass: Enable this to access the Filter section, with the two parameters listed next. These bandpass filters affect the delayed sound, but are not in the feedback path (i.e., the filtering changes don’t become more pronounced with subsequent echoes).
- Cutoff: Sets the bandpass filter frequency, from 15 Hz to 20 kHz.
- Resonance: Increases the gain, and narrows the bandwidth, at the cutoff frequency.