
Stutter Edit 2 Help Documentation
Introduction
Welcome to the deep, inspiring, serendipitous wormhole of fun and sound design that is: Stutter Edit 2.

A note from BT
I’m BT, and the idea of stutter editing - both the technique, and the plugin - has been a labor of love I have sculpted and developed since I was a kid. At the age of fourteen, I found myself holed-up on the floor of a local recording studio, cutting up quarter-inch tape with a metal block, razor blade and a grease pencil. I spent a long, hot summer there as a tape op and intern. I had a burning desire to learn, modify, and create, using anything and everything I could get my hands on.
One day I asked myself: “What if you cut tape on the beat, made a bunch of blocks of audio, and changed the order of them before taping them back together?” The first time I tried it, cutting up electronic music - especially vocals! - and rearranging it - I was quite literally captivated. It was a sound I’d never heard before. An actual revelation.
My obsession with audio editing began right there, sitting on that studio floor surrounded by tiny scraps of 1/4” tape. It’s a moment that has motivated me for years, as I pursued the dream of creating a tool that would allow such tedious editing to be done in a creative, intuitive way.
After years of experimentation, producing records and film scores using crazy-complex buffer cutting and post-DSP processing techniques, largely by hand - I finally created a plugin that could help anyone perform this kind of editing without spending hours on the cutting room floor. The kind folks at iZotope adopted it as part of their family, and it became the original Stutter Edit.
I’ve learned a tremendous amount along the way and have been excited to see Stutter Edit used in remarkable ways I never would have imagined. The fruits of my obsessive passion pursuing the nether regions of rhythm - and the journey that it inspired - can now be found in Stutter Edit 2.
Stutter Edit 2 is unique, in that it offers world-class effects and complex rhythmic parameter sequencing in a form that is playable by anyone. Within this novel paradigm of a “playable effect”, it is controlled with the simplicity and interactivity of a monosynth. Its predecessor has already found its way into the studios of some of the greatest sound designers and artists, and the effect can be heard all over blockbuster films, hit songs, commercials and trailers.
Stutter Edit is designed to work on any kind of audio material, from vocals to beats, pads, guitars - even your master bus. It can create breath-taking ear candy, impart productions with a professional, modern sheen, and it can create stunning transitions that transform the dreaded 8 bar “demo loop” into a finished record.
It’s my great hope it will bring joy and spontaneity to your workflow, elevate your productions to the next level, and inspire you for years to come.
Happy composing!
_BT
Getting Started
Table of Contents
Overview
Stutter Edit 2 is a unique audio processing plug-in that excels for EDM, cinematic sound design, hip-hop, audio-for-video productions, and more. It imparts dynamic, rhythmic effects unlike anything else—and perhaps most importantly, has virtually unlimited creative possibilities. Think of Stutter Edit 2 not just as an effect you insert in a track or bus, but an effect you can play creatively, in — on stage or in the studio - to trigger effects that morph, change, and add motion to your audio.
Quick start
Stutter Edit 2 can give satisfying results almost immediately, yet is deep enough you can take its creative potential further for years to come. For now, let’s get a basic idea of what it can do.
- Insert Stutter Edit 2 on an audio track or bus, as you would any other audio plug-in. Please refer to the DAW Setup section for specific instructions on setting up Stutter Edit 2 in your supported DAW.
- Next, route a MIDI or Instrument track in your DAW to the Stutter Edit plug-in, or make sure Stutter Edit 2
can receive MIDI from your MIDI controller (some DAWs, including Ableton Live, allow using your computer
keyboard to trigger MIDI notes). Audio must be going through the Stutter Edit 2 plug-in and it must be
triggered by a MIDI note before you can hear it add an effect.
Play Mode
If you don’t have a MIDI controller, click on the Play Mode button toward the top of the interface, and choose Auto mode. In this mode, Stutter Edit 2 will automatically activate a Gesture, as selected in Step 5, when the DAW playback starts.
- Start playback at your DAW application’s transport, so that audio goes through the track or bus containing the Stutter Edit 2 plug-in.
- Play notes on your controller, or start painting notes into your MIDI track, to trigger effects in the currently loaded Bank.
- Explore Stutter Edit 2’s available Banks by clicking on the Gesture Bank drop-down menu at the top of Stutter Edit 2’s interface, and clicking on the keyboard graphic to select different Gestures within the Bank.
That should be enough to pique your interest, but it’s just the beginning. You can use Stutter Edit 2 on a basic level by calling up and managing presets, or get deep into editing, and creating your own Gestures.
About Gestures
Stutter Edit 2’s Gestures combine audio processing parameters with complex rhythms. You assign individual Gestures to a note on a MIDI controller (keyboard, drum pad, MIDI guitar, LinnStrument, or anything else that generates MIDI notes). Each note can trigger its own Gesture, so simply by triggering notes, you can choose the right Gesture effects at the right time to process a track the way you’d like.
As you experiment with Gestures, you’ll find they can:
- Add variations to repetitive loops or sections of a song
- Create musical filter sweeps over a set number of beats or measures
- Create delay effects that repeat over your track when you release a gesture
- Add build-ups and transitions with various types of sweeps
- “Stutter” your audio, like rhythmic gating that can affect not just amplitude, but any effect parameter
- Grunge-up your audio subtly or drastically with lo-fi effects
- Provide a suite of innovative effects that don’t necessarily have to sync to tempo
And much more, as you’ll find out when you experiment with triggering various Gestures. Being able to play Gestures on stage or in the studio, in real-time from a MIDI controller, is what makes Stutter Edit 2 such a musical and playable effect. A single press of a key, or strike of a drum pad, can trigger a simple effect—such as replaying a chunk of audio at a certain rhythmic value, like an 1/8 note. Or, a Gesture can trigger a run of incredibly complex stutters that get decimated by a bit crusher before being filtered and then released into a wash of echoes.
The most important point to remember is that Gestures condense all of these complex effects, and their timelines (i.e. the order in which effects occur or change), into a single process. The simplest way to find appropriate effects for your music is by loading one of the included Bank presets, and then playing/triggering different Gestures. This will help you understand how Stutter Edit 2 processes your audio.
Note
Note that Stutter Edit 2 “listens” to the DAW for its tempo, and syncs its effects to tempo (Stutter Edit 2 can also follow tempo variations). When Stutter Edit 2 is locked to tempo, it’s almost impossible to create effects that sound “wrong.” As a result, you’ll get optimum results when your DAW is at the same tempo as the music being played back.
Even though Stutter Edit 2 allows you to play it in real-time and improvise with effects, don’t forget that you can record the keypresses as MIDI data to preserve your creative adventures, and edit them afterward as well.
Bank Basics
A Bank is a collection of Gestures assigned to MIDI notes. Stutter Edit 2 comes with several Banks. As soon as you’ve inserted the plug-in, assigned a MIDI controller to trigger it (see the Quick Start for information on specific programs), and called up a Bank, you’re ready to go. Because Stutter Edit 2 produces complex effects you can play, in real-time, you can pretty much postpone reading this manual and start getting creative.
However, that’s kind of like buying a Porsche and using it only to drive to the store to pick up groceries. Sure, a Porsche will do that (which is great when you need groceries). But it’s a lot more fun to take it out on the open road, rev up the RPMs, and find out what that baby can do. You can take Stutter Edit 2 as far as you want - and that’s pretty far, as you’ll find out.
Time-Variant Modifier Curve Basics
Stutter Edit 2’s sophisticated Time-Variant Modifiers (TVM) technology brings new levels of expressiveness and flexibility to signal processors. A basic TVM acts somewhat like a retriggerable envelope with multiple nodes and curves that can sync to tempo and control its designated parameter. This allows you to create modulation shapes that go way beyond what traditional LFOs or Envelopes can do.
You can set maximum and minimum TVM values, and the TVM syncs to tempo using the Gesture Length. For example, with delay, maybe you want to modulate feedback within a restricted range to avoid too little or too much feedback over two bars. Or, maybe you want a filter to cover a specific frequency range where it sweeps from the highest frequency to the lowest frequency over a dotted quarter-note.
Those examples give a taste of what TVM can do. There’s much more information on how to fine-tune and customize TVM settings in the TVM Curve Editor.*
Navigating the user interface
Stutter Edit 2 has a single-window interface, so you don’t have to mess up your workspace by opening/closing multiple windows. If you’re intimidated by the plug-in’s initial appearance, don’t be! Stutter Edit 2 comes with a comprehensive selection of presets crafted by BT and iZotope’s veteran programmers, so you can find musically useful, sophisticated, and unique effects quickly, and not have to do any editing at all. But of course, editing gestures in new and interesting ways is what makes Stutter Edit 2 really shine.

- Gesture Control Panel: This provides the controls for a Gesture’s rhythmic elements.
- Global Buffer Effects: Use this to select presets and choose global effects that apply to all Gestures until changed. The upper strip controls various system parameters.
- Signal Chain: Enable and bypass audio effects, change the order of effects, and select individual effects for editing.
- Effect Panel: When you select an audio effect for editing in the signal chain column, this section shows all the effect’s parameters. The number of parameters varies, depending on the effect.
- Output Panel: This section consists of an output limiter and output level controls. The limiter is a helpful feature because if you get carried away and create audio processing with excessive level variations, the limiter can help keep them under control.
- TVM Curve Editor: The various control panels are ideal for quick parameter adjustments, but with the TVM Graphic Editor, it’s possible to create complex, deep modulation shapes. To expand the curve editor to fill the entire effects section, click on the small square in the upper left of the TVM Curve Editor.
Expanded TVM Curve Editor
The expanded TVM curve view allows for precise, detailed parameter curve editing. Click on the arrow in the upper left corner to return to the standard interface view. This makes it easy to create very detailed TVM curves. You can choose a snap value for placing notes, as well as Save, Load, Reset, and Reverse curves (along with other features). You can also magnify the Output section, as described next.

If you adjust either the Wet or Dry Level control, the Threshold level, or the Output Gain, the TVM window shows the selected parameter. To expand the Limiter’s Curve Editor to fill the entire effects section, click on the small square in the upper left of the TVM Curve Editor window.
When the Curve Editor shows the Limiter, clicking on any parameter in the TVM Controls Panel switches automatically to showing the selected parameter. Similarly, when the Curve Editor shows a TVM Controls Panel parameter, click on any Limiter parameter to show that parameter in the Curve Editor.
DAW Setup
Table of Contents
Auto Play Mode
Allows you to use Stutter Edit 2 as an audio effect by triggering the currently selected gesture when playback is started in your DAW. Simply insert Stutter Edit 2 on an audio track in your DAW, enable Auto Play Mode, and start the transport to trigger the selected gesture.
Tip: Use Auto mode to edit gestures
The interface can update frequently when working in MIDI mode, making it tough to edit settings for a particular gesture without stopping transport. Try switching to Auto mode to edit your gestures and switch back to MIDI mode to perform them.
MIDI Play Mode
In MIDI Mode, you can trigger Stutter Edit 2 Gestures using MIDI. Setting up Stutter Edit 2 as a MIDI controlled effect can be different depending on the DAW you are using. We’ve included some instructions below for setting up MIDI Play Mode in a few different DAWs.
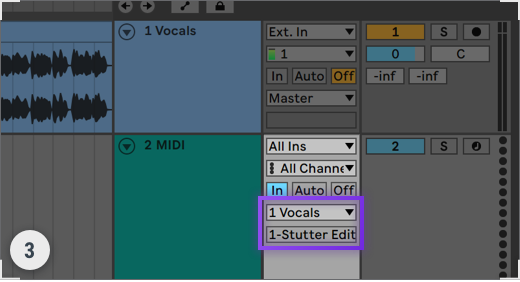
Ableton Live
- Create an Audio Track and insert Stutter Edit 2.

- Create a MIDI Track and change Monitoring to “In”.
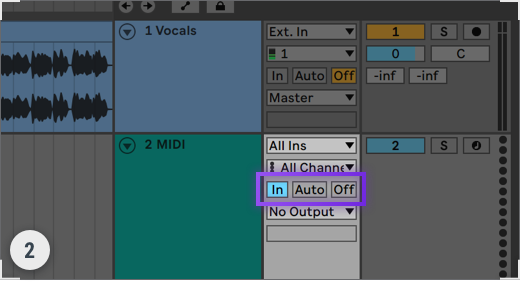
- From the MIDI Track’s ‘MIDI To’ dropdown, choose the Audio Track from Step 1. In the dropdown below it,
ensure Stutter Edit 2 is selected.
Apple Logic Pro
- Go to: Logic Pro X / Preferences / Advanced Tools. Select ‘Show Advanced Tools’ and ‘Enable All’.

- Create an audio track and mute it.

- Create a Software Instrument track and select Stutter Edit 2 from the Instrument menu.

- Select the audio track from the ‘Side Chain’ menu in the Stutter Edit 2 plug-in window.

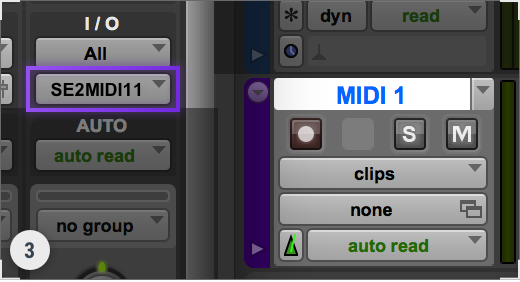
Avid Pro Tools
- Create an Audio Track and a MIDI Track.

- Insert Stutter Edit 2 onto the Audio Track.

- In the Output dropdown of the MIDI Track, select any MIDI channel you want for Stutter Edit 2.
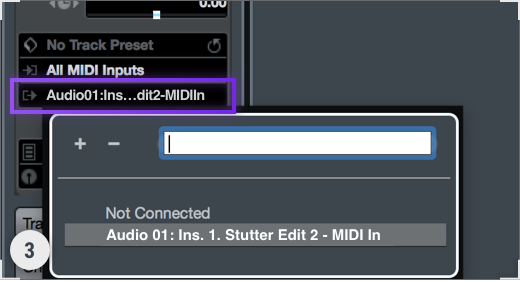
Cockos REAPER
- Create an Audio Track and insert Stutter Edit 2.

- Click ‘Input 1’ to open the dropdown and choose your MIDI device.

- Click the speaker to turn on ‘Record Monitoring’ and record-enable your track.

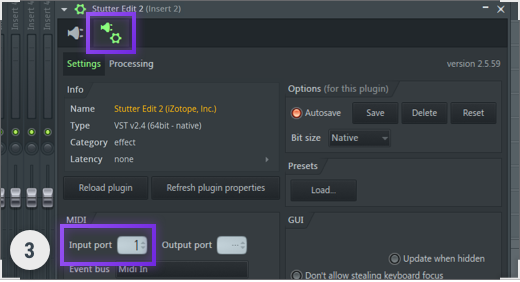
Image-Line Fl Studio
- Create an audio track and add Stutter Edit 2 as an insert on the track.

- Go to Options/MIDI Settings. Under ‘Input’ select your MIDI device and the desired Port, click ‘Enable.’

- In Stutter Edit 2, click the gear icon to open plug-in settings, and ensure the MIDI Input Port matches
your device port.
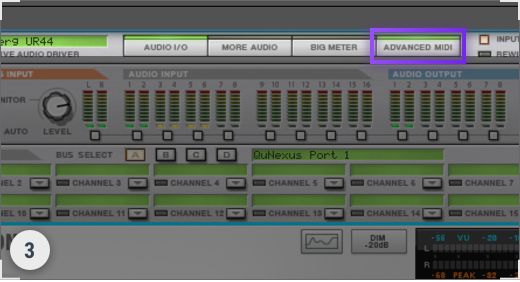
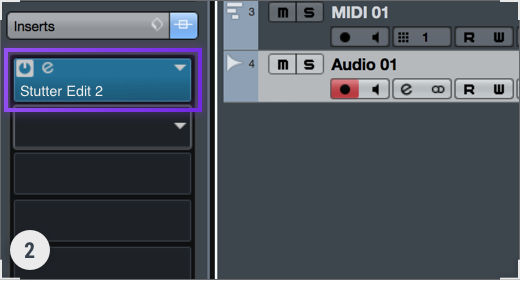
Presonus Studio One
- Create an audio track and insert Stutter Edit 2 on the track.

- Create an Instrument track and select ‘Stutter Edit 2’ in the ‘Instrument Output’ menu.

- If you are using a live MIDI device, set the input of the instrument track to your MIDI device.
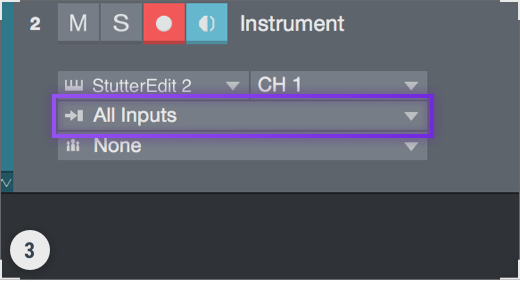
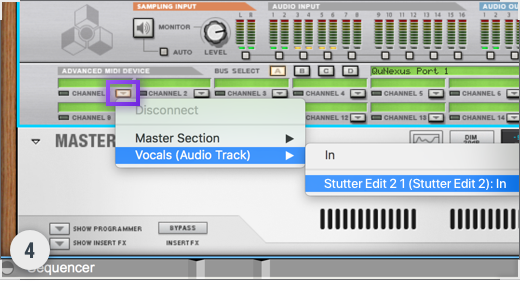
Propellerheads Reason
- Create an Audio Track and insert Stutter Edit 2.
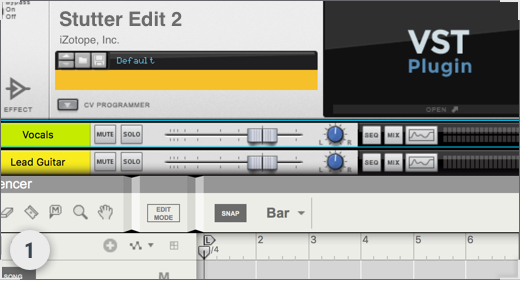
- Open Preferences/Sync. Under ‘External Control: Bus A,’ choose your MIDI Device.
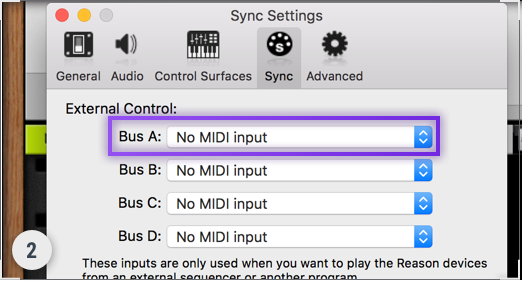
- Open Adv. MIDI Panel from the ‘Hardware Interface’ at the top of the rack.
- In any channel, click the triangle dropdown, choose your Audio Track and then the Stutter Edit 2 plug-in.
Steinberg Cubase
- Create an audio track and a MIDI track.
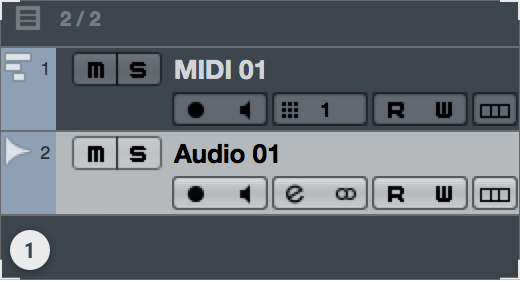
- Insert Stutter Edit 2 on the audio track.
- In the MIDI track output menu, select the Stutter Edit 2 insert on the audio track.
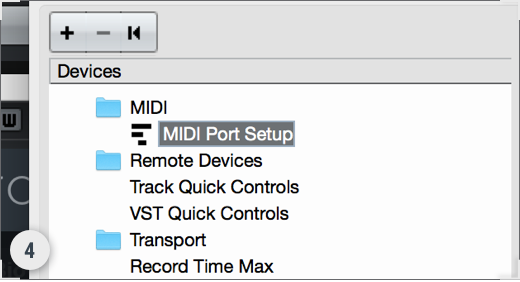
- If you are using a live MIDI device, ensure it is configured in the Studio Setup / MIDI Port Setup window.
Global Controls
Table of Contents
Overview
The chapter contains edits that are global—not in the sense that they affect all Gestures, but that they affect everything that’s going on within individual Gestures. These settings let you set up the way each individual gesture behaves, and how it responds when played. Also, the strip at the top contains various system-related controls; we’ll cover those first.
General Controls
This strip contains functions that pertain to all of Stutter Edit 2.

Play Mode
Choose between Auto or MIDI Mode to trigger Stutter Edit 2 Gestures.
- Auto mode: Stutter Edit 2 activates the selected Gesture automatically when DAW playback starts.
- MIDI mode: Trigger Stutter Edit 2 gestures using MIDI notes from a MIDI controller.
Play Mode Setup Info
Learn more about setting up MIDI Play Mode in the DAW Setup chapter.
Undo and Redo
Undo (counter-clockwise arrow) and redo (clockwise arrow) perform the standard undo and redo functions. Note that these are not duplicated by standard keyboard shortcuts (e.g., Ctrl+Z) so to undo or redo Stutter Edit 2 edits, you need to use these controls. The undo history doesn’t persist when you close the DAW, but while you’re editing Stutter Edit 2, the undo stack extends back to (fun fact) 30,000 actions.
Options
This window is about Global Filter MIDI assignment, and general housekeeping.

The MIDI options on the left allow assigning any MIDI controller, aftertouch, or pitch bend to the Global filter. If you don’t know what controller a piece of hardware generates, click Learn and move the controller to make the assignment. Pitch Bend is always the default upon opening Stutter Edit 2, or adding another instance of Stutter Edit 2 to a project. Custom assignments are not stored with a project.
The Updates, Authorization & Analytics section has three parts.
- Click “Check for Updates” to make sure you have the latest and greatest Stutter Edit 2 version installed.
- Authorization shows that the software is authorized. To install Stutter Edit 2 on a different computer, remove the authorization and then reauthorize on the other computer.
- Enable or disable sharing usage information with iZotope.
Global Filter
A combination control that adjusts the cutoff frequency of a resonant highpass/lowpass filter. This can be adjusted using Pitch Bend on a MIDI controller by default, or mapped to a different MIDI control in the Options menu.
Global Gesture Settings
The global Gesture settings section has four drop-down menus. This shows the one for the Grid parameter.

Length
This drop-down menu sets the current Gesture’s duration, which determines the base rate for how quickly a sweep traverses the ranges you set for a parameter. For example, you might want a filter to vary in a particular way that repeats every 1/4 note, every measure, every 2 measures, etc. Each Gesture can cover different time ranges, from as small as a 16th note triplet, to as long as 2 measures (8 beats). There are 13 possible lengths, including dotted and triplet values. However, you can offset this rate so that individual parameters can sweep at different rates, while still being related to the Gesture Length.
Release
A Gesture can end in several different ways, which allows tailoring Stutter Edit 2 to your own playing style. The drop-down menu offers five modes.
- On Grid: After a MIDI note ends, the Gesture itself waits until the next Grid point (1/8, 1/16 etc.) before ending.
- Full Gesture: The entire Gesture will play through from start to finish, even if you only tap the note.
- Latch: The gesture will play and hold until you trigger it again (or trigger another gesture).
- Instant: The gesture will end instantly when the MIDI note triggering it ends.
- Stick: Similar to Latch mode, but the effect will “stick” at the end of the gesture’s timeline.
Grid
This is like the “Input Quantize” feature found in some drum machines and DAWs. Turning on Grid snaps your trigger to one of nine possible rhythmic values (see the above image). For example, if Grid is 1/8, the Gesture will always start exactly on the next eighth note.
Note
This also allows triggering in advance of when you want a Gesture to occur, and it will still start at the desired time.
Palindrome
Palindrome looping affects how gestures repeat (or loop) when they are held and not released.
- On: The Gesture will reverse direction when it reaches the Gesture Length’s end. This creates an up and down or back and forth sweeping effect.
- Off: The Gesture starts over when it reaches the Gesture Length’s end.
Freeze
This function captures part of the audio buffer (determined by the Duration parameter) and repeats it indefinitely.
Duration
This drop-down menu offers nine rhythmic values that specify the length of buffer audio that’s captured for the Freeze function. For example, with duration is set to 1/2 note, the first half-note of buffered audio will be captured and repeated for as long as Freeze is enabled.
Presets
Table of Contents
Overview
Stutter Edit 2 includes a comprehensive assortment of Gestures. Many users will find these cover most (and maybe all) of their needs, so it’s important to know how to manage Banks and Gestures in Stutter Edit 2. This makes it easy to choose the Gestures you want, and customize their key assignments to your specific needs.
The Browser in Stutter Edit 2 is where you load, save, and manage presets. The Browser is also where you assign Gestures to keys—remember, Stutter Edit 2 is all about creating effects you can play from a MIDI controller.
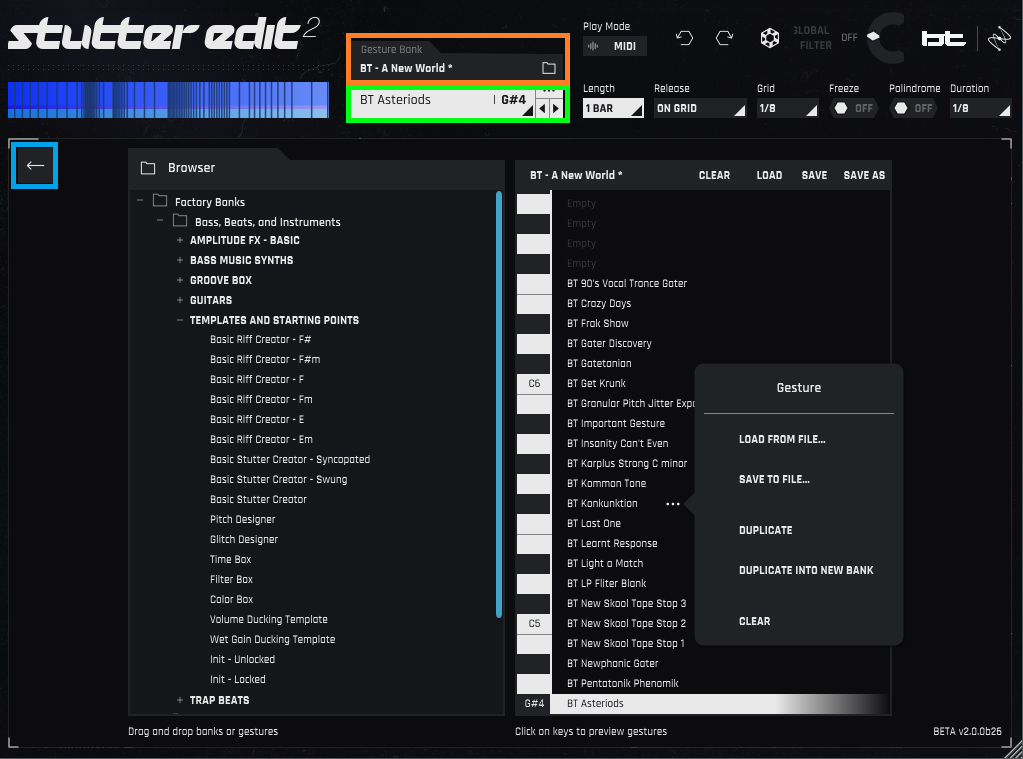
Open the Browser by clicking the Gesture Bank section (outlined in orange). To return to the main screen, click on the left arrow (outlined in blue).
The Browser has two main sections. The one on the left is for browsing Banks and the Gestures within them. The one on the right is where you assign Gestures to MIDI notes in the selected Bank, like what’s generated from a MIDI keyboard. The area outlined in green, described later in Gesture Overview, provides an overview of the available Gesture in a Bank.
Gesture Bank Manager Navigation
Banks and presets follow a familiar browsing hierarchy, with folders, sub-folders, and files within the sub-folders.
Factory Banks and User Banks folders are at the top of the hierarchy. Although you can’t overwrite anything in a Factory Bank, you can edit Factory Bank Gestures, and save them into User Banks. To create new User sub-folders, choose Save into New Folder for a Gesture as you save it.
The sub-folders in the Factory and User Banks are the next level down in the hierarchy. These sub-folders typically contain Banks that are thematically related, such as Gestures for a specific song, cinematic mood, various instruments (from guitars to groove boxes), and so on. Because you can also create complex modulation curves, there are Curves folders for saving your favorite Curves.
In the image above, Bass, Beats, and Instruments is a sub-folder that contains several Banks: Amplitude FX – Basic, Bass Music Synths, Groove Box, Guitars, etc. The Templates and Starting Points Bank has been opened (click on the + symbol next to a Folder or Bank to open it), and you can see the various Gestures stored in the Bank.
Assigning Gestures to MIDI notes
In the screenshot above, the right side shows the Gesture assignments for the bank BT_BEST OF. To assign a Gesture to a key, you have two options.
- Drag from the Browser to the immediate right of the desired key assignment (not onto the key itself).
- Hover over the space to the right of a key, click on the three dots, and choose Load from a file.
Gesture Management
- Change the Gesture’s key assignment. Click on the Gesture name, and drag it to the desired key. The Gesture’s origin key will now be empty, so you can drag in a new Gesture if desired.
- Load a Gesture. Hover over the space to the right of a key, click on the three dots, and choose Load from File.
- Save a Gesture. Hover over the space to the right of a key, click on the three dots, and choose Save to File.
- Remove a Gesture Hover over the space to the right of a key, click on the three dots, and choose Clear.
You can also remove a Gesture from the Gesture overview window outlined in green in the above image. Click
on the three dots in the upper right of this window, and choose Clear Gesture. Duplicate a Gesture.
Hover over the space to the right of a key, click on the three dots, and choose Duplicate.
- The Gesture will be duplicated in the first unassigned (empty) key higher in pitch than the Gesture being duplicated. If there are no unassigned keys higher in pitch, then the Gesture will be duplicated in the first unassigned key lower in pitch than the Gesture being duplicated.
- If there are no unassigned keys, the Gesture will not be duplicated. Instead, save the Gesture, hover over the space to the right of a key with a Gesture you no longer need, click on the three dots, and load the Gesture you just saved.
- You can also duplicate a Gesture from the Gesture overview window outlined in green. Click on the three dots in the upper right of this window, and choose Duplicate Gesture.
- Duplicate into New Bank. Choosing this duplicates the Gesture into a new Bank, and is the preferred way to create new Banks.
Gesture List
The Browser shows a limited number of keyboard keys. To see more details on Gesture keyboard assignments, click on the Gesture overview section outlined in green in the previous image. This opens up a list of all Gestures used on all keys, as well as the note names for the key assignments.

Use the mouse wheel to scroll up and down the Gesture Overview list.
Click on any Gesture in the list, and the right side of the Browser will show the Gesture as selected. You can also select a Gesture by clicking on a key in the keyboard graphic.
- If the Gesture you’ve selected in the overview isn’t visible on the keyboard because it’s higher than the highest displayed pitch, the view of the Gestures next to the keyboard will shift, and the Gesture will appear at the keyboard graphic’s top.
- If the Gesture you’ve selected in the overview isn’t visible on the keyboard because it’s lower than the lowest displayed pitch, the view of the Gestures next to the keyboard will shift, and the Gesture will appear at the keyboard graphic’s bottom.
Note that you can also click on the left/right arrows to step up and down through the Gestures, one at a time, independently of the Gesture overview.
Bank Management

On the right side of the Browser, the top strip above the keys (outlined in yellow) shows the Bank name, as well as options to Clear, Load, Save, or Save As the current Bank. Click on the desired option, and navigate as appropriate to Load, Save, or Save As.
Note
Save is disabled when a factory level bank is loaded and edited. However, you can Save As into a User Bank.
Stutter and Buffer
Table of Contents
Overview
The Stutter and Buffer modules include the controls that are at the heart of the stuttering effect, as they affect the buffered, sampled audio. How Stutter Edit 2 steps through the buffer and alters stuttering and buffering parameters is what gives Stutter Edit 2—in conjunction with the TVM Curves—its unique effects that blur the lines between melody, rhythm, and sound.
Stutter module

The Stutter module controls the note values Stutter Edit 2 uses when playing through a gesture’s timeline.
Stutter Rate
With the Quantize module off, Stutter Edit 2 moves smoothly from the lowest to highest note values set by the Rate parameters. For example, if you choose 1/8 for the bottom of the range, and 1/128 for the top of the range, the Stutter’s length will slide between those two note values.
Quantize
Enable Quantize to make the plug-in “lock” onto different rhythmic values as Stutter Edit 2 moves through the Rate control timeline, in accordance with the parameters below.
Step
This determines how long Stutter Edit 2 stays on each of the Rate note values while moving through the timeline.
Mode
After selecting note intervals in the Rate parameter, Mode affects how the selected notes are played, and the order in which they’re played. Choose one of the following from the drop-down menu.
- Free: ignores notes values and instead holds whatever stutter length is closest to the progress of the curve (this can produce effects that are more jarring and atonal).
- Closest: steps only among the values in the Rate parameter.
- Walk: moves through the Rate parameter note values by moving up one note with each new step.
- Skip: moves through Rate parameter note values in a pattern: up two notes, then down one note (or down two notes, up one note, depending on the curve direction in the TVM).
- Stagger: moves through Rate parameter note values in a pattern: up one note, then up one more note on the next step, then down a note (or the reverse, depending on the curve direction in the TVM).
- Random: moves randomly through the Rate parameter values.
Gate
When enabled, as the stuttered audio repeats during a gesture, Gate changes the envelope of the audio that’s being sampled for the gating and chopping effects that can evolve over the course of the gesture.
Width
At 1.00, the audio played back equals the Stutter Length. The lower the number, the faster the repeating audio will be gated (cut off).
Tail
Sets the “release” portion of the gate effect. Lower values produce a choppier effect, higher values extend the Gate’s effect.
Buffer Module
Stutter Edit 2 samples audio, and applies the stutter effects and effects to this audio. A Buffer stores the audio samples, so the Buffer Section controls alter how audio plays from the buffer.

The L and R displays in the Buffer Controls section are graphic representations of the buffer.
Buffer Position
This is the first display to the right of the Buffer enable button. The buffered audio’s left and right channels can be edited independently, or linked together by clicking on the Link button located between the L and R labels.
When observing these displays in the TVM, the left and right nodes determine where playback from the buffer begins or ends. If the left node is lower than the right node, then playback begins at the point selected by the left node (e.g., if it’s all the way to the bottom left, then playback starts at the buffer beginning), and proceeds toward the end of the sampled audio. If the left node is higher than the right node, then playback begins at the end of the buffered audio and proceeds toward the beginning of the sampled audio. Moving the nodes left or right changes where the playback begins or ends.
However, you can also add nodes, and bend straight lines between nodes into curves, to program how Stutter Edit 2 plays through the selected Buffer section. For example, playback could speed up or slow down in different parts of the buffer. Furthermore, the nodes can snap to particular rhythmic values in the buffer, according to the Grid size (described next).
Buffer Reverse Buttons
These buttons are to the immediate right of the Buffer position display. When enabled, they instantly reverse the playback direction through the buffer.
Movement
After selecting a Grid range (see next), this control determines how Stutter Edit 2 chooses the Buffer Position from the Grid Range.
- Slider: Slides smoothly between the range handles.
- Grid: The Buffer Position locks to the last grid point the timeline passes.
- Random: The Buffer Position can come from anywhere between the range handles.
Grid
This slices the buffer into pieces based on rhythmic values (1/16 notes, 1/4 notes, etc.) with which the other Buffer Position controls (including TVM nodes) interact.
Jitter
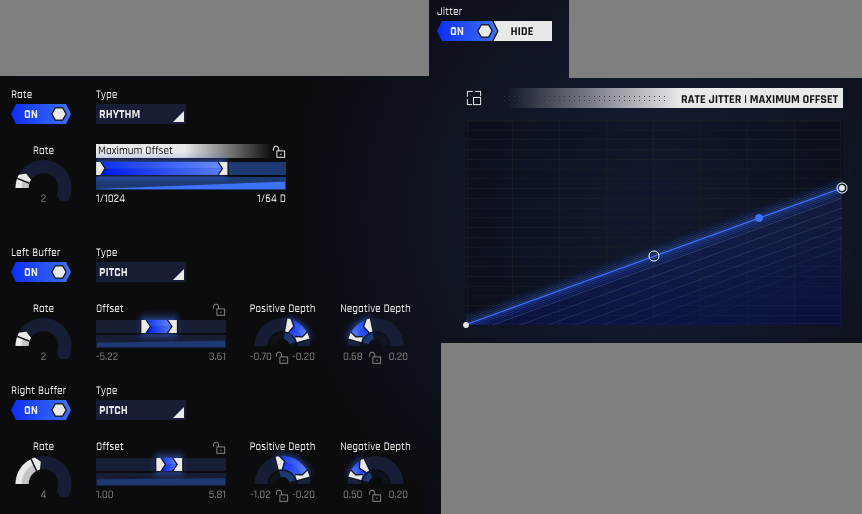
Enabling Jitter adds an adjustable amount of offset to the Buffers, and opens the parameters for editing. Jitter can affect either the pitch of the sampled audio within the buffer or the buffer’s rhythmic value.
The master section toward the top includes the following controls and affects both buffers. Note that the Left Buffer and Right Buffer controls have the same functionality as the master section, except their settings affect only the Left and Right Buffers, respectively.
Rate (switch)
The Rate switch enables the Stutter Rate offset functions. Enable to edit the master Jitter rate.
Rate (control)
The Rate control sets the jitter rate, from 1 to 9. This control is inherently locked. It cannot be split or be displayed in the TVM
Type
Choose between adding jitter to the buffers’ pitch or rhythm. This also varies what’s shown in the TVM. When the Type is Pitch, the TVM calibration ranges from -24 semitones (two octaves lower) to +24 semitones (two octaves higher). For Rhythm, the calibration shows rhythms related to note values and pitches.
Offset (or Maximum Offset with Rhythm selected as the type): This slider chooses the maximum amount of offset being applied to both buffers for the master section, or individual buffers with the lower controls. When edited in the TVM, this can vary over time.
Left/Right Buffer (switch): These switches enable the Left Buffer and Right Buffer offset functions, respectively.
Positive Depth and Negative Depth: These controls appear only when the Type is Pitch. The initial Offset for Jitter will be 0 (i.e., the pitch is neither sharp nor flat compared to normal). These controls determine whether the offset will “bend” the pitch sharp or flat. Note that if the positive and negative depth values are equal and opposite at a particular time, they cancel out and the pitch has no offset.
Pan
As the stuttered audio repeats during a Gesture, enabling Pan spreads each alternating repeat left and right.
Pan Width
Controls the repeating stutters’ distance from the center position.
Pan Center
Sets the overall pan effect offset within the stereo field, from more left to more right.
Effects
Table of Contents
Overview
Stutter Edit 2 includes 11 different signal processors. Although many of these have familiar names, they go far beyond what conventional effects can do. This isn’t just because many of them offer unique parameters, but because of unique Time-Variant Modifiers in Stutter Edit 2.
Stutter Edit 2 takes effects to an entirely new and creative level because you can modulate every parameter of every effect‚and modulate them rhythmically. This offers options for motion and dynamics in all the effects and blurs the boundary between being signal processors and instruments.
The Effects Section interface has three major elements. The user interface image at the beginning of the manual showed these, but let’s explore them in more detail. We’ll start with the Signal Chain, and the available effects.
Signal Chain
This column on the left shows all available signal processors. You can enable as many effects as your computer, or your sanity, can handle.
- To enable an effect, click the hexagon to the left of the effect name. When selected, it lights white.
- To select an effect for editing, click on its name. The associated parameters show up in the other related interface sections, while a partial outline around the hexagon confirms the currently selected effect.
- To change an effect’s order in the chain, click on the bars to the right of the effect’s name, then drag and drop the effect into place.
As we cover the various available effects, you’ll note they offer a wide variety of parameters. However, the way Stutter Edit 2 handles these parameters is far from traditional, so before getting into the effects, let’s look at the Time-Variant Modifiers, why they’re important, and why they’re not as daunting as they may look at first.
Basic TVM Control Adjustments
To make it easy to adjust TVM parameters, Stutter Edit 2 incorporates a new, simplified control method. The TVM Controls Panel consolidates an effect’s Slider and Rotary controls within a panel. Most controls have three modes: Locked, Split, and Custom.
Locked Mode
In Locked mode: a single handle varies the parameter value. This is how most traditional effects adjust parameters.
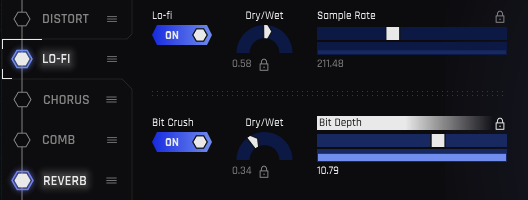
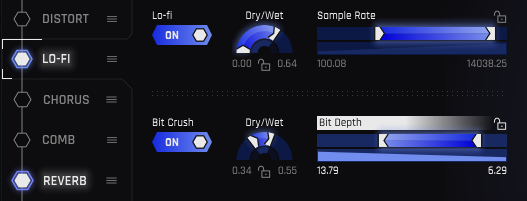
The controls for the Dry/Wet, Sample Rate, and Bit Depth parameters are locked, as shown by the lock symbol. A single handle sets the parameter value.
Split Mode
In Split mode, a control or slider has two independent handles, which set the higher and lower parameter values. What’s more, they have Arrows that indicate direction. This is important because when sweeping a parameter, you can start at a lower value and sweep to a higher value, or start at a higher value and sweep to a lower value.
Sample Rate modulation covers the range between the two handles. The slider arrows point right, which means a sweep will go from the lower to the higher parameter value. The Bit Depth slider arrows point left, so a sweep will go from the higher to the lower parameter value. The rotary controls both sweep from the lower to the higher value.
Custom Mode
Locked and Split modes are the quickest way to adjust parameter values. However, far more sophisticated control options are available in the TVM Graphical Editor. You can customize exactly how sliders will respond, create novel shapes, and more.
When editing in the TVM Graphical Editor, a control or slider represents the customizations you’ve made by changing the lock icon in the upper right into an icon that represents the TVM Graphical Editor and displaying lines at node points you’ve edited.
The lower part of a slider in Custom mode displays a thumbnail of the TVM curve.
If you imagine turning the control on its side, it’s easy to see how the nodes in the TVM Graphical Editor correspond to the lines in the control. Although the lines are more for display, you can still adjust the TVM Graphical Editor’s left-most and right-most nodes using the corresponding lines in the control. However, it makes more sense to do your edits in the TVM Graphical Editor Magnifier window itself, as described later.
Effects
The following sections describe the parameters available in each of the effect panels.
Distort
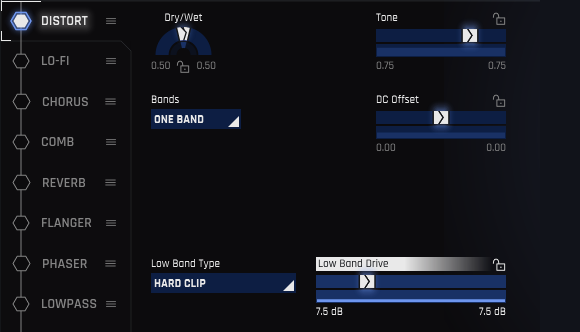
- Dry/Wet: Varies the balance of dry and distorted sound.
- Tone: Lower numbers reduce the level of the high frequencies.
- DC Offset: Audio is like a wave, with a crest (positive-going audio) and a trough (negative-going audio). Distortion flattens the top of the crest and the bottom of the trough. With DC Offset, higher numbers flatten the crest more than the trough. Lower numbers flatten the trough more than the crest. With a setting of 0, flattening is equal for the crest and trough.
- Bands: Traditionally, distortion affects all frequencies equally (One Band). Choosing Two Bands splits the audio into high- and low-frequency bands, with independent distortion for the two bands.
- Low and High Band Type: Choose among 19 different distortion characters—soft, hard, spiky, crunchy, and everywhere in between. With Two Bands selected, an additional Type control appears for the High band.
- Low and High Band Drive: Higher numbers increase the distortion’s intensity by forcing higher levels of audio into the Distort effect. With Two Bands selected, an additional Drive control appears for the High band.
Lo-Fi
Digital audio created the potential for nasty, filthy forms of distortion you can’t get with analog technology.

- Dry/Wet: Varies the balance of dry sound, and the processed sound that has undergone digital destruction.
- Sample Rate: Lowering sample rates (this parameter is calibrated in Hz) into the audio range produces foldover distortion, a type of distortion so unsociable it needed its own name. But really, it’s just misunderstood. Treat it nice, and it will do cool sci-fi sounds for you.
- Bit Depth: Lower bit rate values reduce the audio resolution. It’s the audio equivalent of watching a YouTube video over AT&T DSL compared to seeing it in 3D IMAX. Lower bit rates are also kind of like vintage digital, because in the ‘70s and ‘80s, digital audio didn’t have the refined resolution we enjoy today.
Chorus
The Chorus effect copies the sound at its input, modifies its pitch and timing somewhat to differentiate it from the input sound, then mixes the two sounds together. This creates a thicker, more animated overall sound.

- Dry/Wet: Surely you’ve figured out what this does by now.
- Delay: This sets how much later the copied sound starts compared to the input signal.
- Sweep Rate: The sweep function changes the pitch of the copied signal, in conjunction with the next two parameters. Lower numbers mean a slower rate of change.
- Sweep Width: This sets the extent of the pitch change. More width varies the pitch over a wider range.
- Sweep Waveform: You can choose among six periodic waveforms: sine, triangle, rising (positive-going) sawtooth, falling (negative-going sawtooth, etc.), square, and warbly sine (sine wave with a light vibrato effect imposed on it). A random waveform is also available.
- Feedback: Mixing some of the output back to the input creates feedback. With a value of 0, there’s no feedback and no change to the sound. As the values get more negative, the amount of negative feedback increases, which makes the sound progressively more hollow-sounding. More positive values make the sound progressively sharper, with a more whistling timbre.
- Spacing: The chorus effect generates peaks, and this parameter determines the (very short) delay between the peaks.
- Stereo Spread: Lower values convert the audio to mono, while higher values widen the audio image to exaggerate the stereo effect.
Comb
A comb filter’s sound is somewhat similar to a flanger or phaser, but more nuanced. Unlike a flanger it doesn’t use time delays, so it may be ideal when you want a flanging sound and don’t want the initial delay time a flanger requires.

A comb filter gets its name from creating a frequency response that looks like a comb, as shown in the spectrum analyzer display.
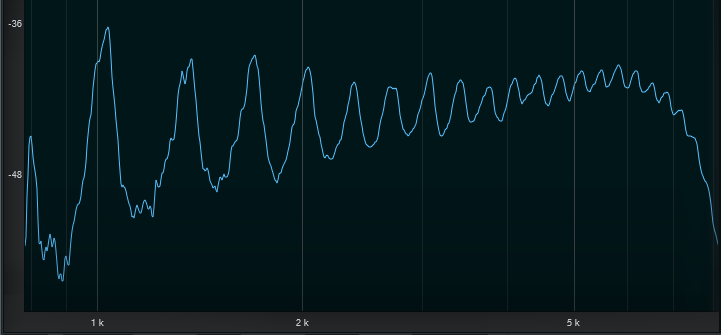
- Frequency: Being a filter, the Comb effect can be set to different frequencies. The frequency becomes more apparent as you increase the amount of feedback.
- Comb Spacing: This offsets the delay between the left and right channel, so it changes the perceived stereo width. If a sound using this will be collapsed to mono, check it in mono to make sure there’s not excessive signal cancellation.
- Feedback: Mixing some of the output back into the input increases the sound’s resonance.
Reverb
Reverb re-creates the sound of acoustic spaces and, traditionally, is a relatively static effect. Stutter Edit 2 re-defines reverb by being able to apply TVM to all reverb parameters.

What makes this reverb amazing is that the room size, shape, reflectivity, pre-delay, and more can vary independently in real time (sort of like a modular synthesizer paradigm). If you’ve seen the movies Inception or Dr. Strange, this reverb is the audio equivalent of the 3D spaces that fold back in on themselves and change dynamically.
- Dry/Wet: Sets the balance of dry to reverberated sound.
- Cut on Release: The reverb tail normally extends for its natural duration. Enabling Cut on Release mutes the reverb upon stopping the note that triggered the Gesture, so that a long reverb tail won’t spill over into the next Gesture you select.
- Size: Changes the cubic volume of the virtual space. Bigger sizes create more reflections.
- Feedback: Mixing the reverb output back to the input imparts a sense of pitch and a more “focused” reverb sound.
- Width: Increasing Width gives the illusion that the sides of the virtual space, as you “face” it, are expanding outward.
- Damping: Increased damping reduces the high-frequency response, and sustain, of the reverb as it decays.
- Pre-Delay: This is not the same as traditional pre-delay. The dry audio passes through the reverb, then you hear the dry audio passing through the reverb again, with the delay between the two based on the pre-delay time. Longer values give longer delays. Feedback also affects this parameter by creating repeats of the reverb sound. Note that both of these intentionally create pitch artifacts so you can pitch bend your reverbs.
- Post-Delay: The dry audio passes through the reverb, then you hear the reverb sound only, with the delay between the initial sound and the delayed reverb based on the post-delay time. Longer values give longer delays.
- Post-Feedback: The Post-Delay creates a single delay of the reverb sound. Post feedback repeats the delayed sound, with higher Post-Feedback values giving more repeats before they ultimately fade out.
- LFO Amount: The low-frequency oscillation, or LFO, modulates the reverb’s character. LFO Amount determines how much variation in the character the LFO creates.
- LFO Waveform: The LFO modulation can be one of six periodic waveforms: sine, triangle, rising (positive-going) sawtooth, falling (negative-going sawtooth, etc.), square, and warbly sine (sine wave with a light vibrato effect imposed on it). A random waveform is also available.
- LFO Rate: This sets the modulation’s speed, with higher values giving more rapidly changing modulation effects.
- Brightness: Increasing brightness reduces the reverb’s low frequencies. This is often helpful when feeding audio with a heavy low-frequency component, such as bass or drums, into reverb. Without trimming the lower frequencies, the sound can seem “muddy.”
Flanger
Flanging reached its peak of popularity in the ‘60s, where it was used to create the “jet airplane” audio effect used by the Beatles, Byrds, Jimi Hendrix, Led Zeppelin, Mandrake Memorial, the Small Faces, and many others.
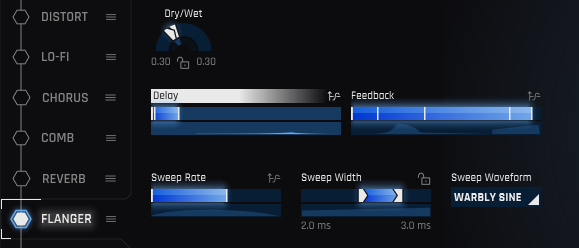
The Flanger effect copies the sound at its input, modifies its pitch and timing somewhat to differentiate it from the input sound, then mixes the two sounds together. This sounds similar to the Chorus, however, the Chorus is designed to provide a more diffused, doubling-kind of effect, while flanging optimizes the pitch and timing variations to produce a more dramatic “whooshing” sound.
- Dry/Wet: The most dramatic flanging effect usually occurs with an equal balance of dry and wet audio. However, with high feedback settings, increasing the Wet amount gives a more resonant sound.
- Delay: This sets how much later the copied sound starts compared to the input signal. Shorter delays accentuate the flanger effect more. Longer delays sound more like a very short echo than flanging.
- Sweep Width: This sets the extent of the delay. More width varies the delay over a wider range; varying from shorter to longer delays produces the traditional flanging effect.
- Sweep Rate: This controls how long it takes for the flanger sweep to vary between the highest and lowest settings. Lower numbers mean a slower rate of change.
- Sweep Waveform: You can choose among six periodic waveforms: sine, triangle, rising (positive-going) sawtooth, falling (negative-going sawtooth, etc.), square, and warbly sine (sine wave with a light vibrato effect imposed on it). A random waveform is also available.
- Feedback: Mixing some of the output back to the input creates feedback. With a value of 0, there’s no feedback, although you’ll still hear a flanging effect. As the values get more negative, the amount of negative feedback increases, which makes the sound progressively more hollow-sounding. More positive values make the sound progressively sharper, with a more resonant timbre.
Phaser
The Phaser effect sounds similar to flanging, but it uses filtering instead of time-based processing.
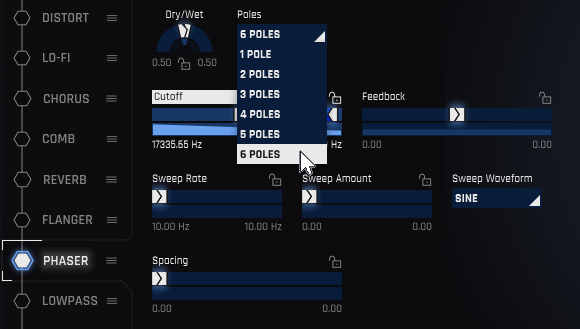
The Phaser copies the sound at its input, alters its phase to differentiate it from the input sound, then mixes the two sounds together to create peaks and notches in the response. Varying the frequencies of these peaks and notches simultaneously can result in a thick, lush modulated effect compared to flanging’s sharper, more focused sound.
- Dry/Wet: The most dramatic phasing effect usually occurs with an equal balance of dry and wet audio.
- Poles: This sets the number of notches with negative feedback, or the number of peaks with positive feedback, using the drop-down menu shown above. The more poles, the less subtle the effect.
- Cutoff: The cutoff frequency sets a base frequency. Sweeping varies the cutoff above and below this base frequency.
- Feedback: Mixing some of the output back to the input creates feedback. With a value of 0, there’s no feedback, although you’ll still hear a phasing effect. More negative values give a “hollower” phasing effect, while more positive values make the sound sharper. The more extreme the value (negative or positive), the greater the apparent resonance.
- Sweep Rate: This controls how long it takes for the flanger sweep to vary between the highest and lowest settings. Options are 1/8 note, 1/32 note, 1/64 note, or for audio rate modulation, C1 or F#1.
- Sweep Amount: Higher values cause a greater variation between the Phaser’s lower and higher cutoff frequencies.
- Sweep Waveform: You can choose among six periodic waveforms: sine, triangle, rising (positive-going) sawtooth, falling (negative-going sawtooth, etc.), square, and warbly sine (sine wave with a light vibrato effect imposed on it). A random waveform is also available.
- Spacing: The pole frequencies are spaced at an equal distance from each other. Spacing determines whether these frequencies are closer together, or further apart. Closer spacing gives a somewhat more intense effect over a narrower part of the frequency spectrum, while further spacing gives a somewhat more subtle effect, but over a wider range of frequencies.
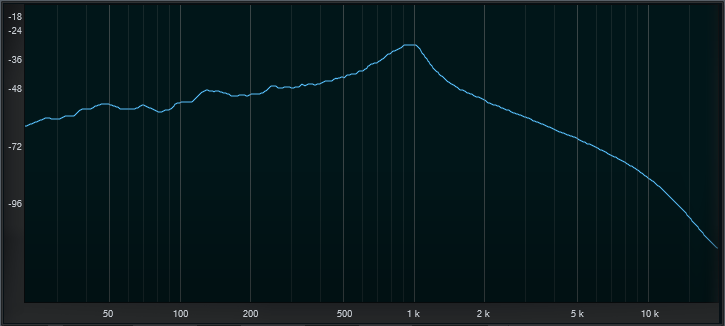
Lowpass
The lowpass filter attenuates frequencies above the cutoff frequency. The higher the frequency is above the cutoff, the more it’s attenuated.

- Dry/Wet: Determines the balance between the dry and lowpass filtered sounds.
- Cutoff: A Lowpass filter passes frequencies below a specified cutoff frequency and reduces the level of frequencies above the cutoff.
- Resonance: Increasing Resonance adds a peak at the cutoff frequency. The following image from a spectrum analyzer shows how Resonance affects the lowpass filter response, which would otherwise just roll off higher frequencies, without any added boost.
Tapestop
The Tapestop effect slows audio down over a certain period of time.
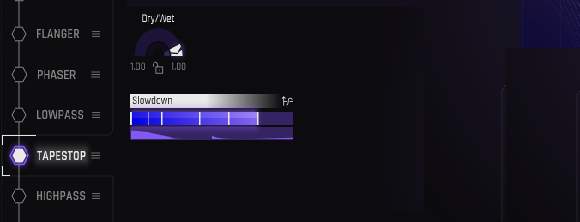
The Tapestop effect sounds like when tape is rolling and you press stop, or when you disconnect a turntable’s motor, and the RPMs go from 33-/1/3 or 45 down to nothing.
- Dry/Wet: Sets the balance between the dry and tapestopped sound.
- Slowdown: Higher values create a steeper downward pitch change until, at the highest value, the audio comes to a complete stop.
Highpass
The highpass filter attenuates frequencies below the cutoff frequency. The higher the frequency is above the cutoff, the more it’s attenuated.

- Dry/Wet: Determines the balance between the dry and highpass filtered sounds.
- Cutoff: A highpass filter passes frequencies above a specified cutoff frequency, and reduces the level of frequencies below the cutoff.
- Resonance: Increasing Resonance adds a peak at the cutoff frequency, similarly to how the Lowpass filter adds a peak at the Cutoff frequency.
Note
Combining the Lowpass and Highpass filter in series can create a bandpass response if the Lowpass frequency is lower than the Highpass frequency. Your trivia for the day: The original Moog modular synthesizers didn’t have filters with a bandpass response, so you had to use both Highpass and Lowpass filters. The following image shows what happens when set this way, with resonance turned up for both filters. The Lowpass and Highpass filters, when placed in series, produce a bandpass response that rolls off both high and low frequencies. In this instance, both filters have added resonance at their cutoff frequencies.
Delay
This stereo delay provides the kind of echo effects you’d expect, but also includes optional filtering, the ability to create delays in the audio range, and the option to “tune” delays.
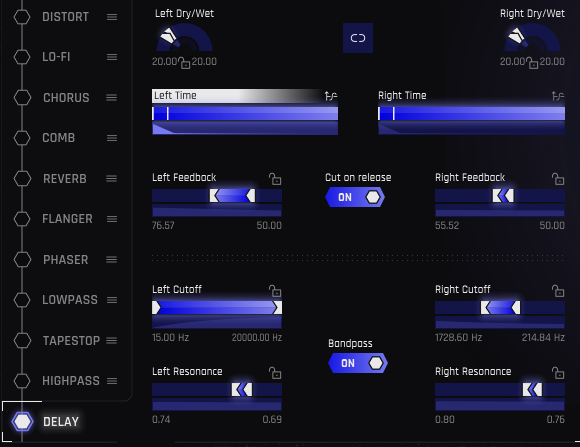
The controls have the same functionality for both the left and right channels, so we need to describe only one set of parameters.
- Link Button: When enabled, the two channels are linked together so that they both have the same delay settings. Otherwise, the left and right channels can have independent settings.
- Dry/Wet: Sets the blend of unprocessed and delayed sounds.
- (Delay) Time: Although you can set any delay time you want, note that you can choose delays with specific rhythmic values in the TVM window. Note that delays can even go into the audio range, which creates tuned delays and other effects that meld pitch and time. For more information on how audio frequencies relate to delay time, see Snapping to Rhythms in the section on Snapping in the TVM Magnifier Window.
- Feedback: This control recirculates the echoes so that after one appears at the output it returns to the input and is echoed again. Higher values create a series of echos that fade out over time; the more feedback, the more echoes, and the longer it takes for them to fade out.
- Cut on Release: The echoes normally extend until they fade out. Enabling Cut on Release mutes the echoes upon stopping the note that triggered the Gesture, so that a long trail of echoes due to higher Feedback settings won’t spill over into the next Gesture you select.
- Bandpass: Enable this to access the Filter section, with the two parameters listed next. These bandpass filters affect the delayed sound, but are not in the feedback path (i.e., the filtering changes don’t become more pronounced with subsequent echoes).
- Cutoff: Sets the bandpass filter frequency, from 15 Hz to 20 kHz.
- Resonance: Increases the gain, and narrows the bandwidth, at the cutoff frequency.
TVM Curve Editor
Table of Contents
Overview
Time-Variant Modifiers Curves are the key to making complex modulations that can be controlled over time, or by pitch. You can see a thumbnail with adjustable parameters on the main screen, but clicking on the icon in the thumbnail’s upper left opens up a window with a magnified view. This offers far more editing and programming possibilities.
Master Curve Controls
In addition to being able to edit TVM curves in the window, there’s also a set of master controls.
 The master control section works in conjunction with the
curve-editing abilities.
The master control section works in conjunction with the
curve-editing abilities.
- Free Value: Turn off to enable snapping to rhythmic, note, or time values on the vertical axis. Turn on to disable snapping. This is not available in some TVM windows.
- Grid Resolution: This chooses the resolution of the background rhythmic grid. Aside from serving as a display, it also allows snapping to particular rhythmic values.
- Show Dry/Wet: For parameters with Dry/Wet controls, turn on to show both parameters simultaneously. Turn off to show only the wet signal parameters.
- Speed: As the time varies over the TVM, you can vary its relationship to the tempo by 0.25 times to 4 times the tempo.
- Save, Load, Reverse, Reset: Save and Load allow saving and loading your own curves. Reverse is convenient when you want two parameters to work oppositely, for example, having the Dry and Wet parameters work in a complementary way. Reset removes all edits to the TVM curve, and returns to the default straight line.
- Curve Presets (not shown): The column on the right contains often-used curves. which differ from parameter to parameter. Click on the curve to place it in the TVM.
Curve Editing
These curves use the usual paradigm for editing rate/level envelopes, where you enter nodes (these looks like solid dots) that correspond to particular parameter values the envelope should follow over time.
- Add Node: Double-click anywhere in the window to create a node.
- Bend Lines: A hollow circle between nodes indicates a point where you can drag up or down to bend the straight line between the nodes into a curve.
- Draw Curve: Alt+drag (Win) or Option+drag (Mac) to draw a curve in the window, with notes spaced horizontally based on the selected Grid Resolution in the master controls.
- Move Node: Click and drag node. Hold down the Shift key for more precise movement.
- Move Node While Snapping to Grid Resolution: Ctrl+drag (Cmd+drag on Mac) node. Hold down the Shift key for more precise movement.
- Delete Node: Click on the node, and hit the Del key.
- Delete or Move Multiple Nodes: Draw a marquee around the nodes to select them. You can then Delete (hit the Del key), or move while snapping to the Grid Resolution (Ctrl+drag, or Cmd+drag on Mac, any selected node to affect all nodes).
Snapping in the TVM Curve Editor
The Time-Variant Modifier windows are different for different parameters. With the Free Value option turned off, TVM nodes can “snap” to different types of values. With Free Value enabled, parameters can be set to any values, without snapping. (The Free Value button is present only in relevant windows.)
Note that labels appear on the left side that correspond to the parameter values for specific nodes. If the labels overlap so that you can’t see a particular label, clicking on its associated node will bring the label to the front.
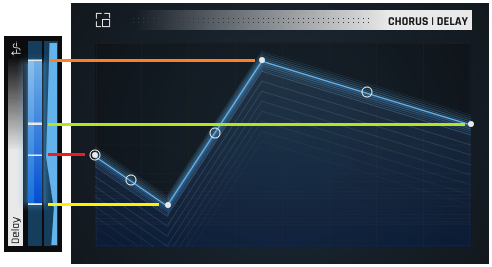
Snapping to Pitches or Notes
If you turn up the Flanger resonance, it acquires a sense of pitch. So, this is a situation where you might want to snap parameter nodes to specific pitches. Select the desired snap pitches in the keyboard graphic toward the left of the window; a label shows the pitch to which a node is snapped.

From left to right, the nodes (circled in yellow) snap to C1, G1, C3, C2, and back down to C1. Look to the left of a node (highlighted by yellow lines showing which nodes relate to which labels) to see the label that relates to a particular nodes position.
Free Value Off
With Free Value off, a parameter like Flanger Delay snaps to its “native” parameter value, which is delay time. In this case, you can set the nodes to any arbitrary delay time, with the times shown on labels to the left of the nodes.

With Free Value on, nodes (circled in yellow) can move anywhere vertically, without snap to selected parameter values.
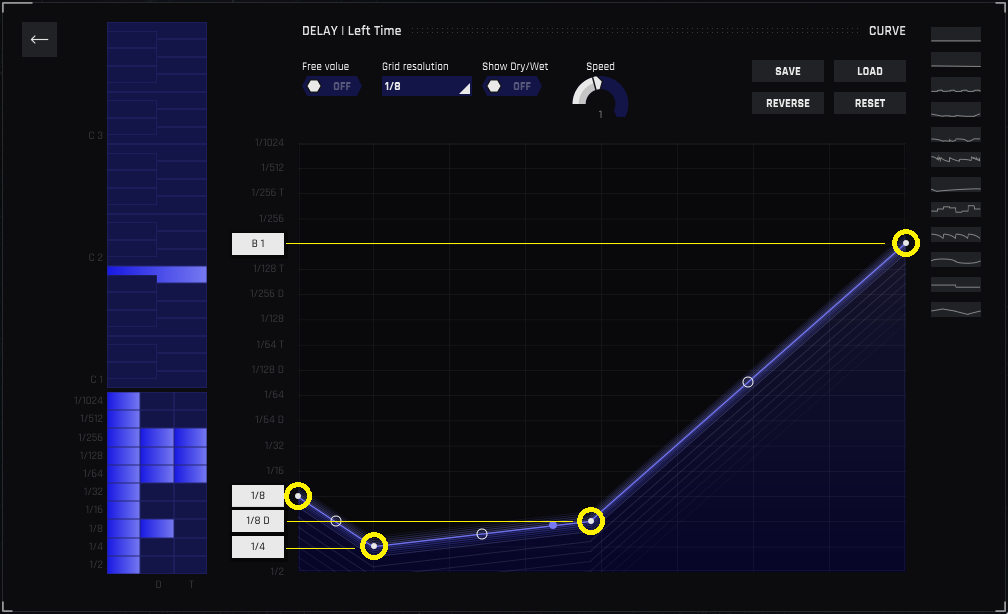
Snapping to Rhythms
Delay is a good example of snapping to rhythms, so that the echoes fall on specific note values. In this case, turn on the rhythmic values you want to use in the graphic located at the lower left. Values range from 1/2 note to 1,024th note with dotted note (D) and triplet (T) options. Rhythmic values range from the longest selected note at the bottom, to shorter selected notes at the top.
However, you can also snap to notes. For a parameter like delay time, these aren’t necessarily notes per se, but they’re mathematically related to a non-rhythmic delay time. Referring to the image below, the right-most node is snapping to B1, which represents a rhythmic value between a 128th note triplet and a 256th note.
Rocket Science Tip!
For those who want to get into the weeds about how notes translate into rhythms, here’s an example. Consider A = 400 Hz in a song with a 120 BPM tempo. At 120 BPM, each quarter-note is 0.5 seconds, or 500 ms. So, if you wanted a quarter-note delay, the delay time would be 500 ms. The period of an A 440 (note A4) is 2.5 milliseconds. As you lower the note by an octave, the delay time doubles: 220 Hz (A2) = 5 ms, 110 Hz (A3) = 10 ms, 55 Hz (A1) = 20 ms, 27.5 (A0)= 40 ms, and so on. So if you select A1 as the delay time, that’s equivalent to 20 ms of delay.
Output Section
Overview
Stutter Edit 2’s Output Section includes controls for wet/dry level, overall output, and a high-performance limiter. When not in the TVM Magnifier window, the Output Section shares the TVM view with the effects parameters. However, the graph image is purple (like the Output Section itself) if you’ve chosen an Output Section parameter for editing, as opposed to the blue color for edits of all other Stutter Edit 2 sections.

The output section, showing the curve for the Limiter’s Threshold parameter.
Wet Gain
When off, the Wet/Dry balance in the effects sections themselves set the amount of wet and dry gain. When enabled, this parameter acts like a “master” Wet Gain control for all selected effects in the effects chain. The Level parameter follows the paradigm of all other controls.
Dry Gain
When off, the Wet/Dry balance in the effects sections themselves set the amount of wet and dry gain. When enabled, this parameter acts like a “master” Dry Gain control for all selected effects in the effects chain.
Limiter
Although the controls may seem similar to other limiters, note that they can all be modulated. This allows treating the limiter not just as a tool for dynamics control, but as a creative effect.
A Limiter is a dynamics processor that clamps signal levels to a particular threshold, which (within reason) doesn’t allow audio to exceed the threshold level. This is useful to avoid overloading of subsequent elements in a DAW’s audio path, particularly since unanticipated volume changes can occur with extreme Stutter Edit 2 settings.
Threshold
When enabled, the Threshold parameter controls the Limiter’s action. However, this is far more versatile than a typical limiter, which typically allows setting only a single threshold. As the audio varies over time, it’s possible to have more or less limiting. For example, the limiter could clamp down hard to the audio initially, but control subsequent audio less drastically.
Output Gain
When locked, this acts as an overall level control. However when split, you can modulate the overall output level. For example, you could dip the level initially, then let it rise, to emulate the “pumping” effect that a lot of EDM tracks obtain by using sidechaining and trance gate-type amplitude changes (e.g., Eric Prydz “Call on Me”).
Customer Care
Purchasing Stutter Edit 2
If you are using the demo version of Stutter Edit 2 and would like the full version, you can purchase directly from the iZotope online store: https://www.izotope.com/en/shop.html
Once your purchase is complete, you will be sent an email confirmation and a full version serial number that can be used to fully authorize your current installation of Stutter Edit 2.
iZotope Customer Care policy
iZotope is happy to provide professional technical Customer Care to all registered users absolutely free of charge. https://support.izotope.com/hc/en-us/
We also offer valuable pre-sales technical Customer Care to customers who may be interested in purchasing an iZotope product. Before contacting iZotope Customer Care, you can search our Knowledgebase to see if the solution to your problem has already been published.
How long does iZotope provide customer support for purchased products? You can email us with any question for 12 months after you buy any iZotope product. Past 12 months, we’ll still help you with your account and authorization but will not provide technical support for in-depth product questions. If you need more detailed help on how to use the product, please check out our FAQs and Tutorials.
How long does iZotope support its products? Although we can’t guarantee it, we do our best to keep our products up to date with the operating systems and plug-in hosts that we support. Sometimes, other companies make changes that we’re not able to support, but we actively work with other companies to avoid these sorts of compatibility problems. We also do our best to address bug fixes within the product itself to ensure our products operate in accordance with our specifications.
We will provide software updates for 12 months from product release. After 12 months, no software updates will be provided.
For details on what operating systems and plug-in host software are officially supported for a product, please check that product’s Specs page.
Contacting iZotope Customer Care
For additional help with Stutter Edit 2:
- Check out the Customer Care pages on our website: https://support.izotope.com/hc/en-us/
- Contact our Customer Care department at support@izotope.com
iZotope’s highly trained Customer Care team is committed to responding to all requests within one (1) business day and frequently respond faster. Please try to explain your problem with as much detail and clarity as possible. This will ensure our ability to solve your problem accurately, the first time around. Please include all system specs and the build/version of Stutter Edit 2 that you are using.
Once your Customer Care request is submitted, you will receive a confirmation email from iZotope Customer Care. If you do not receive this email within a few minutes, please check your spam folder and make sure our responses are not getting blocked. To prevent this from happening please add support@izotope.com to your list of allowed email addresses
International Distribution
Customer Care is also available from our international distributors worldwide for any customers who purchased their iZotope products through a certified iZotope distributor.
Check with your local distributor for availability. If you would like help locating your local distributor please contact iZotope Customer Care.
Thanks for using Stutter Edit 2!
-The iZotope Team
License Information
Table of Contents
Anti-Grain Geometry
Version 2.4
Copyright (c) 2002-2005 Maxim Shemanarev (McSeem).
Redistribution and use in source and binary forms, with or without modification, are permitted provided that the following conditions are met:
-
Redistributions of source code must retain the above copyright notice, this list of conditions and the following disclaimer.
-
Redistributions in binary form must reproduce the above copyright notice, this list of conditions and the following disclaimer in the documentation and/or other materials provided with the distribution.
-
The name of the author may not be used to endorse or promote products derived from this software without specific prior written permission.
THIS SOFTWARE IS PROVIDED BY THE AUTHOR ``AS IS’’ AND ANY EXPRESS OR IMPLIED WARRANTIES, INCLUDING, BUT NOT LIMITED TO, THE IMPLIED WARRANTIES OF MERCHANTABILITY AND FITNESS FOR A PARTICULAR PURPOSE ARE DISCLAIMED. IN NO EVENT SHALL THE AUTHOR BE LIABLE FOR ANY DIRECT, INDIRECT, INCIDENTAL, SPECIAL, EXEMPLARY, OR CONSEQUENTIAL DAMAGES (INCLUDING, BUT NOT LIMITED TO, PROCUREMENT OF SUBSTITUTE GOODS OR SERVICES; LOSS OF USE, DATA, OR PROFITS; OR BUSINESS INTERRUPTION) HOWEVER CAUSED AND ON ANY THEORY OF LIABILITY, WHETHER IN CONTRACT, STRICT LIABILITY, OR TORT (INCLUDING NEGLIGENCE OR OTHERWISE) ARISING IN ANY WAY OUT OF THE USE OF THIS SOFTWARE, EVEN IF ADVISED OF THE POSSIBILITY OF SUCH DAMAGE.
Better Enums
Version 0.11.1
Copyright (c) 2012-2016, Anton Bachin. All rights reserved.
Redistribution and use in source and binary forms, with or without modification, are permitted provided that the following conditions are met:
-
Redistributions of source code must retain the above copyright notice, this list of conditions and the following disclaimer.
-
Redistributions in binary form must reproduce the above copyright notice, this list of conditions and the following disclaimer in the documentation and/or other materials provided with the distribution.
THIS SOFTWARE IS PROVIDED BY THE COPYRIGHT HOLDERS AND CONTRIBUTORS “AS IS” AND ANY EXPRESS OR IMPLIED WARRANTIES, INCLUDING, BUT NOT LIMITED TO, THE IMPLIED WARRANTIES OF MERCHANTABILITY AND FITNESS FOR A PARTICULAR PURPOSE ARE DISCLAIMED. IN NO EVENT SHALL THE COPYRIGHT HOLDER OR CONTRIBUTORS BE LIABLE FOR ANY DIRECT, INDIRECT, INCIDENTAL, SPECIAL, EXEMPLARY, OR CONSEQUENTIAL DAMAGES (INCLUDING, BUT NOT LIMITED TO, PROCUREMENT OF SUBSTITUTE GOODS OR SERVICES; LOSS OF USE, DATA, OR PROFITS; OR BUSINESS INTERRUPTION) HOWEVER CAUSED AND ON ANY THEORY OF LIABILITY, WHETHER IN CONTRACT, STRICT LIABILITY, OR TORT (INCLUDING NEGLIGENCE OR OTHERWISE) ARISING IN ANY WAY OUT OF THE USE OF THIS SOFTWARE, EVEN IF ADVISED OF THE POSSIBILITY OF SUCH DAMAGE.
Crashpad
Version 0.8.0
Copyright 2014 The Crashpad Authors. All rights reserved.
Licensed under the [Apache License, Version 2.0][APLv2.0] (the “License”); you may not use this file except in compliance with the License. You may obtain a copy of the License at:
http://www.apache.org/licenses/LICENSE-2.0
Unless required by applicable law or agreed to in writing, software distributed under the License is distributed on an “AS IS” BASIS, WITHOUT WARRANTIES OR CONDITIONS OF ANY KIND, either express or implied. See the License for the specific language governing permissions and limitations under the License.
Eigen
Version 3.2.4
Distributed under the Mozilla Public License v2.0 (MPLv2.0).
Full text of the license is available here: https://www.mozilla.org/en-US/MPL/2.0/
To receive a copy of the source code for the Eigen library distributed with this product under the under the terms of the MPLv2.0 please contact devsupport@izotope.com.
FreeType
FreeType is licensed under the FreeType Project LICENSE.
Portions of this software are copyright (c) 1996-2002, 2006 The FreeType Project (www.freetype.org). All rights reserved.
GLEW
The OpenGL Extension Wrangler Library Copyright (C) 2002-2008, Milan Ikits <milan ikits[]ieee org> Copyright (C) 2002-2008, Marcelo E. Magallon <mmagallo[]debian org> Copyright (C) 2002, Lev Povalahev All rights reserved.
Redistribution and use in source and binary forms, with or without modification, are permitted provided that the following conditions are met:
- Redistributions of source code must retain the above copyright notice, this list of conditions and the following disclaimer.
- Redistributions in binary form must reproduce the above copyright notice, this list of conditions and the following disclaimer in the documentation and/or other materials provided with the distribution.
- The name of the author may be used to endorse or promote products derived from this software without specific prior written permission.
THIS SOFTWARE IS PROVIDED BY THE COPYRIGHT HOLDERS AND CONTRIBUTORS “AS IS” AND ANY EXPRESS OR IMPLIED WARRANTIES, INCLUDING, BUT NOT LIMITED TO, THE IMPLIED WARRANTIES OF MERCHANTABILITY AND FITNESS FOR A PARTICULAR PURPOSE ARE DISCLAIMED. IN NO EVENT SHALL THE COPYRIGHT OWNER OR CONTRIBUTORS BE LIABLE FOR ANY DIRECT, INDIRECT, INCIDENTAL, SPECIAL, EXEMPLARY, OR CONSEQUENTIAL DAMAGES (INCLUDING, BUT NOT LIMITED TO, PROCUREMENT OF SUBSTITUTE GOODS OR SERVICES; LOSS OF USE, DATA, OR PROFITS; OR BUSINESS INTERRUPTION) HOWEVER CAUSED AND ON ANY THEORY OF LIABILITY, WHETHER IN CONTRACT, STRICT LIABILITY, OR TORT (INCLUDING NEGLIGENCE OR OTHERWISE) ARISING IN ANY WAY OUT OF THE USE OF THIS SOFTWARE, EVEN IF ADVISED OF THE POSSIBILITY OF SUCH DAMAGE.
Mesa 3-D graphics library Version: 7.0
Copyright (C) 1999-2007 Brian Paul All Rights Reserved.
Permission is hereby granted, free of charge, to any person obtaining a copy of this software and associated documentation files (the “Software”), to deal in the Software without restriction, including without limitation the rights to use, copy, modify, merge, publish, distribute, sublicense, and/or sell copies of the Software, and to permit persons to whom the Software is furnished to do so, subject to the following conditions:
The above copyright notice and this permission notice shall be included in all copies or substantial portions of the Software.
THE SOFTWARE IS PROVIDED “AS IS”, WITHOUT WARRANTY OF ANY KIND, EXPRESS OR IMPLIED, INCLUDING BUT NOT LIMITED TO THE WARRANTIES OF MERCHANTABILITY, FITNESS FOR A PARTICULAR PURPOSE AND NONINFRINGEMENT. IN NO EVENT SHALL BRIAN PAUL BE LIABLE FOR ANY CLAIM, DAMAGES OR OTHER LIABILITY, WHETHER IN AN ACTION OF CONTRACT, TORT OR OTHERWISE, ARISING FROM, OUT OF OR IN CONNECTION WITH THE SOFTWARE OR THE USE OR OTHER DEALINGS IN THE SOFTWARE.
Copyright (c) 2007 The Khronos Group Inc.
Permission is hereby granted, free of charge, to any person obtaining a copy of this software and/or associated documentation files (the “Materials”), to deal in the Materials without restriction, including without limitation the rights to use, copy, modify, merge, publish, distribute, sublicense, and/or sell copies of the Materials, and to permit persons to whom the Materials are furnished to do so, subject to the following conditions:
The above copyright notice and this permission notice shall be included in all copies or substantial portions of the Materials.
THE MATERIALS ARE PROVIDED “AS IS”, WITHOUT WARRANTY OF ANY KIND, EXPRESS OR IMPLIED, INCLUDING BUT NOT LIMITED TO THE WARRANTIES OF MERCHANTABILITY, FITNESS FOR A PARTICULAR PURPOSE AND NONINFRINGEMENT. IN NO EVENT SHALL THE AUTHORS OR COPYRIGHT HOLDERS BE LIABLE FOR ANY CLAIM, DAMAGES OR OTHER LIABILITY, WHETHER IN AN ACTION OF CONTRACT, TORT OR OTHERWISE, ARISING FROM, OUT OF OR IN CONNECTION WITH THE MATERIALS OR THE USE OR OTHER DEALINGS IN THE MATERIALS.
gsl
Copyright (c) 2015 Microsoft Corporation. All rights reserved.
This code is licensed under the MIT License (MIT).
Permission is hereby granted, free of charge, to any person obtaining a copy of this software and associated documentation files (the “Software”), to deal in the Software without restriction, including without limitation the rights to use, copy, modify, merge, publish, distribute, sublicense, and/or sell copies of the Software, and to permit persons to whom the Software is furnished to do so, subject to the following conditions:
The above copyright notice and this permission notice shall be included in all copies or substantial portions of the Software.
THE SOFTWARE IS PROVIDED “AS IS”, WITHOUT WARRANTY OF ANY KIND, EXPRESS OR IMPLIED, INCLUDING BUT NOT LIMITED TO THE WARRANTIES OF MERCHANTABILITY, FITNESS FOR A PARTICULAR PURPOSE AND NONINFRINGEMENT. IN NO EVENT SHALL THE AUTHORS OR COPYRIGHT HOLDERS BE LIABLE FOR ANY CLAIM, DAMAGES OR OTHER LIABILITY, WHETHER IN AN ACTION OF CONTRACT, TORT OR OTHERWISE, ARISING FROM, OUT OF OR IN CONNECTION WITH THE SOFTWARE OR THE USE OR OTHER DEALINGS IN THE SOFTWARE.
IcoMoon
IcoMoon-Free licensed under: CC BY 4.0
Intel® Integrated Performance Primitives (Intel® IPP)
Use and Redistribution. You may use and redistribute the software (the “Software”), without modification, provided the following conditions are met:
-
Redistributions must reproduce the above copyright notice and the following terms of use in the Software and in the documentation and/or other materials provided with the distribution.
-
Neither the name of Intel nor the names of its suppliers may be used to endorse or promote products derived from this Software without specific prior written permission.
-
No reverse engineering, decompilation, or disassembly of this Software is permitted.
Limited patent license. Intel grants you a world-wide, royalty-free, non-exclusive license under patents it now or hereafter owns or controls to make, have made, use, import, offer to sell and sell (“Utilize”) this Software, but solely to the extent that any such patent is necessary to Utilize the Software alone. The patent license shall not apply to any combinations which include this software. No hardware per se is licensed hereunder.
Third party programs. The Software may contain Third Party Programs. “Third Party Programs” are third party software, open source software or other Intel software listed in the “third-party-programs.txt” or other similarly named text file that is included with the Software. Third Party Programs, even if included with the distribution of the Software, may be governed by separate license terms, including without limitation, third party license terms, open source software notices and terms, and/or other Intel software license terms. These separate license terms may govern your use of the Third Party Programs.
DISCLAIMER. THIS SOFTWARE IS PROVIDED “AS IS” AND ANY EXPRESS OR IMPLIED WARRANTIES, INCLUDING, BUT NOT LIMITED TO, THE IMPLIED WARRANTIES OF MERCHANTABILITY, FITNESS FOR A PARTICULAR PURPOSE, AND NON-INFRINGEMENT ARE DISCLAIMED. THIS SOFTWARE IS NOT INTENDED FOR USE IN SYSTEMS OR APPLICATIONS WHERE FAILURE OF THE SOFTWARE MAY CAUSE PERSONAL INJURY OR DEATH AND YOU AGREE THAT YOU ARE FULLY RESPONSIBLE FOR ANY CLAIMS, COSTS, DAMAGES, EXPENSES, AND ATTORNEYS’ FEES ARISING OUT OF ANY SUCH USE, EVEN IF ANY CLAIM ALLEGES THAT INTEL WAS NEGLIGENT REGARDING THE DESIGN OR MANUFACTURE OF THE MATERIALS.
LIMITATION OF LIABILITY. IN NO EVENT WILL INTEL BE LIABLE FOR ANY DIRECT, INDIRECT, INCIDENTAL, SPECIAL, EXEMPLARY, OR CONSEQUENTIAL DAMAGES (INCLUDING, BUT NOT LIMITED TO, PROCUREMENT OF SUBSTITUTE GOODS OR SERVICES; LOSS OF USE, DATA, OR PROFITS; OR BUSINESS INTERRUPTION) HOWEVER CAUSED AND ON ANY THEORY OF LIABILITY, WHETHER IN CONTRACT, STRICT LIABILITY, OR TORT (INCLUDING NEGLIGENCE OR OTHERWISE) ARISING IN ANY WAY OUT OF THE USE OF THIS SOFTWARE, EVEN IF ADVISED OF THE POSSIBILITY OF SUCH DAMAGE. YOU AGREE TO INDEMNIFY AND HOLD INTEL HARMLESS AGAINST ANY CLAIMS AND EXPENSES RESULTING FROM YOUR USE OR UNAUTHORIZED USE OF THE SOFTWARE.
No support. Intel may make changes to the Software, at any time without notice, and is not obligated to support, update or provide training for the Software.
Termination. Intel may terminate your right to use the Software in the event of your breach of this Agreement and you fail to cure the breach within a reasonable period of time.
Feedback. Should you provide Intel with comments, modifications, corrections, enhancements or other input (“Feedback”) related to the Software Intel will be free to use, disclose, reproduce, license or otherwise distribute or exploit the Feedback in its sole discretion without any obligations or restrictions of any kind, including without limitation, intellectual property rights or licensing obligations.
Compliance with laws. You agree to comply with all relevant laws and regulations governing your use, transfer, import or export (or prohibition thereof) of the Software.
Governing law. All disputes will be governed by the laws of the United States of America and the State of Delaware without reference to conflict of law principles and subject to the exclusive jurisdiction of the state or federal courts sitting in the State of Delaware, and each party agrees that it submits to the personal jurisdiction and venue of those courts and waives any objections. The United Nations Convention on Contracts for the International Sale of Goods (1980) is specifically excluded and will not apply to the Software.
*Other names and brands may be claimed as the property of others.
JsonCpp
Version 1.2.1
Copyright (c) 2007-2010 Baptiste Lepilleur and The JsonCpp Authors
Permission is hereby granted, free of charge, to any person obtaining a copy of this software and associated documentation files (the “Software”), to deal in the Software without restriction, including without limitation the rights to use, copy, modify, merge, publish, distribute, sublicense, and/or sell copies of the Software, and to permit persons to whom the Software is furnished to do so, subject to the following conditions:
The above copyright notice and this permission notice shall be included in all copies or substantial portions of the Software.
THE SOFTWARE IS PROVIDED “AS IS”, WITHOUT WARRANTY OF ANY KIND, EXPRESS OR IMPLIED, INCLUDING BUT NOT LIMITED TO THE WARRANTIES OF MERCHANTABILITY, FITNESS FOR A PARTICULAR PURPOSE AND NONINFRINGEMENT. IN NO EVENT SHALL THE AUTHORS OR COPYRIGHT HOLDERS BE LIABLE FOR ANY CLAIM, DAMAGES OR OTHER LIABILITY, WHETHER IN AN ACTION OF CONTRACT, TORT OR OTHERWISE, ARISING FROM, OUT OF OR IN CONNECTION WITH THE SOFTWARE OR THE USE OR OTHER DEALINGS IN THE SOFTWARE.
LibXML2
Version 2.7.8
Except where otherwise noted in the source code (e.g. the files hash.c, list.c and the trio files, which are covered by a similar licence but with different Copyright notices) all the files are:
Copyright (C) 1998-2003 Daniel Veillard. All Rights Reserved.
Permission is hereby granted, free of charge, to any person obtaining a copy of this software and associated documentation files (the “Software”), to deal in the Software without restriction, including without limitation the rights to use, copy, modify, merge, publish, distribute, sublicense, and/or sell copies of the Software, and to permit persons to whom the Software is fur- nished to do so, subject to the following conditions:
The above copyright notice and this permission notice shall be included in all copies or substantial portions of the Software.
THE SOFTWARE IS PROVIDED “AS IS”, WITHOUT WARRANTY OF ANY KIND, EXPRESS OR IMPLIED, INCLUDING BUT NOT LIMITED TO THE WARRANTIES OF MERCHANTABILITY, FIT- NESS FOR A PARTICULAR PURPOSE AND NONINFRINGEMENT. IN NO EVENT SHALL THE DANIEL VEILLARD BE LIABLE FOR ANY CLAIM, DAMAGES OR OTHER LIABILITY, WHETHER IN AN ACTION OF CONTRACT, TORT OR OTHERWISE, ARISING FROM, OUT OF OR IN CONNECTION WITH THE SOFTWARE OR THE USE OR OTHER DEALINGS IN THE SOFTWARE.
Except as contained in this notice, the name of Daniel Veillard shall not be used in advertising or otherwise to promote the sale, use or other dealings in this Software without prior written authorization from him
Material Docs Theme
Copyright (c) 2016 Digitalcraftsman digitalcraftsman@protonmail.com Copyright (c) 2016 Martin Donath martin.donath@squidfunk.com
Permission is hereby granted, free of charge, to any person obtaining a copy of this software and associated documentation files (the “Software”), to deal in the Software without restriction, including without limitation the rights to use, copy, modify, merge, publish, distribute, sublicense, and/or sell copies of the Software, and to permit persons to whom the Software is furnished to do so, subject to the following conditions:
The above copyright notice and this permission notice shall be included in all copies or substantial portions of the Software.
THE SOFTWARE IS PROVIDED “AS IS”, WITHOUT WARRANTY OF ANY KIND, EXPRESS OR IMPLIED, INCLUDING BUT NOT LIMITED TO THE WARRANTIES OF MERCHANTABILITY, FITNESS FOR A PARTICULAR PURPOSE AND NON-INFRINGEMENT. IN NO EVENT SHALL THE AUTHORS OR COPYRIGHT HOLDERS BE LIABLE FOR ANY CLAIM, DAMAGES OR OTHER LIABILITY, WHETHER IN AN ACTION OF CONTRACT, TORT OR OTHERWISE, ARISING FROM, OUT OF OR IN CONNECTION WITH THE SOFTWARE OR THE USE OR OTHER DEALINGS IN THE SOFTWARE.
readerwriterqueue
Copyright (c) 2013-2015, Cameron Desrochers All rights reserved.
Redistribution and use in source and binary forms, with or without modification, are permitted provided that the following conditions are met:
-
Redistributions of source code must retain the above copyright notice, this list of conditions and the following disclaimer.
-
Redistributions in binary form must reproduce the above copyright notice, this list of conditions and the following disclaimer in the documentation and/or other materials provided with the distribution.
THIS SOFTWARE IS PROVIDED BY THE COPYRIGHT HOLDERS AND CONTRIBUTORS “AS IS” AND ANY EXPRESS OR IMPLIED WARRANTIES, INCLUDING, BUT NOT LIMITED TO, THE IMPLIED WARRANTIES OF MERCHANTABILITY AND FITNESS FOR A PARTICULAR PURPOSE ARE DISCLAIMED. IN NO EVENT SHALL THE COPYRIGHT HOLDER OR CONTRIBUTORS BE LIABLE FOR ANY DIRECT, INDIRECT, INCIDENTAL, SPECIAL, EXEMPLARY, OR CONSEQUENTIAL DAMAGES (INCLUDING, BUT NOT LIMITED TO, PROCUREMENT OF SUBSTITUTE GOODS OR SERVICES; LOSS OF USE, DATA, OR PROFITS; OR BUSINESS INTERRUPTION) HOWEVER CAUSED AND ON ANY THEORY OF LIABILITY, WHETHER IN CONTRACT, STRICT LIABILITY, OR TORT (INCLUDING NEGLIGENCE OR OTHERWISE) ARISING IN ANY WAY OUT OF THE USE OF THIS SOFTWARE, EVEN IF ADVISED OF THE POSSIBILITY OF SUCH DAMAGE.
Tipue Search
Copyright (c) 2017 Tipue
Permission is hereby granted, free of charge, to any person obtaining a copy of this software and associated documentation files (the “Software”), to deal in the Software without restriction, including without limitation the rights to use, copy, modify, merge, publish, distribute, sublicense, and/or sell copies of the Software, and to permit persons to whom the Software is furnished to do so, subject to the following conditions:
The above copyright notice and this permission notice shall be included in all copies or substantial portions of the Software.
THE SOFTWARE IS PROVIDED “AS IS”, WITHOUT WARRANTY OF ANY KIND, EXPRESS OR IMPLIED, INCLUDING BUT NOT LIMITED TO THE WARRANTIES OF MERCHANTABILITY, FITNESS FOR A PARTICULAR PURPOSE AND NONINFRINGEMENT. IN NO EVENT SHALL THE AUTHORS OR COPYRIGHT HOLDERS BE LIABLE FOR ANY CLAIM, DAMAGES OR OTHER LIABILITY, WHETHER IN AN ACTION OF CONTRACT, TORT OR OTHERWISE, ARISING FROM, OUT OF OR IN CONNECTION WITH THE SOFTWARE OR THE USE OR OTHER DEALINGS IN THE SOFTWARE.
vectorize
Copyright (c) 2012 Aaron Wishnick. All rights reserved.
Redistribution and use in source and binary forms, with or without modification, are permitted provided that the following conditions are met:
- Redistributions of source code must retain the above copyright notice, this list of conditions and the following disclaimer.
- Redistributions in binary form must reproduce the above copyright notice, this list of conditions and the following disclaimer in the documentation and/or other materials provided with the distribution.
- Neither the name of the nor the names of its contributors may be used to endorse or promote products derived from this software without specific prior written permission.
THIS SOFTWARE IS PROVIDED BY THE COPYRIGHT HOLDERS AND CONTRIBUTORS “AS IS” AND ANY EXPRESS OR IMPLIED WARRANTIES, INCLUDING, BUT NOT LIMITED TO, THE IMPLIED WARRANTIES OF MERCHANTABILITY AND FITNESS FOR A PARTICULAR PURPOSE ARE DISCLAIMED. IN NO EVENT SHALL BE LIABLE FOR ANY DIRECT, INDIRECT, INCIDENTAL, SPECIAL, EXEMPLARY, OR CONSEQUENTIAL DAMAGES (INCLUDING, BUT NOT LIMITED TO, PROCUREMENT OF SUBSTITUTE GOODS OR SERVICES; LOSS OF USE, DATA, OR PROFITS; OR BUSINESS INTERRUPTION) HOWEVER CAUSED AND ON ANY THEORY OF LIABILITY, WHETHER IN CONTRACT, STRICT LIABILITY, OR TORT (INCLUDING NEGLIGENCE OR OTHERWISE) ARISING IN ANY WAY OUT OF THE USE OF THIS SOFTWARE, EVEN IF ADVISED OF THE POSSIBILITY OF SUCH DAMAGE.
zlib
Copyright (c) 1995-2004 Jean-loup Gailly and Mark Adler.
This software is provided ‘as-is’, without any express or implied warranty. In no event will the authors be held liable for any damages arising from the use of this software.
Permission is granted to anyone to use this software for any purpose, including commercial applications, and to alter it and redistribute it freely, subject to the following restrictions:
-
The origin of this software must not be misrepresented; you must not claim that you wrote the original software. If you use this software in a product, an acknowledgment in the product documentation would be appreciated but is not required.
-
Altered source versions must be plainly marked as such, and must not be misrepresented as being the original software.
-
This notice may not be removed or altered from any source distribution.
Jean-loup Gailly jloup@gzip.org
Mark Adler madler@alumni.caltech.edu
EULA
END USER LICENSE AGREEMENT
READ CAREFULLY THE TERMS AND CONDITIONS OF THIS AGREEMENT (“AGREEMENT”) BEFORE YOU CLICK ON THE “ACCEPT” BUTTON OR OTHERWISE USE THE PRODUCT. CLICKING ON THE “ACCEPT” BUTTON OR OTHERWISE DOWNLOADING, INSTALLING AND/OR USING THE LICENSED SOFTWARE OR ANY TECHNOLOGY, IDEA, DATA AND DATABASES, ALGORITHM OR INFORMATION CONTAINED THEREIN OR PROVIDED THEREWITH (COLLECTIVELY, THE “SOFTWARE”), ESTABLISHES A BINDING AGREEMENT BETWEEN YOU AS THE PERSON LICENSING THE SOFTWARE, EITHER ON BEHALF OF YOURSELF OR ANY THIRD PARTY ENTITY (“YOU” OR “LICENSEE”) AND IZOTOPE, INC. (“IZOTOPE”), YOU (WHETHER AN INDIVIDUAL OR FORMAL LEGAL ENTITY) (HEREINAFTER REFERRED TO AS “YOU”), AGREE TO BE BOUND BY THE TERMS AND CONDITIONS OF THIS AGREEMENT WITH RESPECT TO YOUR USE OF THE SOFTWARE.
BY INSTALLING AND/OR BY USING THE SOFTWARE, YOU REPRESENT AND WARRANT THAT YOU HAVE THE LEGAL CAPACITY AND AUTHORITY TO ENTER INTO A BINDING AGREEMENT TO ADHERE TO THE TERMS AND CONDITIONS SET FORTH HEREIN, AND THAT THE SOFTWARE WILL BE USED ONLY IN ACCORDANCE WITH THESE TERMS AND CONDITIONS AND WITH ALL APPLICABLE LAWS. IF AN INDIVIDUAL IS REGISTERING OR USING THE SOFTWARE ON BEHALF OF AN ENTITY OR ORGANIZATION, THAT INDIVIDUAL WARRANTS, REPRESENTS, AND COVENANTS TO IZOTOPE THAT SUCH INDIVIDUAL IS DULY AUTHORIZED TO AGREE TO THESE TERMS AND CONDITIONS ON BEHALF OF THE ORGANIZATION AND TO BIND THE ORGANIZATION TO THEM.
LICENSE. Subject to all the terms and conditions of this Agreement, iZotope hereby grants to Licensee a license to use the Software accompanying this Agreement, as well as any presets and documentation provided, whether in printed, “online” or electronic form, either on a stand-alone computer or on a network, on any one computer at any one time. If more than one user will be using the Software at any one time, you must obtain from iZotope additional license(s) for each additional concurrent user of the Software. The Software is “in use” on a computer when loaded into memory (RAM). You may make one copy of the Software solely for backup or archival purposes if all copyright and other notices are reproduced on that copy, or you may copy the Software to a single hard disk provided you keep the original solely for backup or archival purposes. If the Software is an upgrade, you must have a license for the Software from which it is upgraded. If you receive the Software in more than one media, that does not affect the number of licenses you are receiving or any other term of this Agreement.
OWNERSHIP. The copyrights, patents, trade secrets, trademarks, and all other intellectual property rights in the Software and documentation (including any images, photographs, animations, video, audio, music and text incorporated in them) are owned by iZotope or its suppliers and are protected by the copyright, patent and other laws of the United States and other countries and by international treaty provisions. iZotope retains all rights not expressly granted in this Agreement. You shall not remove any product identification, trademark, copyright or other notices contained in or on the Software.
OTHER RESTRICTIONS. You may not modify, adapt, decompile, disassemble or otherwise reverse engineer the Software, except to the extent this restriction is expressly prohibited by applicable law, nor may you create derivative works based upon the Software, or to permit third parties to do so. You may not loan, rent, lease, or license the Software, or use the Software as a service bureau, as an application service provider, to perform consulting or training services for a third party or in any commercial time share arrangement, but you may permanently transfer your rights under this Agreement provided you transfer this Agreement, the Software, and all accompanying printed materials and retain no copies, and the recipient agrees to the terms of this Agreement. Any such transfer must include the most recent update and all prior versions.
LIMITED WARRANTY. iZotope warrants that, for a period of thirty (30) days from the date the Software is made available to you for download, the Software will substantially conform to the applicable user documentation provided with the Software. Any implied warranties which may exist despite the disclaimer herein will be limited to thirty (30) days (“Warranty Period”). This limited warranty is void if you buy from an unauthorized reseller, you violate the terms of this Agreement, or if the failure of the Software is due to accident, abuse or misapplication. Some states/jurisdictions do not allow limitations on duration of an implied warranty, so this limitation may not apply to you.
YOUR REMEDIES. iZotope’s sole obligation and your exclusive remedy for any breach of warranty will be, at iZotope’s sole option, either the return of the purchase price you paid or the repair or replacement of the Software, media and documentation, provided you in all instances return the Software, together with all media and documentation and a copy of your receipt, to the location where you obtained it during the Warranty Period. Outside the United States, neither these remedies nor any support services are available without proof of purchase from an authorized non-U.S. source.
SUPPORT. Subject to the limited warranty stated above, and further subject to you not being in violation of any term of this Agreement, iZotope will provide email support for the Software to the original purchaser, for a period of 12 months from the original purchase date.
REGISTRATION INFORMATION. When you activate the Software, iZotope may collect your name and email address and other contact information you choose to provide. IZotope may use this information to contact you regarding upgrades and new products. iZotope does not collect or retain any financial information (such as credit card information).
USAGE INFORMATION. When you activate and/or use the Software, iZotope may collect certain information about your computer and your interaction with the Software via the internet (“Usage Information”). Usage Information is information on how you interact with the Software, and is then utilized by iZotope for statistical analysis for improving the Software, and to provide you with a more relevant user experience. No direct personal information or audio files/samples are collected as part of this Usage Information. Usage Information is generally collected in the aggregate form, without identifying any user individually, although IP addresses, computer and session ids in relation to purchases and downloads/installations of the Software may be tracked as part of iZotope’s customer order review, statistical analysis, and fraud and piracy prevention efforts. This Usage Information may be sent to an iZotope web or third-party cloud server for storage or further processing by iZotope and/or its partners, subsidiaries or affiliates, including, but not limited to, Google Analytics and Mixpanel. The Software includes an opt-out provision if you do not wish to provide iZotope with such Usage Information.
DISCLAIMER. THE SOFTWARE IS PROVIDED “AS IS.” TO THE MAXIMUM EXTENT PERMITTED BY APPLICABLE LAW, EXCEPT FOR THE EXPRESS WARRANTY SET FORTH HEREIN, IZOTOPE DISCLAIMS ALL OTHER WARRANTIES, EXPRESS OR IMPLIED, INCLUDING BUT NOT LIMITED TO THE IMPLIED WARRANTIES OF NON-INFRINGEMENT, MERCHANTABILITY AND FITNESS FOR A PARTICULAR PURPOSE. IZOTOPE DOES NOT WARRANT THAT THE SOFTWARE WILL MEET YOUR REQUIREMENTS OR THAT THE SOFTWARE WILL OPERATE UNINTERRUPTED OR ERROR-FREE. THE WARRANTY AND REMEDIES SET FORTH HEREIN ARE EXCLUSIVE AND IN LIEU OF ALL OTHERS, ORAL OR WRITTEN, EXPRESS OR IMPLIED. No dealer, distributor, agent or employee of iZotope is authorized to change or add to the warranty and remedies set forth herein. Any other software furnished with or accompanying the Software is not warranted by iZotope.
LIMITATION OF LIABILITY. TO THE MAXIMUM EXTENT PERMITTED BY APPLICABLE LAW, IN NO EVENT WILL IZOTOPE BE LIABLE FOR ANY AMOUNTS EXCEEDING THE AMOUNTS RECEIVED FROM YOU FOR YOUR LICENSE OF THE SOFTWARE, REGARDLESS OF THE FORM OF ACTION, AND WHETHER ARISING OUT OF THE USE OF OR INABILITY TO USE THE SOFTWARE (INCLUDING, WITHOUT LIMITATION, DAMAGES OR COSTS FOR LOSS OF PROFITS, BUSINESS, GOODWILL, DATA OR OTHER ASSETS, OR COMPUTER PROGRAMS) EVEN IF IZOTOPE HAS BEEN ADVISED OF THE POSSIBILITY OF SUCH DAMAGES. Some jurisdictions do not allow exclusion or limitation of liability for consequential or incidental damages, so this limitation may not apply to you.
TERMINATION. The Agreement will terminate automatically if you fail to comply with any of its terms. On termination, you must immediately cease using and destroy all copies of the Software.
LICENSES TO U.S. GOVERNMENT. This paragraph applies to all acquisitions of the Software by or for the federal government, or by any prime contractor or subcontractor (at any tier) under any contract, grant, cooperative agreement or other activity with the United States government (collectively, the “Government”). By clicking “I ACCEPT”, you are agreeing on behalf of the Government that the Software and any documentation related thereto are respectively “commercial computer software” and “commercial computer software documentation” within the meaning of the acquisition regulation(s) applicable to this procurement. These terms and conditions alone will govern the Government’s use of the Software and will supersede any conflicting contractual terms or conditions. If the license granted by these terms and conditions fails to meet the Government’s needs or is inconsistent in any respect with Federal law, the Government must return the Software unused to iZotope. Contractor/Manufacturer is iZotope, Inc., 60 Hampshire Street, Cambridge, MA 02139.
GENERAL. The export of the Software from the United States and re-export from any other country is governed by the U.S. Department of Commerce under the export control laws and regulations of the United States and by any applicable law of such other country, and the Software may not be exported or re-exported in violation of any such laws or regulations. This Agreement is the complete and exclusive statement of the agreement between you and iZotope and supersedes any proposal or prior agreement, oral or written, and any other communications relating to the subject matter of this Agreement. This Agreement will be governed by and interpreted under the laws of the Commonwealth of Massachusetts, United States of America, without regard to conflicts of law provisions. The application of the United Nations Convention of Contracts for the International Sale of Goods is expressly excluded. This Agreement is in the English language only, which language will be controlling in all respects, and all versions of this Agreement in any other language will be for accommodation only.
IN ADDITION, ANY SUCH LEGAL PROCEEDING SHALL NOT BE HEARD BEFORE A JURY. EACH PARTY GIVES UP ANY RIGHT TO A JURY TRIAL. To the extent permitted by law, you agree that you will not bring any class action lawsuit against iZotope or be a representative plaintiff or plaintiff class member in any such lawsuit.
Should you have any questions about this Agreement or iZotope’s software use policies, or if you desire to contact iZotope for any other reason, in the U.S., please email sales@izotope.com; outside the U.S., please contact the iZotope representative or affiliate serving your country or, if you are unsure whom to contact, iZotope at the above location.
Please indicate that you understand and accept these terms by clicking the “Accept” option. If you do not accept these terms, installation will terminate.
1.1.0