TVM Curve Editor
Table of Contents
Overview
Time-Variant Modifiers Curves are the key to making complex modulations that can be controlled over time, or by pitch. You can see a thumbnail with adjustable parameters on the main screen, but clicking on the icon in the thumbnail’s upper left opens up a window with a magnified view. This offers far more editing and programming possibilities.
Master Curve Controls
In addition to being able to edit TVM curves in the window, there’s also a set of master controls.
 The master control section works in conjunction with the
curve-editing abilities.
The master control section works in conjunction with the
curve-editing abilities.
- Free Value: Turn off to enable snapping to rhythmic, note, or time values on the vertical axis. Turn on to disable snapping. This is not available in some TVM windows.
- Grid Resolution: This chooses the resolution of the background rhythmic grid. Aside from serving as a display, it also allows snapping to particular rhythmic values.
- Show Dry/Wet: For parameters with Dry/Wet controls, turn on to show both parameters simultaneously. Turn off to show only the wet signal parameters.
- Speed: As the time varies over the TVM, you can vary its relationship to the tempo by 0.25 times to 4 times the tempo.
- Save, Load, Reverse, Reset: Save and Load allow saving and loading your own curves. Reverse is convenient when you want two parameters to work oppositely, for example, having the Dry and Wet parameters work in a complementary way. Reset removes all edits to the TVM curve, and returns to the default straight line.
- Curve Presets (not shown): The column on the right contains often-used curves. which differ from parameter to parameter. Click on the curve to place it in the TVM.
Curve Editing
These curves use the usual paradigm for editing rate/level envelopes, where you enter nodes (these looks like solid dots) that correspond to particular parameter values the envelope should follow over time.
- Add Node: Double-click anywhere in the window to create a node.
- Bend Lines: A hollow circle between nodes indicates a point where you can drag up or down to bend the straight line between the nodes into a curve.
- Draw Curve: Alt+drag (Win) or Option+drag (Mac) to draw a curve in the window, with notes spaced horizontally based on the selected Grid Resolution in the master controls.
- Move Node: Click and drag node. Hold down the Shift key for more precise movement.
- Move Node While Snapping to Grid Resolution: Ctrl+drag (Cmd+drag on Mac) node. Hold down the Shift key for more precise movement.
- Delete Node: Click on the node, and hit the Del key.
- Delete or Move Multiple Nodes: Draw a marquee around the nodes to select them. You can then Delete (hit the Del key), or move while snapping to the Grid Resolution (Ctrl+drag, or Cmd+drag on Mac, any selected node to affect all nodes).
Snapping in the TVM Curve Editor
The Time-Variant Modifier windows are different for different parameters. With the Free Value option turned off, TVM nodes can “snap” to different types of values. With Free Value enabled, parameters can be set to any values, without snapping. (The Free Value button is present only in relevant windows.)
Note that labels appear on the left side that correspond to the parameter values for specific nodes. If the labels overlap so that you can’t see a particular label, clicking on its associated node will bring the label to the front.
Snapping to Pitches or Notes
If you turn up the Flanger resonance, it acquires a sense of pitch. So, this is a situation where you might want to snap parameter nodes to specific pitches. Select the desired snap pitches in the keyboard graphic toward the left of the window; a label shows the pitch to which a node is snapped.

From left to right, the nodes (circled in yellow) snap to C1, G1, C3, C2, and back down to C1. Look to the left of a node (highlighted by yellow lines showing which nodes relate to which labels) to see the label that relates to a particular nodes position.
Free Value Off
With Free Value off, a parameter like Flanger Delay snaps to its “native” parameter value, which is delay time. In this case, you can set the nodes to any arbitrary delay time, with the times shown on labels to the left of the nodes.

With Free Value on, nodes (circled in yellow) can move anywhere vertically, without snap to selected parameter values.
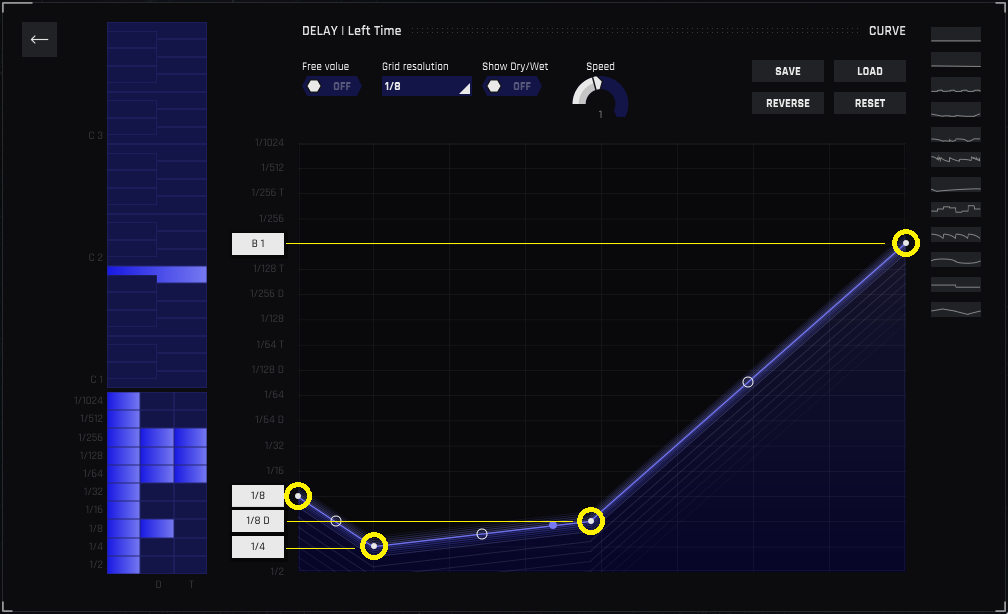
Snapping to Rhythms
Delay is a good example of snapping to rhythms, so that the echoes fall on specific note values. In this case, turn on the rhythmic values you want to use in the graphic located at the lower left. Values range from 1/2 note to 1,024th note with dotted note (D) and triplet (T) options. Rhythmic values range from the longest selected note at the bottom, to shorter selected notes at the top.
However, you can also snap to notes. For a parameter like delay time, these aren’t necessarily notes per se, but they’re mathematically related to a non-rhythmic delay time. Referring to the image below, the right-most node is snapping to B1, which represents a rhythmic value between a 128th note triplet and a 256th note.
Rocket Science Tip!
For those who want to get into the weeds about how notes translate into rhythms, here’s an example. Consider A = 400 Hz in a song with a 120 BPM tempo. At 120 BPM, each quarter-note is 0.5 seconds, or 500 ms. So, if you wanted a quarter-note delay, the delay time would be 500 ms. The period of an A 440 (note A4) is 2.5 milliseconds. As you lower the note by an octave, the delay time doubles: 220 Hz (A2) = 5 ms, 110 Hz (A3) = 10 ms, 55 Hz (A1) = 20 ms, 27.5 (A0)= 40 ms, and so on. So if you select A1 as the delay time, that’s equivalent to 20 ms of delay.