Dialogue Contour
ADV
Table of Contents
Overview
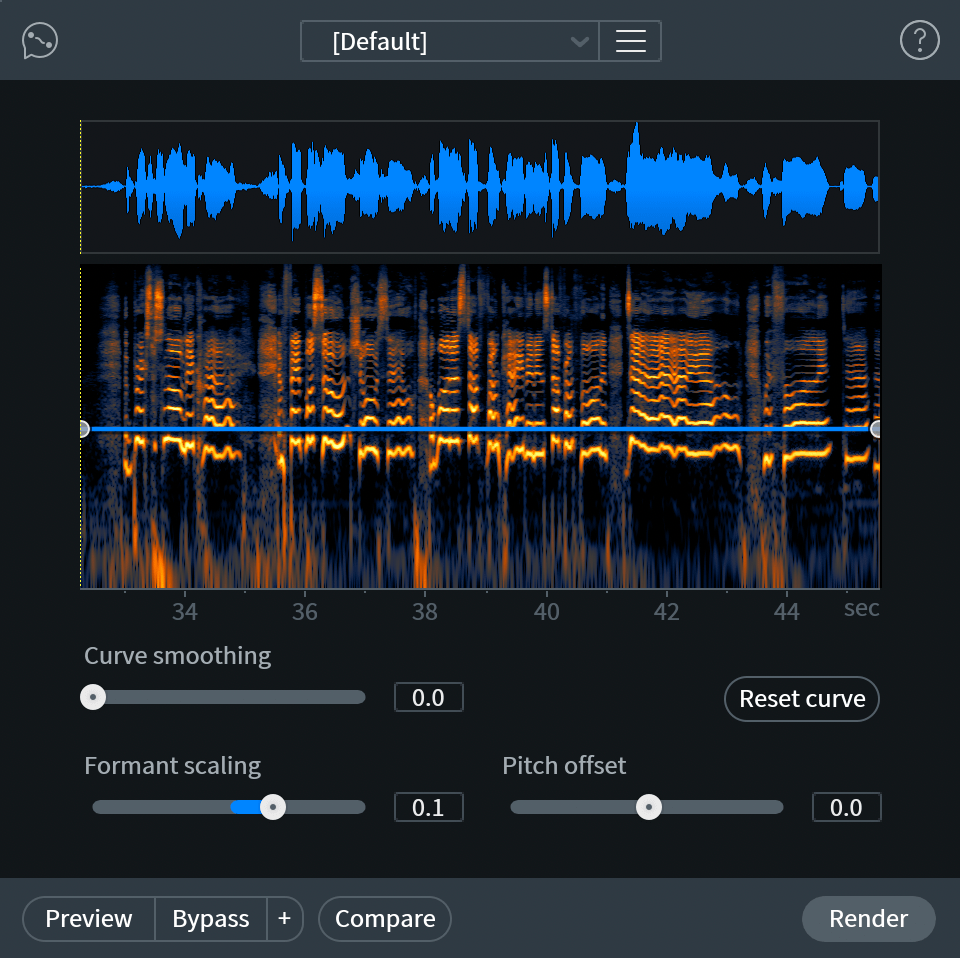
Dialogue Contour allows for the manipulation of the pitch envelope of a dialogue selection. Dialogue Contour features pitch correction processing that is tailored to speech. It is useful for adjusting the inflection of words that may not flow or fit with the rest of the dialogue in the clip.
Displays
Dialogue Contour features a waveform panel and a spectrogram panel that each display information about the current selection in the active file tab. These panels will dynamically update when the selection is changed. If no selection is made in the active file tab, no information will be displayed in the spectrogram or waveform panels.
Window Resizing
Click and drag on the bottom right-hand corner of the module window to customize the window size.
Waveform Display
The single waveform drawn in this panel represents a sum of all enabled channels in the current selection. The waveform drawing is normalized to allow for consistent vertical resolution when working with selections of varying amplitude.

Spectrogram Display
The spectrogram drawn in this panel represents a sum of all enabled channels in the current selection.

Playhead Indicators
The solid white vertical line and dotted yellow vertical line overlaid on the waveform and spectrogram panels indicate the current playhead position (white) and the playhead anchor position (yellow).
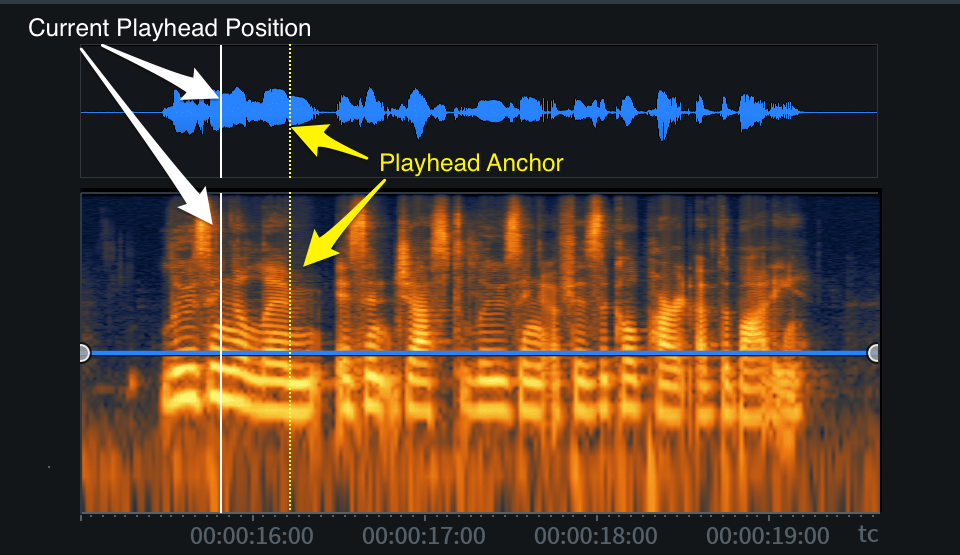
Current Playhead Position
The solid white vertical line overlaid on the waveform and spectrogram panels indicates the current playhead position. This indicator line updates to follow the current playhead position during playback. The playhead position indicator will only appear in the module window when it is within the bounds of the current selection.
Playhead Anchor
The dotted yellow vertical line overlaid on the waveform and spectrogram panels indicates the playhead anchor position in the main editor window. If the playhead anchor position is outside of the current selection bounds, the indicator will not be displayed in the module window.
Contour Curve Display
The blue line overlaid on the spectrogram panel represents the pitch contour curve. Nodes can be added to this curve and adjusted to make changes to pitch over the course of the active selection.

Contour Curve Axes
The contour curve allows for adjustments along two axes: Pitch and Time.
- PITCH: The vertical y-axis of the contour curve represents pitch in semitones.
- The Pitch axis ranges from -6 (bottom) to +6 (top) semitones.
- The center of the Pitch axis equates to 0 semitones.
- TIME: The horizontal x-axis represents time.
- The time format used here is determined by the time format display selection in the transport section of the main editor window.
- The range of the time ruler matches the length of the current selection.
Ruler Zooming
- Hover over the ruler and use a mousewheel or trackpad to zoom in and out.
- Click and drag left or right on the ruler when zoomed in to change the ruler position.
- Double-click on a ruler display to reset the zoom level to default.
Contour Curve Readout
When the cursor is positioned over the spectrogram panel, a text readout will appear in the upper left hand corner of the panel. This readout displays information about the processing that will be applied when the contour curve is rendered.
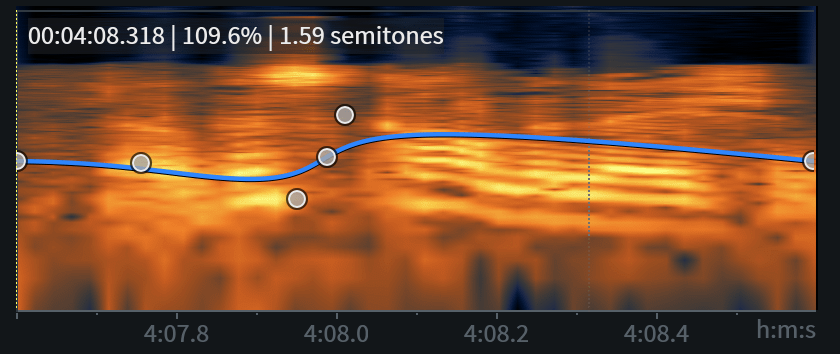
The readout displays the following information about the cursor position, from left to right:
- TIME: Current time position of the cursor within the spectrogram panel.
- PITCH SHIFT (%): Percentage of pitch shift that will be applied at the cursor’s current time position.
- PITCH SHIFT (Semitones): Amount of pitch shift that will be applied at the cursor’s current time position.
Contour Curve Editing
The following section describes the methods and controls available for editing the contour curve.
Add Nodes
Click in the spectrogram panel to add a new node to the contour curve.
Contour Curve Node Limit
The contour curve supports adding up to 25 nodes.
Semitone Adjustments
Click and drag a node up or down to adjust its semitone value.
Time Adjustments
Click and drag a node left or right to move it earlier or later in time.
Note
- Nodes cannot be moved outside of the time bounds of the current selection.
- The contour curve shape will be maintained when the selection changes.
- The contour curve shape will be maintained after rendering.
Remove Nodes
Individual nodes can be deleted from the curve using the following methods:
- Click and drag a node past the top or bottom edge of the contour curve display to quickly remove it from the curve.
- Control-click (Mac) or ctrl-click (Windows) on a node to remove it from the curve.
Reset Individual Nodes
Double-click on a node to reset it to default (0 semitones).
Reset Curve
Removes all custom nodes from the curve, resetting it to default. Two nodes are present in the default curve, one at the start and one at the end of the current selection. The default nodes are set to 0 semitones (no pitch adjustment).
Smoothing
Adjusts the amount of smoothing applied between nodes on the contour curve. Smoothing is a global control and is applied to all nodes on the curve.
- Lower smoothing values: Applies little to no smoothing between nodes on the curve. Allows for stricter
transitions between nodes.

- Higher smoothing values: Applies more smoothing between nodes on the curve, resulting in a gradual,
rounded slope between points on the curve. Allows for more gradual transitions between nodes.

Controls
The following section describes the controls available for refining formant scaling and applying a global pitch offset to the entire selection.
Formant Scaling
Adjusts the amount of formant shift applied when adjusting pitch, the formant shift is scaled relative to the pitch shift. This control can be helpful for maintaining or correcting the timbre and quality of the dialogue after processing. In some situations, the formants may sound unnaturally high or low after processing. Formant scaling can be used to correct for these unnatural sounding results.
Pitch Offset
Applies a global semitone offset value to the current selection. This value is added to or subtracted from the processing applied by the contour curve. Adjusting the Pitch Offset amount will not update the contour curve display.
Tip: Pitch Offset
Pitch Offset can be useful for adjusting a single word by a static amount. For example, setting Pitch Offset to +2 semitones with the contour curve set to default will shift the pitch of the current selection up by 2 semitones.
Alternative Modules
For more generalized, non-dialogue specific pitch envelope editing, try using the Variable Pitch module. The Variable Pitch module features the ability to shift pitch over the course of a selection with or without preserving timing and is suitable for use on a wide range of input material.