Application Menus

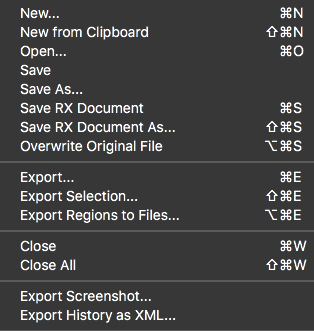
File
The file menu provides options for creating, importing and exporting files. For information about file management in the RX Audio Editor, see the Working with Files chapter.
Edit
The Edit menu includes the following options:
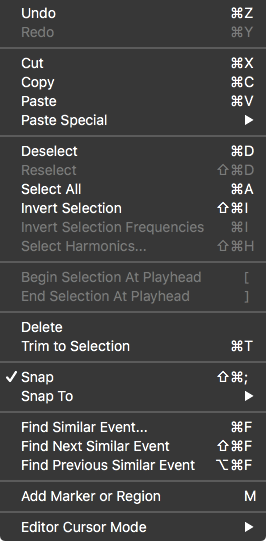
- Undo [Ctrl/Cmd-Z] Reverses the last action taken.
- Redo [Ctrl/Cmd-Shift-Z; Ctrl/Cmd-Y] Cancels the undo.
Undo History
The RX Audio Editor includes an Undo History event list in each file tab. The Undo History list stores a list of all processing or edit operations applied to a given file.
- Cut[Ctrl/Cmd-X] Removes the currently selected audio and stores it temporarily on the Clipboard.
- Copy [Ctrl/Cmd-C] Makes a copy of the currently selected audio and places it on the Clipboard.
- Paste[Ctrl/Cmd-V] Places audio that has been copied or cut to the Clipboard at the current cursor point.
- Paste Special Provides additional options for placing the Clipboard data:
- Insert [Ctrl/Cmd-Alt/Opt-V]: Inserts the audio from the Clipboard and moves audio in the project [does not overwrite]
- Replace [Ctrl/Cmd-Alt/Opt-Shift-V]: Replaces audio in the project with audio from the Clipboard
- Mix [Shift-V] Combines the audio from the Clipboard with audio in the project
- Invert and Mix [Alt/Opt-V] Inverts the audio in the Clipboard and then mixes it with audio in the project. This is useful when you want to compute the difference between two signals.
- To Selection [Alt/Opt-Shift-V] Pastes audio from the clipboard only within the selection bounds, regardless of the copied audio’s length. If the copied audio is longer than the new selection, the audio will be cropped to fit. If the selection is longer than the audio being pasted, silence will be inserted to fill the remaining space.
- To Clip Gain Only [Ctrl/Cmd-Shift-V] Pastes only clip gain information to the current selection
- Deselect [Ctrl/Cmd-D] If audio is selected, deselects it and places the anchor sample at the start of the selection.
- Reselect [Esc] Restores the last selection if you have no current selection.
- Select All [Ctrl/Cmd-Shift-D] Selects the entire open file.
- Invert Selection [Ctrl/Cmd-Shift-I] Selects everything that isn’t currently selected.
- Invert Selection Frequencies [Ctrl/Cmd-I] Selects everything in the current time range that isn’t selected. This is useful for refining processing by first selecting what you don’t want to process, then inverting the selection frequency.
- Select Harmonics [Ctrl/Cmd-Shift-H] Refines the current selection to include more harmonics. For this feature to work well, try it with a simple selection that includes only the fundamental harmonic of what you are trying to select. You can also use the Magic Wand tool to automatically refine a selection to include the appropriate harmonics.
- Begin Selection at Playhead [Left Bracket] during playback only If audio is currently selected, this will automatically adjust the selection to begin at the current playback position.
- End Selection at Playhead [Right Bracket] during playback only Automatically create a selection between the current playhead position and the original anchor playhead position.
- Delete Selection [Delete on a time selection] Deletes the selected audio and closes the space with audio from either side of the timeline.
- Silence [Delete on a frequency, time-frequency, or freeform selection] Deletes selected audio and replaces it with silence.
- Trim to Selection [Ctrl/Cmd-T] Deletes all audio except for the selected audio.
- Add Marker or Region [M] This will create a new marker point at the current location of the cursor/playhead or create a new region if any audio is selected.
- Edit Cursor Mode Changes the behavior of the editor cursor to select by time and/or frequency, or to
zoom. These modes can also be selected from the Cursor Mode buttons.
- Select Time [T] Makes a time selection
- Select Time/Freq [R] Makes a Rectangular time-frequency selection
- Select Freq [F] Makes a frequency selection for the duration of a file
- Lasso [L] Selects everything in a freely defined area
- Selection Brush [B] Selects everything in a predefined radius
- Selection Wand [W] Intelligently selects material similar to whatever is under your cursor [magic wand]
- Zoom Time [Z] Zooms in time
- Zoom Time/Freq [Shift-Z] Zooms in time and frequency
- Zoom Freq [Alt/Opt-Z] Zooms in frequency
- Grab Time [G] Grabs and drags the view in time
- Grab Time/Freq [Shift-G] Grabs and drags the view in time and frequency
- Grab Freq [Alt/Opt-G] Grabs and drags the view in frequency
- Snap [Ctrl/Cmd-Shift-;] Snap selections to the boundaries selected in the “Snap To” sub-menu.
- Snap to:
- Markers
- Ruler Coarse
- Ruler Fine
- Zero Crossings
- All
- None
View
The View menu includes the following options:
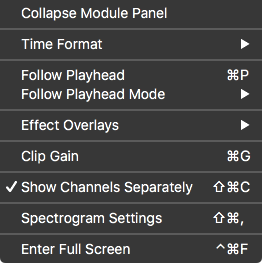
- Collapse/Expand Module Panel Collapses the module list panel of RX into a row of icons.
- Time Format RX’s time scale and playhead location counter can be set to show different time units. Learn more about changing the time format in the Transport chapter
- Follow Playhead [Ctrl/Cmd+P]: Toggles whether or not the current view follows the playhead position
during playback.
- In Page mode, the view will follow the playhead one view length at a time.
- In Continuous mode, the view is centered on the playhead as it moves across the file.
- Effect Overlays: This sub-menu allows you to turn special display features for the De-clip
and Spectral Repair modules on and off.For an overlay to be visible, you need to have
the option selected in the view menu, and the corresponding module window needs to be open.
- De-clip Threshold When the waveform is visible, the threshold settings and controls appear as white lines within the display. This display can be used to adjust the de-clip threshold settings.
- Spectral Repair Source Regions Displays effective region bounds when using the Spectral Repair module.
- Clip Gain: Enables/disables the Clip Gain envelope in the main editor window. The Clip Gain curve can also be toggled on or off by clicking the “View Clip Gain” button to the right of the selection tool buttons, or by using the following keyboard shortcuts: Command+G (Mac); Ctrl+G (Windows).
- Show Channels Separately: Toggles how channels are displayed in the spectrogram/waveform view. When enabled, each channel will be drawn in its own lane in the main editor view. When disabled, the channels are drawn in one summed view. This allows for greater vertical resolution, especially when working with multichannel files. This option can also be toggled on or off by: clicking the Channel View button to the left of the mini waveform overview display or by using the following keyboard shortcuts: Command+Shift+C (Mac); Ctrl+Shift+C (Windows).
- Spectrogram Settings: Opens the Spectrogram Settings window.
- Enter full screen: Enables full screen mode.
Modules
The Modules menu includes options for opening module windows, running Learn on the current selection without opening the module window, and rendering module settings on the current selection without opening the module window.
Open Module Window
Open a module window by selecting it from this menu.
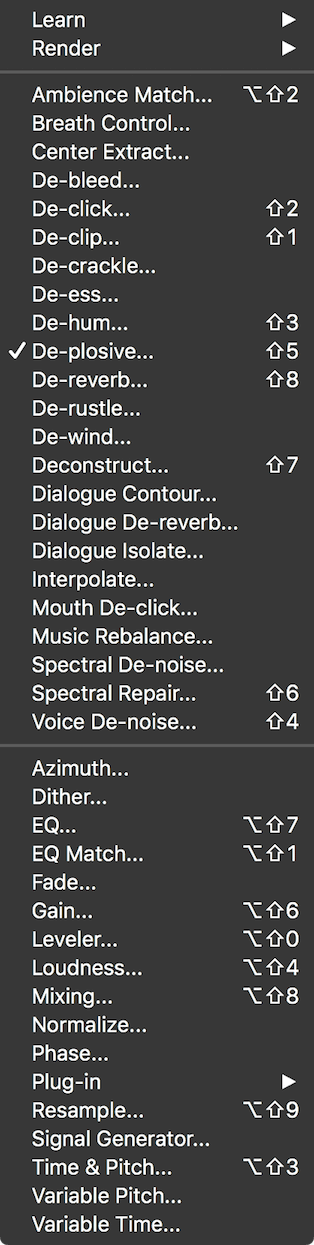
Learn
Run a Learn pass on the current selection without opening the associated module window.
Render
Render settings for any module on the current selection without opening the associated module window.
Transport
The Transport menu includes the following options:
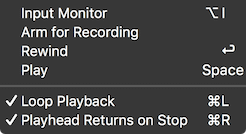
- Input Monitor [Alt/Option-I] Enables input monitoring. When input monitoring is enabled, the input signal of RX will be routed to the output signal of RX.
- Arm for Recording / Record / Stop Recording [Alt/Option-Space] Runs the next possible step for recording. If you have not opened a new file, Arm for Recording will open the New File dialogue box for you.
- Rewind [Return] Sets the playhead to the beginning of the file.
- Play/Stop [Space] Starts or stops playback. If Input Monitoring is enabled, starting playback will temporarily suspend Input Monitoring.
- Loop Playback [Control/Command-L] Toggles playback looping. If nothing in the file is selected, the end of the file will loop back to the beginning.
- Playhead Follows Playback [Control/Command-R]: Toggles the behavior of the playhead on stop. If this is
enabled, the playhead will return to the anchor sample (the position before playback began).
- This is useful for comparing processing. If this is disabled, the anchor sample will be set to the current playhead position. This is useful for moving through a file while listening for irregularities.
Window
The Window menu includes the following options:
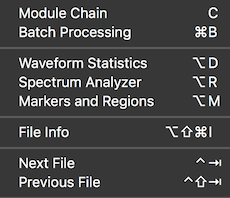
- Batch Processing [Ctrl/Cmd+B]: This gives you access to file based batch processing, as explained in the Batch Processor chapter.
- Waveform Statistics [Alt/Opt+D]: This gives you access to informational readouts on a variety of amplitude measurements, as explained in the Waveform Statistics chapter.
- Spectrum Analyzer: The Spectrum Analyzer displays an analytical view of your audio. More information is located in the Spectrum Analyzer chapter.
- Markers and Regions [Alt+M]: Markers and regions allows you to define and save particular points or selections in time for your audio file. More information is located in the Markers and Regions
- Close All Floating Windows/Reopen Closed Windows [Ctrl/Cmd+Opt+W]: Closes or reopens all floating windows.
- File Info: View metadata and other information about the audio file, as explained in the Working with Files chapter.
- Next File (Control-Tab) Changes RX’s current file tab to the next file in the window order.
- Previous File (Control-Shift-Tab) Changes RX’s current file tab to the previous file in the window order.
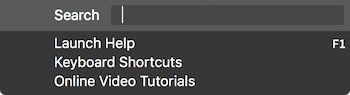
Help
The Help menu includes options for launching the product documentation, viewing the Keyboard Shortcut Guide, and accessing tutorial videos online.