Reverb
Overview
The Reverb module will recreate the reverberant space learned from the Reference profile.
Module
The Reverb module includes the following controls:
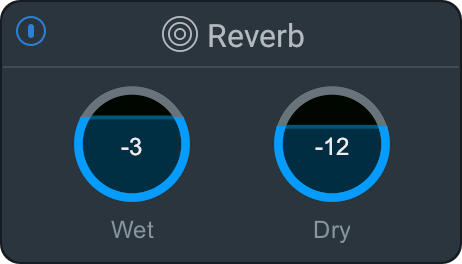
| Control | Description |
|---|---|
| Power Button | Bypasses the Reverb processing. |
| Wet | Determines the amount of wet signal in dB (processed signal) that becomes mixed into the output. |
| Dry | Determines the amount of dry signal in dB (unprocessed signal) that becomes mixed into the output. |
Advanced View
The following advanced controls and views are available for the Reverb module:
Reverb parameters
Reverb parameters will appear in two different visual indicators that represent the early reflections and the reverb tail.
Early Reflections
The Early Reflections view displays vertical lines that allow you to visualize the echoes, or early reflections, of your signal.
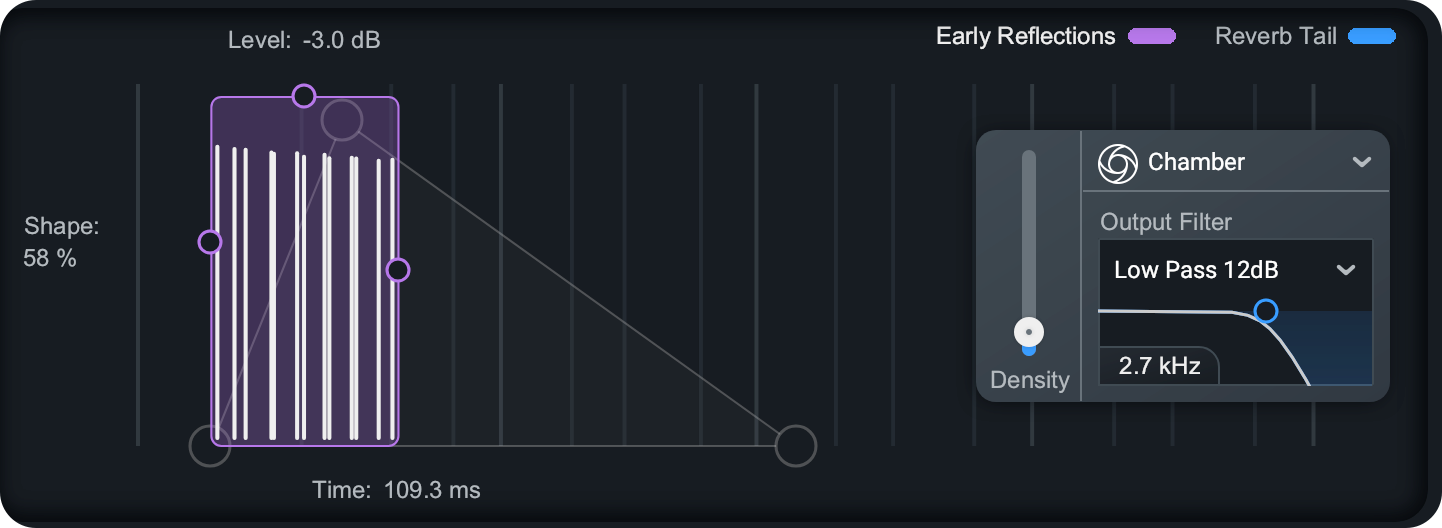
Early Reflections Impulse Visualization
The Early Reflections visualization is a representation of your clip’s delay taps. This displays exactly half of delay taps that are spaced nicely for visualization.
| Control | Description |
|---|---|
| Early Reflections Legend | Click on the Early Reflections legend to switch to the Early Reflections view. You can also change views by clicking on the Early Reflections display. |
| Shape | Click and drag the Shape node up or down to adjust slope of the amplitude of the early reflections. |
| Level | Click and drag the Level node up or down to adjust the gain of the early reflections in dB. |
| Time | Click and drag the Time node left or right to shorten or lengthen the duration of time between reflections in milliseconds. |
Reverb Tail
Displays a visual of the wash of sound that happens after the early reflections in a reverb. The Reverb Tail display includes the following controls:
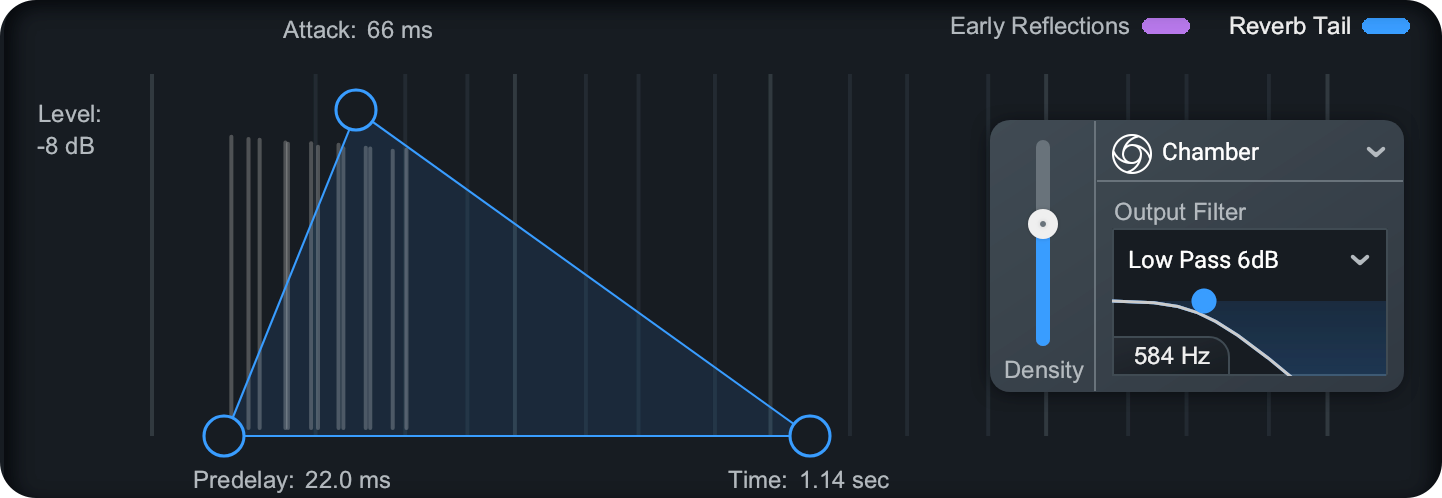
| Control | Description |
|---|---|
| Reverb Tail Legend | Click on the Reverb Tail legend to switch to the Reverb Tail view. You can also change views by clicking on the Reverb Tail triangle display. |
| Predelay | Click and drag the Predelay handle left or right to adjust the amount of time between direct sound and the arrival of reflections. |
| Attack/Level | Click and drag the Attack/Level handle left or right to adjust how quickly the reverb tail reaches maximum amplitude in milliseconds. Click and drag the the Attack/Level handle up or down to adjust the gain of the reverb tail in dB. |
| Time | Click and drag the Time node left or right to shorten or lengthen the decay time of the reverb tail in milliseconds. |
Use Shift To Lock Attack/Level Node Movement
Click and hold the Shift key to lock the horizontal or vertical movement of the Attack/Level node.
HUD
By adjusting the HUD controls, you can fine tune your reverb. The available HUD controls are outlined in the image and table below.
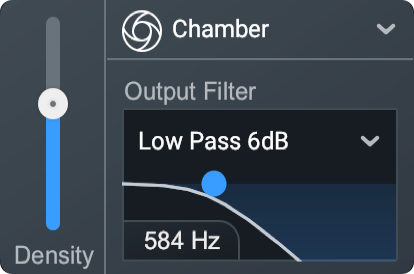
| Control | Description |
|---|---|
| Density | Sets the amount of absorption within the space. |
| Reverb Type Menu | Selects the type of diffusion within the reverb tail. You can choose from Chamber, Plate, or Hall. For more information on the available options, see Reverb Type Options below. |
| Output Filter Menu | Selects the type of output filter. For more information on the available options, see Output Filter Options below. |
| Output Filter Node | Sets the cutoff frequency of the selected Output Filter. |
Reverb Type Options
You can choose from the following Reverb Type options:
| Type | Effect |
|---|---|
| Chamber | Select to apply a smooth, uncolored sound. |
| Plate | Select to apply a dense, diffuse sound. |
| Hall | Select to apply a thick, full sound. |
Output Filter Options
You can choose from the following Output Filter options:
| Filter | Effect |
|---|---|
| Lowpass/Highpass 6dB | Select to apply a more gentle roll-off. |
| Lowpass/Highpass 12dB | Select to apply a sharper roll-off. |
Lowpass and Highpass filters Applied to Reverb Output
The Lowpass and Highpass filters have the same function as EQ filters, but these are applied to the output of the reverb.