Getting Started
Overview
Welcome to Dialogue Match! If you haven’t used an iZotope product or want to know more about Dialogue Match, this is the right chapter for you. Dialogue Match is currently supported in Pro Tools only via AudioSuite.
The topics discussed in this chapter include:
Authorization
The first time you open a Dialogue Match plug-in, the Authorization window will appear. The Authorization window offers the following options:
- TRIAL: Start or continue a trial period evaluation prior to purchasing.
- DEMO: Continue evaluating the product with Demo limitations (after the 10-day trial period ends).
- AUTHORIZE: Authorize the product with a serial number.

Trial Mode
Trial mode allows you to evaluate Dialogue Match over a 10-day trial period. The trial period begins when you first open a Dialogue Match plug-in in Pro Tools. The Authorization window will display the number of days remaining in your trial period. Click the Continue button to exit the Authorization window.
Demo Mode
After your 10-day trial period expires, you have the option to operate Dialogue Match in Demo mode. To continue evaluating Dialogue Match in Demo mode, click the Demo button.
Authorization Methods
To disable Trial or Demo mode, you must authorize the product with a valid serial number. We offer three authorization methods for Dialogue Match:
- Online Authorization: Authorize on a computer online.
- Offline Authorization: Authorize on a computer offline.
- iLok Authorization: Authorize using iLok.
More Authorization Help
- For information about Authorization, please visit the iZotope website: https://www.izotope.com/authorization
- For additional help authorizing Dialogue Match visit iZotope Customer Care information on the iZotope website: http://www.izotope.com/support or contact our Customer Care department by sending an email to: support@izotope.com.
- More information about iZotope’s Customer Care department and policies can be found in the Customer Care chapter.
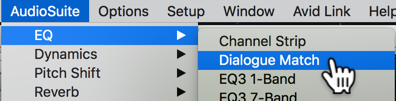
Accessing Dialogue Match
You can access iZotope’s Dialogue Match plug-in in Pro Tools by navigating to the EQ folder under the AudioSuite file menu.
Working in AudioSuite
When using Audiosuite plug-ins, there are various user definable input options and output options, which may affect how you use Dialogue Match.
Input Options
The available input options via AudioSuite include the following:
| Option | Description |
|---|---|
| Clip-by-clip | Recognizes individual clips in the timeline, as well as fades. |
| Entire selection | Treats the entire selected area as one clip. |
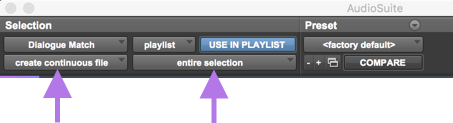
Output Options
The available output options via AudioSuite include the following:
| Option | Description |
|---|---|
| Create individual files | Nondestructive processing of the audio file(s) in the session, replacing them with the processed audio. This mode preserves individual clips and fades/handles. |
| Create continuous files | Nondestructive processing of the original audio file. Creates a new audio file with the audio sent back from Dialogue Match, consolidated into one continuous clip. |
Navigating the Interface
Dialogue Match’s plug-in interface is divided into four main areas as seen in the image below and described in the table below.

| Label | Section | Description |
|---|---|---|
 |
Global Header | The global header area provides access to the Snapshots, Reset, Options, and Help. For more information on these controls, see the Global Header Controls section. |
 |
Profiles | Allows you to collect a Reference profile and an Apply To (source) profile. For more information, see Profiles section. |
 |
Modules | Access controls for each module. The following modules are available: EQ, Reverb, Ambience. |
 |
Advanced view | Allows you to hide or show the advanced controls for each module. For more information on the advanced controls, see the Advanced view sections for each module. |
Global Header Controls
The Dialogue Match global header area includes the following controls:

| Label | Controls | Description |
|---|---|---|
|
Snapshot Selection | Choose from either a preset Snapshot or custom Snapshot to recall a saved state of all Dialogue Match parameters. |
|
Reset | Returns the plug-in to its factory default settings. |
|
Options | Opens up the Options window. For more information, see the Options chapter. |
|
Help | Links to the Dialogue Match Help Documentation. |
Resize Window
You can resize the main window by clicking and dragging the bottom right corner of the plug-in window.

Expand/Collapse
You can utilize the expand/collapse button to show more or less information within the Dialogue Match plugin. There are two locations where you can access this control: Profiles section and Advanced view section.
Profiles
Click on the arrow next to the Profiles section to expand or shrink the Profile section.

Advanced view
Click on the arrow next to Advanced view to expand or collapse the Advanced view of the selected module.
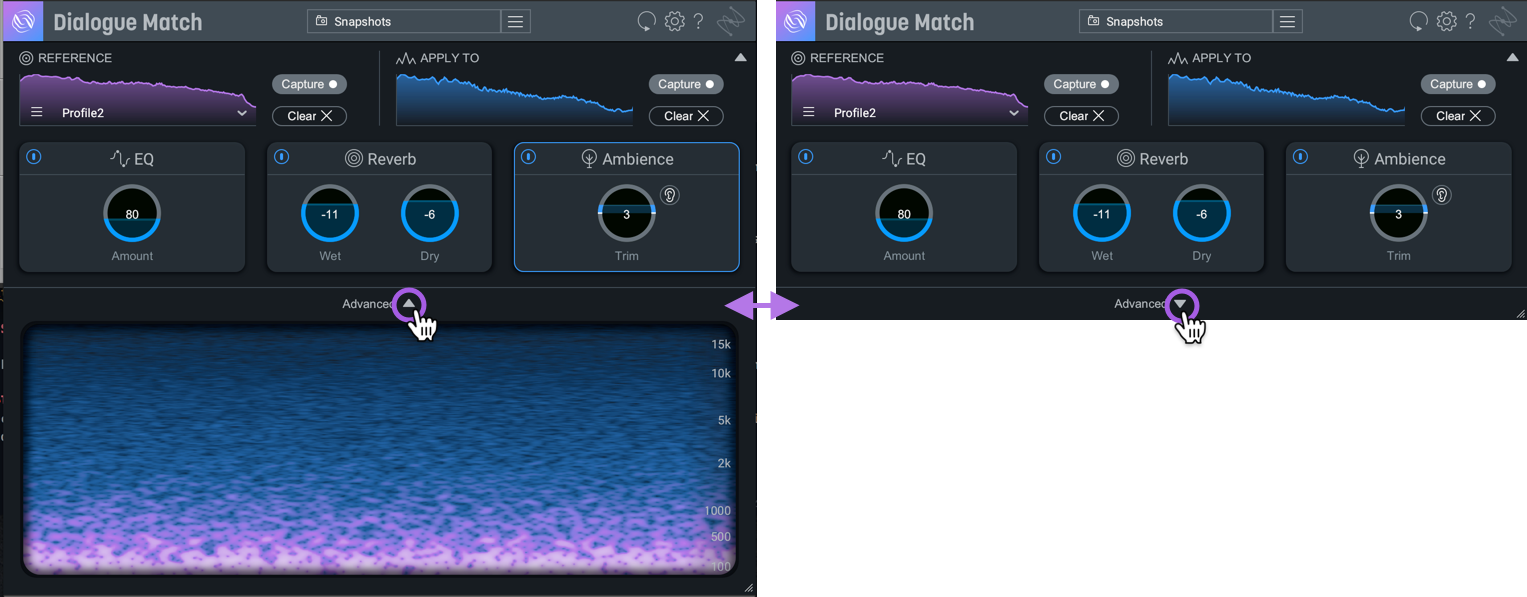
Resize Window to Display Advanced view
You can also show the Advanced view by expanding the window using the resize behavior until the view appears.