So You Want to Make an Advanced Home Movie…
by HearItWow, as a special guest contribution to HSM
In my last go-around on Home machinima (So You Want to Make a Home Movie, April 29, 2011), I talked about the basic equipment to use and offered some tips to get you started. Now it’s time to pull the curtain back on some of the tricks and techniques I use to make HomeCast look the way that it does. By the time we’re done, you’ll be dollying through Home and shooting closeups of yourself like a pro.
Let’s begin with a few things that the advanced Home machinima maker really ought to own:
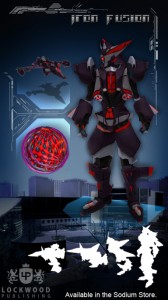
Lockwood MechJet Suit
This is the single-most useful item for shooting in public spaces, and for machinima making in general. There are two reasons for this:
- Power Orb: Go find an object in a public space. It could be a wall, a lamp post, or a chair. Now pop out that Power Orb emote and turn the camera around. You’ll have a 200-degree view at a high angle, something that the Corner Crouch technique simply cannot achieve. This opens up hundreds of new possibilities for camera angles and places to shoot. Pier Park, with its lampposts, is particularly fertile ground.
- The Transformation: Press R3 for the over-the-shoulder view from the camera, then walk toward the camera slowly. You’ll notice that the Mech Jet disappears from the screen, giving you a smooth dolly shot away from your subject. You can reverse this footage in editing software to dolly in, or go for a different must-have item…
Konami Urban Camo Costumes
Get the Christmas Tree or the Trash Can. Press R3 for the over-the-shoulder view, and you’ll see that these half-height avatars take up very little room on the screen. You can now dolly in to anything you like in any public or personal space. And as we’ll see in a bit, getting rid of that tiny bit of avatar is easy with the right software.
Paris Modern Pen or Namco Coins
The Paris Modern Pen can be found in Furniture, or you can win the Namco coins at the Namco Museum public space. Either item will do, because all you want is something very, very small.
Open the Furniture browser, press R2 until the Pen or Coins are at the top of the screen, then tilt down. The item disappears from the screen, giving you a high-angle shot with nearly unlimited movement, as long as there are no invisible barriers in the way. You can also disappear these items against a wall or corner, then use R2 and L2 to crane up and down.
There are three disadvantages to this, one of which makes this technique limited in its usefulness:
- No avatars on screen. You can’t see avatars while you’re in the furniture menu. Depending on your feelings toward actors, this may or may not be a problem.
- Active items have borders around them. Removing actives from the shot solves this.
- There’s flashing text on the bottom. Those options in the furniture menu will flash at you as long as you’re in the Furniture Menu. Like that little bit of Urban Camo avatar, this can be fixed.
Now that you’re armed with the best tools, let’s have some fun with the footage. If you own Sony Vegas HD, you’ll find what I’m about to explain incredibly easy. Other software may have similar functions.
Ever wonder how I get those shots of myself talking without the chat box? As we all know, turning off the chat box turns off speaking animations. So the trick is to learn how to get rid of the box.
First, you want to get yourself close to a wall so you can get a nice closeup. Be sure to frame your avatar and the background about 20% to 25% larger than you want in the final shot. You’re going to lose some image on the left and at the top, so be sure that whatever you want people to see is to the right of your avatar.
To capture text, just fill the text bar with a line of type. Anything will do, but I use solid chains of “a,” “b,” “c” and “d” so that I can easily identify the takes in post production. Once you have that text bar filled, hit Capture on your PC, then hit Enter on your keyboard.
This is the skill part: Once your avatar starts talking, you’ll need to hit L3 twice quickly. The first push will expand the chat box, and the second one will collapse it to the black “Open Chat Log” button. With practice, you’ll be able to get about 12 seconds of your avatar doing talking animations in closeup with the rest of the screen clear, except for that button and the flashing “www” icon in the corner. Get in close enough, and you can even get your text bubble off the screen, although this isn’t always necessary.
Cropping the Image
This is where the magic happens. Whether you’re looking to get rid of the top of a Christmas tree, lose that flashing Furniture menu or remove the “Open Chat Log” button, the technique is the same.
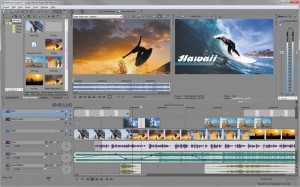
Import your footage to Sony Vegas. At the far right-hand side of the clip, you’ll see a little white box with scissors poking out of its corners. This is the Event Pan/Crop tool, and it’s about to become the best friend you ever had.
 Slide the timeline cursor over a portion of your clip so that you can see it in the preview window, then click on the little white square. A new window opens with a still of your shot surrounded by a rectangle with a giant “F” in the middle. Grab a corner of that rectangle. Any corner. Pull it out and push it in and watch what happens to your shot in the preview window.
You’ll notice that as you pull the frame out, your clip gets smaller, and as you push it in, it gets bigger. The rectangle determines what part of your shot gets into the finished frame.
To get rid of unwanted elements, just push the frame in until they’re off the screen, then move the frame to get the composition you want. For our talking avatar example, push the frame in so that you can’t see the “Open Chat Log” button. By default, the image is zoomed proportionally, so you’ll get rid of that flashing “www” indicator as well. Bringing it in by about 20% is enough to get rid of the buttons; for the flashing Furniture menu and the tops of Urban Camo avatars, you may need to push in a little more. Move the rectangle until you like the composition, then click X to close the window. This crop will be applied to your entire shot, making your pans, dollys and tracking shots look like they were recorded with a floating camera.
The Final Step
There’s one last thing to do whenever you zoom a shot like this, and that’s sharpening the image. If you don’t sharpen, the footage may look fuzzy or blocky alongside clips that haven’t been cropped.
Click on the Event FX button at the far right of the clip. It’s right below the Event Pan/Crop button. This pulls up the special effects and filters in Sony Vegas. Choose Sony Sharpen, then set the sharpening to 0.350, which works perfectly for the talking avatar shots. If you’ve zoomed in a lot, you may want to go as high as 0.400; for lighter zooms, 0.200 may be enough. Keep an eye on the preview; if you start seeing thick, black lines around things, you’ve sharpened too much.
Want to make that MechJet move a dolly in instead of a dolly out? Just right-click on the clip and select Reverse. Now you’re tracking in instead of out. Note that this will skip like mad when you play it back in Sony Vegas, but it will look perfect in the final render.
The Big Caveat
As mentioned previously, using the Event Pan/Crop tool discards a lot of information in the frame. As you’re setting up your shots, you need to think in terms of what will be in the finished project, rather than what you’re seeing when you capture. Once you’ve used this technique a few times, you should have a solid sense of how to frame your shots to get what you want.
With these techniques, you’ll be able to explore new ways of shooting in Home, and give your projects a professional, finished look. Have fun, experiment and you might just make a talked-about Home machinima.


I know this is going to sound like some crappy infomercial testimonial (you know the kind, where everyone’s too brightly lit and there’s that godawful generic John Tesh music in the background), but I’ve tried out some of the techniques HearItWow outlined in this article, and they work brilliantly. Just take a look at the difference in cinematography for the French Chateau virtual tour versus, say, The Nautical Saturnalia, and there’s a conspicuous difference in camera work.
Keep in mind, by the way, that i haz teh dumb when it comes to technology stuffs. So if you actually understand how to exploit software like Sony Vegas, you can really take Home machinima to some crazy levels. Look at Alinea3’s “Alors on Danse,” ShikasClouds’ “SAW” homage, any of DOD’s videos, Sue’s work, and certainly the HomeCast to see what a pro can do.
Agreed,these articles are great “How to”guides.Where can I find ShikasClouds Saw homage?
Hey I’m just wondering,why does it say Home is online in the upper left of this page?
Thanks HearItWow! I am reading the other article too. I haven’t seen the Saw homage yet either. I will have to look that up. I study as much of this art as I can here lately, and this will be information I revisit until I get used to it.
A friend!Hello friend!I’m feelin a bit like Casey Jones at the moment,with all the maintenance…Strewth!
@NorseGamer-technology stuffs?I thougt u had sum fancy book lernin..;-)
It would be possible to describe me as well-versed in computer technology if I were being compared to, for instance, a poodle.
ShikasClouds’ SAW homage can be found here: https://www.youtube.com/watch?v=OtYdGnKL0L0 — he did a very good job with the LOOT Active Camera, I think.
For me, the single best filmmaking tool I’ve used so far is the Lockwood MechJet. Ten bucks, but absolutely worth it. LOOT’s equipment is perfect for stationary shots, but HearItWow’s right: for dolly shots, you really should have a MechJet.
HIW, I am at a loss for words. I want to express my appreciation for your help -- I know that writing these articles takes up a lot of your time. But, I would not attempt doing machinima if it was not for the information you have been posting. I bought the Sony Video Vegas package and am playing with it now.
I’m taking notes.
This please me.
Thanks for the kind words. If anyone needs a more in-depth explanation of anything, do let me know.
Until we get that go-anywhere camera that can record avatar animations without the chat box popping up, sharing ideas like this is the best way to advance Home machinima techniques. Personally, I find the limitations of the camera to be part of the fun, because it forces the filmmaker to work within some limitations, and that demands creative solutions.
I still want that go-anywhere camera. And a trophy room.
I had some fun with my actors yesterday. I was using your Urban Camo idea and I kept telling them, “face the bush!”.
But the Nintendo Coin & Nintendo Museum doesn’t exist
Good eye, AL. That should be Namco Coin and Namco Museum.
Somewhere an editor has turned white with horror, even though it’s really the author’s fault.