Pair Sites - Add Site Dialog
See the following sections:
Pairing to Another Site
You can pair to any site where Zerto is installed.
Zerto can be installed at multiple sites and each of these sites can be paired to any other site on which Zerto has been installed. Virtual machines that are protected on one site can be recovered to any paired site.
To pair to a site:
|
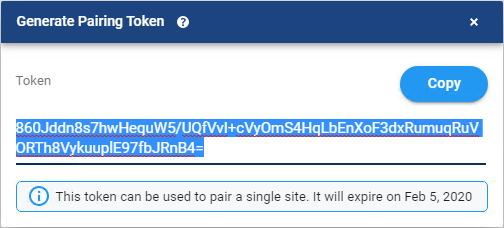
1.
|
From the remote site to which you will pair, in Zerto Virtual Manager > Sites tab, click the button Generate Pairing Token. |
|
2.
|

|
The Generate Pairing Token window opens.
|
3.
|
Click Copy, to copy the token. |
The token expires when the earliest of one of the following conditions is met:
|
•
|
48 hours after clicking Copy |
|
•
|
At the next ZVM process termination |
|
•
|
After the token is used to authenticate the pairing request |
|
4.
|
From the site which will initiate the pairing, in the Zerto Virtual Manager > Sites tab, click PAIR. |
The Add Site window is displayed.

|
5.
|
Specify the following: |
|
•
|
Host name/IP: IP address or fully qualified DNS host name of the remote site Zerto Virtual Manager to pair to. |
|
•
|
Port: The HTTPS port communication between the sites. Enter the port that was specified during the installation. The default port during the installation was 9071. |
|
•
|
Token: Paste the token which you copied above. |
The sites are paired, meaning that the Zerto Virtual Manager for the local site is connected to the Zerto Virtual Manager at the remote site.
After the pairing completes, the content of the SITES tab updates to include summary information about the paired site.
Unpairing Sites
You can unpair any two sites that are paired to each other.
!
Important: If there is a VPG on either of the sites you are unpairing, the VPGs will be deleted.
To unpair two sites:
|
1.
|
In the Zerto User Interface, in the SITES tab, select the site which you want to unpair. |
A message appears warning the user that the sites are about to unpair.
If there are either protected or recovered VPGs on the paired sites, a message appears warning the user that the VPGs will be deleted.
|
3.
|
For vSphere, Hyper-V and Azure platforms, you can select to keep disks to use for preseeding if the VMs are re-protected. If you select this option, the disks are not removed from the recovery site. |
|
4.
|
To unpair, click CONTINUE. |
The sites are no longer paired. If there are VPGs on either site, they are deleted.
The VRA on the recovery site that handles the replication for the VPG is updated including keeping or removing the replicated data for the deleted VPG, depending if you selected to keep disks to use for preseeding.
The locations of the saved target disks are specified in the Events tab in the ZVM application on the Recovery site.
See also: