Upgrading Zerto Virtual Replication
Zerto Virtual Replication releases regular updates. VMware and Microsoft also release new versions of their products which can impact Zerto Virtual Replication. This section describes different options for different upgrade scenarios.
The following topics are described in this section:
Upgrading Zerto Virtual Replication
You can upgrade from version N to the next version (N+1) of Zerto Virtual Replication including to any update within the current version. You cannot do an N+2 upgrade directly.
The order you upgrade the sites, protected or recovery, is not relevant as long as paired sites remain only one version apart.
Note: Upgrade releases are considered to be upgrades of the same version. Releases 4.5, 4.5U1, 4.5U2, etc., are the same version.
The following table shows what version you can upgrade to based on the current version running at the site.
Current Version: | Can Upgrade to: |
3.5, 3.5Ux | 4.0, 4.0Ux |
4.0, 4.0Ux | 4.5 |
4.5, 4.5Ux | N/A |
Note: Zerto recommends upgrading to the latest version of Zerto Virtual Replication that supports the environment you are using. Refer to the
Zerto Virtual Replication Interoperability Matrix for the list of environments supported by this version of Zerto Virtual Replication.
A Zerto Virtual Manager can be used with a different version on another site, as long as the other version is only one version higher or lower. The following table shows what versions can be used on a peer site, based on the version on the current site.
Version N (This Version) | Version N-1 | Version N+1 |
3.5, 3.5Ux | 3.1, 3.1Ux | 4.0, 4.0Ux |
4.0, 4.0Ux | 3.5, 3.5Ux | 4.5 |
4.5 | 4.0Ux | N/A |
When upgrading Zerto Virtual Replication, the VRAs that were installed in the previous version are not upgraded automatically. If a newer version of the installed VRAs exists, you can continue to use the current VRAs with the new version of Zerto Virtual Replication or upgrade these VRAs from within the Zerto User Interface, as described in
Upgrading VRAs. Zerto recommends that you always upgrade the VRAs to the latest version on your site.
The order you upgrade the sites, protected or recovery, is not relevant as long as paired sites remain only one version apart, that is, only one version higher or lower.
When using the Zerto Cloud Manager, you must upgrade the Zerto Cloud Manager to be consistent with the latest version of Zerto Virtual Replication run by the CSP. Also, upgrade the version of Zerto Virtual Replication run by the CSP before Zerto Cloud Manager, so that they are never more than one version separated from each other. For details about upgrading Zerto Cloud Manager, refer to the Zerto Cloud Manager Installation Guide.
Before Upgrading
Before upgrading to a new version, either by installing the new version over the existing version or by uninstalling the existing version and then installing the new version, Zerto recommends doing the following:
■ Clear the Microsoft Internet Explorer cache of temporary Internet files. Not clearing the cache of temporary files can result in problems when accessing the Zerto Virtual Manager via the vSphere Client console.
■ Make sure that all VPGs are in Protecting state and not in a sync state, such as Delta Sync, or an error state, such as Needs Configuration.
■ Complete any recovery operation before starting the upgrade.
■ Save the tweaks file before doing the upgrade, if you have made any changes to it. The tweaks.txt file is replaced with the default tweak file so all the tweaks entered before the upgrade are lost.
■ Stop the Zerto Virtual Manager service.
■ Create a backup of the machine where the Zerto Virtual Manager runs, to use in case the upgrade fails. Zerto recommends taking a snapshot of the machine after stopping the Zerto Virtual Manager service.
Note: The snapshot should only be used to rollback to the pre-upgrade state immediately after the upgrade has completed. The snapshot should not be used after the protection of virtual machines has restarted.
The installation procedure checks for an existing installation that is either one version lower than the new version or is the same version. If an installation is found you can upgrade the installation.
Upgrading the Current Installation
The existing Virtual Replication Appliances and protected virtual machines, along with all other information, such as checkpoints, journals, sites, and pairing details, are retained and are available in the upgraded installation. The upgrade is performed without disrupting the protection, but no new checkpoints are written to the journal during the actual upgrade. This temporarily causes alerts to be issued, even if only a single site was affected, stating that the journal history and RPO do not meet their specified target settings.
Note: You must run the upgrade procedure to completion.
To upgrade the version:
1. Run the Zerto installation executable for vSphere.
The Zerto Virtual Replication upgrade wizard is displayed.
2. Proceed to completion.
Note: If the vSphere Client console was open during the upgrade, close it and reopen it.
You can upgrade Zerto Virtual Replication silently, by running the silent installation, as described in
Performing a Silent Installation.
Additional Considerations
The following information should be considered when upgrading:
■ When using the Zerto Cloud Manager, you must upgrade the Zerto Cloud Manager to be consistent with the latest version of Zerto Virtual Replication run by the CSP. Upgrade the version of Zerto Virtual Replication run by the CSP before Zerto Cloud Manager. Make sure that they are never more than one version apart from each other.
■ VRAs from the existing installation are not automatically upgraded when upgrading Zerto Virtual Replication. VRAs installed with the previous version of Zerto Virtual Replication can continue to work with the current version and with any combination of VRAs, all from one version or a mix of VRA versions, on both the protected and recovery sites, as long as the VRA versions differ by only one version, higher or lower. Zerto recommends upgrading the VRAs to be consistent with the latest version.
See
Upgrading VRAs for information relating to upgrading existing VRAs.
Upgrading Multiple Sites Running Different Versions
A Zerto Virtual Manager can be installed on a site running a different version, as long as each version is only one version higher or lower than the other. When you have multiple sites, make sure that the version of Zerto Virtual Manager is never more than one version higher or lower than any of the versions running on the paired sites.
To upgrade Zerto Virtual Replication installed on multiple sites:
1. Upgrade a site whose version is lower than the required version. Start the upgrades with the site whose version is lowest.
Note: Make sure, at all times, that no site is more or less than one version higher or lower than any of the paired sites.
2. If the VRAs on the site need upgrading, upgrade these VRAs to ensure that they are also no more or less than one version higher or lower than any of the VRAs on any of the paired sites.
3. Repeat the above step for all sites.
For example, if you have sites running versions 3.5U7 paired to a site running 4.0U4, and you are planning to upgrade to 4.5, you must first upgrade the 3.5U7 site to a 4.0Ux version and then both of the sites to 4.5.
Upgrading To More Than One Version Higher
If you need to upgrade more than one version higher, do one of the following:
■ Upgrade versions stepwise, one version at a time, as described above, until you reach the required version.
■ Use the Zerto Diagnostics utility’s export option to export the existing VPG definitions, then uninstall the old version of Zerto Virtual Replication. Install the new version, then use the Zerto Diagnostics utility’s import option to re-create the VPGs.
Note: Before upgrading to a new version, make sure that all VPGs are in Protecting state and not in a sync state, such as Delta Sync, or an error state, such as Needs Configuration.
To upgrade Zerto Virtual Replication using the Zerto Diagnostics utility:
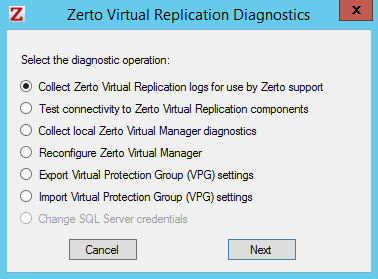
1. Click Start > Programs > Zerto Virtual Replication > Zerto Diagnostics.
The Zerto Virtual Replication Diagnostics menu dialog is displayed.
2. Select the Export Virtual Protection Group (VPG) settings option and click Next.
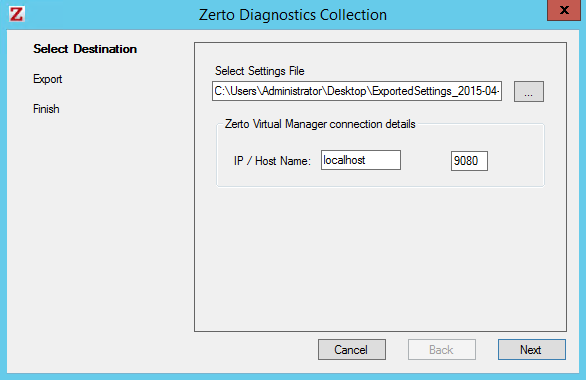
Note: Zerto Virtual Replication regularly exports settings to the Zerto_Installation_Folder\Zerto Virtual Replication\ExportedSettings folder. You can use the last exported file. The default location of Zerto_Installation_Folder is C:\Program Files\Zerto.
3. Select the destination for the file that will contain the exported settings and enter the Zerto Virtual Manager IP address and port for the protected site.
4. Click Next.
The list of exported VPGs is displayed.
5. Click Done.
6. In the Zerto User Interface delete the VPGs, and keep their target disks.
Note: If you did not export the settings, Zerto Virtual Replication regularly exports settings to the Zerto_Installation_Folder\Zerto Virtual Replication\ExportedSettings folder. You can use the last exported file as input to recreate the VPGs to this point in time. The default location of Zerto_Installation_Folder is C:\Program Files\Zerto.
7. Uninstall the existing Zerto Virtual Replication version.
Note: If the protected site and recovery site are the same for any of the VPGs that were exported, set Enable replication to self in the Policies section of the Site Settings dialog, as described in Zerto Virtual Manager Administration Guide.
10. Click Start > Programs > Zerto Virtual Replication > Zerto Diagnostics.
The Zerto Virtual Replication Diagnostics menu dialog is displayed.
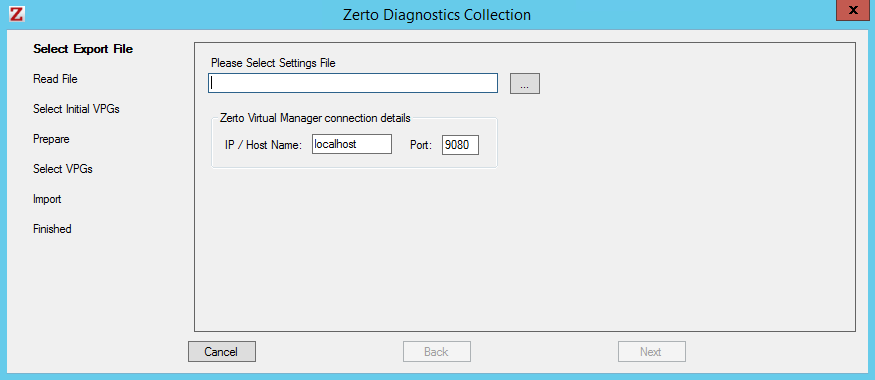
11. Select Import Virtual Protection Group (VPG) settings.
12. Click Next.
13. Select the file previously exported and enter the Zerto Virtual Manager IP address and port for the protected site.
14. Click Next.
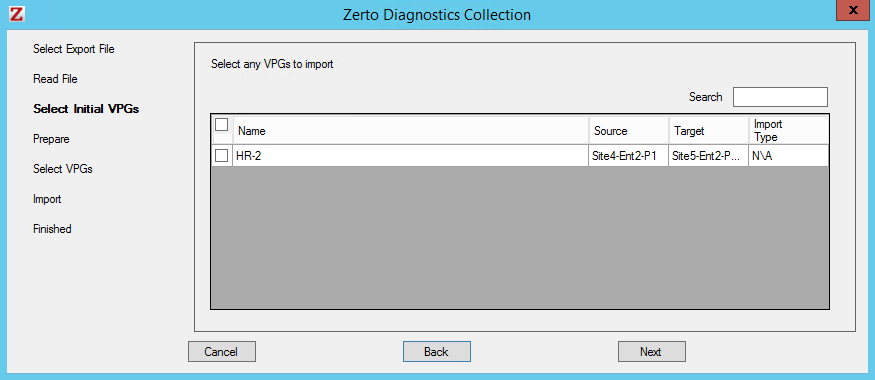
The list of exported VPGs is displayed.
15. Select the VPGs to import. You cannot import VPGs that have the same name as a VPG that is already defined in current installation. If a VPG in the import file has the same name as an existing VPG, it is disabled and is grayed-out.
16. Click Next.
The list of imported VPGs is displayed. If the VPG cannot not be imported, the reason is specified.
17. Click Done.