Performing an Installation
The Zerto Virtual Replication installation deploys the Zerto Virtual Manager (ZVM) and copies the installation software for the Virtual Replication Appliance (VRA).
A complete installation includes installing Zerto Virtual Replication on the protected and peer, recovery, sites. When both these sites are managed by a single vCenter Server, Zerto Virtual Replication is installed on only one site. In this case, Zerto recommends the following:
■ Install Zerto Virtual Replication in the site where protected machines will be recovered.
■ Make sure that the machine running the vCenter Server is also in the datacenter used for the recovery and not protection.
In all cases, Zerto recommends that you do not install Zerto Virtual Replication on the machine running the vCenter Server service.
You can install Zerto Virtual Replication using the defaults provided by Zerto or perform a custom install, in which you can determine the ports that will be used by Zerto Virtual Replication.
Performing an Express Installation
You can install Zerto Virtual Replication using the defaults provided by Zerto. Site information and information to connect to vCloud Director can be provided, if required, after the installation in the Zerto User Interface.
Note: You cannot install Zerto Virtual Replication on the same machine where another version of Zerto Virtual Replication has been installed, for example, if the Zerto Virtual Replication for Microsoft Hyper-V version has been installed on the machine.
To perform an express install of Zerto Virtual Replication:
1. Run the Zerto Virtual Replication installer for VMware.
Note: If the required version of Microsoft .NET Framework is not installed, you are prompted to install the required version of .NET Framework, which is included as part of the Zerto Virtual Replication installation package. After .NET is installed the machine automatically restarts and the Zerto Virtual Replication installation begins.
2. Follow the wizard through the installation until the Choose Installation Type dialog and select the Express installation option.
3. Click NEXT.
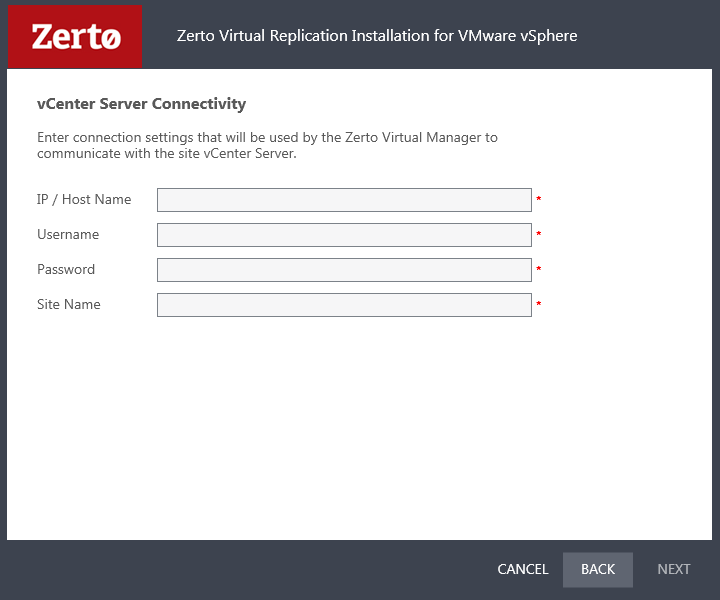
The vCenter Server Connectivity dialog is displayed.
4. Specify the following:
IP / Host Name – The IP address or host name of the machine where the vCenter Server runs.
Username – The user name of a user with administrator level privileges in the vCenter Server. The name can be entered using either of the following formats:
username
domain\username
Password – A valid password for the given user name.
Site Name – A name to identify the site.
5. Click NEXT.
The Validation dialog is displayed.
The installation performs checks to make sure that the installation can proceed successfully.
6. After the checks complete successfully, click RUN and continue to the end of the installation.
7. If you intend managing your disaster recovery from this machine, you can select to open the Zerto Virtual Manager (ZVM) Interface at the end of the installation, logging in with the user name and password for the vCenter Server connected to the Zerto Virtual Manager. In this user interface you set up Zerto Virtual Replication, as described in
Initial Configuration.
8. It is required to exclude the Zerto Virtual Replication folder from antivirus scanning. Failure to do so may lead to the ZVR folder being incorrectly identified as a threat and in some circumstances corrupt the ZVR folder.
Install Zerto Virtual Replication on the peer sites.
Performing a Custom Installation
You can install Zerto Virtual Replication providing specific details including the ports that will be used by Zerto Virtual Replication and full contact details. In addition, when performing a custom install, you can provide information to connect to vCloud Director.
To perform a custom install of Zerto Virtual Replication:
1. Run the Zerto Virtual Replication installer for VMware.
Note: If the required version of Microsoft .NET Framework is not installed, you are prompted to install the required version of .NET Framework, which is included as part of the Zerto Virtual Replication installation package. After .NET is installed the machine automatically restarts and the Zerto Virtual Replication installation begins.
2. Follow the wizard through the installation until the dialog for the Installation Type and select the Custom Installation option.
3. Click NEXT.
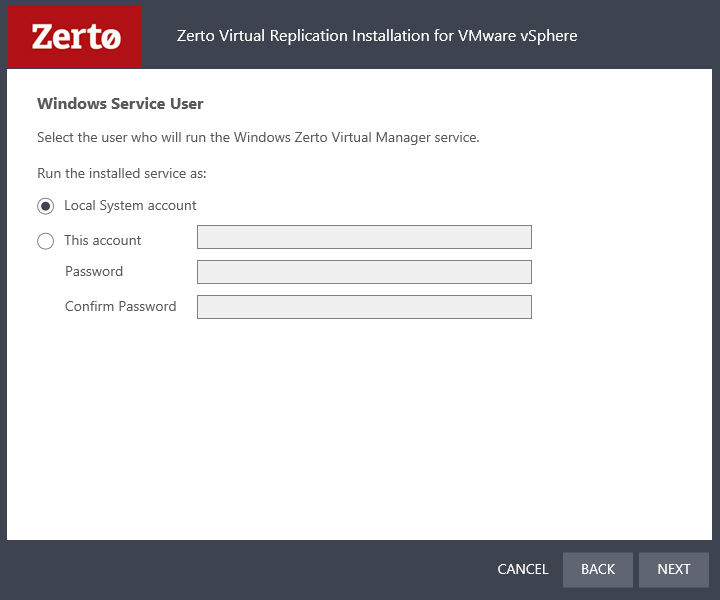
The Windows Service User dialog is displayed.
4. Select either Local System account or This account:
Local System account – Use the Local System account to run the Zerto Virtual Manager service, which is installed as part of Zerto Virtual Replication. The Local System account has unrestricted access to local resources.
This account – Use a specific account as the user account to run the Zerto Virtual Manager service, which is installed as part of Zerto Virtual Replication. The account must have unrestricted access to local resources.
Password – The password to use to run the service under the specified account.
Confirm Password – Confirmation of the password.
5. Click NEXT.
The Database Type dialog is displayed.
Information required by Zerto Virtual Replication is stored in a database embedded in the Zerto Virtual Manager. This information includes details of the site where the Zerto Virtual Manager is installed, details of the Virtual Replication Appliances and the volumes they use, and points-in-time recorded for recovery purposes. By default an embedded SQL-based database is used, but you can use an externally managed database, either Microsoft SQL Server or SQL Server Express.
Note: Protection and recovery can only be performed when the database is running. If you use an external database and it is down for any reason, protection ceases.
6. To use the embedded database, leave the default, or select the option to connect to an external Microsoft SQL Server database.
Zerto recommends using SQL Server when a site has more than 40 hosts that have virtual machines that need protecting, and the site has more than 400 virtual machines that need protecting.
If you select the external database option, the SQL Server Authentication section is enabled.
a) Enter the following details to enable access to the SQL Server database:
Server Name – The domain name and server instance to connect to, with the format domain\instance.
Specify one of the following authentication options:
Windows Authentication – Use Windows authentication. This option is only enabled if a specific service user account was specified in the previous Windows Service User dialog, in which case the service account name and password are used.
SQL Server Authentication – Use SQL Server authentication.
Username – The user name for the SQL Server database.
Password – A valid password for the given user name.
b) When you select SQL Server authentication and enter a user name and password, click TEST AUTHENTICATION, which is displayed.
The installer checks whether it can connect to the specified database with the specified username and password. You can only continue when the authentication is successful.
7. Click NEXT.
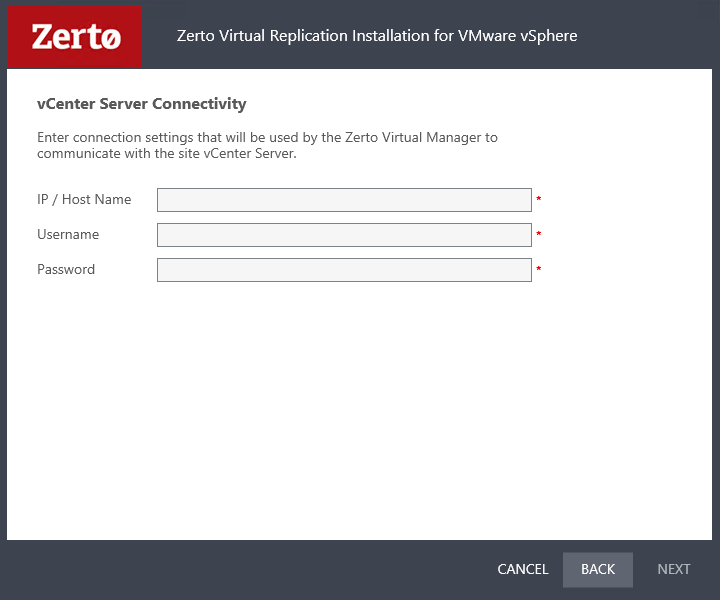
The vCenter Server Connectivity dialog is displayed.
8. Enter connection settings that the Zerto Virtual Manager uses to communicate with the vCenter Server:
IP / Host name – The IP address or host name of the machine where the vCenter Server runs.
Username – The user name of a user with administrator level privileges in the vCenter Server. The name can be entered using either of the following formats:
username
domain\username
Password – A valid password for the user name.
9. Click NEXT.
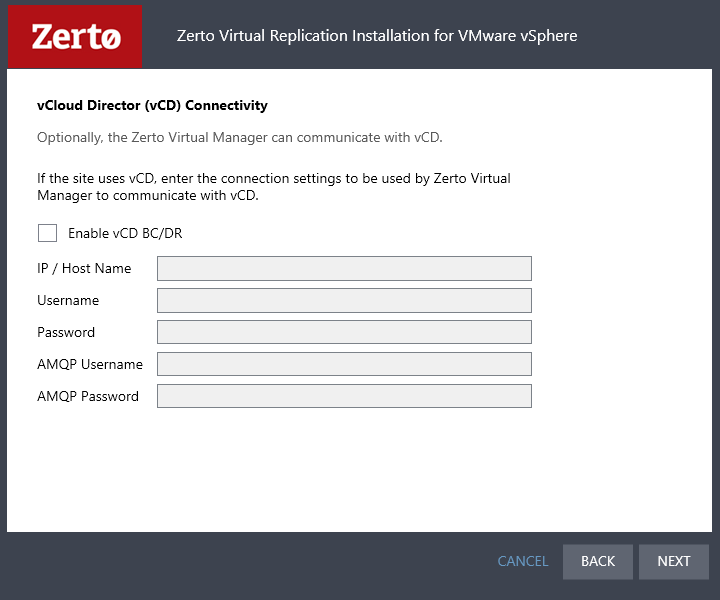
The vCloud Director Connectivity dialog is displayed.
10. When using vCloud Director and you have installed an AMQP server, click the Enable vCD BC/DR checkbox and enter the VMware vCloud Director access details:
IP / Host name – The IP address or host name of the machine where vCD runs. When connecting to vCD with multiple cells, enter the virtual IP for the network load balancing used by the cells.
Username – The user name for an administrator to vCD.
Password – A valid password for the given user name.
AMQP Username – The user name for the AMQP server.
AMQP Password – A valid password for the given AMQP user name.
If the vCD connection settings are not specified, for example, when you do not have an AMQP server installed, they can be set in the Advanced Settings dialog in the Site Configuration panel, in the Zerto User Interface after installation, as described in the Zerto Cloud Manager Administration Guide.
Zerto provides an AMQP installation kit if you do not have one installed for vCD. Run ZertoAMQPInstallWizard.exe as described in the Zerto Cloud Manager Administration Guide, with the following credentials:
Username – The AMQP user account Zerto will use. RabbitMQ prior to version 3.3 installs with a default administrator user: guest. In RabbitMQ version 3.3 and higher, specify a user with administrator privileges.
Password – The password for the user. RabbitMQ prior to version 3.3 installs with a default password of guest.
11. Click NEXT.
The Zerto Virtual Manager Site Details dialog is displayed.
12. Enter the site details:
Site Name – A name to identify the site. This name is displayed in the Zerto User Interface. This field is mandatory.
Location – Information such as the address or name of the site to identify it. Optional.
Contact Information – The name of the person to contact if a need arises. Optional.
Contact Email – The email address to contact if a need arises. Optional.
Contact Phone – The phone number to contact if a need arises. Optional.
13. Click NEXT.
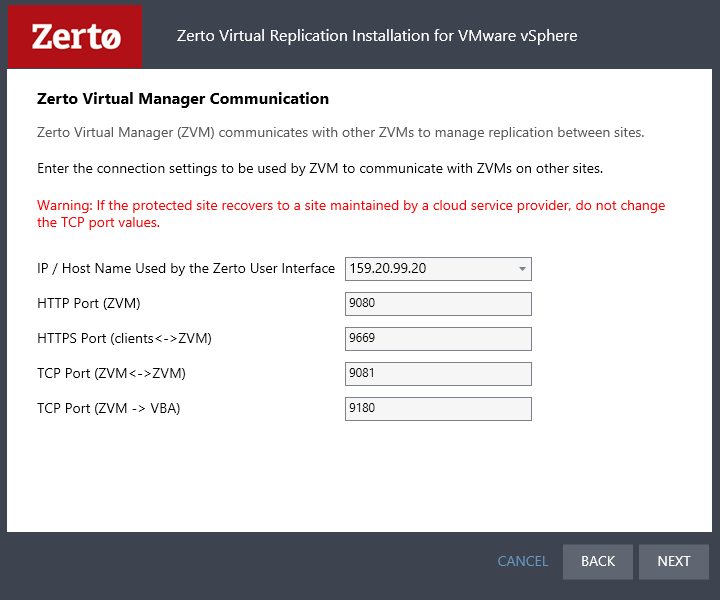
The Zerto Virtual Manager Communication dialog is displayed.
IP/Host Name Used by the Zerto User Interface – The IP to access the Zerto Virtual Manager from the Zerto User Interface. If the machine has more than one NIC, select the appropriate IP from the list, otherwise the IP that is displayed is the only option.
HTTPS Port (ZVM) – The port used for inbound communication between the Zerto Virtual Manager and Zerto internal APIs, Cmdlets and a VSS Agent.
HTTPS Port (clients <->ZVM) – The port used for inbound communication between the Zerto User Interface and the Zerto Virtual Manager.
TCP Port (ZVM <-> ZVMs) – The port used for communication between Zerto Virtual Managers.
Both the protected and recovery sites belong to the same enterprise – If you change the value, when pairing sites, use the TCP port value you specify here. Pairing the sites is described in
Pairing Sites.
An enterprise using a cloud service provider to supply disaster recovery services – You must not change this value.
TCP Port (ZVM -> VBA) – The port used for communication between the Zerto Virtual Manager and the Virtual Backup Appliance.
14. Click NEXT.
The Validation dialog is displayed. The installation performs checks to make sure that the installation can proceed successfully.
15. After the checks complete successfully, click RUN to perform the installation.
If you intend managing your disaster recovery from this machine, you can select to open the Zerto Virtual Manager (ZVM) Interface at the end of the installation, logging in with the user name and password for the vCenter Server connected to the Zerto Virtual Manager. In this user interface you set up Zerto Virtual Replication, as described in
Initial Configuration.
16. It is required to exclude the Zerto Virtual Replication folder from antivirus scanning. Failure to do so may lead to the ZVR folder being incorrectly identified as a threat and in some circumstances corrupt the ZVR folder.
17. Add the machine to the relevant host boot configuration, so that on starting up the host, this machine, running the Zerto Virtual Manager, is also powered on automatically.
Install Zerto Virtual Replication on the peer sites.
Note: If the vSphere Client console was open during the installation, close it and reopen it to ensure you have the Zerto Virtual Replication user interface loaded.
The installation creates the Zerto Virtual Manager and Virtual Backup Appliance as services and the installation package to enable installing Virtual Replication Appliances on hosts.