RX Audio Editor Preferences
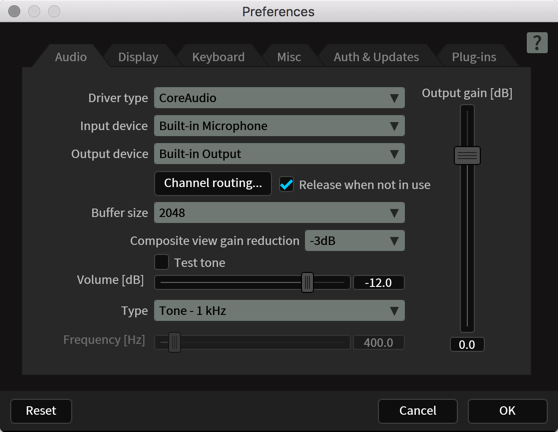
Audio
Note
- Some hardware devices monopolize the audio drivers when sending audio clips to RX via RX Connect. If you are not able to hear the audio sent to RX from your DAW with RX Connect, change the audio driver to RX Monitor in the Driver type menu.
- Driver Type: Allows you to select a sound card driver model to use for playback and recording.
- Input/Output Device: Choose the device/sound card you want RX to use for playback and recording.
- Buffer Size: The total playback buffer size. In general, lowering these buffer sizes will improve meter responsiveness and lower latency, but increase CPU needs. Raising buffer sizes will lower CPU cost but increase latency. It’s worth exploring these ranges to find values that work best on your system.
- Num Buffers: Number of playback sub-buffers. (Windows MME Only.)
- Composite View gain reduction: Nondestructively reduces the output gain of all clips included in the Composite View tab by the amount specified in the dropdown.
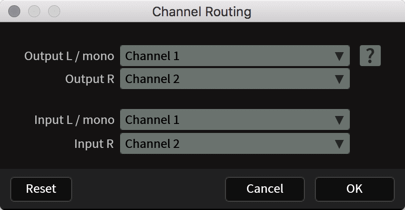
- Channel Routing: For ASIO and CoreAudio drivers, click this button to choose which input and output channels RX uses. Click the Channel Routing button to open the Channel Routing dialog box.
- Configure Driver: Launches the manufacturer’s driver configuration dialog.
- Release when not in use: Auto-closes the audio device when playback in RX stops, freeing it for use in other audio applications. Disable this if playback from RX isn’t responsive enough.
- Test Tone: The test tone generator is useful for testing your speakers, audio hardware and listening environment. Tones at set frequencies or at a custom frequency can be used as test tones, as can white or pink noise. In addition, a Channel Identification mode will identify left and right speakers.
- Enable: Starts playback of a test tone.
- Type: Sets the type of test tone to play.
- Volume: Sets the volume of the test tone.
- Frequency: Sets the frequency of the test tone.
- Enable: Starts playback of a test tone.
- Output Gain: Output gain allows you to nondestructively adjust the playback level of RX 6 Audio Editor.
Display
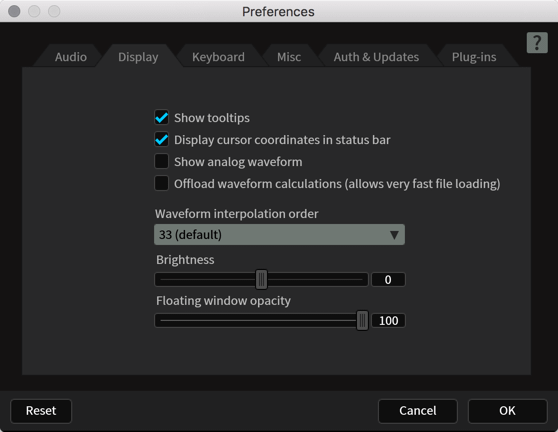
- Show tooltips: When enabled, hovering over an RX feature with the mouse cursor will show a short description of the feature.
Display cursor coordinates in status bar: When enabled, the time coordinate of the cursor is shown in the status bar at the bottom of the RX main window. The amplitude of the audio at the cursor position and the frequency at the cursor position is also shown.
Show analog waveform: When digital audio is played back, it is converted to analog. The peak values in the analog waveform can be larger than the peaks in the digital waveform, leading to clipping in the output of a digital-to-analog converter. When Show analog waveform is enabled, RX will compute an analog waveform in the background. Any peaks will be highlighted in red on top of the existing digital waveform.
Note
RX will automatically display an analog waveform when zooming in at extreme zoom levels.
Offload waveform calculations: When enabled, RX’s waveform display will be computed in the background. This allows very large files to be loaded very quickly, but it slows down RX’s waveform displays.
Waveform interpolation order: If you zoom into the waveform so that individual samples become visible, RX will display an upsampled analog waveform as well as the individual digital samples. The interpolation order controls the quality of upsampling. Higher values yield more accurate analog waveforms at the expense of CPU usage.
Brightness: Adjusts the general brightness of the RX interface, allowing you to make RX more readable on your specific display.
Floating window opacity: Changes the opacity for RX’s floating windows. This can be useful if you wish to leave floating windows on top of the spectrogram and waveform without completely obscuring the display.
Keyboard
Customizing Keyboard Shortcuts
While RX includes default keyboard shortcuts, you can also customize them to your liking.
Refer to the Keyboard Shortcut Guide to reference a list of default RX key commands and find the internal shortcut command names used by RX. Referring to the guide can help you quickly identify the name of the key commands you want to customize and search for them in the “Show commands containing” field (explained below.)
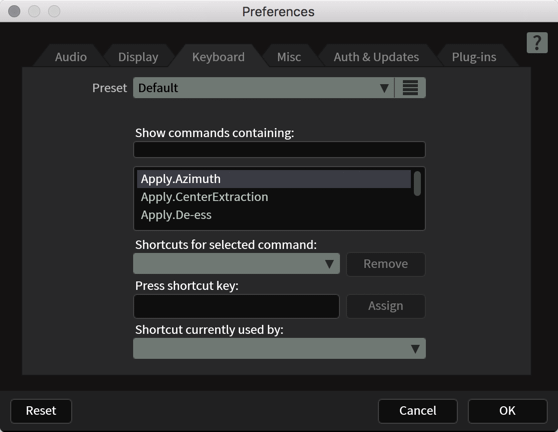
- Presets: Save groups of key assignments with this tool.
- Show commands containing: Lets you search by keyword for a command you want to assign to a keystroke.
- Shortcuts for selected command: Shows if there are any keystrokes assigned to the command selected in the above menu.
- Remove: Removes the currently assigned keystroke from a command.
- Press Shortcut Key: To assign a new keystroke to a command, select the command from the menu, then click in this field and press a key or combination of keys.
- Assign: Assigns the entered keystroke to the current command. The shortcut will only be assigned to the current command if you press this button.
- Shortcut key currently used by: Lists commands that the current keystroke is assigned to.
Using the Alt modifier on Windows
On Windows systems, by default, “Alt + a letter” will open the corresponding menu for your currently open application. Alt + V for example will open RX’s View menu drop down. By default, none of RX’s shortcuts should conflict with these keyboard shortcuts, however if you wish to assign Alt + V to another operation, it will take precedence over the View menu.
Misc
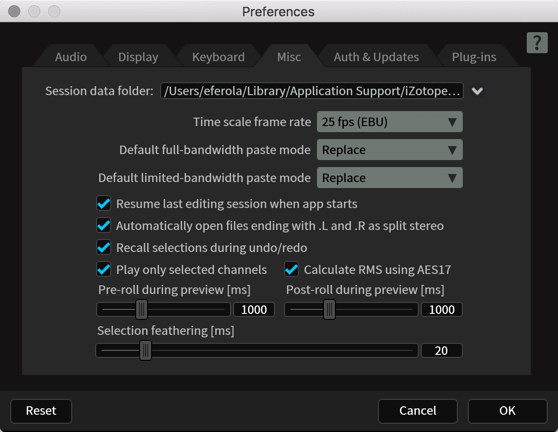
- Session data folder: Allows you to choose a different folder to save RX’s temporary session data. These files are created to allow actions to be undone and sessions to be recalled in RX. Because these can be very large, it is best to set this to the drive on your computer with the most free space.
- Time scale frame rate: This sets the frame rate used to draw the time scale when RX is set to display the time code (see View menu or right-click the time ruler to change this setting). Choose from a list of standard frame rates or click in the combo box to define a custom frame rate.
- Default full-bandwidth paste mode: This controls RX’s behavior when pasting a full-bandwidth audio selection. Insert will move aside existing audio, Replace will overwrite existing audio, and Mix will add to existing audio.
- Default limited-bandwidth paste mode: Similar to the full-bandwidth paste mode, this controls RX’s behavior when pasting a limited-bandwidth audio selected.
- Resume last editing session when app starts: When enabled, RX will open all of the files (including edits, processing and undo history events) that were present when RX was last closed. Disabling this option will open the RX Audio Editor in its default state (no files loaded.)
- Automatically open files ending with .L and .R as split stereo: Mono audio files with (.L and .R) as well as (.1 and .2) extensions will be opened as stereo files when this option is enabled.
- Recall selections during undo/redo: When this is enabled, RX will recall the selection used for an item in the undo history. When stepping through the undo history events, selections that were used for each event will be restored along with the audio.
Disabling the selection undo/redo option
- Sometimes it is useful to turn this off if you need to compare undo history items and not break your current selection (like a useful loop).
- Sometimes it is useful to turn this off if you need to compare undo history items and not break your current selection (like a useful loop).
- Play only selected channels: If only a single channel of audio is selected and this option is enabled, all other channels will be muted during playback.
- Calculate RMS using AES-17: Uses the AES-17 1998 standard for RMS calculations (0 dB is a full scale sine wave) in the level meter, Waveform Statistics and Leveler modules. The other option is when 0 dB is the RMS of a full-scale square wave. These options differ by 3 dB.
- Pre- and Post-Roll during preview (ms): When Previewing audio processing in any module, the specified time amount will be added to the beginning and end of the previewed selection in order to provide contrast between unprocessed and preview-processed audio.
- Selection Feathering (ms): Allows for crossfading of processed and unprocessed audio when processing. If you need to make more precise edits, set this to 0.
Auth & Updates
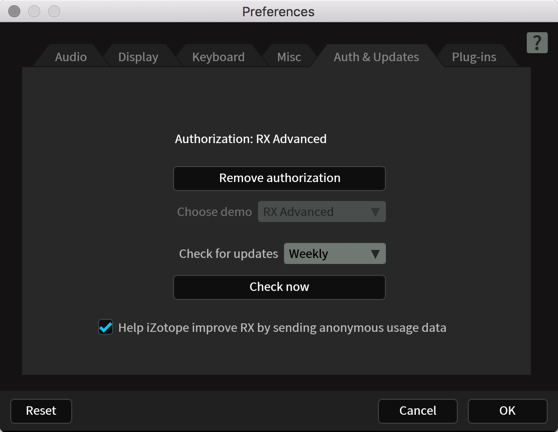
Provides options to authorize or de-authorize RX (explained in the Authorization chapter), launch the iZotope Updater and choose how often the Updater automatically checks for updates.
Plug-ins
RX 6 Audio Editor supports the use of the following plug-in formats in the “Plug-in” module:
- VST 2: Windows and Mac
- AU (AudioUnit): Mac Only
- DirectX: Windows only
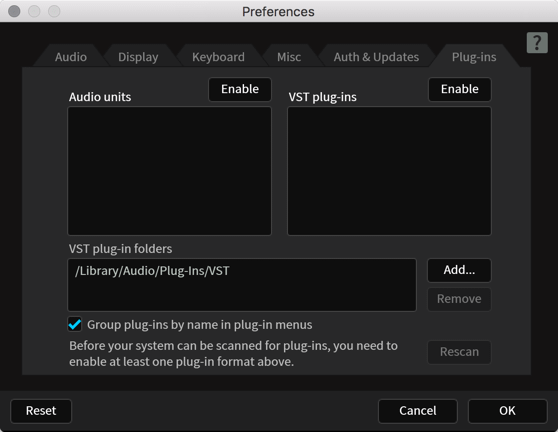
- Plug-in Lists: Displays plug-ins that have been scanned for use in the “Plug-in” hosting module of the RX Editor.
- Enable: Enables that plug-in format for use in the RX Audio Editor. This will trigger plug-in scanning to begin in the background.
Disable: Disables the associated plug-in format. This will clear the scanned plug-in list for that format. Re-enabling that plug-in format will prompt RX to re-scan that plug-in format.
Note
- If a plug-in failed scanning for any reason, the plug-in’s name will be prefixed with an error tag (ex: [Crashed] or [Failed]) to help troubleshoot the failure
- If a plug-in failed scanning for any reason, the plug-in’s name will be prefixed with an error tag (ex: [Crashed] or [Failed]) to help troubleshoot the failure
VST plug-in folders: Allows you to add or remove custom VST2 plug-in folder paths. RX uses the system VST2 plug-in folder by default. If you are using a custom directory for VST2 plug-ins, use this option to ensure that those VST2 plug-ins will be scanned.
Note about sub-folders when scanning for plug-ins
- RX will scan the first level of sub-folders in the custom VST2 folder. If some of your plug-ins do not show up when you scan them, and you know they’re in a subfolder of your plug-in folder, try moving them up one directory level.
- RX will scan the first level of sub-folders in the custom VST2 folder. If some of your plug-ins do not show up when you scan them, and you know they’re in a subfolder of your plug-in folder, try moving them up one directory level.
Group plug-ins by name in plug-in menus: When enabled, the RX plug-in menu will group plug-ins by common first words, usually the manufacturer’s name. When disabled, the RX plug-in menu will appear as a single, alphabetically sorted list.
Rescan: If RX detects that a plug-in is unstable, it will blacklist it and prevent it from being opened. The rescan option allows you to clear the blacklist of unsupported plug-ins and rescan all installed plug-ins in case an RX update or an update from the plug-in manufacturer resolves the issue.