
Note: ● District data administrators may restrict your ability to add/edit class data. If you do not have access and require support, you must contact the district data administrator team that manages rostering for your district. ● When you create or edit user and class accounts manually, the updates directly alter the rostering data stored in the centralized data store and impact all HMH Rostering Platforms. If your district is using HMH recommended best practices of integrating to Clever, ClassLink, or a SIS, then all rostering changes should take place in the rostering system and not using the manual entry options. To learn more, see the HMH Rostering Service Overview topic.
|
To edit class information, you must locate the class in the school in which the class is rostered.
1. On the My Schools page, proceed as follows depending on your user role.
– If you are a district administrator with more than one school in your district or a school administrator tied to multiple schools, select a school from the list of schools. The School page appears.
– If you are a school administrator, the School page is the first page that appears.

The School page allows you to view all the users and classes associated with the selected school.
2. Locate the class to be edited by doing the following:
a. In the Filter by area, click the Classes option button. The Classes page appears and lists all the classes for the selected school.
b. If necessary, narrow the list of classes using the Search Classes and Search Grade fields.
The list of classes that meet your search criteria displays on the page.
Note: On the Classes page, you can use buttons in the ACTIONS column to edit or delete a class or you can click a class name link to view more details about the class and select further actions from that page. (Continue to step 3 for details.)
3. On the Class Overview page, do any of the following:
To do the following . . . |
Follow these steps: |
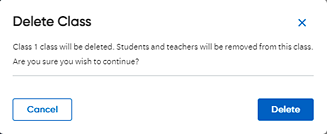
Delete the class |
Note: Deleting the class account on this page deletes it from the centralized data store, which means that it is deleted from the Ed, Flight, and NWEA platforms.
a. Click the Delete Class button. A Delete Class dialog box appears.
b. Click Delete. A message appears confirming that the class is deleted from the school. |
Edit the class information |
Note: Editing the class account on this page edits the data in the centralized data store, which means that it is edited in the Ed, Flight, and NWEA platforms.
a. Click Edit Class to edit the class details. The Edit Class dialog box appears.
b. Update the class information as follows:
– Lead Teacher (only one Lead Teacher allowed) ○ To change or add a new lead teacher to the class, select a teacher from the list or begin typing the teacher name and then select the teacher from the list. ○ To
remove the assigned lead teacher, click the
– Team Teacher (multiple Team Teachers allowed) ○ To add a new team teacher to the class, select a teacher from the list or begin typing the teacher name and then select the teacher from the list. ○ To add additional team teachers, select another team teacher from the list. ○ To remove an assigned team teacher, click Remove. The teacher is removed from the class. Note: The lead teacher and the team teachers both have the same capabilities to manage classes, including adding and removing students and creating assignments.
– Class Name – Edit the name of the class, as needed.
– Grade – Select a different grade from the list, as needed.
Note: The Class Local ID cannot be edited.
c. Click Save. A message appears to inform you that the class has successfully been edited. |
Add students to the class |
a. Click the Add Students to Class button to add one or more students to the class.
An Add Student to Class dialog box appears.
b. Find students to add by clicking the down arrow and selecting a student from the list or by typing all or part of a student name and then selecting the student from the list.
The selected students appear below the list box.
c. Click Save to add the selected students to the class. A message appears confirming that the students are added to the class. |
Manage Program Settings (Ed users only) |
➔ Click the Program Settings button. The Program Settings page appears. For Ed users only, see the Manage Programs for Classes |
Return to the My Schools page |
➔ At the top
of the Class Overview page,
click the |
See Also:
 in the list box. The teacher is removed from the class.
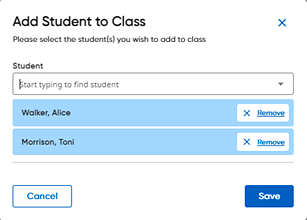
 link. The
main
link. The
main