Add Components to the active Job.
![]()
Review Learn Guide: How to Generate a Centroid File
![]() Online Movie: Generate X/Y Centroid file from Gerber, using FAB 3000
Online Movie: Generate X/Y Centroid file from Gerber, using FAB 3000
Command Sequence
1. Turn-off all layers except for Top Paste & Top Silkscreen.
2. Locate a footprint, and select the entire component.
![]() Note: This function requires that you select objects before proceeding.
Note: This function requires that you select objects before proceeding.
![]() Note: For more information about object selection see Viewing & Selection Basics
Note: For more information about object selection see Viewing & Selection Basics
![]() Note: Add Components requires flashed footprints and will ignore anything else, so it's fine to select a window around the entire Component (any selected Silkscreen objects would be ignored).
Note: Add Components requires flashed footprints and will ignore anything else, so it's fine to select a window around the entire Component (any selected Silkscreen objects would be ignored).
3. Goto menu: Tools | Components | Add Components...
4. Select Pin One
![]() Note: Usually Pin One is the Top-Leftmost pin for Top side (assuming no rotation), and Top-Rightmost for Bottom side (assuming no rotation).
Note: Usually Pin One is the Top-Leftmost pin for Top side (assuming no rotation), and Top-Rightmost for Bottom side (assuming no rotation).
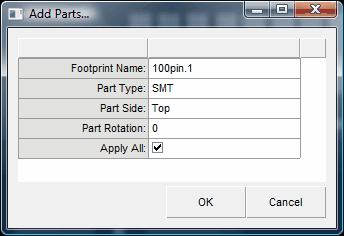
5. Assign Component Description, and press OK when done.

![]() Note: Enter Component Rotation as it appears on the board. If you have selected a component that is rotated 90 degrees on the board, than make sure to enter that here.
Note: Enter Component Rotation as it appears on the board. If you have selected a component that is rotated 90 degrees on the board, than make sure to enter that here.
![]() Note: If Apply All is checked (recommended), Fab3000 will go out and seek all similar footprints.
Note: If Apply All is checked (recommended), Fab3000 will go out and seek all similar footprints.
![]() Note: You will notice (if Apply All is checked) that all similar footprints have been detected and assigned a generic reference designator value ( for example "?21" ).
Note: You will notice (if Apply All is checked) that all similar footprints have been detected and assigned a generic reference designator value ( for example "?21" ).
6. Repeat Steps 2 thru 5, until all footprints on the paste layer have been completed.
![]() Note: You can also add Components individually by using function: Insert Single Component
Note: You can also add Components individually by using function: Insert Single Component
Now its time for the Bottom Side (if required)
7. Turn off all layers except Bottom Paste & Bottom Silkscreen, and repeat steps 2-6.