DAW Setup
Overview
The sections below outline how to setup VocalSynth 2 in popular DAWs. To learn more about how the different modes work, see the Global Modes chapter.
Ableton Live
The following instructions apply to Ableton Live 9 and Ableton Live 10.
AUTO MODE | Ableton Live
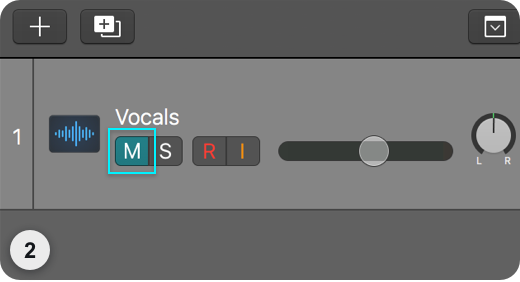
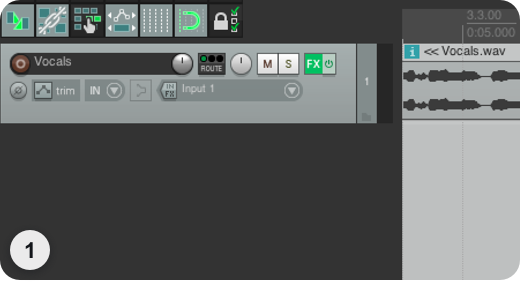
Make sure there is audio on the track VocalSynth 2 is inserted on and press play.

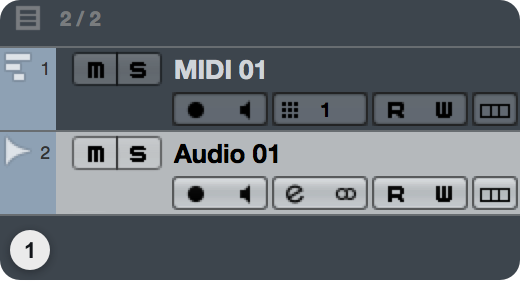
MIDI MODE | Ableton Live
This mode uses a MIDI keyboard or the piano roll as a MIDI input.
More Information: MIDI Mode
See the MIDI Mode section of the Global Modes chapter to learn more about MIDI Mode.
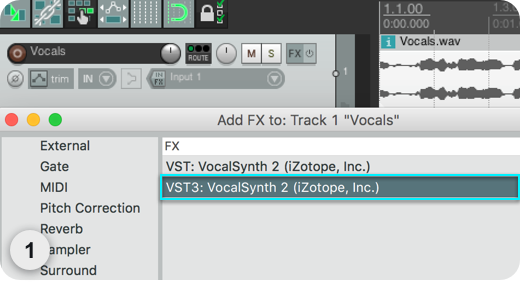
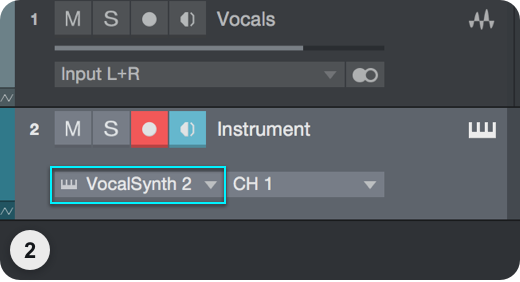
- Create an Audio Track and insert VocalSynth 2.
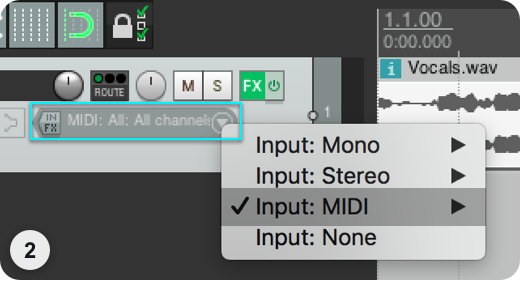
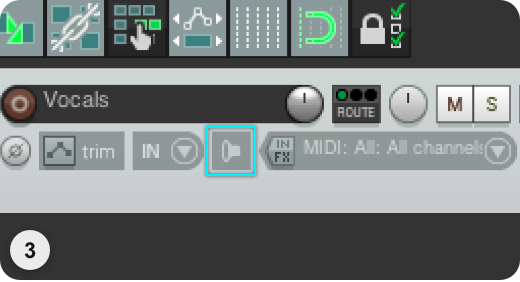
- Create a MIDI Track and choose “In” from the Monitor drop down.

- On the MIDI Track’s “MIDI To” dropdown, choose the name of the Audio Track that has VocalSynth 2 on it. In the next dropdown menu, select “VocalSynth 2.”

SIDECHAIN MODE | Ableton Live
The audio routed into VocalSynth’s sidechain input will be modulated by your vocal track, allowing you to make any audio source “talk.”
More Information: Sidechain Mode
See the Sidechain Mode section of the Global Modes chapter to learn more about Sidechain Mode.
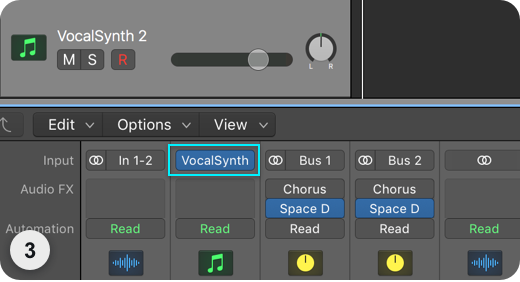
- Create an Audio Track (1) and insert VocalSynth 2.
- Create a second Audio Track (2) and make sure there is some audio on Audio Track (2).
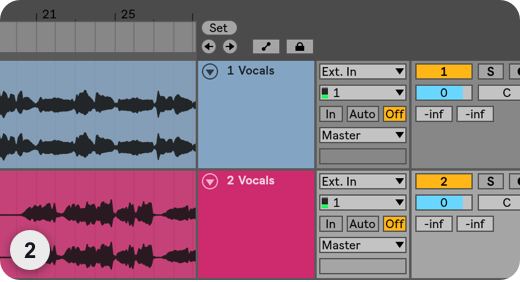
- On Audio Track (2), find the “Audio To” dropdown and choose Audio Track (1). In the next dropdown menu, select “VocalSynth 2.”

Cubase
AUTO MODE | Cubase
Make sure there is audio on the track VocalSynth 2 is inserted on and press play.
MIDI MODE | Cubase
This mode uses a MIDI keyboard or the piano roll as a MIDI input.
More Information: MIDI Mode
See the MIDI Mode section of the Global Modes chapter to learn more about MIDI Mode.
Note: Plug-in Formats
- Use VST3 instances of VocalSynth 2 when using MIDI Mode in Cubase.
- MIDI mode will not work as expected when using VST2 instances of VocalSynth 2 in Cubase.
- Create an Audio Track and a MIDI Track.
- Insert VocalSynth 2 on the Audio Track (VST3 only, not VST2).

- Select VocalSynth 2 in the Output section of your MIDI Track.
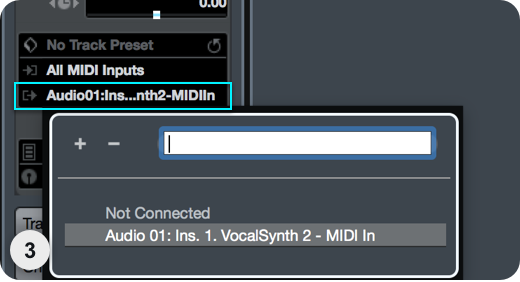
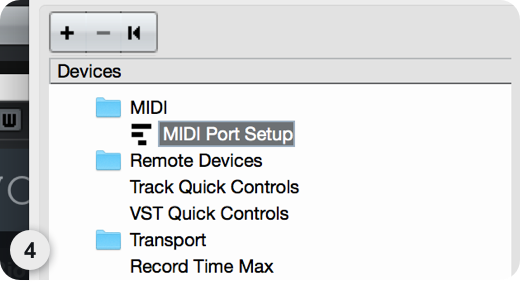
- If you are using a live MIDI device, make sure it is configured by going to Devices/Device Setup, and navigating to the MIDI Port Setup option.
SIDECHAIN MODE | Cubase
The audio routed into VocalSynth’s sidechain input will be modulated by your vocal track, allowing you to make any audio source “talk.”
More Information: Sidechain Mode
See the Sidechain Mode section of the Global Modes chapter to learn more about Sidechain Mode.
Note: Plug-in Formats
- Use VST3 instances of VocalSynth 2 when using Sidechain Mode in Cubase.
- Sidechain mode will not work as expected when using VST2 instances of VocalSynth 2 in Cubase.
- Create two Audio Tracks.
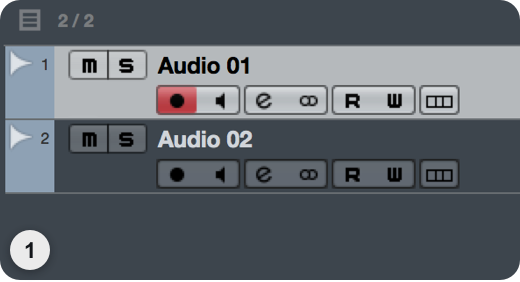
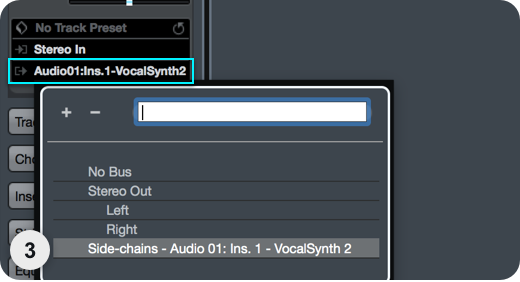
- Insert VocalSynth 2 on one of the two Audio Tracks (VST3 only) and activate sidechain.

- On Audio Track 2, navigate to the Output section and set the Output to the sidechain input for VocalSynth 2.
FL Studio
AUTO MODE | FL Studio
Make sure there is audio on the track VocalSynth 2 is inserted on and press play.

MIDI MODE | FL Studio
This mode uses a MIDI keyboard or the piano roll as a MIDI input.
More Information: MIDI Mode
See the MIDI Mode section of the Global Modes chapter to learn more about MIDI Mode.
Note: Plug-in Formats
- Use VST3 instances of VocalSynth 2 when using MIDI Mode in FL Studio.
- MIDI mode will not work as expected when using VST2 instances of VocalSynth 2 in FL Studio.
- Create an Audio Track and insert VocalSynth 2 as a VST3 (not VST2) onto this track.
- Go to Options/MIDI Settings. Under “Input,” select your MIDI keyboard and the desired Port, then click “Enable.” If you don’t have a keyboard, insert a MIDI Out instrument into your project and select the port in the MIDI Out window.

- Open VocalSynth 2 and click the gear icon to open the plug-in settings. Make sure the MIDI Input Port matches the Port you selected for your device.

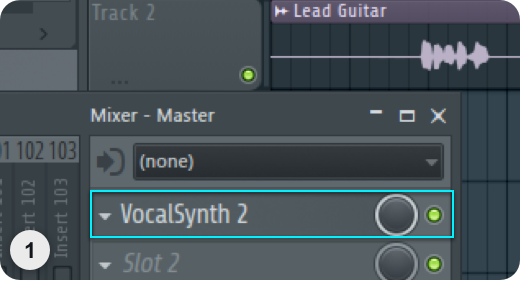
SIDECHAIN MODE | FL Studio
The audio routed into VocalSynth’s sidechain input will be modulated by your vocal track, allowing you to make any audio source “talk.”
More Information: Sidechain Mode
See the Sidechain Mode section of the Global Modes chapter to learn more about Sidechain Mode.
Note: Plug-in Formats
- Use VST3 instances of VocalSynth 2 when using Sidechain Mode in FL Studio.
- Sidechain mode will not work as expected when using VST2 instances of VocalSynth 2 in FL Studio.
- Create two Audio Tracks: one with VocalSynth 2 inserted as a VST3 (not VST2), and one with the audio you want to send to VocalSynth 2.

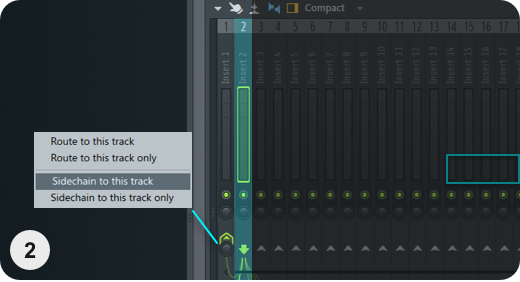
- In the FL Studio Mixer window, select Track 2 then, right-click on the upward arrow at the bottom of your VocalSynth 2 track and select “Sidechain to this track.”
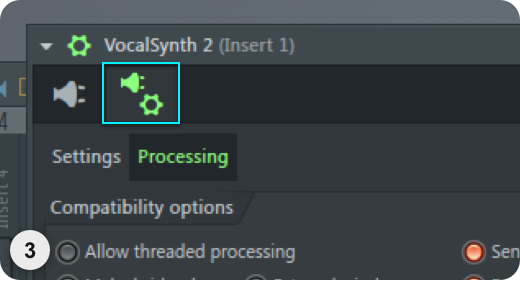
- Open the VocalSynth 2 window, and click on the gear icon in the upper left corner of the plug-in window to open the plug-in settings.
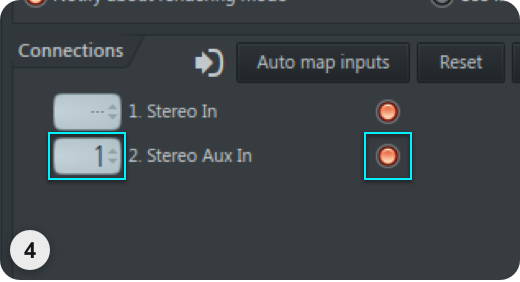
- In Processing, enable the “Stereo Aux In” option, then left-click in the grey box to select the Sidechain input.
Logic Pro X
AUTO MODE | Logic Pro X
Make sure there is audio on the track VocalSynth 2 is inserted on and press play.

MIDI MODE | Logic Pro X
This mode uses a MIDI keyboard or the piano roll as a MIDI input.
More Information: MIDI Mode
See the MIDI Mode section of the Global Modes chapter to learn more about MIDI Mode.
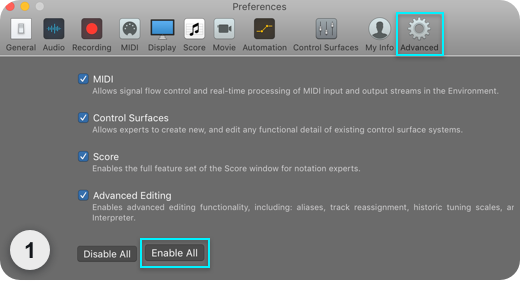
- “Advanced Tools” need to be enabled in Logic’s Preferences menu to use MIDI mode in VocalSynth 2. To enable “Advanced Tools” in Logic:
- Navigate to: “Logic Pro X” menu > “Preferences” > “Advanced Tools…”
- Check the “Show Advanced Tools” box.
- Select “Enable All” at the bottom of the window.

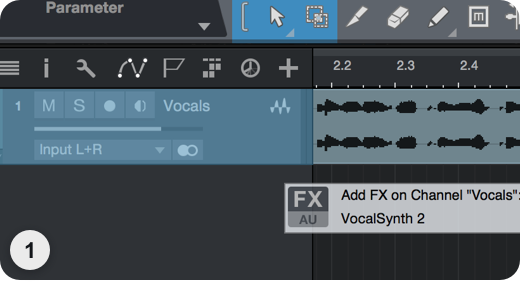
- Create an Audio Track and mute it.
- Create a Software Instrument Track and insert VocalSynth 2 into the Instrument slot.
- In the VocalSynth 2 plug-in window, navigate to the Sidechain dropdown menu and select the Audio track you want to apply VocalSynth to.

SIDECHAIN MODE | Logic Pro X
The audio routed into VocalSynth’s sidechain input will be modulated by your vocal track, allowing you to make any audio source “talk.”
More Information: Sidechain Mode
See the Sidechain Mode section of the Global Modes chapter to learn more about Sidechain Mode.
- “Advanced Tools” need to be enabled in Logic’s Preferences menu to use Sidechain mode in VocalSynth 2. To enable “Advanced Tools” in Logic:
- Navigate to: “Logic Pro X” menu > “Preferences” > “Advanced Tools…”
- Check the “Show Advanced Tools” box.
- Select “Enable All” at the bottom of the window.
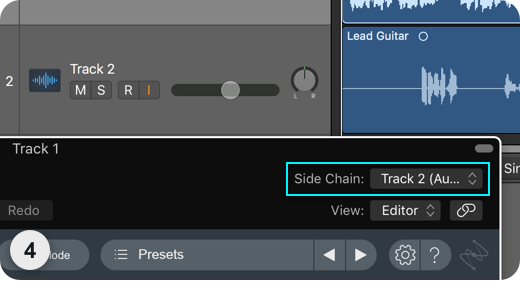
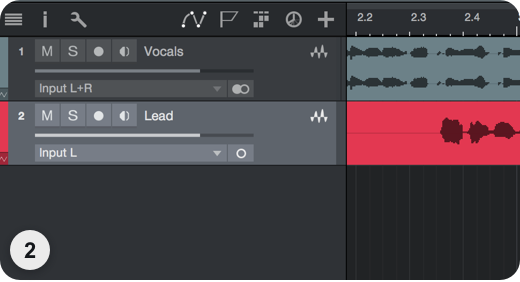
- Create two Audio Tracks with audio on both. Try vocals on Track 1 and the instrument on Track 2.

- Insert VocalSynth as a plug-in on Track 1.

- From the VocalSynth 2 plug-in window, find the Sidechain menu and choose Track 2.
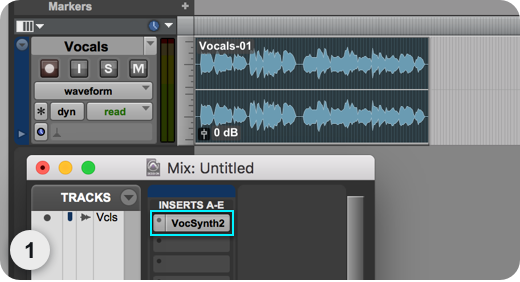
Pro Tools
AUTO MODE | Pro Tools
Make sure there is audio on the track VocalSynth 2 is inserted on and press play.
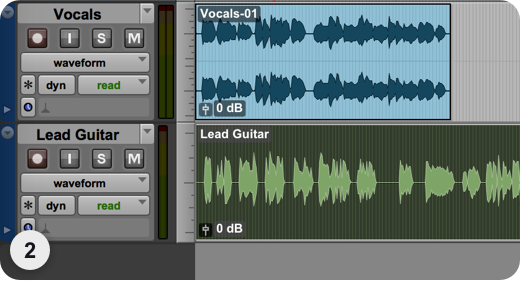
MIDI MODE | Pro Tools
This mode uses a MIDI keyboard or the piano roll as a MIDI input.
More Information: MIDI Mode
See the MIDI Mode section of the Global Modes chapter to learn more about MIDI Mode.
- Create an Audio Track and a MIDI Track.

- Insert VocalSynth 2 onto the Audio Track.

- In the Output dropdown menu of the MIDI Track, select any MIDI channel you want for VocalSynth 2.
SIDECHAIN MODE | Pro Tools
The audio routed into VocalSynth’s sidechain input will be modulated by your vocal track, allowing you to make any audio source “talk.”
More Information: Sidechain Mode
See the Sidechain Mode section of the Global Modes chapter to learn more about Sidechain Mode.
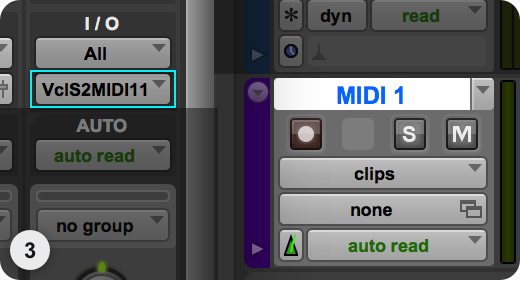
- Create an Audio Track (1) and insert VocalSynth 2.

- Create a second Audio track (2) and make sure there is some audio on it.
- On Audio Track (2), set the Output to any open Bus.
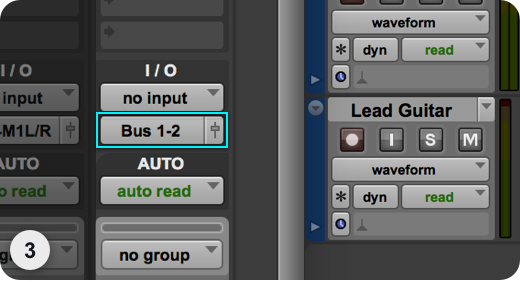
- From the VocalSynth 2 plug-in window (Track 1), select the Bus you set in Step 3 from the key input dropdown.

REAPER
AUTO MODE | REAPER
Make sure there is audio on the track VocalSynth 2 is inserted on and press play.
MIDI MODE | REAPER
This mode uses a MIDI keyboard or the piano roll as a MIDI input.
More Information: MIDI Mode
See the MIDI Mode section of the Global Modes chapter to learn more about MIDI Mode.
- Create an Audio Track and insert VocalSynth 2.
- Click “Input 1” to open the dropdown and choose your MIDI device.
- Click the speaker to turn on “Record Monitoring” and record-enable your Track.
SIDECHAIN MODE | REAPER
The audio routed into VocalSynth’s sidechain input will be modulated by your vocal track, allowing you to make any audio source “talk.”
More Information: Sidechain Mode
See the Sidechain Mode section of the Global Modes chapter to learn more about Sidechain Mode.
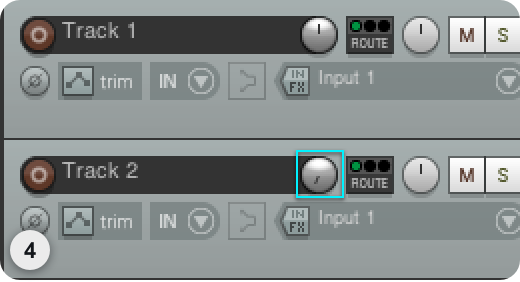
- Create an Audio Track (1) and insert VocalSynth 2.

- Create a second Audio track (2) and make sure there is some audio on Audio Track (2).

- On Track (1), click the Route button, select “Add new receive,” choose Track (2), choose “pre-fader” and choose ¾ instead of ½.
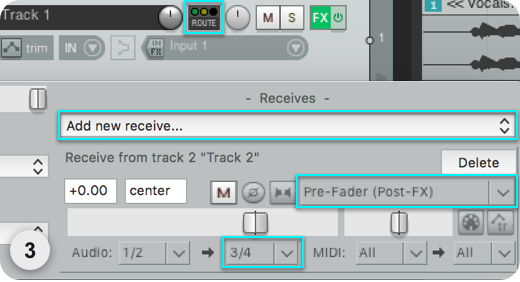
- Bring the fader of Audio Track (2) to off.
Reason
AUTO MODE | Reason
Make sure there is audio on the track VocalSynth 2 is inserted on and press play.

MIDI MODE | Reason
This mode uses a MIDI keyboard or the piano roll as a MIDI input.
More Information: MIDI Mode
See the MIDI Mode section of the Global Modes chapter to learn more about MIDI Mode.
- Create an Audio Track and and insert VocalSynth 2.
- Open Preferences/Sync. Under “External Control: Bus A,” choose your MIDI Device.

- Open Adv. MIDI Panel from the “Hardware Interface” at the top of the rack.

- In any channel from the Adv. MIDI Panel, from the triangle button dropdown, choose your Audio Track and then the VocalSynth 2 plug-in.

SIDECHAIN MODE | Reason
The audio routed into VocalSynth’s sidechain input will be modulated by your vocal track, allowing you to make any audio source “talk.”
More Information: Sidechain Mode
See the Sidechain Mode section of the Global Modes chapter to learn more about Sidechain Mode.
- Create two Audio Tracks, and make sure there is audio on one of the tracks.

- Insert VocalSynth 2 onto Track 1.
- Press Tab to flip to the back of the rack, and press the CV Programmer button on Track 1.
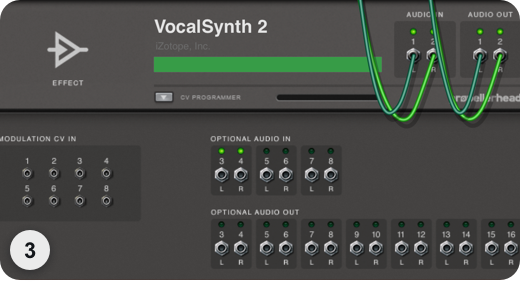
- Expand track 2 and connect the Output cables from Track 2 to “Optional Audio In” 3-4 of Track 1.

Studio One
AUTO MODE | Studio One
Make sure there is audio on the track VocalSynth 2 is inserted on and press play.

MIDI MODE | Studio One
This mode uses a MIDI keyboard or the piano roll as a MIDI input.
More Information: MIDI Mode
See the MIDI Mode section of the Global Modes chapter to learn more about MIDI Mode.
- Create an Audio Track and insert VocalSynth 2 (VST3) on the track.
- Create an Instrument Track and select “VocalSynth 2” in the output section.
- If you are using a live MIDI device, make sure to set the input of this track to your MIDI device. If you do not see your device available, open the Studio One Preferences and select the External Devices option to configure it.

SIDECHAIN MODE | Studio One
The audio routed into VocalSynth’s sidechain input will be modulated by your vocal track, allowing you to make any audio source “talk.”
More Information: Sidechain Mode
See the Sidechain Mode section of the Global Modes chapter to learn more about Sidechain Mode.
- Create an Audio Track (1) and insert VocalSynth 2.

- Create a second Audio Track (2) and make sure there is some audio on Audio Track (2).
- Open the Console View, click “+” in the Sends section of Track (2), and select VocalSynth 2 under Sidechains.
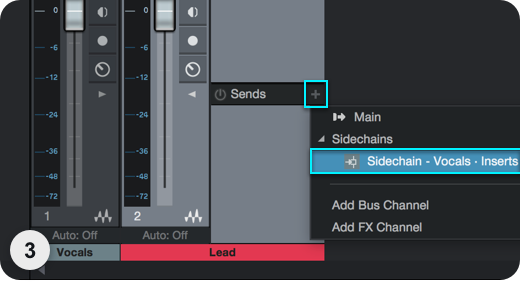
- Turn the Pre/Post-fader toggle to Pre-Fader (the toggle will turn yellow) and turn down the volume fader for the sidechain’s Audio Track.