Common Module Controls
Overview
There are a number of common functions and workflows shared across Ozone modules. This chapter explains the standard controls and workflows shared by: module selectors in the signal chain, multiband modules, mini metering views, processing modes, etc…
Module Chain

The signal chain in Ozone 8 (not applicable to the Ozone 8 Advanced component plug-ins) allows for up to 6 modules at a time. The module selectors in the signal chain offer common controls and behaviors.
MODULE PRESET
Opens module preset system (see Module Preset System).
SOLO
Clicking the Solo (“S”) button turns off (bypasses) all the mastering modules except the one currently displayed. This allows you to audition the e ect of one module without hearing the e ect of the others.
BYPASS
Clicking the Bypass button (which visually looks like a “power” button) turns off the processing within the currently displayed module. This allows you to compare the sound with or without the currently displayed module. You can also bypass more than one module at a time, by clicking on the bypass control for each module you wish to bypass the processing for.
REMOVE
Click on the “X” icon to delete a module from the processing chain. You can also delete a module by right clicking and selecting “Remove Module.”
ADD
If a module slot is empty, click on the area that says “Click to Insert Module.” This will bring up Ozone’s module browser, where you can add an Ozone module or a third-party plug-in.
Multiband Modules
Ozone 8 offers multiband processing in the following modules:
Multiband modules allow for up to 4 independent frequency bands of processing. By default, multiband modules open with all 4 bands enabled. The crossover points can be easily modified by clicking and dragging on the crossover handles within the Crossover mini-spectrum view and can also be learned automatically using the Crossover Learn function.
Crossovers
Bypass
You can bypass the processing for a specific band (or bands) by clicking on the power button that appears above the center of that band. The power button is similar in appearance to the power button used by the mastering modules. When you bypass a band of the crossover, you will hear the audio within that band, but without any processing for that band.
Solo
You can Solo a band by clicking on the box labeled “S” above the center of the band. This allows you to adjust multiband processing more easily, by hearing only the audio within the selected band.
Add & Remove Bands
To add or remove bands, click in the “plus” and “minus” signs in the lower left-hand corner of the crossover display.
- Clicking “+” will add a band
- Clicking “x” will remove a band.
Crossover Learn
Ozone multiband modules include an innovative Learn function for determing crossover points. When enabled, the Learn function intelligently searches for the most natural points to set the crossover cutoff values based on the incoming audio.
Crossover Learning requires audio playback to function properly
For crossover learning to behave as expected, the module must be receiving audio input while Learn is engaged.
Ozone will search for natural crossover cutoff points using a few criteria, including minima in the spectrum. When the Learn function has determined the ideal values for the crossover cutoffs, it will turn itself off automatically.
Disable Crossover Learn Manually
You can also stop the Crossover Learn function manually by clicking the ‘Learn’ button again
Crossover Context Menu Options
Insert Band
Inserts a new band, same as if you click on the “+” button. If all four bands are already added, this control will be automatically hidden.
Remove Band
Removes an existing band, same as if you click on the “x” button.
Copy
Clicking on “Copy” will copy all of the settings used for that band of the processor into the copy buffer, where they can be pasted into a different band.
Paste
Clicking on the Paste command will take the band settings that have been copied into the copy buffer, and will apply them to the band that is currently being right-clicked. Copying and pasting can be helpful, for example, for duplicating settings across bands in the multiband Dynamics module.
Spectrum Options
Navigates to the options tab for Ozone’s spectrum analyzer.
Crossover Options
Navigates to the crossover options tab for the module you are right-clicking on.
Multiband Crossover Types
Each multiband module can have its own independent crossover options, including Analog, Digital, and Hybrid.
Crossover Type
- ANALOG: The analog crossover option provides a natural character reminiscent of filter slopes in analog equipment.
- HYBRID: This perfect reconstruction IIR (Infinite Impulse Response) analog crossover is designed to reduce phase distortion and frequency distortion found in other analog crossovers while maintaining precise crossover points and the warm characteristics of analog crossovers.
- DIGITAL: Ozone 3 first introduced the option of digital linear-phase crossovers. These provide a more accurate and transparent sound.
Digital Crossover Options
The following crossover options are only available when the Digital crossover type is selected for a given module:
- CROSSOVER BUFFER SIZE Sets the buffer size for the digital crossover. See Buffer Sizes for more info.
- CROSSOVER Q: You can adjust the bandwidth, or Q, of the crossover filters with this control. A higher Q results in tighter crossovers, while a lower Q provides a more gradual transition from one band to the next. This is only available for the digital crossover.
Module Channel Processing Modes
Ozone offers different processing modes that determine how processing is applied in a given module. When a module supports more than one processing mode, processing mode options will appear on the left hand side of the module control area.
Ozone modules with channel processing mode options:
| MODULE | STEREO | M/S | L/R |
|---|---|---|---|
| Dynamics | YES | YES | NO |
| Dynamic EQ | YES | YES | YES |
| EQ | YES | YES | YES |
| Exciter | YES | YES | NO |
| Spectral Shaper | YES | YES | NO |
| Vintage Compressor | YES | YES | NO |
| Vintage EQ | YES | YES | YES |
Stereo Mode
Stereo mode (or ‘Mono’ mode if the input audio is single channel) is the default processing mode for all modules. This also applies to modules that do not offer explicit Mid/Side or Left/Right processing options.
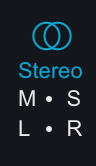
When Stereo mode is selected (or when no Mid/Side or Left/Right channel options exist), one set (“channel”) of controls will be available for processing in the selected module.
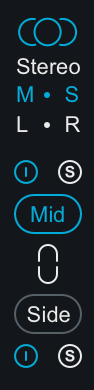
Mid/Side (M/S) Mode
Mid/Side processing is enabled by selecting the M-S processing mode button on the left side of the module control area.
Mid/Side Processing Examples
For more information about mid/side processing, see the Tips & Examples chapter
Mid/Side Encoding & Decoding
When Mid/Side mode is enabled, the input signal to the module is encoded into a Mid/Side configuration. After processing in Mid/Side mode, the signal is decoded from Mid/Side to Stereo at the output of the module.
- Mid Channel Encoding: The encoded Mid channel signal represents the phantom image between left & right speakers, or the center channel of the input audio.
- Side Channel Encoding: The encoded Side channel signal represents the sides (or edges) of the input audio. Increasing the level of the side channel can create
Independent Mid & Side Control Adjustments
Selecting Mid/Side mode will expose two unique sets of parameters for processing. One set of parameters applies processing to the encoded Mid channel and the second set of parameters applies processing to the encoded Side channel.
Mid Channel Controls
- View & Adjust Mid Channel Controls Select the “Mid” button to independently view and adjust the parameters that affect the Mid channel processing of the active module.
- Bypass Mid Channel Processing Deselect the power button above the Mid channel selector to Bypass the Mid channel processing.
- Solo Mid Channel Processing Select the ’S’ button above the Mid channel selector to solo the module’s Mid channel processing.
Side Channel Controls
- View & Adjust Side Channel Controls Select the “Side” button to independently view and adjust the parameters that affect the Side channel processing in the active module.
- Bypass Side Channel Processing Deselect the power button below the Side channel selector to Bypass the Side channel processing.
- Solo Side Channel Processing Select the ’S’ button below the Side channel selector to solo the module’s Side channel processing.
Linked Mid/Side Control Adjustments
You can easily link Mid & Side controls by enabling the ‘Link’ button between the Mid & Side selection buttons. When Link is enabled, parameter adjustments in the Mid channel will adjust the corresponding Side channel parameter and vice versa.
More information: Relative Parameter Linking
See the Tips & Examples chapter for more information about parameter linking in Ozone.
Mid/Side Metering
By default, the I/O meters will display the stereo mix of your audio. However, when working with Mid/Side processing, it is often very helpful to have a clear meter indication of the overall Mid & Side levels individually. To change your meters to display the Mid/Side information of your master, you can set the I/O meter source to Mid/Side.
When the I/O meters are in Mid/Side mode, they will no longer display your signal in terms of stereo left and right. Instead, the middle of the meter will be the level of the entire Mid channel, and on the right left meters will be the overall level of the Side channel. The left and right gain sliders will still control the left and right gain of your signal. The Mid/Side meters will still adhere to the same Type and Scale settings defined in the I/O options menu.
Left/Right (L/R) Mode
Let/Right processing is enabled by selecting the L-R processing mode button on the left side of the module control area.
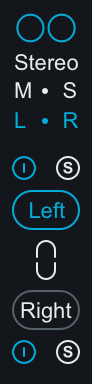
When enabled, the input signal to the module is split into two processing channels, Left & Right. The signal is ‘summed’ back to Stereo at the module’s output.
Independent Left & Right Control Adjustments
Selecting Left/Right mode will expose two unique sets of parameters for processing. One set of parameters applies processing to the Left channel and the second set of parameters applies processing to the Right channel.
Left Channel Controls
- View & Adjust Left Channel Controls Select the “Left” button to independently view and adjust the parameters that affect the Left channel processing of the active module.
- Bypass Left Channel Processing Deselect the power button above the Left channel selector to Bypass the Left channel processing.
- Solo Left Channel Processing Select the ’S’ button above the Left channel selector to solo the module’s Left channel processing.
Right Channel Controls
- View & Adjust Right Channel Controls Select the “Right” button to independently view and adjust the parameters that affect the Right channel processing of the active module.
- Bypass Right Channel Processing Deselect the power button below the Right channel selector to Bypass the Right channel processing.
- Solo Right Channel Processing Select the ’S’ button above the Right channel selector to solo the module’s Right channel processing.
Linked Left/Right Control Adjustments
You can easily link Left & Right controls by enabling the ‘Link’ button between the Left & Right selection buttons. When Link is enabled, parameter adjustments in the Left channel will adjust the corresponding Right channel parameter and vice versa.
More information: Relative Parameter Linking
See the Tips & Examples chapter for more information about parameter linking in Ozone.