| Exercise 1 | Basic FME Skills Review |
| Data | Public Art (Microsoft Excel) Transit Stations (File Geodatabase) |
| Overall Goal | Review basic FME skills |
| Demonstrates | Reading and writing data with basic transformer use |
| Start Workspace | None |
| End Workspace | C:\FMEData2019\Workspaces\DesktopAdvanced\FMEReview-Ex1-Complete.fmw |
You have been hired by a city GIS department. For your first project, you've been asked to create a map that shows the public art within a 5-minute walking radius (2-3 street blocks) of each transit station.
Project Requirements:
To carry out this project in FME Workbench you'll need to do the following:
- Read all the sheets from an Excel spreadsheet (PublicArt.xlsx) turning the data into spatial features
- Reproject the arts data to the UTM83-10 coordinate system
- Read the Transit Stations table from a File Geodatabase (CommunityMapping.gdb)
- Create a buffer around the transit stations set to approximately 3 blocks (250 meters)
- Find artwork features within the station buffer
- Style the data and write it to Google KML format
| TIP |
| If you struggle with this exercise, it's a good idea to go back and review the FME Desktop Basic Manual before taking this advanced course. |
1) Create a New Workspace
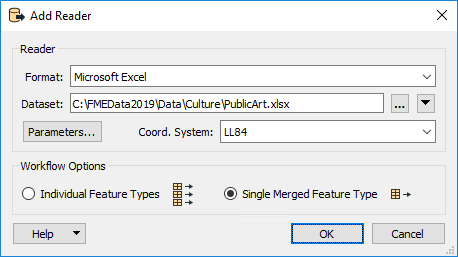
Open FME Workbench and start with a blank workspace. Add a new reader using the following parameters:
| Reader Format: | Microsoft Excel |
| Reader Dataset: | C:\FMEData2019\Data\Culture\PublicArt.xlsx |
| Coord. System: | LL84 |
| Workflow Options: | Single Merged Feature Type |
Once the Microsoft Excel reader is added, turn on feature caching (or add an Inspector transformer) and run the workspace. Inspect the results in the Visual Preview window, by clicking on the cache if necessary. Check especially the coordinate system of the data.
Note: Don't use the Inspect pop-up button on the reader feature type. You will not see any geometry.
| NEW |
| The Visual Preview window is a new tool for FME2019, that incorporates FME Data Inspector functionality into FME Workbench. |
2) Add Geodatabase Data
Next, add another reader, this time the Transit Stations table from a Geodatabase:
| Reader Format: | Esri Geodatabase (File Geodb Open API) |
| Reader Dataset: | C:\FMEData2019\Data\CommunityMapping\CommunityMap.gdb |
| Parameters > Table List: | TransitStations |
| Workflow Options: | Individual Feature Types |
Once more, inspect this new dataset paying particular attention to the coordinate system.
3) Reproject PublicArt
The coordinate system for the transit data is UTM83-10, the artwork features are LL84; therefore one of these datasets must be reprojected to match the other, to test spatial relationships.
Since the requirement is to buffer features in meters, we'll use UTM83-10.
Add a Reprojector transformer to the canvas and connect it to the Public Art feature type (<All>). In the parameters set the Destination Coordinate System to UTM83-10:

Inspect both datasets together (with the background maps turned off) to prove that they now inhabit the same coordinate space.
4) Buffer the Transit Stations
To create a 5-minute walking radius for each transit station, which is about 2-3 city blocks, we will need to create a buffer. To do this, we will use the Bufferer transformer.
Add a Bufferer transformer to the canvas and connect it to the TransitStations feature type. In the parameters set the Buffer Amount to 250:

Re-run the workspace and inspect the output to ensure that the buffers are correct.
| 2019.1 UPDATE |
A common question with the Bufferer is what units the buffer amount uses. In general it's the coordinate system (ground) units, but in 2019.1 the Bufferer has a new parameter called Buffer Distance Units:
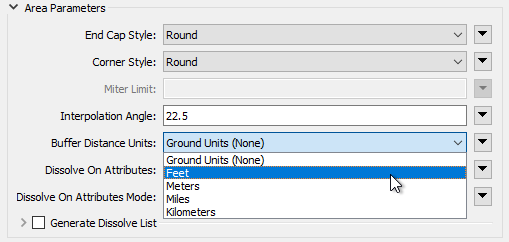
This parameter allows you to set (for example) units in feet, while retaining the data in its original coordinate system (maybe latitude/longitude where the units are decimal degrees). As long as you have FME2019.1.0.1 (build 19610 or greater - there was a minor bug in the 2019.1 release build) for this exercise the parameter can be either Ground Units or Meters (metres), as meters are both the ground units and the required buffer amount. If you wish, try changing the units to Feet and setting the buffer size to 820. The results should be virtually identical. |
5) Filter Public Art
Now let's find which of the public art pieces fall within the buffered area.
Add a SpatialFilter transformer to the canvas. Connect the Reprojector:Reprojected output port to the SpatialFilter:Candidate input port, and the Bufferer:Buffered output port to the SpatialFilter:Filter input port:
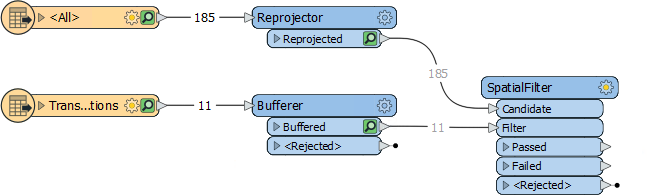
Adjust the workspace as necessary to ensure there are no crossed connections.
Set the SpatialFilter Spatial Predicates to Test parameter to apply both Filter Contains Candidate and Filter Touches Candidate.
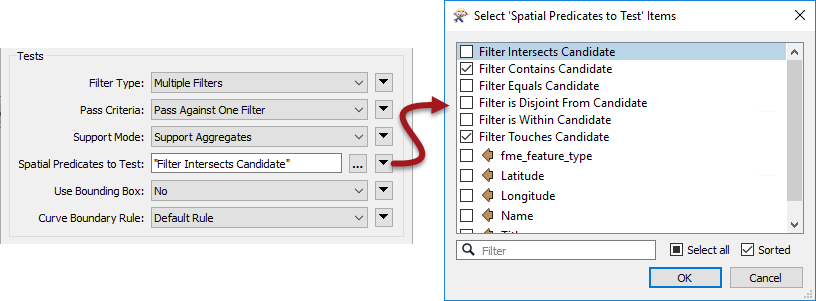
Rerun the translation if you wish, and inspect the SpatialFilter:Passed output port (alongside the Bufferer output) to make sure the results are correct. There should be 52 Passed features.
6) Style Output KML
Add a KMLStyler transformer to the SpatialFilter:Passed output port. This will be used to style the artwork to be written to the KML output.
In the parameters under Icon > Name, click the ellipsis then select an icon such as A1. Then for Label Style set the Scale to 0 and the Opacity to 0:
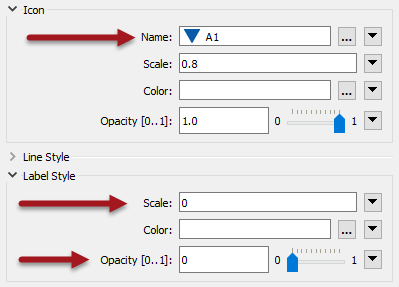
This will allow the icon to show, but hide their labels.
7) Add Google KML Writer
Finally, we can write out to Google KML. Add a Google KML Writer using the following parameters:
| Writer Format: | Google KML |
| Writer Dataset: | C:\FMEData2019\Output\Training\Artworks.kml |
| Feature Type Definition | Automatic |
Change the name of the newly created feature type to ArtNearTransit. Connect it to the KMLStyler:KMLStyled output port.
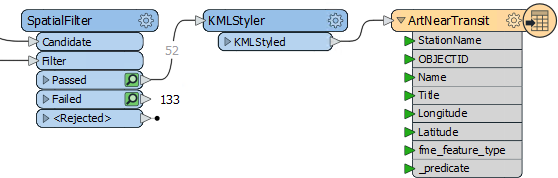
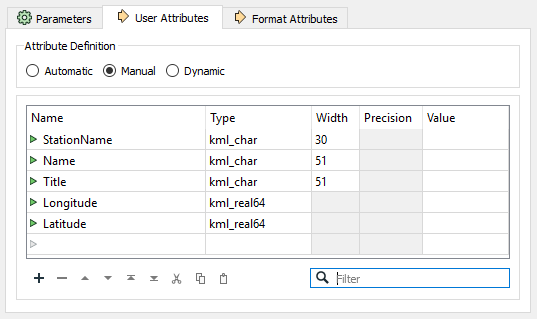
Reopen the ArtNearTransit feature type parameters and select the User Attributes tab. Change the Attribute Definition to Manual and remove the attributes OBJECTID, _predicate, and fme_feature_type:
8) Save and Run Translation
You can now save your workspace then run the translation. Open up the Google KML file in Google Earth to inspect the output.
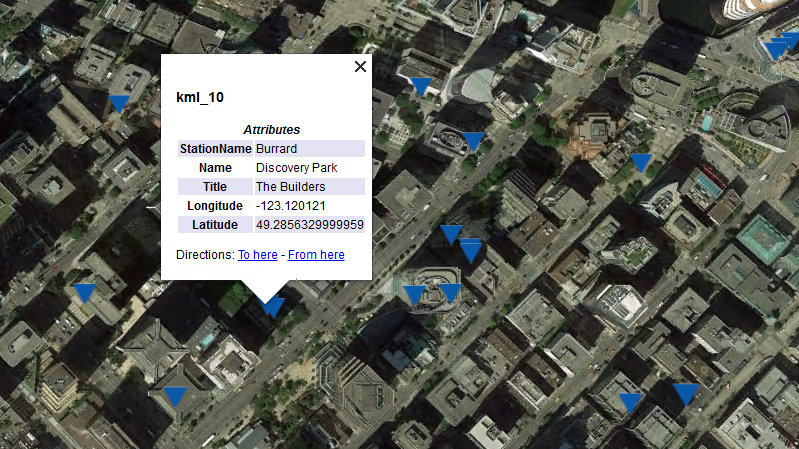
Note: Even though we reprojected the data to UTM83-10, Google KML format supports only a Latitude and Longitude coordinate system. Notice that the writer automatically reprojected our data for us.
| CONGRATULATIONS |
By completing this exercise you have reviewed the following skills:
|