Grid DS-Client
Creation Date: February 08, 2008
Revision Date: January 19, 2015
Product: DS‑Client (Windows)
This article provides an overview of Grid DS-Client.
See Also
Introduction & overview
Data storage protection is a fast growing market. More and more data needs to be backed up and the backup jobs / sets are getting bigger and bigger. Meanwhile, backup time windows are shrinking and RTO (recovery time objective) is vital. This means multiple DS‑Clients for a single LAN are becoming commonplace. Automatic balancing between multiple DS‑Clients for higher performance becomes a new challenge. High availability becomes more important. The Agentless Grid DS‑Client is the solution to achieve these requirements and to meet customer Service Level Agreements.
Grid DS‑Client is designed to deliver better performance scalability of DS‑Client and to increase the availability of the Backup Service. It is designed so that DS‑Client can survive failures of some of its nodes without interrupting the backup service.
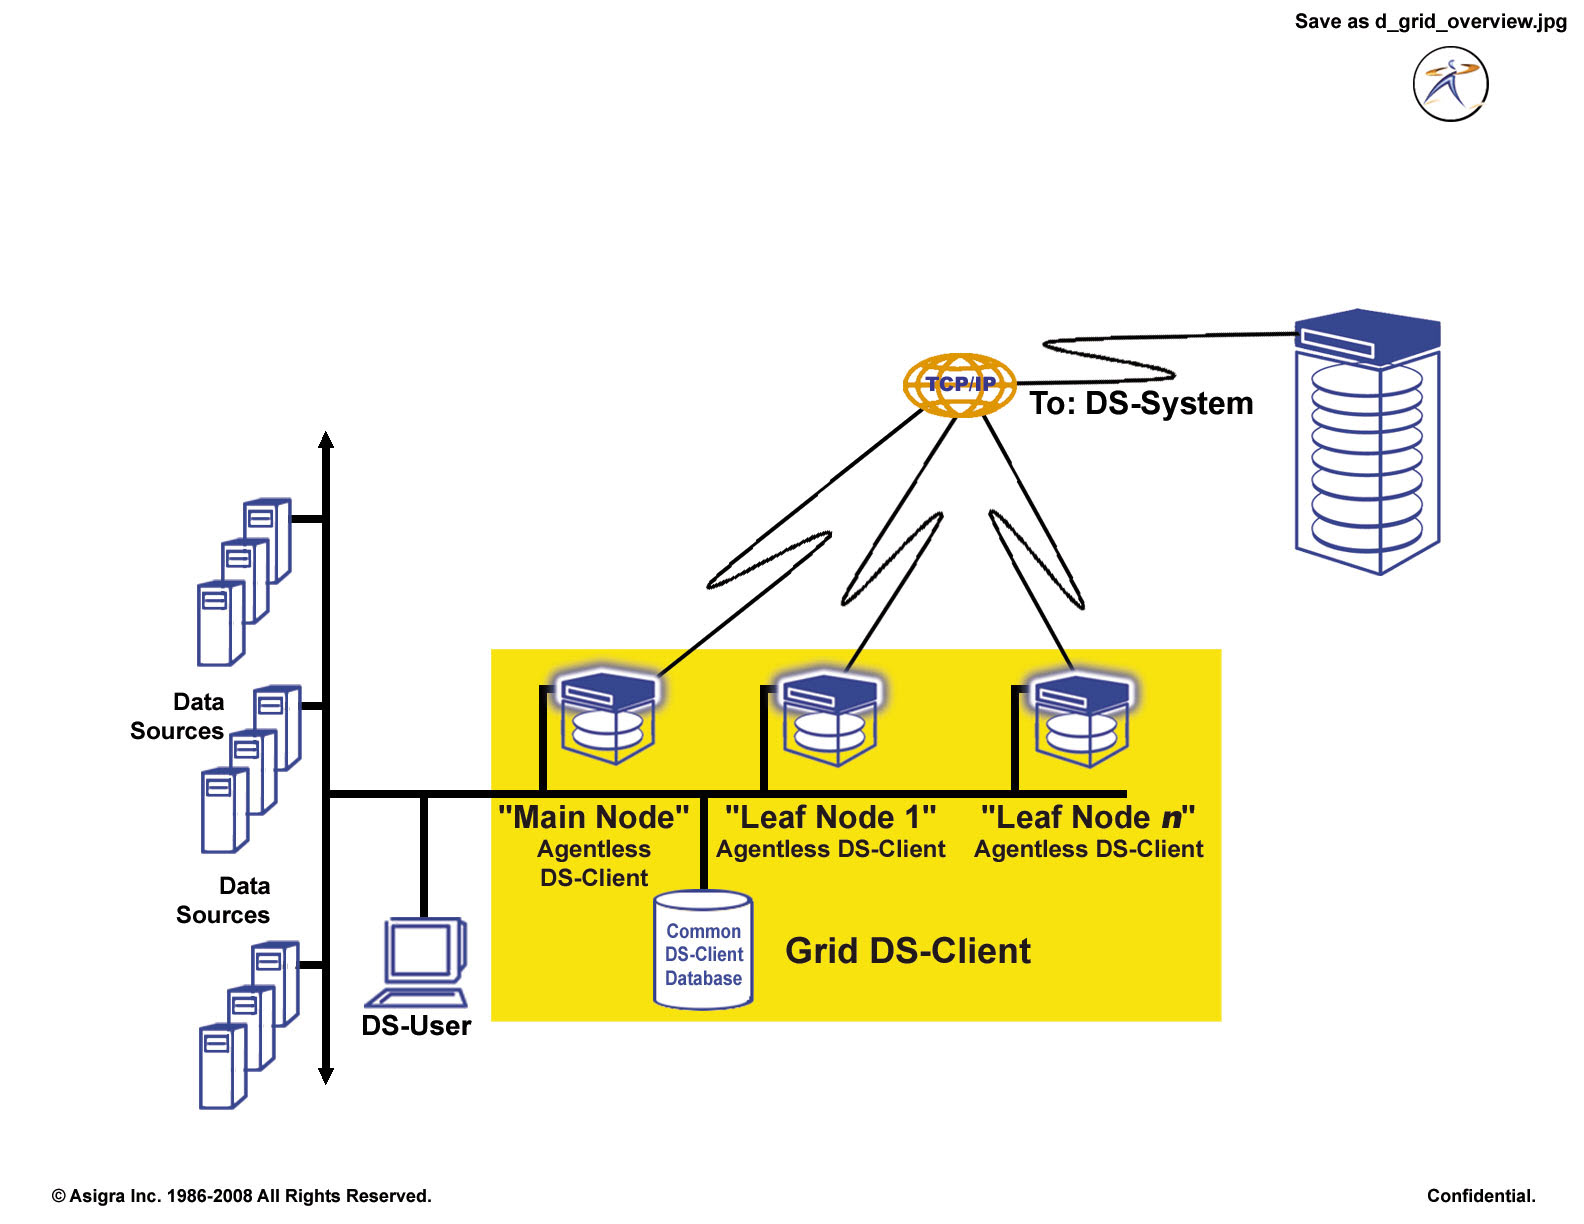
Configuring Grid DS‑Client means that several DS‑Clients will work together to provide backup and restore services as if they are a single DS‑Client (from the DS‑System perspective). Any node in the Grid DS‑Client can provide the same service (backup, restore, delete, synchronization, admin, etc.) as long as the nodes are configured properly (see
“Hardware and software setup”).
All nodes in a Grid DS‑Client share the same DS‑Client database. They also share the same Account Number, DS‑Client number and private/account encryption keys.
Each node in the Grid DS‑Client has a separate network connection to DS‑System.
One of the nodes will be selected as the Main Node to perform common internal tasks and to synchronize and balance activities. It also interacts with DS‑User GUI. Any other node is called a “Leaf Node”. Leaf nodes will perform tasks assigned by the Main node.
Activities are controlled by the Main Node and assigned to all nodes in a balanced manner. The balance is measured by the load (determined by the activities assigned, compared to the “MaxSession” parameter configured for that node) and CPU usage.
If the Main Node goes down, the other (leaf) nodes will continue their current tasks. In the meantime, a new Main Node will be elected.
Even if only one node is alive and all other nodes are down, the Grid DS‑Client will still be available and will continue providing the same backup services.
Operating systems supported
We recommend that you run all nodes on the same platform and Windows version. For information on supported operating systems, see the Client Software Installation Guide.
Hardware and software setup
NOTE: For detailed instructions on how to install a Grid DS-Client, see the Client Software Installation Guide.
For each node to be able to provide the same backup services, they must have the same access to the source data. This means that the nodes must be configured the same way with regards to network credentials:
All nodes must also be able to access that source data with that same network credential.
Moreover, if one node has software installed to access a specific data source type (e.g. “Oracle Client” to backup Oracle Server, “iSeries Access for Windows” to backup System i Servers, etc.) all other nodes must also be configured with the same capability.
Each node must be able to access the DS‑Client database using a trusted connection. This means that a central database must be configured for the Grid DS‑Client to access. It is recommended that the database be clustered to avoid single point of failures.
All nodes (including the DS‑Client database machine) must be in the same domain to achieve the above two requirements.
(Not applicable to Cloud-to-Cloud DS-Client) Grid DS‑Client is supported on VMware. Multiple nodes can be configured to run on virtual machines on the same physical machine. Since all these nodes share the same CPU/RAM on the physical machine, if some nodes are idle or down, other nodes will get more CPU/RAM resources and will become more powerful.
Database configuration is the same as for stand‑alone DS‑Clients:
• The database configuration is maintained in the Registry of each node’s machine.
• The database service account must have the required credentials to access the DS‑Client buffer on each of the Grid’s nodes (to perform database dump during Daily/Weekly Admin).
• Proper delegation must also be configured so that bulk insert is possible from each node’s DS‑Client buffer.
Each node’s service account should have enough credentials to remotely start/stop the DS‑Client service on all other nodes. This is required for the “Auto upgrade” feature. In addition, perform the following:
• On Windows VISTA / 2008 / 7: Go to Windows Control Panel > Administrative Tools > Local Security Settings > Local Policies > Security Options > Network Access: Sharing and security model for local accounts. Set its value to Classic - local users authenticate as themselves.
• On Windows VISTA: Go to Windows Control Panel > Network and Internet > Network and Sharing Center: the option “File Sharing” should be set to ON.
• On Windows 2008 / 7: Go to Windows Control Panel > Network and Internet > Network and Sharing Center > Change advanced sharing settings: the option “Turn on file and printer sharing” should be set to ON.
• On Windows VISTA / 2008 / 7, configure the firewall setting:
• For VISTA / 2008 / 7, ensure “File and printer sharing” and “Remote Administration” are in the exception list.
• On Windows VISTA / 2008 / 7: Verify that UAC (User Account Control) is turned off.
• On all Windows platforms: Check if the firewall allows remote control of the DS-Client service between the nodes with the following commands:
sc \\[other-node] start|stop ds-client
taskkill /S \\[other-node] /IM dsclient.exe
NOTE: Note: Replace [other-node] with the IP address or machine name of the target node. If these commands fail, you have a network or configuration problem that you must resolve before you can continue.
All nodes (including the DS‑Client database machine) should be synchronized to the same time server and configured to the same time zone to ensure time‑consistency. Otherwise, confusing (or even failure) scenarios may occur regarding logs and backups.
Configuring a Grid DS‑Client
Requirements for configuring a Grid DS-Client
To configure a Grid DS-Client, you must prepare to fulfill these requirements:
• All nodes in a Grid DS-Client must point to the same DS-Client database and use the same registration info (such as the Account number and DS-Client number) and encryption key configuration.
• Port 4410 is used for the communication between nodes in a Grid DS‑Client. This port must be opened on all nodes of the Grid DS‑Client.
To configure a new Grid DS-Client without an existing DS-Client
1. Install the DS-Client software on one of the machines (nodes) with which you plan to configure a Grid DS-Client.
IMPORTANT: The database instance that you specify for this node during DS-Client installation will be used by all remaining nodes.
• When DS-Client installation is complete, ensure that the following options are selected:
• Launch the DS-User application
• Start the DS-Client service
2. In DS-User, connect to the DS-Client after the DS‑Client service on the node has started automatically.
3. Perform Initial DS-Client Configuration.
4. Provide the required information and click Save. Do not select Connect to DS-System and Verify information.
5. Stop the DS-Client service on the node.
6. Install the DS-Client software on each of the remaining machines (nodes) of the Grid DS-Client that you plan to configure.
IMPORTANT: During DS-Client installation, select the database instance that was specified for the first node. When prompted, keep the existing database instance. Do not replace the database instance.
7. When DS-Client installation is complete, clear the following options so that they will not be performed:
• View the Help file
• Launch the DS-User application
• Start the DS-Client service
NOTE: The DS-Client services of all nodes must not be running before you configure the Grid DS-Client.
8. Run DSConfig.exe on a node on which you have just installed DS-Client to start the Grid DS‑Client Configuration Tool.
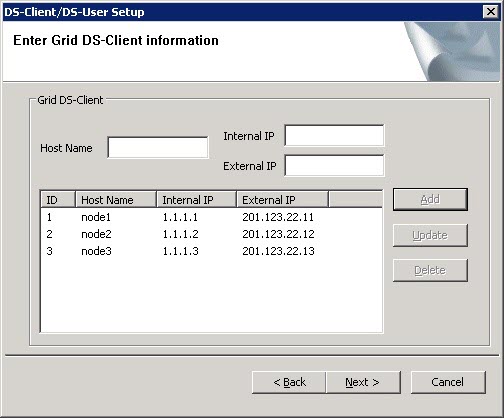
9. In the Grid DS‑Client Configuration Tool, provide the machine name (NetBIOS name) and the internal and external IPs of each node to configure the Grid DS-Client and click Next.
After the configuration process is complete, the DS‑Client service of each node is started automatically.
10. Through the DS-Client of the main node, verify that the connection with the DS‑System is successful.
11. Modify the connection on the DS‑System side as necessary.
To configure a new Grid DS-Client from existing stand‑alone DS‑Clients
The following procedure assumes that all the existing DS-Clients with which you plan to configure a new Grid DS-Client are stand-alone DS-Clients. Each stand-alone DS-Client is connected to its own database instance, which is not shared by other DS-Clients.
1. Among the database instances of the stand-alone DS-Clients with which you plan to configure a new Grid DS-Client, determine which database instance you want the new Grid DS-Client to use.
2. Stop the DS-Client service on all these machines with which you plan to configure a new Grid DS-Client.
3. Keep the DS-Client that is connected to the database instance that you chose for the new Grid DS-Client.
4. Uninstall the DS-Client software on all the remaining machines (nodes) and then install the DS-Client software on each of these nodes.
IMPORTANT: During DS-Client installation, select the database instance that you chose and kept for the new Grid DS-Client. When prompted, select to keep the existing database instance that is detected. Do not replace that database instance.
5. When DS-Client installation is complete, clear the following options so that they will not be performed:
• View the Help file
• Launch the DS-User application
• Start the DS-Client service
NOTE: The DS-Client services of all the nodes must not be running before you configure the Grid DS-Client.
6. Run DSConfig.exe on one of the nodes to start the Grid DS‑Client Configuration Tool.
7. In the Grid DS‑Client Configuration Tool, provide the machine name (NetBIOS name) and the internal and external IPs of each node to configure the Grid DS-Client and click Next.
After the configuration process is complete, the DS‑Client service of each node is started automatically.
8. Through the DS-Client of the main node, verify that the connection with the DS‑System is successful.
9. Modify the connection on the DS‑System side as necessary.
Reconfiguring an existing DS-Client
You may add a new node, remove an existing node, upgrade a stand‑alone DS-Client to become a new node in an existing Grid DS-Client, and downgrade an existing node of a Grid DS-Client to become a stand‑alone DS-Client.
IMPORTANT: Grid DS-Client configurations are stored in the DS-Client database. Before changing the Grid configuration, back up the DS-Client database using Daily Admin or Weekly Admin. Otherwise, if the database becomes corrupted or fails while the Grid DS-Client is being configured, you will be required to reconfigure the DS-Client database after recovering the DS-Client database.
To add a new node to an existing Grid DS-Client
You can upgrade an existing stand-alone DS-Client or add a newly installed DS-Client to become a new node in an existing Grid DS-Client.
1. Stop the DS‑Client service on all the nodes.
2. Perform one of the following:
• To upgrade an existing stand-alone DS-Client to be a new node, uninstall the DS-Client software of the stand-alone DS-Client and then install the DS-Client software on the machine.
• To add a newly installed DS-Client to be a new node, install the DS-Client software on the machine that will contain the new node.
IMPORTANT: During DS-Client installation, select the database instance that is currently used by the Grid DS-Client. When prompted, select to keep the existing database instance that is detected. Do not replace that database instance.
3. When DS-Client installation is complete, clear the following options so that they will not be performed:
• View the Help file
• Launch the DS-User application
• Start the DS-Client service
NOTE: The DS-Client services of all the nodes must not be running before you configure the Grid DS-Client.
4. Run DSConfig.exe on one of the nodes to start the Grid DS‑Client Configuration Tool.
5. Provide the machine name (NetBIOS name) and the internal and external IP addresses of the DS-Client that you are adding as a new node to the Grid DS-Client and click Next.
After the configuration process is complete, the DS‑Client service of each node is started automatically.
6. Through the DS-Client of the main node, verify that the connection with the DS‑System is successful.
7. Modify the connection on the DS‑System side as necessary.
8. Unregister the Grid DS‑Client on DS‑System side.
9. Start the DS‑Client service on each node, and re-register to DS‑System.
Nodes that were not started at the time you re-registered to DS‑System will send their hardware registration information to DS‑System later, on their next connection to DS‑System.
To downgrade a node in a Grid DS‑Client to a stand‑alone DS‑Client
1. Stop the DS‑Client service on all the nodes.
2. Run DSConfig.exe on one of the nodes to start the Grid DS‑Client Configuration Tool.
3. In Grid DS‑Client Configuration Tool, delete the node that you want to downgrade.
NOTE: The deleted node is removed from the Grid DS-Client. The DS-Client of the deleted node is disconnected from the DS-Client database.
4. To reconfigure the DS-Client of the deleted node to become a stand-alone DS-Client, do the following:
a) Unregister the DS‑Client on DS‑System side.
b) Reinstall the DS-Client so that it is reconnected to its own DS-Client database, not shared by any other DS-Clients.
After successful installation, the DS-Client can be used as a stand-alone DS-Client.
5. Do the following for the Grid DS‑Client that you have just reconfigured:
a) Modify the connection on the DS‑System side as necessary.
b) Start the DS‑Client service on each node, and reregister to DS‑System.
To downgrade all the nodes in a Grid DS‑Client to stand‑alone DS‑Clients
1. Stop the DS‑Client service on all the nodes.
2. Run DSConfig.exe on one of the nodes to start the Grid DS‑Client Configuration Tool.
3. In Grid DS‑Client Configuration Tool, delete all the nodes.
NOTE: When all the nodes are deleted, they no longer form a Grid DS-Client. All the DS-Clients that represent the deleted notes are disconnected from the DS-Client database.
4. To reconfigure the DS-Client of each deleted node to become a stand-alone DS-Client, do the following:
a) Unregister the DS‑Client on DS‑System side.
b) Reinstall the DS-Client so that it is reconnected to its own DS-Client database, not shared by any other DS-Clients.
After successful installation, each DS-Client can be used as a stand-alone DS-Client.
Connectivity
DS‑User can connect only to the Main Node.
• Since the Main Node is variable, DS‑User must be initialized with all the IP addresses of all the nodes of the Grid DS‑Client. (On Classic DS-User, this is done from Setup Menu > Initialization: Connection Tab.)
Each node will connect to DS‑System using a separate network connection, using its own external IP.
• Each node must be able to connect to all source data to be protected.
• A High‑speed network connection (at least 1 Gigabit per second is recommended) is necessary between Grid DS‑Client and the data source to improve the overall backup service performance.
Grid DS-Client setup
NOTE: For detailed instructions on how to install a Grid DS-Client, see the Client Software Installation Guide.
The default path for Grid DS‑Client Configuration Tool is C:\Program Files\CloudBackup\DS-Client\DSConfig.exe.
• Configure at least two nodes to make a Grid DS‑Client. If you configure only one node (or none), this DS‑Client will be a standalone DS-Client.
User input and modification of nodes is controlled by the Add, Update and Delete buttons.
Specific GUIs for Grid DS‑Client
In general, the DS‑User functionalities are the same as for the stand‑alone DS‑Client, with a few additional functionalities for managing the Grid DS‑Client. For details, see
“About Grid DS-Client”.
Upgrading, recovering DS‑Client DB, and version control
NOTE: For detailed instructions on how to upgrade a Grid DS-Client, see the Client Software Installation Guide.
Manual upgrade
To manually upgrade a Grid DS‑Client to a new version:
1. Stop all DS‑Client services on all nodes in the Grid DS‑Client.
2. Run the Service Pack / Release / Hot Fix package on each node, using the same steps as for stand‑alone DS‑Client.
3. Start all the DS‑Client services that are part of the Grid DS‑Client.
Auto upgrade
Grid DS‑Clients can auto-upgrade if their DS-System is configured to allow it.
The first node that downloads a higher version auto‑upgrade package from DS‑System will stop the DS‑Client service on all other nodes. After the first node has finished upgrading, it will restart the DS‑Client services on all other nodes. Once those nodes restart, they will connect to DS‑System and download the auto‑upgrade package (this time auto‑upgrade will only stop the DS‑Client service on the local node).
Auto‑upgrade will be triggered if the following occurs:
When starting DS‑Client service, at least one other node is found to have a higher version (only the node performing upgrading will be stopped for upgrading and restarted automatically).
When connecting to DS‑System, a higher version DS‑Client auto‑upgrade package is available.
Recover the DS‑Client database
The Recover DS‑Client database process can be performed on any node (Classic DS-User > Setup > System Activities: Repair). Since the DS‑Client Database Recovery needs exclusive access to the database, all nodes are required to stop for recovery. After the node that performed recovery successfully downloads the database dump, it will notify all other nodes to stop. Once it detects all other nodes have stopped, it will notify the user to restart the DS‑Client service on that node. Before that node has successfully recovered the DS‑Client database (database load completed), other nodes will not be able to start.
• If an old DS‑Client database is recovered and is not compatible with the current DS‑Client executable, run the latest DS‑Client installation to upgrade the DS‑Client database. Otherwise, the nodes will not be allowed to start.
Version control
If a node’s version is lower than the highest version in the Grid DS‑Client, it will perform auto‑upgrade right after starting the DS‑Client service.
If auto‑upgrade is not allowed or fails to upgrade, a version compatibility check will be performed and nodes that are not compatible will not be allowed to start.
Configuring the Grid DS-Client nodes (node level configuration)
The default configuration (created by installing and running the Grid DS‑Client Configuration Tool) is sufficient to run a Grid DS-Client. Advanced users may wish to configure individual nodes for optimum performance.
For different nodes in the same Grid, some DS‑Client parameters can be different. These local parameters are flagged
Local Setting. All local parameters must be configured from the DS-Client configuration - Advanced Tab (see
“Configuring the advanced settings”).
Every Local Setting parameter has a corresponding Global Setting that is the default value for each node.
• To switch, select Use global setting.
If this option is not selected, the Value field is activated and the user can give each node a different value.
A special parameter is “DSCBuffer”. This is the same as DS‑Client Buffer in the DS-Client Configuration - Parameters tab. However, it can be set to a different value for each DS‑Client node because each DS‑Client node can have its own buffer.
Frequently asked questions (FAQ)
1. | Question How is the Main node elected? Answer The first node that is started and detects there is no existing Main node will become the Main node. |
2. | Question How is a Leaf crash handled by the Grid DS-Client? Answer • In case a Leaf node crashes, all activities on that node will be interrupted. However, if there are still some nodes active, they will continue functioning and the pending activities running on these nodes continue to run. All activities that are running on the node that crashed will be considered to have “failed”. • For interrupted backup sessions, the files that have already been completely sent to DS-System will be protected, while the others will be backed up in the next backup session. • Retries for scheduled activities keep the same behavior as on a stand-alone DS-Client: it will retry in case the connection to DS-System is lost, but not if the activity is stopped on the DS-Client side. |
3. | Question How is a Main node crash handled? Answer If the Main node is down, the internal tasks (scheduling, etc.) will be temporarily stopped. However, all activities that are running on the Leaf nodes will continue. In the meantime, a new Main node will be elected from among the remaining nodes. This will occur in a short period (usually a few seconds, but sometimes it may take a few minutes). |
4. | Question How many nodes can be configured in a Grid DS-Client? Answer The minimum number of nodes in a Grid DS-Client is logically two (2). If there is only one node configured, it becomes a stand-alone DS-Client. There is no actual maximum node limit. However, a larger number of nodes means the DS-Client database server must have the CPU and RAM capabilities to support the nodes. |