Switching from a Non-Clustered (Standard) Environment to a Clustered Environment
Before switching from a non-Clustered (standard) environment to a clustered environment, review the Considerations and Before you Begin sections below.
Considerations
■ This procedure can be performed only when an external SQL Server is used.
■ The ZVM IP will be used as the Cluster IP. It is configured in the Zerto role IP. This is used so as to maintain connections to existing peer sites and to retain VPG configurations.
If you change the IP, you will need to pair all the peer sites, and reconfigure the VPGs.
Note: |
When relevant, you are able to switch back from a clustered environment to a non-clustered environment. |
Before you Begin
Make sure:
■ You have decided on the following, and have the information accessible:
■ Cluster Name
■ Cluster IP
■ Zerto Role Name
■ Zerto Role IP
■ You have:
■ Access to the Registry.
■ (Recommended) A backup of the Registry
To Switch from a Non-Clustered (Standard) Mode to a Clustered Mode:
3. In the Failover Cluster Manager, create an empty role. To do this, right click the roles menu on the left pane, and select Create Empty Role.
When the role is created, it is automatically in the state, Running.
4. Name the Role:
a) Right-click the role, and select Properties.
b) In the General tab, define the role Name.
c) Click Apply.
5. Configure Failover settings.
a) Navigate to the Failover tab and define the following:
Maximum restarts in the specified period | 12 |
Period | 1 hour |
b) In the Failback area, select Prevent failback.
c) Click Apply, then click OK.
6. Stop the role. To do this, right-click the role, and select Stop Role.
8. Copy and replace the tweak.txt file from the first node to the second node.
9. Select the node where ZVM is installed, and Stop all Zerto Services.
10. Reconfigure the Zerto Services Startup Type from Automatic to Manual. To do this:
a) Open the Services manager.
b) Select and right-click the service Zerto Virtual Manager.
c) Navigate to Properties > General tab, Startup type drop-down list, and select Manual.
d) Repeat steps
b and
c for the services
Zerto Virtual Backup Appliance, and
Zerto Online Services Connector.
11. Change the Log On modes to a domain account for the services Zerto Virtual Manager and Zerto Virtual Backup Appliance. To do this:
a) Navigate to Properties > Log On tab.
12. Update the Registry. Go to the Registry, navigate to HKEY_LOCAL-MACHINE > SOFTWARE > Zerto > Zerto Virtual Replication, and create the FailOverCluster key with it’s sub-keys.
a) Right-click the key Zerto Virtual Replication, and select New > Key, then enter FailoverCluster.
b) Right-click the key FailoverCluster, and select New > Key, then enter ClusterDetails.
c) Right-click the key FailoverCluster, and select New > Key, then enter ZvmRoleDetails.
13. Select the ClusterDetails sub-key, then set the cluster IP value:
a) In the right pane, right-click and select New > String value.
b) Enter the value name: IP
c) Right-click IP, select Modify, then enter the value data: Cluster IP
14. Select the ClusterDetails sub-key, then set the cluster name value:
a) In the right pane, right-click and select New > String value.
b) Enter the value name: Name
c) Right-click Name, select Modify, then enter the value data: Cluster Name
15. Select the ZvmRoleDetails sub-key, then set the ZVM role IP value:
a) In the right pane, right-click and select New > String value.
b) Enter the value name: IP
c) Right-click IP, select Modify, then enter the value data: Role IP
16. Select the ZvmRoleDetails sub-key, then set the ZVM role name value:
a) In the right pane, right-click and select New > String value.
b) Enter the value name: Name
c) Right-click Name, select Modify, then enter the value data: Role Name
First Clustered Node - Installing Zerto Virtual Replication
Use the following procedure to configure ZVR on the first clustered node.
Before you Begin:
■ vCD environments only: When you install and configure an AMQP Server for Zerto Virtual Replication, make sure you enter the Cluster role IP in the field AMQP host.
To install Zerto Virtual Manager on the first clustered node:
1. On the first cluster node, run the Zerto Installer.
■ If the required version of Microsoft .NET Framework is not installed, you are prompted to install the required version of .NET Framework, which is included as part of the Zerto installation package.
After .NET is installed, the machine automatically restarts and the Zerto installation begins.
2. Follow the wizard until the Installation Type window appears, then select the option, Custom Installation.
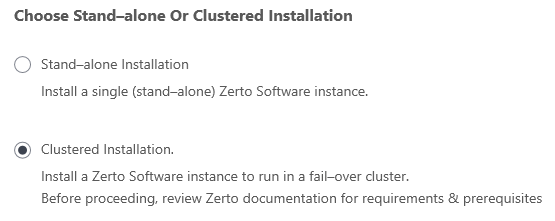
The Choose Stand-alone Or Clustered Installation window appears.
3. Select Clustered Installation, then click Next.
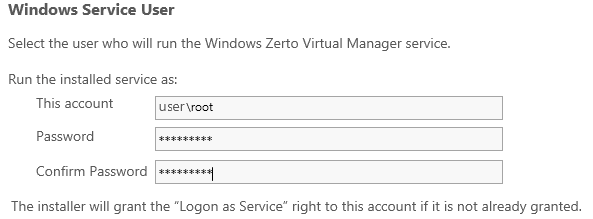
The Windows Service User window appears.
This is the account which will run the Zerto Virtual Manager Service.
Note: |
The user who runs the Windows Zerto Virtual Manager service must be configured with permission to ‘logon as a service’. |
4. Best Practice: Enter the domain username and password of the user who will run the Zerto Virtual Manager Service.
Note: |
Make sure that the domain user has the required privileges. |
5. Click NEXT.
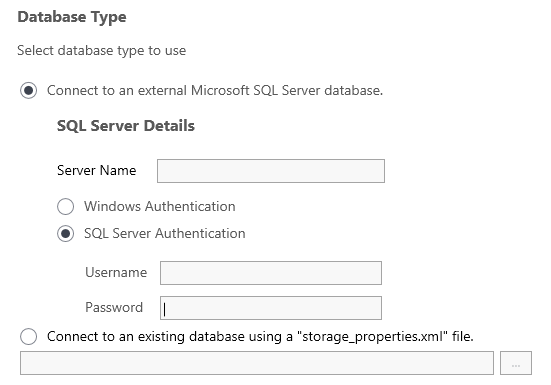
The Database Type window appears.
■ In the Database Type window you connect the first node to an external Microsoft SQL Server. This is the same database which will be used for the second node.
■ Do not select Connect to an existing database - that option will be used when you install Zerto on the second node, later on.
6. Connect to the external database by selecting Connect to an external Microsoft SQL Server or Microsoft SQL Server Express database, then enter the SQL Server Authentication details.
a) Server Name: The domain name and server instance to connect to, with the format: <server_name>\<instance_name> or <Server_IP>\<instance_name>
b) Specify an authentication method. Select one of the following:
■ Windows Authentication
- or -
■ SQL Server Authentication
c) If you selected
Windows Authentication: This option is enabled only if a specific service user account was specified in Windows Service User, in
4. In this case, the service account name and password are used.
d) If you selected SQL Server Authentication, the Test Authentication button is also displayed.
Define the following:
■ Username: The user name for the SQL Server database.
■ Password: A valid password for the given user name.
The installer checks whether it can connect to the specified database with the specified username and password.
e) Click TEST CONNECTION. You can only continue when the authentication is successful.
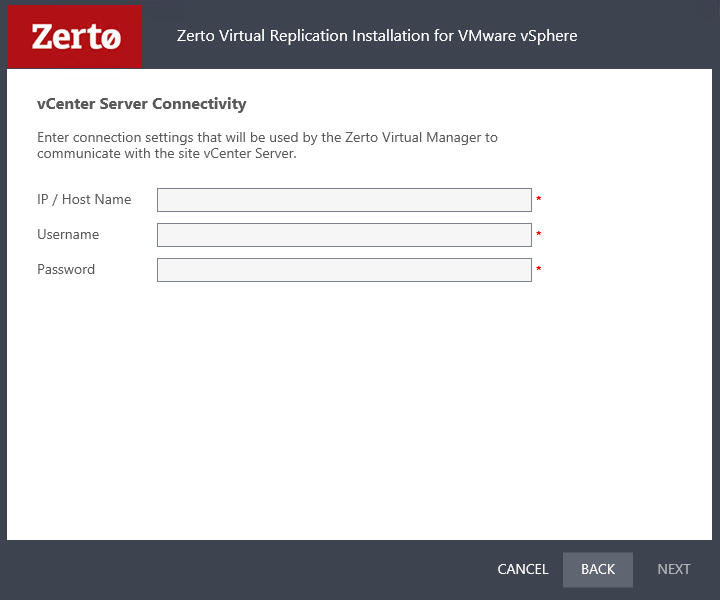
7. Click NEXT. The vCenter Server Connectivity window appears.
8. Enter connection settings that the Zerto Virtual Manager uses to communicate with the vCenter Server:
■ IP/Host name: The IP address or host name of the machine where the vCenter runs.
■ Username: The user name for a user with administrator level privileges to the vCenter Server. The name can be entered using either of the following formats:
■ username
■ domain/username
■ Password: A valid password for the given user name.
9. Click NEXT.
■ For further steps on vCloud Direct (vCD) Connectivity, continue to
10.
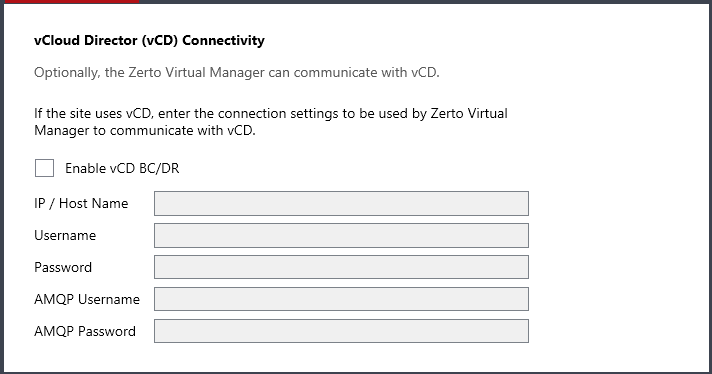
10. The vCloud Director Connectivity window is displayed.
11. When using vCloud Director and you have installed an AMQP server, click the Enable vCD BC/DR checkbox and enter the VMware vCloud Director access details:
■ IP / Host name: The IP address or host name of the machine where vCD runs. When connecting to vCD with multiple cells, enter the virtual IP for the network load balancing used by the cells.
■ Username: The user name for an administrator to vCD.
■ Password: A valid password for the given user name.
■ AMQP Username: The user name for the AMQP server.
■ AMQP Password: A valid password for the given AMQP user name.
If the vCD connection settings are not specified, for example, when you do not have an AMQP server installed, they can be set in the Advanced Settings dialog in the Site Configuration panel, in the Zerto User Interface after installation, as described in the Zerto Cloud Manager Administration Guide.
TIP:
Zerto provides an AMQP installation kit if you do not have one installed for vCD.
■ Run ZertoAMQPInstallWizard.exe as described in the Zerto Cloud Manager Administration Guide, and enter the following credentials:
■ Username: The AMQP user account Zerto will use. RabbitMQ prior to version 3.3 installs with a default administrator user: guest. In RabbitMQ version 3.3 and higher, specify a user with administrator privileges.
■ Password: The password for the user. RabbitMQ prior to version 3.3 installs with a default password of guest.
12. Click NEXT.
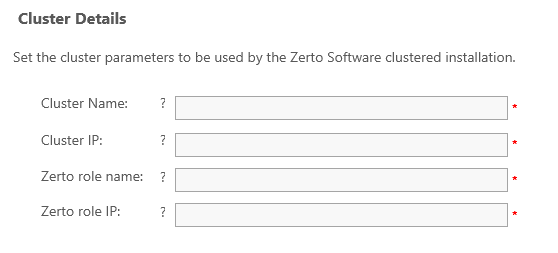
The Cluster Details window appears.
13. Enter the cluster details:
Cluster Name | The exact name of the cluster, as it was created in the Failover Cluster Manager. |
Cluster IP | The IP of the cluster, as it was defined in the Failover Cluster Manager. |
Zerto role name | The exact name of the role, as it appears in the Failover Cluster Manager. |
Zerto role IP | The IP of the role, as it appears in the Failover Cluster Manager. |
14. Click NEXT.
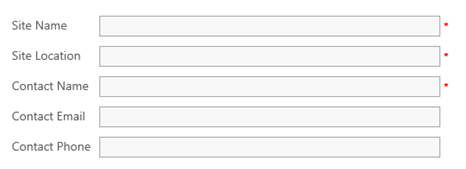
15. The Zerto Virtual Manager Site Details window appears, where you define general information about the site.
16. Enter the site details:
Site Name: | A name to identify the site. This name is displayed in the Zerto User Interface. This field is mandatory. |
Location: | (Optional) Information such as the address, or name of the site to identify it. |
Contact Information: | (Optional) The name of the person to contact if a need arises. |
Contact Email: | (Optional) The email address to contact if a need arises. |
Contact Phone: | (Optional) The phone number to contact if a need arises. |
17. Click NEXT.
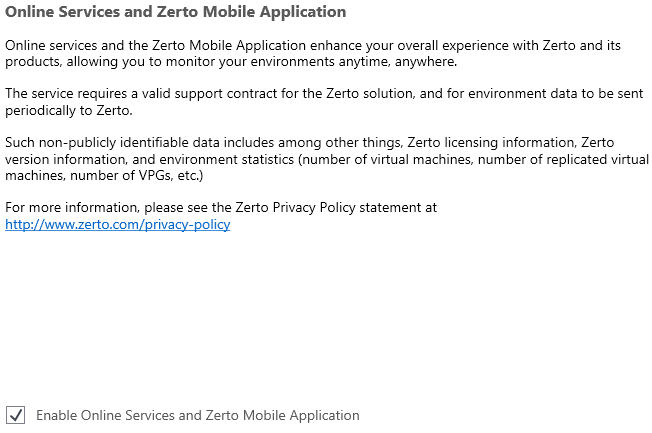
The Online Services and Zerto Mobile Application window appears.
The Online Services and Zerto Mobile Application are enabled by default.
■ You can disable these services by deselecting Enable Online Services and Zerto Mobile Application.
18. Click NEXT.
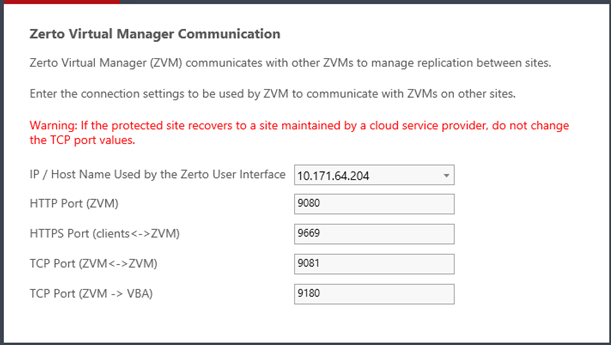
The Zerto Virtual Manager Communication window appears.
In this window you define the connection settings (ports) which are used by Zerto Virtual Manager to communicate with Zerto Virtual Managers on other sites.
Port Description Parameter | Default Port Number | Communication Direction | Between... | Comments |
IP/Host Name Used by the Zerto User Interface | NA | | Zerto User Interface - and - Zerto Virtual Manager | IP to access the Zerto Virtual Manager from the Zerto User Interface. If the machine has more than one NIC, select the appropriate IP from the list. Otherwise, the IP that is displayed is the only option. |
HTTP Port (ZVM) | 9080 | Inbound | Zerto Virtual Manager - and - Zerto internal APIs, and Cmdlets | |
HTTP Port (clients<->ZVM) | 9669 | Inbound | Zerto User Interface - and - Zerto Virtual Manager | |
TCP Port (ZVM<->ZVM) | 9081 | Inbound and outbound | Zerto Virtual Manager - and - Zerto Virtual Manager | ■ When both the protected and recovery sites belong to the same enterprise: ■ If you change this value, when pairing sites, use the TCP port value specified here. Pairing the sites is described in Zerto Installation Guide for Microsoft Hyper-V or VMware vSphere, in the section Pairing Sites. ■ When an enterprise uses a cloud service provider to supply disaster recovery services: ■ Do not change this value |
TCP Port (ZVM->VBA) | 9180 | Inbound and outbound | Zerto Virtual Manager - and - Virtual Backup Appliance (VBA) | |
19. Click NEXT.
The installation performs checks to verify that the installation can proceed successfully.
20. If you intend managing your disaster recovery from this machine, you can select to open the Zerto Virtual Manager (ZVM) Interface at the end of the installation, logging in with the user name and password for the vCenter Server connected to the Zerto Virtual Manager. In this user interface you set up Zerto, as described in Zerto Installation Guide for Microsoft Hyper-V or VMware vSphere, in the section Initial Configuration.
21. You must exclude the following folders from antivirus scanning:
Zerto Virtual Replication |
%ProgramData%\Zerto\Data\zvm_db.mdf |
C:\Program Files\Zerto\Zerto Virtual Replication\Zerto.Zvm.Service.exe |
C:\Program Files\Zerto\Zerto Virtual Replication\Zerto.Vba.VbaService.exe |
C:\Program Files\Zerto\Zerto Virtual Replication\Zerto Online Services Connector\Zerto.Online.Services.Connector.exe |
C:\Program Files\Zerto\Zerto Virtual Replication\Embedded DB Manager Service\Zerto.LocalDbInstanceManagerService.exe |
Failure to do so may lead to the Zerto Virtual Replication folder being incorrectly identified as a threat and in some circumstances corrupt the Zerto Virtual Replication folder.
22. Add the machine to the relevant host boot configuration, so that on starting up the host, this machine, running the Zerto Virtual Manager, is also powered on automatically.
Note: If the vSphere Client console was open during the installation, close it and reopen it to ensure you have the Zerto Virtual Manager user interface loaded.
23. Continue with step
3 on
here.
Second Clustered Node - Installing Zerto Virtual Replication
Use the following procedure to configure ZVR on the second clustered node.
Before You Begin:
■ Verify you installed and configured Zerto Virtual Manager on the first node.
■ vCD environments only: When you install and configure an AMQP Server for Zerto Virtual Replication, make sure you enter the Cluster role IP in the field AMQP host.
To install Zerto Virtual Manager on the second clustered node:
1. Copy the storage_properties.xml file from the first node, to a folder in the second node.
1. On the first cluster node, run the Zerto Installer.
■ If the required version of Microsoft .NET Framework is not installed, you are prompted to install the required version of .NET Framework, which is included as part of the Zerto installation package.
After .NET is installed, the machine automatically restarts and the Zerto installation begins.
2. Follow the wizard until the Installation Type window appears, then select the option, Custom Installation.
The Choose Stand-alone Or Clustered Installation window appears.
3. Select Clustered Installation, then click Next.
The Windows Service User window appears.
This is the account which will run the Zerto Virtual Manager Service.
Note: |
The user who runs the Windows Zerto Virtual Manager service must be configured with permission to ‘logon as a service’. |
4. Best Practice: Enter the domain username and password of the user who will run the Zerto Virtual Manager Service.
Note: |
Make sure that the domain user has the required privileges. |
5. Click NEXT.
The Database Type window appears.
You now configure the database for the second node.
6. Select
Connect to an existing database using a “storage_properties.xml” file, then browse to the
storage_properties.xml file which you copied over to a folder in the second node in
1.
This automatically connects the database from the first node to the second node.
7. Click TEST CONNECTION. You can only continue when the authentication is successful.
8. Click NEXT. The vCenter Connectivity window appears.
9. Enter connection settings that the Zerto Virtual Manager uses to communicate with the vCenter Server:
■ IP/Host name: The IP address or host name of the machine where the vCenter runs.
■ Username: The user name for a user with administrator level privileges to the vCenter Server. The name can be entered using either of the following formats:
■ username
■ domain/username
■ Password: A valid password for the given user name.
10. Click NEXT.
■ For further steps on vCloud Direct (vCD) Connectivity, continue to
11.
11. The vCloud Director Connectivity window is displayed.
12. When using vCloud Director and you have installed an AMQP server, click the Enable vCD BC/DR checkbox and enter the VMware vCloud Director access details:
■ IP / Host name: The IP address or host name of the machine where vCD runs. When connecting to vCD with multiple cells, enter the virtual IP for the network load balancing used by the cells.
■ Username: The user name for an administrator to vCD.
■ Password: A valid password for the given user name.
■ AMQP Username: The user name for the AMQP server.
■ AMQP Password: A valid password for the given AMQP user name.
If the vCD connection settings are not specified, for example, when you do not have an AMQP server installed, they can be set in the Advanced Settings dialog in the Site Configuration panel, in the Zerto User Interface after installation, as described in the Zerto Cloud Manager Administration Guide.
TIP:
Zerto provides an AMQP installation kit if you do not have one installed for vCD.
■ Run ZertoAMQPInstallWizard.exe as described in the Zerto Cloud Manager Administration Guide, and enter the following credentials:
■ Username: The AMQP user account Zerto will use. RabbitMQ prior to version 3.3 installs with a default administrator user: guest. In RabbitMQ version 3.3 and higher, specify a user with administrator privileges.
■ Password: The password for the user. RabbitMQ prior to version 3.3 installs with a default password of guest.
13. Click NEXT. The Cluster Details window appears.
14. Enter the cluster details, exactly as they were entered on the first node:
Cluster Name | The exact name of the cluster, as it was created in the Failover Cluster Manager. |
Cluster IP | The IP of the cluster, as it was defined in the Failover Cluster Manager. |
Zerto role name | The exact name of the role, as it was created in the Failover Cluster Manager. |
Zerto role IP | The IP of the first role, at it appears in the Failover Cluster Manager. |
15. Click NEXT.
16. The Zerto Virtual Manager Site Details window appears, where you define general information about the site.
17. Enter the site details:
Site Name: | A name to identify the site. This name is displayed in the Zerto User Interface. This field is mandatory. |
Location: | (Optional) Information such as the address, or name of the site to identify it. |
Contact Information: | (Optional) The name of the person to contact if a need arises. |
Contact Email: | (Optional) The email address to contact if a need arises. |
Contact Phone: | (Optional) The phone number to contact if a need arises. |
18. Click NEXT.
The Online Services and Zerto Mobile Application window appears.
The Online Services and Zerto Mobile Application are enabled by default.
■ You can disable these services by deselecting Enable Online Services and Zerto Mobile Application.
19. Click NEXT.
The Zerto Virtual Manager Communication window appears.
In this window you define the connection settings (ports) which are used by Zerto Virtual Manager to communicate with Zerto Virtual Managers on other sites.
Port Description Parameter | Default Port Number | Communication Direction | Between... | Comments |
IP/Host Name Used by the Zerto User Interface | NA | | Zerto User Interface - and - Zerto Virtual Manager | IP to access the Zerto Virtual Manager from the Zerto User Interface. If the machine has more than one NIC, select the appropriate IP from the list. Otherwise, the IP that is displayed is the only option. |
HTTP Port (ZVM) | 9080 | Inbound | Zerto Virtual Manager - and - Zerto internal APIs, and Cmdlets | |
HTTP Port (clients<->ZVM) | 9669 | Inbound | Zerto User Interface - and - Zerto Virtual Manager | |
TCP Port (ZVM<->ZVM) | 9081 | Inbound and outbound | Zerto Virtual Manager - and - Zerto Virtual Manager | ■ When both the protected and recovery sites belong to the same enterprise: ■ If you change this value, when pairing sites, use the TCP port value specified here. See the section Pairing Sites. ■ When an enterprise uses a cloud service provider to supply disaster recovery services: ■ Do not change this value |
TCP Port (ZVM->VBA) | 9180 | Inbound and outbound | Zerto Virtual Manager - and - Virtual Backup Appliance (VBA) | |
20. Click NEXT.
The installation performs checks to verify that the installation can proceed successfully.
21. If you intend managing your disaster recovery from this machine, you can select to open the Zerto Virtual Manager (ZVM) Interface at the end of the installation, logging in with the user name and password for the vCenter Server connected to the Zerto Virtual Manager. In this user interface you set up Zerto. See the section Initial Configuration.
22. You must exclude the following folders from antivirus scanning:
Zerto Virtual Replication |
%ProgramData%\Zerto\Data\zvm_db.mdf |
C:\Program Files\Zerto\Zerto Virtual Replication\Zerto.Zvm.Service.exe |
C:\Program Files\Zerto\Zerto Virtual Replication\Zerto.Vba.VbaService.exe |
C:\Program Files\Zerto\Zerto Virtual Replication\Zerto Online Services Connector\Zerto.Online.Services.Connector.exe |
C:\Program Files\Zerto\Zerto Virtual Replication\Embedded DB Manager Service\Zerto.LocalDbInstanceManagerService.exe |
Failure to do so may lead to the Zerto Virtual Replication folder being incorrectly identified as a threat and in some circumstances corrupt the Zerto Virtual Replication folder.
23. Add the machine to the relevant host boot configuration, so that on starting up the host, this machine, running the Zerto Virtual Manager, is also powered on automatically.
Note: If the vSphere Client console was open during the installation, close it and reopen it to ensure you have the Zerto Virtual Replication user interface loaded.
24. Continue with step
8 on
here.
Configuring the Role with Zerto Services
Use the following procedures to add Zerto services to the role, and to configure the role for Zerto Virtual Manager - in the following order:
Adding and Configuring the Zerto Virtual Manager Service
Procedure 1: To add the Zerto Virtual Manager service
1. Select the role which you created in Creating a Role for the Zerto Services.
2. Right-click the role and select Add Resource > Generic Service.
3. From the list of services, select Zerto Virtual Manager service, then click Next.
4. Complete the wizard.
Procedure 2: To configure the Zerto Virtual Manager service
1. Right-click the service Zerto Virtual Manager, and select Properties.
2. Define the service’s startup parameter:
a) Click the General tab.
b) In the Startup Parameters field enter the following parameter: /RUNASPARTOFCLUSTER
3. Configure the service’s dependencies:
a) Click the Dependencies tab.
b) In the first row, select the network resource name, which you entered in Procedure 2: To add and configure a network resource to the roleand click Apply.
4. Define the Policies. Navigate to the Policies tab, and configure the following:
If resource fails, attempt restart on current node | Select this option |
Period for restart | 15:00 (minutes) |
Maximum restarts in the specified period | 10 |
Delay between restarts | 30 (seconds) |
If restart is unsuccessful, fail over all resources in this Role | Select this option |
If all the restart attempts fail, begin restarting again after the specified period | Deselect this option |
Adding and Configuring the Zerto Virtual Backup Appliance Service
Procedure 1: To add the Zerto Virtual Backup Appliance service
1. Select and right-click the role, then navigate to Add Resource > Generic Service.
2. Select the service Zerto Virtual Backup Appliance, then click Next.
3. Complete the wizard.
Procedure 2: To configure the Zerto Virtual Backup Appliance service
1. Right-click the service Zerto Backup Appliance, and select Properties.
2. Configure the service’s dependencies:
a) Click the Dependencies tab.
b) In the first row, select Zerto Virtual Manager, and click Apply.
3. Define the Policies. Navigate to the Policies tab, and configure the following:
If resource fails, attempt restart on current node | Select this option |
Period for restart | 15:00 (minutes) |
Maximum restarts in the specified period | 10 |
Delay between restarts | 30 (seconds) |
If restart is unsuccessful, fail over all resources in this Role | Deselect this option |
If all the restart attempts fail, begin restarting again after the specified period | Select this option |
Adding and Configuring the Online Services Connector Service
Procedure 1: To add the Zerto Online Services Connector service
1. Select and right-click the role, then navigate to Add Resource > Generic Service.
2. Select the service Zerto Online Services Connector, then click Next.
3. Complete the wizard.
Procedure 2: To configure the Zerto Online Services Connector service
1. Right-click the service Zerto Online Services Connector, and select Properties.
2. Configure the service’s dependencies:
a) Click the Dependencies tab.
b) In the first row, select the network resource name, and click Apply.
3. Define the Policies. Navigate to the Policies tab, and configure the following:
If resource fails, attempt restart on current node | Select this option |
Period for restart | 15:00 (minutes) |
Maximum restarts in the specified period | 10 |
Delay between restarts | 30 (seconds) |
If restart is unsuccessful, fail over all resources in this Role | Deselect this option |
If all the restart attempts fail, begin restarting again after the specified period | Select this option |
4. Click Apply, and click OK.
5. Right-click the role, and select Start Role.
