6.5.1 Polar3D 1.0 printer z and x calibration

1.
To calibrate the z height of the extruder, from within the Polar Cloud, click on the printer, and then click on the LOCAL UI” button (dial icon); or when communicating directly with the printer, from a browser on your device (computer/tablet/phone), connect to the printer’s local IP address. At this point you should be seeing the printer’s local web interface, as illustrated in Figure 6.1.


Figure 6.1: Printer local web interface landing screen (Network screen with Existing WiFi pane)

pict

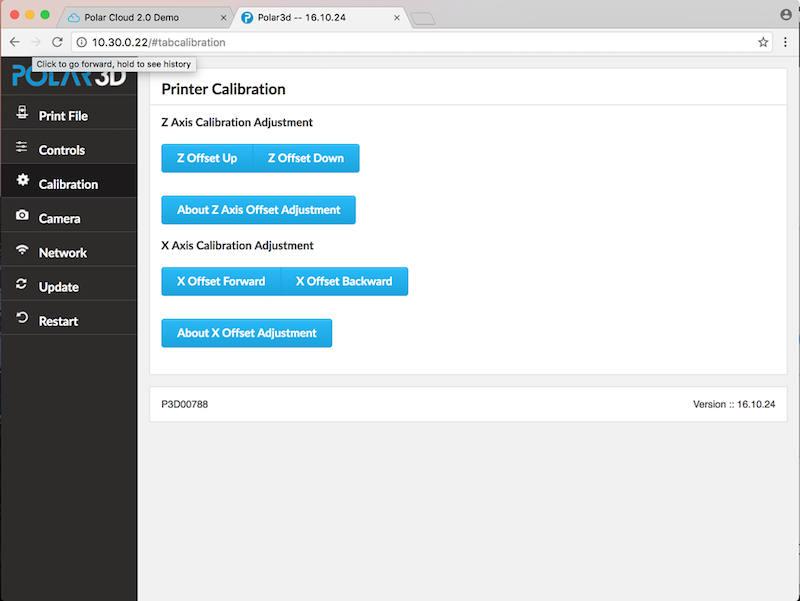
Select “Calibration” from the stacked tabs on the left to go to the calibration screen, see Figure 6.2; then click “Z Offset Down” or “Z Offset Up”, as desired.

Each click will lower (or raise) the z home of the print head (and hence the extruder) by 0.05 millimeters (about 12 the thickness of a sheet of paper). Adjust the z height until the tip of the extruder is just touching the build plate. When you are at the correct height, select the “Just Right button.


Figure 6.2: Printer local web interface Calibration screen

pict

2.
The center of the build plate should be located directly under the extruder nozzle of the print head when the build plate is homed. This is easier to check with the build plate removed from the build plate shuttle, so that you can compare the location of the center of the extruder nozzle with the location of the center of the build plate shuttle’s drive gear bearing.

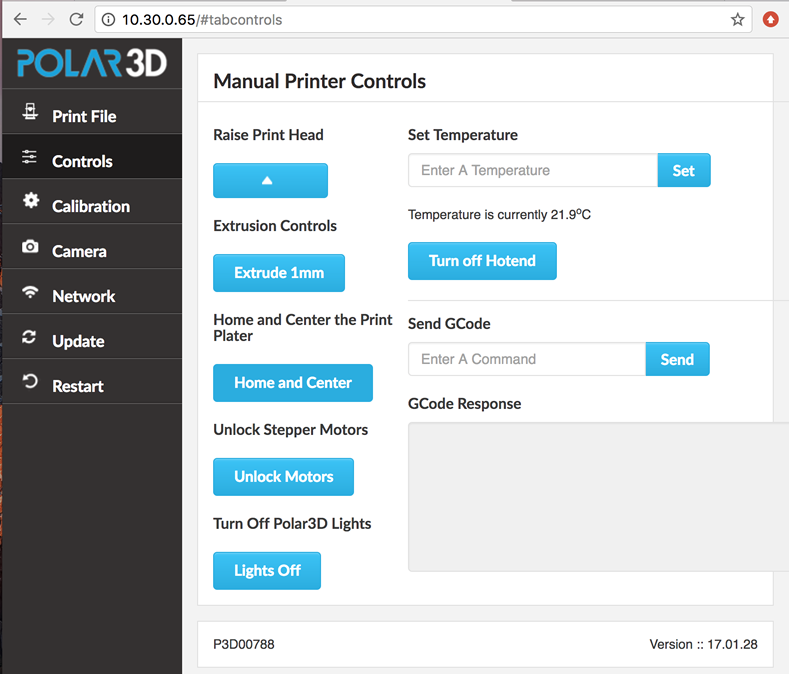
To home the build plate, click the “Controls” tab on the printer local web interface left-hand menu; then click the “Home and Center” button; see Figure 6.3.


Figure 6.3: Printer local web interface Controls screen’s Home and Center button

pict

If the x offset (forward vs. backward) of the build plate seems a bit “off” from the location of the extruder nozzle when the build plate is putatively homed, then click the printer local web interface “Calibration” tab to go back to the calibration screen, Figure 6.2, and use the “Calibration” screen’s “X Offset Forward” or “X Offset Backward” buttons to adjust the build plate location.

You’re done with z and x calibration! See the discussion of consistent levelness of the build plate (item 3 in Section 6.5) if you still seem to have a bit of miscalibration.