Setting & Description | Select... |
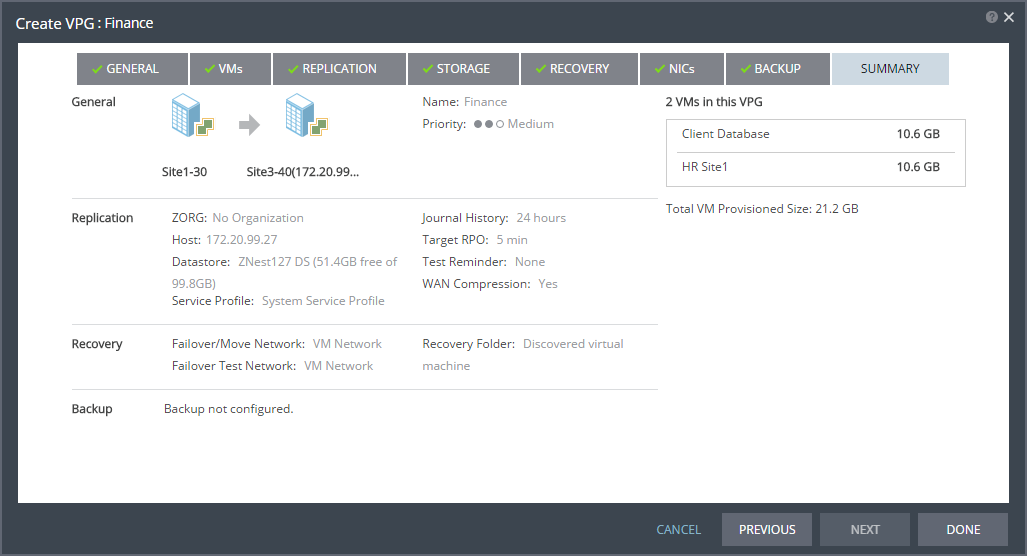
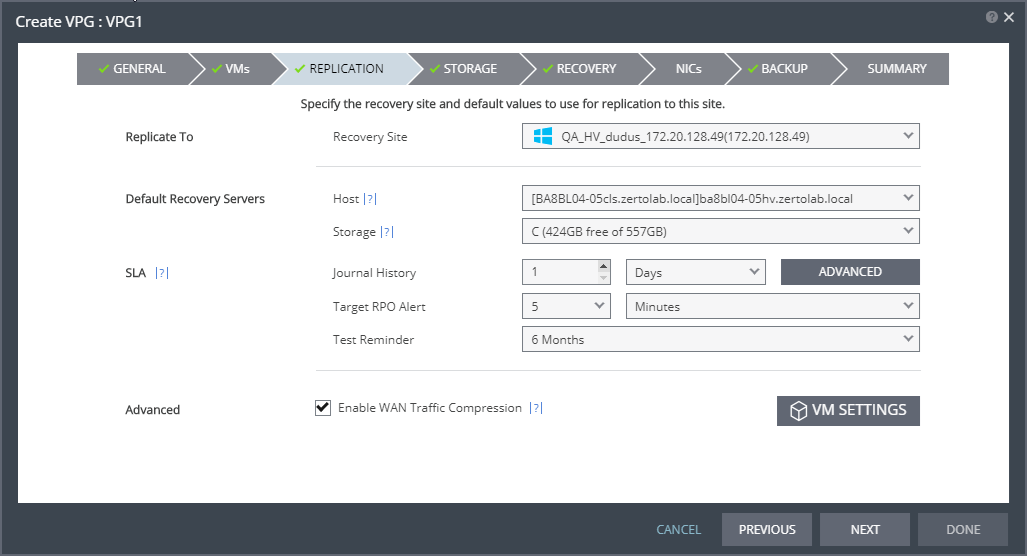
Journal History | |
The time that all write commands are saved in the journal. The longer the information is saved in the journal, the more space is required for each journal in the VPG. | ■ Number of hours from 1 to 24 |
■ Number of days from 2 to 30 | |
Default Journal Storage (Hyper-V), or Default Journal Datastore (vSphere) | |
The storage/datastore used for the journal data for each virtual machine in the VPG. Note: This field is not relevant when replicating to a vCD recovery site. | ■ Select the storage/datastore accessible to the host. When you select a specific journal storage/datastore, the journals for each virtual machine in the VPG are stored in this storage/datastore, regardless of where the recovery storage/datastore is for each virtual machine. All protected virtual machines are recovered to the hosts that can access the specified journal storage/datastore. |
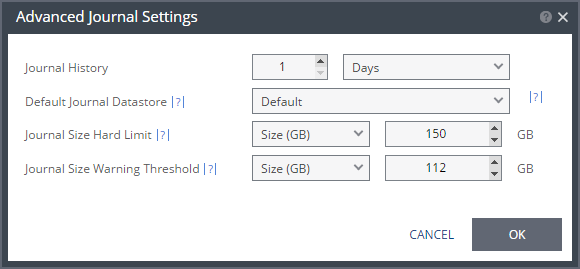
Journal Size Hard Limit | |
The maximum size that the journal can grow, either as a percentage or a fixed amount. The journal is always thin-provisioned. Note: The Journal Size Hard Limit applies independently both to the Journal History and also to the Scratch Journal Volume. For Example: If the Journal Size Hard Limit is configured to a maximum size of 160 GB limit, then during Failover Test, both the Journal History and the Scratch Journal Volume together can take up to 320 GB. Each one with a maximum size of 160 GB limit. | ■ Unlimited: The size of the journal is unlimited and it can grow to the size of the recovery storage/datastore. If Unlimited is selected, Size and Percentage options are not displayed. |
■ Size (GB): The maximum journal size in GB. ■ The minimum journal size, set by Zerto Virtual Replication, is 8GB for Hyper-V and vSphere environments, and 10GB for Microsoft Azure environments. | |
■ Percentage: The percentage of the virtual machine volume size to which the journal can grow. ■ This value can be configured to more than 100% of the protected VM's volume size. | |
Journal Size Warning Threshold | |
The size of the journal that triggers a warning that the journal is nearing its hard limit. | ■ Unlimited: The size of the journal is unlimited and it can grow to the size of the recovery storage/datastore. If Unlimited is selected, Size and Percentage options are not displayed. |
■ Size* (GB): The size in GB that will generate a warning. | |
■ Percentage*: The percentage of the virtual machine volume size that will generate a warning. | |
*The values of Size and Percentage must be less than the configured Journal Size Hard Limit so that the warning will be generated when needed. In addition to the warning threshold, Zerto Virtual Replication will issue a message when the free space available for the journal is almost full. | |
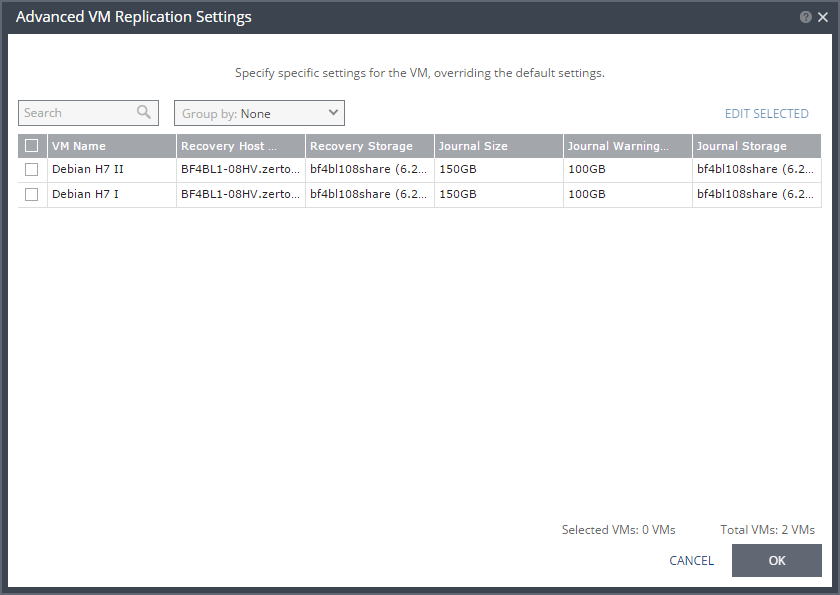
Setting & Description | Select... |
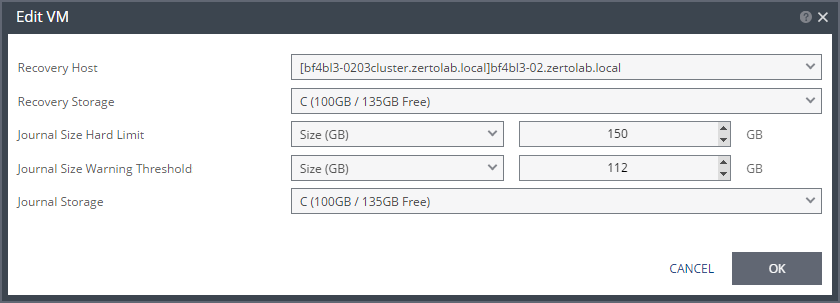
Recovery Host (not relevant when replicating to vCD) | |
(Hyper-V) The cluster or host that will host the recovered virtual machine. | |
(vSphere) The cluster, resource pool, or host that will host the recovered virtual machine. If the site is defined in Zerto Cloud Manager, only a resource pool can be specified and the resource pool must also have been defined in Zerto Cloud Manager. For details about Zerto Cloud Manager, see Zerto Cloud Manager Administration Guide. When a resource pool is specified, Zerto Virtual Replication checks that the resource pool capacity is enough for all the virtual machines specified in the VPG | When a resource pool is specified, Zerto Virtual Replication checks that the resource pool capacity is enough for all the virtual machines specified in the VPG. If a resource pool is specified and DRS is disabled for the site later on, all the resource pools are removed by VMware and recovery is to any one of the hosts in the recovery site with a VRA installed on it. All resource pool checks are made at the level of the VPG and do not take into account multiple VPGs using the same resource pool. If the resource pool CPU resources are defined as unlimited, the actual limit is inherited from the parent but if this inherited value is too small, failover, move, and failover test operations can fail, even without a warning alert being issued by Zerto Virtual Manager. |
VM Recovery Datastore (vSphere) (not relevant when replicating to vCD) | |
The datastore where the VMware metadata files for the virtual machine are stored, such as the VMX file. | If a cluster or resource pool is selected for the host, only datastores that are accessible by every ESX/ESXi host in the cluster or resource pool are displayed. This is also the datastore where RDM backing files for recovery volumes are located. |
Recovery Storage (Hyper-V) | |
The location where the metadata files for the virtual machine are stored, such as the VHDX file. I | If a cluster is selected for the host, only storage that are accessible by every host in the cluster are displayed. |
Journal Size Hard Limit | |
The maximum size that the journal can grow, either as a percentage or a fixed amount. ■ The journal is always thin-provisioned. ■ The Journal Size Hard Limit applies independently both to the Journal History and also to the Scratch Journal Volume. For Example: If the Journal Size Hard Limit is configured to a maximum size of 160 GB limit, then during Failover Test, both the Journal History and the Scratch Journal Volume together can take up to 320 GB. Each one with a maximum size of 160 GB limit. | Unlimited: The size of the journal is unlimited and it can grow to the size of the recovery storage/datastore. If Unlimited is selected, Size and Percentage options are not displayed. |
Size (GB): The maximum journal size in GB. ■ The minimum journal size, set by Zerto Virtual Replication, is 8GB for Hyper-V and vSphere environments, and 10GB for Microsoft Azure environments. | |
Percentage: The percentage of the virtual machine volume size to which the journal can grow. ■ This value can be configured to more than 100% of the protected VM's volume size. | |
Journal Size Warning Threshold | |
The size of the journal that triggers a warning that the journal is nearing its hard limit. | Unlimited: The size of the journal is unlimited and it can grow to the size of the recovery storage/datastore. If Unlimited is selected, Size and Percentage options are not displayed. |
Size* (GB): The size in GB that will generate a warning. | |
Percentage*: The percentage of the virtual machine volume size that will generate a warning. | |
*The values of Size and Percentage must be less than the configured Journal Size Hard Limit so that the warning will be generated when needed. In addition to the warning threshold, Zerto Virtual Replication will issue a message when the free space available for the journal is almost full. | |
Journal Storage (Hyper-V), or Journal Datastore (vSphere) (not relevant when replicating to vCD) | |
The storage/datastore used for the journal data for each virtual machine in the VPG. | (vSphere) To change the default, specify a host and then select one of the datastores accessible by this host to be used as the journal datastore. When you select specific journal datastore, the journals for each virtual machine in the VPG are stored in this datastore, regardless of where the recovery datastores are for each virtual machine. In this case, all the protected virtual machines must be recovered to hosts that can access the specified journal datastore. (Hyper-V) To change the default, specify a host and then select the storage location accessible by this host to be used as the journal storage. When you select specific journal storage, the journals for each virtual machine in the VPG are stored in this storage, regardless of where the recovery storage is for each virtual machine. In this case, all the protected virtual machines must be recovered to hosts that can access the specified journal storage. |
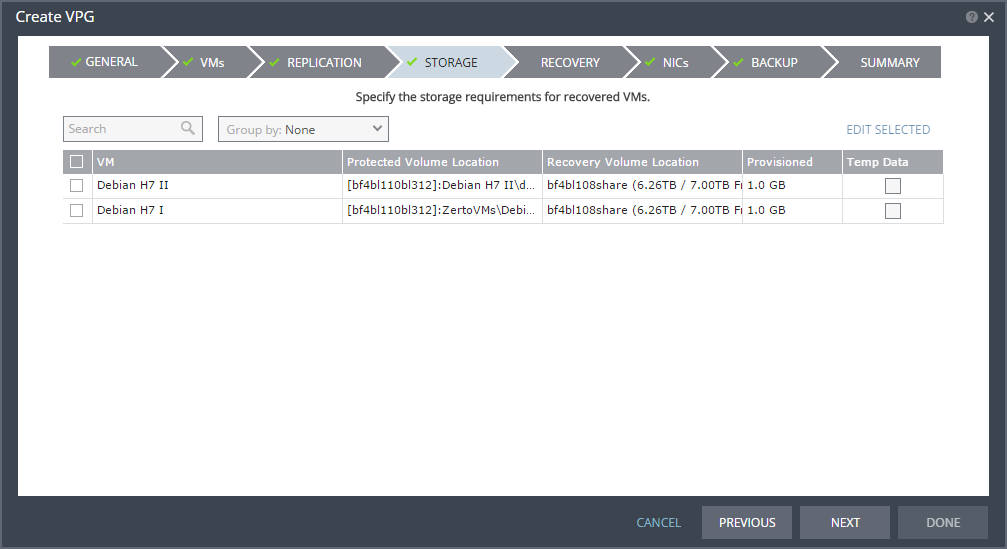

Setting & Description | Select... |
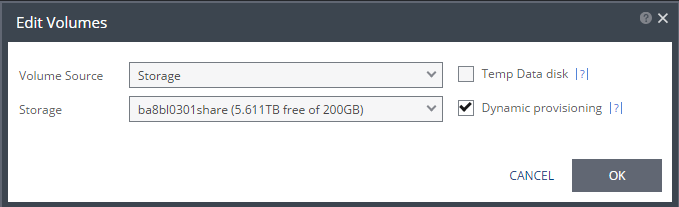
Volume Source | |
■ (Hyper-V) Select a Volume Source for recovery from one of the drop-down options: ■ Storage ■ Preseeded volume | ■ Volume Source > Storage: A new volume is used for replicated data. ■ From the Storage drop-down list, specify the storage to use to create disks for the replicated data. The storage specified for the replication must have at least the same amount of space as the protected volume and then an additional amount for the journal. The amount of additional space needed for the journal can be fixed by specifying a maximum size for the journal, or can be calculated as the average change rate for the virtual machines in the VPG, multiplied by the length of time specified for the journal history. |
■ Volume Source > Preseeded volume: Whether to copy the protected data to a virtual disk in the recovery site. Zerto recommends using this option particularly for large disks so that the initial synchronization will be faster since a Delta Sync can be used to synchronize any changes written to the recovery site after the creation of the preseeded disk. When not using a preseeded disk, the initial synchronization phase must copy the whole disk over the WAN. When using a preseeded virtual disk, you select the storage and exact location, folder, and name of the preseeded disk. Zerto Virtual Replication takes ownership of the preseeded disk, moving it from its source folder to the folder used by the VRA. Only disks with the same size as the protected disk can be selected when browsing for a preseeded disk. The storage where the preseeded disk is placed is also used as the recovery storage for the replicated data. | |
■ (vSphere) Select a Volume Source for recovery from one of the drop-down options: ■ Datastore ■ RDM ■ Preseeded volume | Volume Source > Datastore: A new volume is used for replicated data. ■ Specify the Datastore to use to create disks for the replicated data. ■ If the source disk is thin provisioned, the default for the recovery volume is also thin provisioned. ■ The datastore specified for replication must have at least the same amount of space as the protected volume and an additional amount for the journal. ■ The amount of additional space needed for the journal can be fixed by specifying a maximum size for the journal, or can be calculated as the average change rate for the virtual machines in the VPG, multiplied by the length of time specified for the journal history. ■ Zerto Virtual Replication supports the SCSI protocol. Only disks that support this protocol can be specified. Then, define the following: ■ Datastore: The Datastore where the preseeded disk is located. Only disks with the same size as the protected disk can be selected when browsing for a preseeded disk. |
Volume Source > RDM: The VMware RDM (Raw Device Mapping) which will be used for the replication. 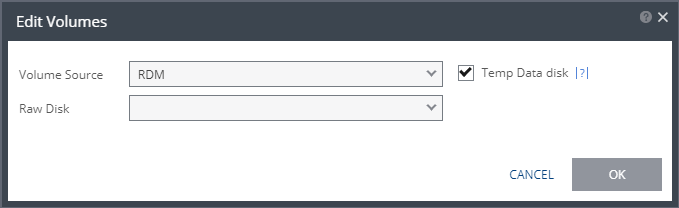 By default, RDM is recovered as thin-provisioned VMDK in the datastore specified in the VM Recovery Datastore/Storage field in the Edit VM dialog, and not to RDM. Only a raw disk with the same size as the protected disk can be selected from the list of available raw disks. Other raw disks with different sizes are not available for selection. The RDM is always stored in the recovery datastore, used for the virtual machine. The following limitations apply to protecting RDM disks: ■ RDM disks with an even number of blocks can replicate to RDM disks of the same size with an even number of blocks and to VMDKs. ■ RDM disks with an odd number of blocks can only replicate to RDM disks of the same size with an odd number of blocks and not to VMDKs. ■ You cannot define an RDM disk to be protected to a cloud service provider via a Zerto Cloud Connector nor if the virtual machine uses a BusLogic SCSI controller, nor when protecting or recovering virtual machines in an environment running vCenter Server 5.x with ESX/ESXi version 4.1 hosts. | |
■ (vSphere) Volume Source continued | Volume Source > Preseeded volume: Select this when you want to copy the protected data to a virtual disk in the recovery site. 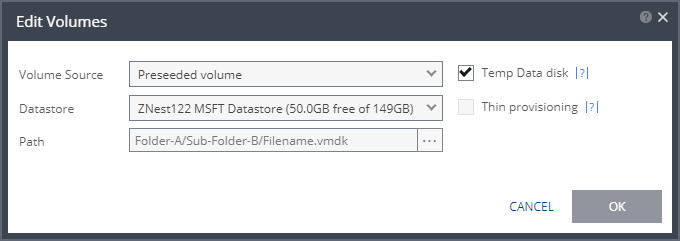 Consider the following, then proceed to define the Datastore and the Path: ■ Zerto recommends using this option particularly for large disks so that the initial synchronization is faster since a Delta Sync can be used to synchronize any changes written to the recovery site after the creation of the preseeded disk. ■ If a preseeded disk is not selected, the initial synchronization phase must copy the whole disk over the WAN. ■ If you use a preseeded virtual disk, you select the datastore and exact location, folder, and name of the preseeded disk, which cannot be an IDE disk. Zerto Virtual Replication takes ownership of the preseeded disk, moving it from its source folder to the folder used by the VRA. ■ The datastore where the preseeded disk is placed is also used as the recovery datastore for the replicated data. ■ If the preseeded disk is greater than 1TB on NFS storage, the VPG creation might fail. This is a known VMware problem when the NFS client does not wait for sufficient time for the NFS storage array to initialize the virtual disk after the RPC parameter of the NFS client times out. The timeout default value is 10 seconds. See VMware documentation, http://kb.vmware.com/selfservice/microsites/search.do?language=en_US&cmd=displayKC&externalId=1027919, which describes the configuration option to tune the RPC timeout parameter by using the command: esxcfg-advcfg -s <Timeout> /NFS/SetAttrRPCTimeout ■ If the protected disks are non-default geometry, configure the VPG using preseeded volumes. ■ If the protected disk is an RDM disk, it can be used to preseed to a recovery VMDK disk. Zerto Virtual Replication makes sure that the VMDK disk size is a correct match for the RDM disk. ■ If the VPG is being defined for a Zerto Organization, ZORG, the location of the preseeded disk must be defined in the Zerto Cloud Manager. See Zerto Cloud Manager Administration Guide. Then, define the following: ■ Datastore: The Datastore where the preseeded disk is located. Only disks with the same size as the protected disk can be selected when browsing for a preseeded disk. ■ Path: The full path to the preseeded disk. |
Temp Data disk | |
If the virtual machine to be replicated includes a temp data disk as part of its configuration. | Specify a mirror disk for replication that is marked as a temp data disk. In this case, data is not replicated to the temp data disk after initial synchronization |
Thin Provisioning (vSphere) | |
If the recovery volumes are thin-provisioned or not. | If the source disk is thin provisioned, the default for the recovery volume is that it is also thin provisioned. |
Text Box | Description |
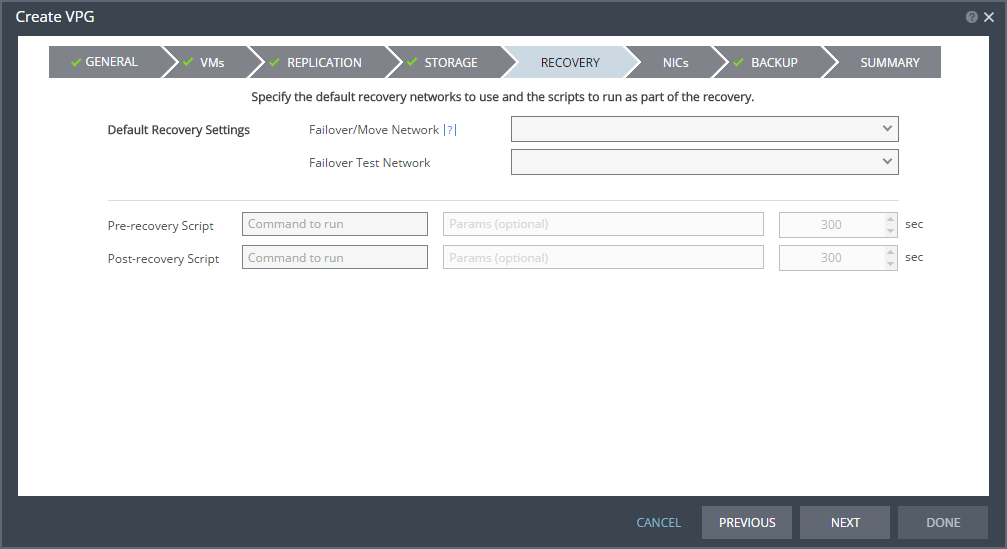
Command to run | The full path of the script. The script must be located on the same machine as the Zerto Virtual Manager for the recovery site. |
Params | The parameters to pass to the script. Separate parameters with a space. |
Timeout | The time-out, in seconds, for the script to run. ■ If the script runs before executing a failover, move, or test failover, and the script fails or the timeout value is reached, an alert is generated and the failover, move, or test failover is not performed. ■ If the script runs after executing a failover, move, or test failover, and the timeout value is reached, an alert is generated. ■ The default time-out value is specified in Site Settings > Performance and Throttling tab. |

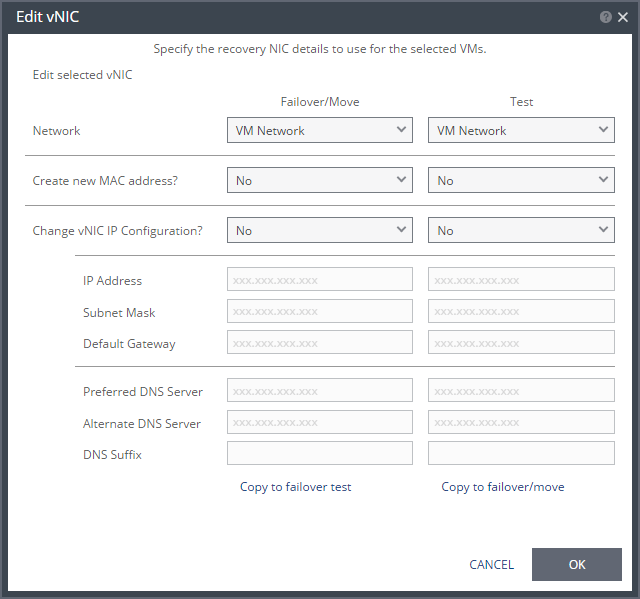
IMPORTANT Re-IP Information: |
To utilize re-IP during failback, make sure that: ■ VMware Tools is installed on the virtual machine in vCenter server. ■ The user who is logged on to VMWare Tools has sufficient privileges to execute re-IP changes. See the Zerto Virtual Replication Interoperability Matrix for the list of operating systems for which Zerto supports re-IP. |
Text Box | Description |
Command to run | The full path of the script. The script must be located on the same machine as the Zerto Virtual Manager for the recovery site. |
Parameters | The values of parameters to pass to the script. Separate parameters with a space. |
Timeout | The time-out, in seconds, for the script to run. If the timeout value is reached, an alert is generated. The default time-out value is specified in the Performance and Throttling tab of the Site Settings dialog. |