Replication From a Protected Site vCenter Server to a Recovery Site vCenter Server
You can protect virtual machines to a recovery site vCenter Server. The procedure is the same whether you intend to protect one virtual machine or multiple virtual machines.
To create a virtual protection group (VPG) to recover in vCenter:
1. In the Zerto User Interface, select ACTIONS > CREATE VPG.
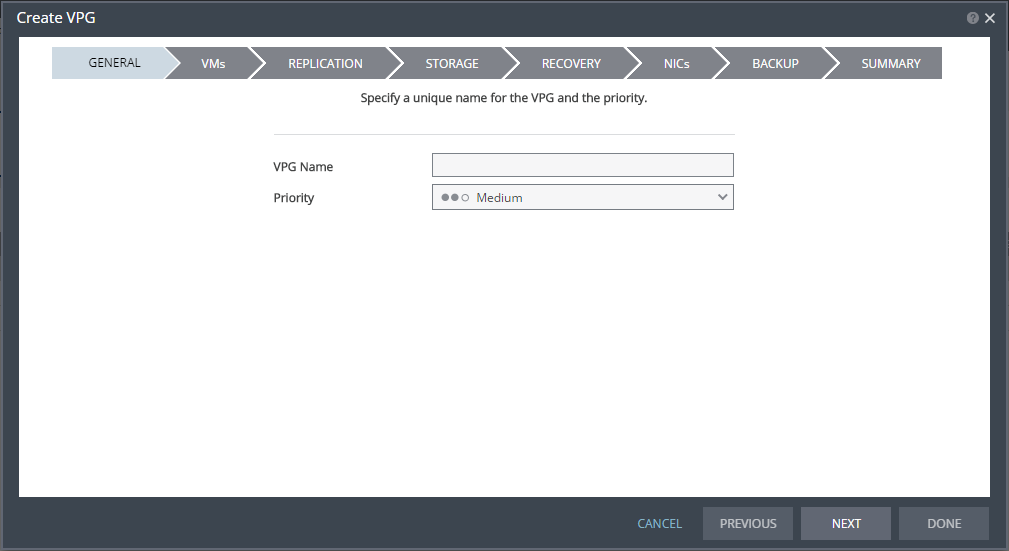
The GENERAL step of the Create VPG wizard is displayed.
2. Specify the name of the VPG and the priority of the VPG.
■ VPG Name: The VPG name must be unique. The name cannot be more than 80 characters.
■ Priority: Determine the priority for transferring data from the protected site to the recovery site when there is limited bandwidth and more than one VPG is defined on the protected site.
■ High Priority: When there are updates to virtual machines protected in VPGs with different priorities, updates from the VPG with the highest priority are passed over the WAN first.
■ Medium Priority: Medium priority VPGs will only be able to use whatever bandwidth is left after the high priority VPGs have used it.
■ Low Priority: Low priority VPGs will use whatever bandwidth is left after the medium priority VPGs have use it.
Updates to the protected virtual machines are always sent across the WAN before synchronization data, such as during a bitmap or delta sync.
During synchronization, data from the VPG with the highest priority is passed over the WAN before data from medium and low priority VPGs.
3. Click NEXT.
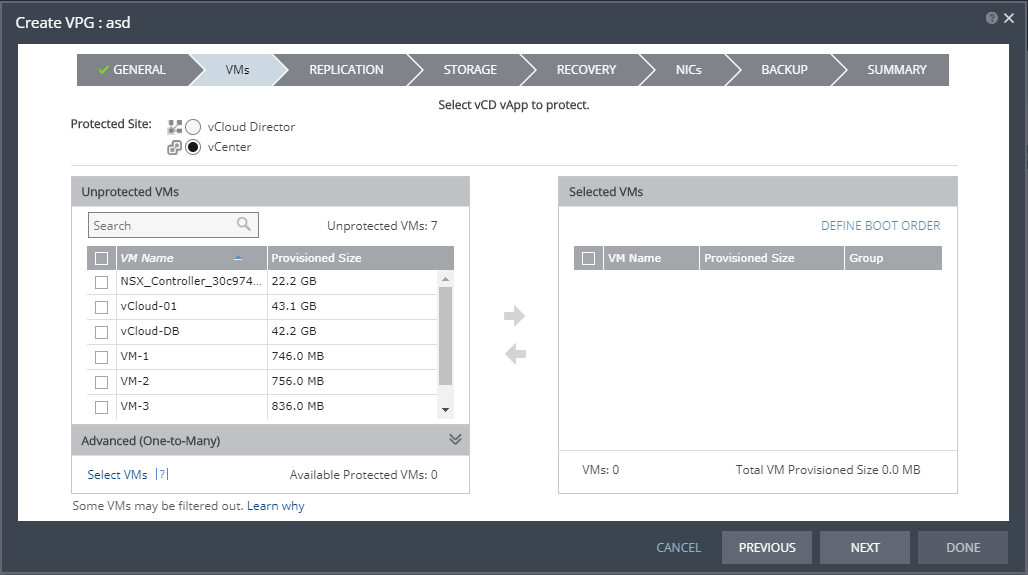
The VMs step is displayed.
4. Select the VMs that will be part of this VPG and click the right-pointing arrow to include these VMs in the VPG.
■ Zerto Virtual Replication uses the SCSI protocol. Only virtual machines with disks that support this protocol can be specified.
■ When using the Search field, you can use the wildcards; * or ?
Virtual machines that are not yet protected are displayed in the list. A VPG can include virtual machines that are not yet protected and virtual machines that are already protected.
5. You can view protected virtual machines in the Advanced (One-to-Many) section, by clicking Select VMs.
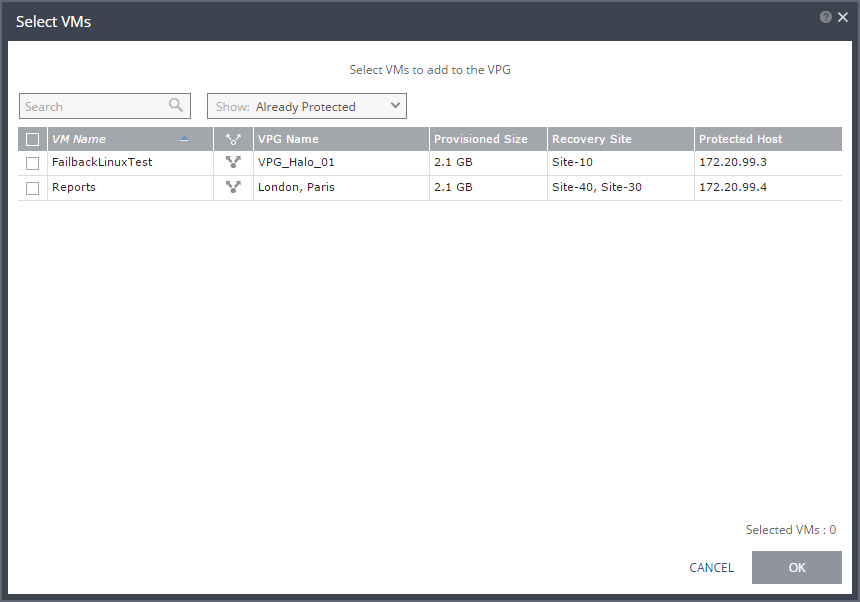
The Select VMs dialog is displayed.
Note: Virtual machines can be protected in a maximum of three VPGs. These VPGs cannot be recovered to the same site. Virtual machines protected in the maximum number of VPGs are not displayed in the Select VMs dialog.
Protecting virtual machines in several VPGs is enabled only if both the protected site and the recovery site, as well as the VRAs installed on these sites, are of version 5.0 and higher.
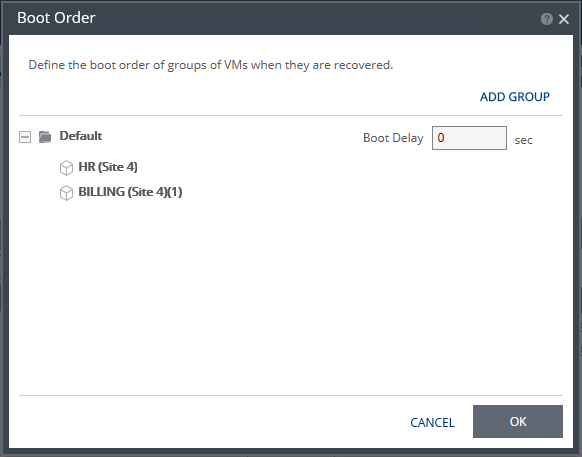
6. To define the boot order of the virtual machines in the VPG, click DEFINE BOOT ORDER, otherwise go to the next step.
When virtual machines in a VPG are started in the recovery site, by default these machines are not started up in a particular order. If you want specific virtual machines to start before other machines, you can specify a boot order. The virtual machines are defined in groups and the boot order applies to the groups and not to individual virtual machines in the groups. You can specify a delay between groups during startup.
Note: Up to five (5) virtual machines may boot on a host simultaneously. Following the boot, a 300 second (default) delay occurs until the next boot batch.
Initially, virtual machines in the VPG are displayed together under the Default group. If you want specific machines to start before other virtual machines, define new groups with one or more virtual machines in each group.
7. Click ADD GROUP to add a new group. Then, do the following:
a) To change the name of a group, click the Pencil icon next to the group.
b) To delete a group, click the delete icon on the right side. You cannot delete the Default group nor a group that contains a virtual machine.
c) Drag virtual machines to move them from one group to another.
d) Drag groups to change the order the groups are started, or, optionally, in Boot Delay, specify a time delay between starting up the virtual machines in the group and starting up the virtual machines in the next group.
For Example: Assume three groups, Default, Server, and Client, defined in this order. The boot delay defined for the Default group is 10, for the Server group is 100, and for the Client group 0. The virtual machines in the Default group are started together and after 10 seconds the virtual machines in the Server group are started. After 100 seconds the virtual machines in the Client group are started.
e) Click OK to save the boot order.
8. Click NEXT.
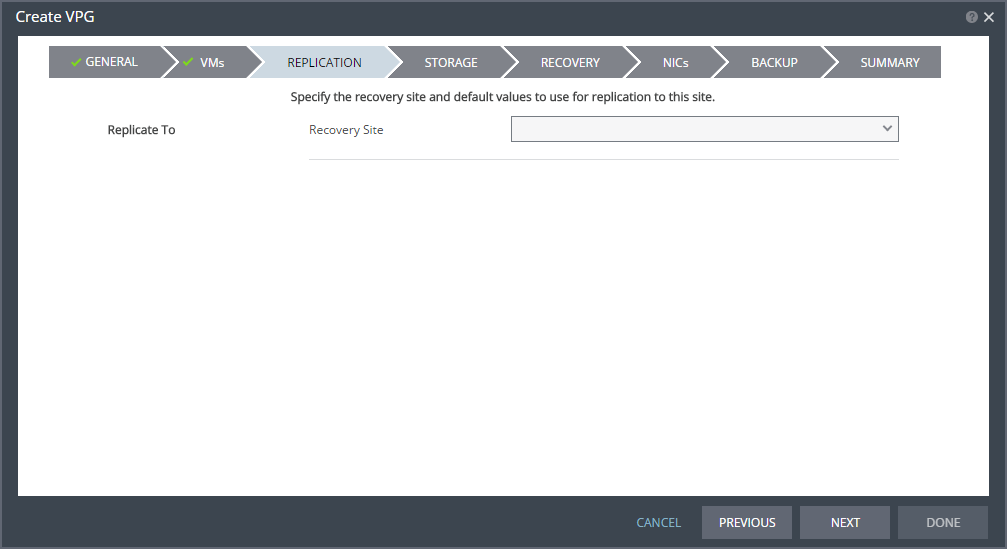
The REPLICATION step is displayed.
Note: If the protected site is paired with only one recovery site, the recovery step is displayed with the Recovery Site field automatically filled in and defaults set for the SLA and Advanced settings, as shown below.
9. Specify the Recovery Site. This is the site to which you want to recover the virtual machines. After specifying the recovery site, additional fields are displayed including the host and datastore to use for replication.
Note: You cannot select a recovery site if any of the virtual machines you selected are already in VPGs that recover to that site.
10. ZORG: If the site is defined in Zerto Cloud Manager, select the name used by the cloud service provider (CSP) to identify you as a Zerto Organization (ZORG). For details about Zerto Cloud Manager, see Zerto Cloud Manager Administration Guide.
11. Host: The default cluster, resource pool or host in the recovery site that handles the replicated data. If the site is defined in Zerto Cloud Manager, only a resource pool can be specified and the resource pool must also have been specified as a resource in Zerto Cloud Manager. For details about Zerto Cloud Manager, refer to Zerto Cloud Manager Administration Guide.
Note: If Zerto Cloud Manager is used, vSphere Standard edition cannot be used.
When a resource pool is specified, Zerto Virtual Replication checks that the resource pool capacity is enough for any virtual machines specified in the VPG.
All resource pool checks are made at the level of the VPG and do not take into account multiple VPGs using the same resource pool. If the resource pool CPU resources are specified as unlimited, the actual limit is inherited from the parent but if this inherited value is too small, failover, move, and failover test operations can fail, even without a warning alert being issued by Zerto Virtual Manager.
Note: If a resource pool is specified and DRS is disabled for the site later on, all the resource pools are removed by VMware and recovery will be to any one of the hosts in the recovery site with a VRA installed on it.
12. Datastore: The default datastore to use for recovered virtual machine files and for their data volumes. Every datastore for the selected recovery host is included in the drop-down list. If a cluster or resource pool is selected for the host, only datastores that are accessible by every host in the cluster or resource pool are displayed.
13. In the SLA area, you define the Service Level Agreement for which this VPG is associated.
■ When Zerto Cloud Manager is used, select the Service Profile to use.
The Service Profile determines the VPG SLA settings for the group. This applies predefined settings for the Journal History, Target RPO Alert and the Test Reminder. These settings apply to every virtual machine in the group.
■ When a Custom service profile is available, the VPG SLA settings are editable, and the Advanced button becomes available. When you change these settings, they apply to every virtual machine in the group.
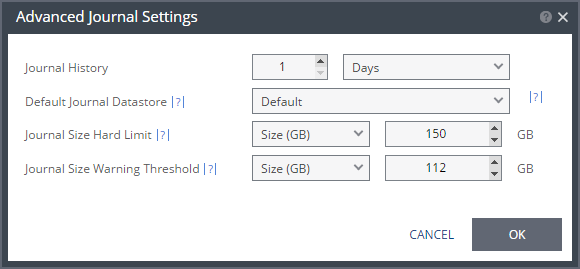
14. Click ADVANCED. The Advanced Journal Settings dialog is displayed.
15. 
Setting & Description | Select... |
Journal History |
The time that all write commands are saved in the journal. The longer the information is saved in the journal, the more space is required for each journal in the VPG. | ■ Number of hours from 1 to 24 |
■ Number of days from 2 to 30 |
Default Journal Storage (Hyper-V), or Default Journal Datastore (vSphere) |
The storage/datastore used for the journal data for each virtual machine in the VPG. Note: This field is not relevant when replicating to a vCD recovery site. | ■ Select the storage/datastore accessible to the host. When you select a specific journal storage/datastore, the journals for each virtual machine in the VPG are stored in this storage/datastore, regardless of where the recovery storage/datastore is for each virtual machine. All protected virtual machines are recovered to the hosts that can access the specified journal storage/datastore. |
Journal Size Hard Limit |
The maximum size that the journal can grow, either as a percentage or a fixed amount. The journal is always thin-provisioned. Note: The Journal Size Hard Limit applies independently both to the Journal History and also to the Scratch Journal Volume. For Example: If the Journal Size Hard Limit is configured to a maximum size of 160 GB limit, then during Failover Test, both the Journal History and the Scratch Journal Volume together can take up to 320 GB. Each one with a maximum size of 160 GB limit. | ■ Unlimited: The size of the journal is unlimited and it can grow to the size of the recovery storage/datastore. If Unlimited is selected, Size and Percentage options are not displayed. |
■ Size (GB): The maximum journal size in GB. ■ The minimum journal size, set by Zerto Virtual Replication, is 8GB for Hyper-V and vSphere environments, and 10GB for Microsoft Azure environments. |
■ Percentage: The percentage of the virtual machine volume size to which the journal can grow. ■ This value can be configured to more than 100% of the protected VM's volume size. |
Journal Size Warning Threshold |
The size of the journal that triggers a warning that the journal is nearing its hard limit. | ■ Unlimited: The size of the journal is unlimited and it can grow to the size of the recovery storage/datastore. If Unlimited is selected, Size and Percentage options are not displayed. |
■ Size* (GB): The size in GB that will generate a warning. |
■ Percentage*: The percentage of the virtual machine volume size that will generate a warning. |
*The values of Size and Percentage must be less than the configured Journal Size Hard Limit so that the warning will be generated when needed. In addition to the warning threshold, Zerto Virtual Replication will issue a message when the free space available for the journal is almost full. |
16. Target RPO Alert: The maximum desired time between each automatic checkpoint write to the journal before an alert is issued.
17. Test Reminder: The amount of time in months recommended between each test, where you test the integrity of the VPG. A warning is issued if a test is not performed within this time frame.
18. Enable WAN Traffic Compression: Whether or not data is compressed before being transferred to the recovery site. Compressing the data is more efficient, but results in a small performance degradation.
■ Enable WAN traffic compression if network considerations are more critical than CPU usage considerations.
■ When WAN compression is enabled, the compressed data is written in compressed format to the recovery site journal. Even if WAN compression is selected, Zerto Virtual Replication decreases the level of compression if it takes too many resources. The VRA automatically adjusts the compression level according to CPU usage, including totally disabling it if needed. Zerto recommends enabling WAN compression.
■ Zerto Virtual Replication can also work with third-party WAN optimization and acceleration technologies, such as those supplied by Riverbed Technologies and Silver Peak.
■ When third-party WAN optimization is implemented, Zerto recommends disabling VPG WAN compression.
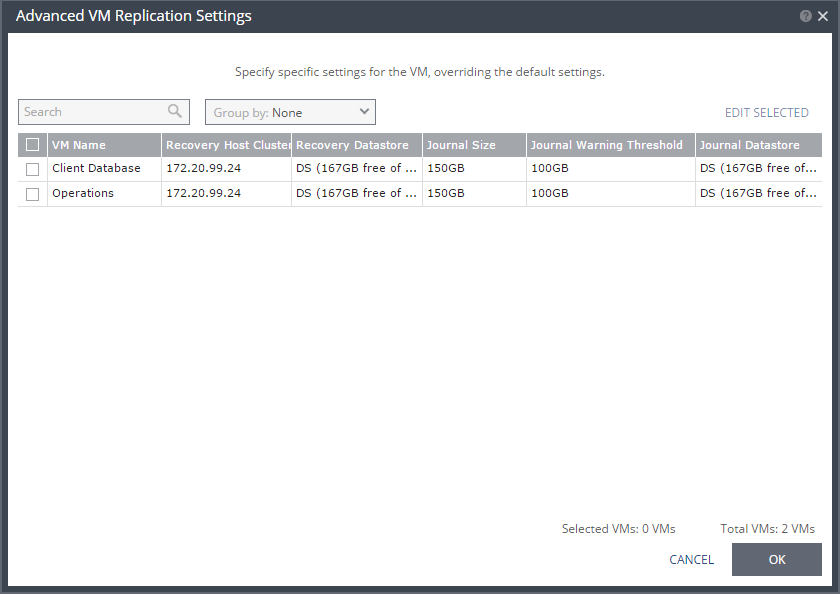
19. To change the replication settings per virtual machine, click VM SETTINGS.
The Advanced VM Replication Settings dialog is displayed.
In this dialog, you can edit the values of one or more of the virtual machines in the VPG.
20. To edit information in one field, click the field and update the information.
21. To edit information for several virtual machines at the same time, select the virtual machines and click EDIT SELECTED.
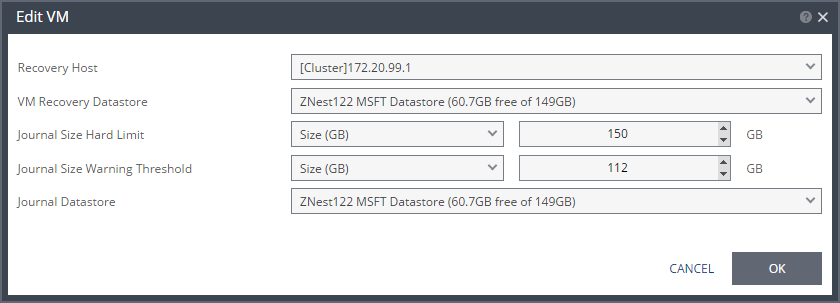
The Edit VM dialog is displayed.
Define as follows:
Setting & Description | Select... |
Recovery Host (not relevant when replicating to vCD) |
(Hyper-V) The cluster or host that will host the recovered virtual machine. | |
(vSphere) The cluster, resource pool, or host that will host the recovered virtual machine. If the site is defined in Zerto Cloud Manager, only a resource pool can be specified and the resource pool must also have been defined in Zerto Cloud Manager. For details about Zerto Cloud Manager, see Zerto Cloud Manager Administration Guide. When a resource pool is specified, Zerto Virtual Replication checks that the resource pool capacity is enough for all the virtual machines specified in the VPG | When a resource pool is specified, Zerto Virtual Replication checks that the resource pool capacity is enough for all the virtual machines specified in the VPG. If a resource pool is specified and DRS is disabled for the site later on, all the resource pools are removed by VMware and recovery is to any one of the hosts in the recovery site with a VRA installed on it. All resource pool checks are made at the level of the VPG and do not take into account multiple VPGs using the same resource pool. If the resource pool CPU resources are defined as unlimited, the actual limit is inherited from the parent but if this inherited value is too small, failover, move, and failover test operations can fail, even without a warning alert being issued by Zerto Virtual Manager. |
VM Recovery Datastore (vSphere) (not relevant when replicating to vCD) |
The datastore where the VMware metadata files for the virtual machine are stored, such as the VMX file. | If a cluster or resource pool is selected for the host, only datastores that are accessible by every ESX/ESXi host in the cluster or resource pool are displayed. This is also the datastore where RDM backing files for recovery volumes are located. |
Recovery Storage (Hyper-V) |
The location where the metadata files for the virtual machine are stored, such as the VHDX file. I | If a cluster is selected for the host, only storage that are accessible by every host in the cluster are displayed. |
Journal Size Hard Limit |
The maximum size that the journal can grow, either as a percentage or a fixed amount. ■ The journal is always thin-provisioned. ■ The Journal Size Hard Limit applies independently both to the Journal History and also to the Scratch Journal Volume. For Example: If the Journal Size Hard Limit is configured to a maximum size of 160 GB limit, then during Failover Test, both the Journal History and the Scratch Journal Volume together can take up to 320 GB. Each one with a maximum size of 160 GB limit. | Unlimited: The size of the journal is unlimited and it can grow to the size of the recovery storage/datastore. If Unlimited is selected, Size and Percentage options are not displayed. |
Size (GB): The maximum journal size in GB. ■ The minimum journal size, set by Zerto Virtual Replication, is 8GB for Hyper-V and vSphere environments, and 10GB for Microsoft Azure environments. |
Percentage: The percentage of the virtual machine volume size to which the journal can grow. ■ This value can be configured to more than 100% of the protected VM's volume size. |
Journal Size Warning Threshold |
The size of the journal that triggers a warning that the journal is nearing its hard limit. | Unlimited: The size of the journal is unlimited and it can grow to the size of the recovery storage/datastore. If Unlimited is selected, Size and Percentage options are not displayed. |
Size* (GB): The size in GB that will generate a warning. |
Percentage*: The percentage of the virtual machine volume size that will generate a warning. |
*The values of Size and Percentage must be less than the configured Journal Size Hard Limit so that the warning will be generated when needed. In addition to the warning threshold, Zerto Virtual Replication will issue a message when the free space available for the journal is almost full. |
Journal Storage (Hyper-V), or Journal Datastore (vSphere) (not relevant when replicating to vCD) |
The storage/datastore used for the journal data for each virtual machine in the VPG. | (vSphere) To change the default, specify a host and then select one of the datastores accessible by this host to be used as the journal datastore. When you select specific journal datastore, the journals for each virtual machine in the VPG are stored in this datastore, regardless of where the recovery datastores are for each virtual machine. In this case, all the protected virtual machines must be recovered to hosts that can access the specified journal datastore. (Hyper-V) To change the default, specify a host and then select the storage location accessible by this host to be used as the journal storage. When you select specific journal storage, the journals for each virtual machine in the VPG are stored in this storage, regardless of where the recovery storage is for each virtual machine. In this case, all the protected virtual machines must be recovered to hosts that can access the specified journal storage. |
Click OK.
22. In the Advanced VM Replication Settings dialog, click OK.
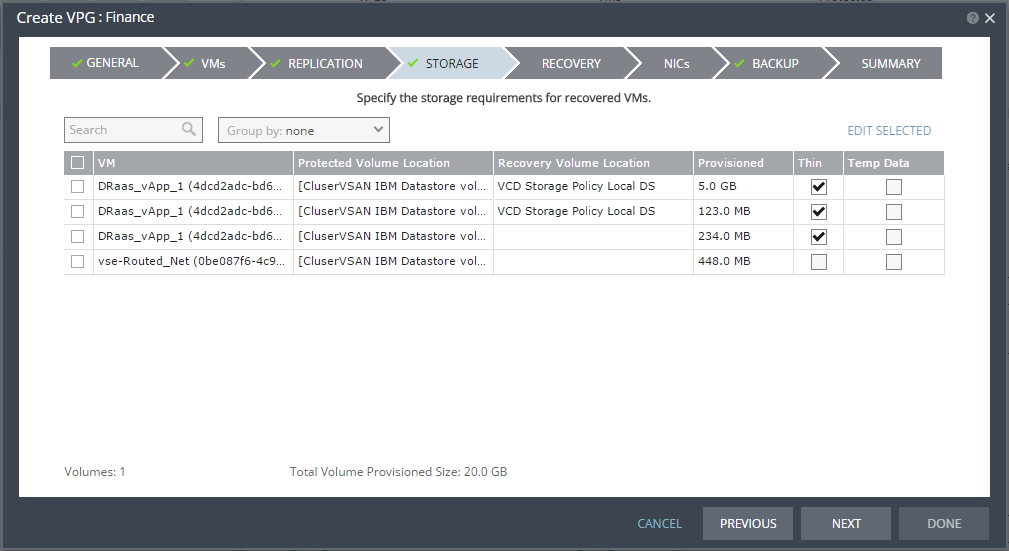
23. Click NEXT.
The STORAGE step is displayed.
By default the storage used for the virtual machine definition is also used for the virtual machine data.
For each virtual machine in the VPG, Zerto Virtual Replication displays its storage-related information.
Note: Steps that do not require input are marked with a check mark. You can jump directly to a step that has been marked with a check mark to edit the values for that step. Every step must be marked with a check mark before you can click DONE to create the VPG.
You can define Thin provisioning and Temp Data in this window, or you can alternatively define them when you separately select and edit each VMs volume.
IMPORTANT: |
Changing the VPG recovery volume from thin-provisioned to thick-provisioned or vice versa, results in volume initial synchronization. |
See the following considerations regarding Thin provisioning:
■ Unless the user explicitly requests Thin provisioning, provisioning type is the same type as provisioning in the source VM.
■ If the source disk is Thin provisioned, the default for the recovery volume is also Thin provisioned.
■ If the user uses preseed disks, Zerto maintains the provisioning types of the disks, so they can have other provisioning types.
Preseed | Provisioning in the Recovery VM |
Not selected | ■ User can select Thin provisioning |
Selected | ■ User cannot select Thin provisioning ■ Provisioning is the same as defined in source VMs |
24. To define whether the recovery volumes are thin-provisioned or not, select the Thin checkbox.
25. If the virtual machine to be replicated includes a temp data disk as part of its configuration, select the Temp Data checkbox to mark the recovery disk for this disk as a temp data disk. In this case, data is not replicated to the temp data disk after initial synchronization.
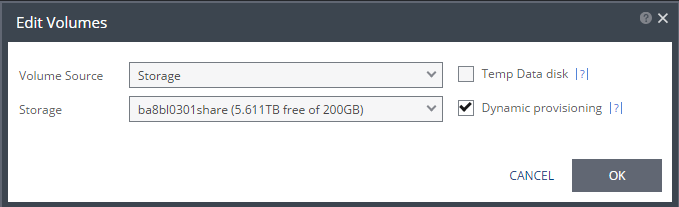
26. To edit storage information for one of the virtual machines’ volume location, first select the virtual machine, then click EDIT SELECTED. The Edit Volumes window is displayed.
■ In Hyper-V environments, the following window appears.
■ In vSphere environments, the following window appears.
Setting & Description | Select... |
Volume Source |
■ (Hyper-V) Select a Volume Source for recovery from one of the drop-down options: ■ Storage ■ Preseeded volume | ■ Volume Source > Storage: A new volume is used for replicated data. ■ From the Storage drop-down list, specify the storage to use to create disks for the replicated data. The storage specified for the replication must have at least the same amount of space as the protected volume and then an additional amount for the journal. The amount of additional space needed for the journal can be fixed by specifying a maximum size for the journal, or can be calculated as the average change rate for the virtual machines in the VPG, multiplied by the length of time specified for the journal history. |
■ Volume Source > Preseeded volume: Whether to copy the protected data to a virtual disk in the recovery site. Zerto recommends using this option particularly for large disks so that the initial synchronization will be faster since a Delta Sync can be used to synchronize any changes written to the recovery site after the creation of the preseeded disk. When not using a preseeded disk, the initial synchronization phase must copy the whole disk over the WAN. When using a preseeded virtual disk, you select the storage and exact location, folder, and name of the preseeded disk. Zerto Virtual Replication takes ownership of the preseeded disk, moving it from its source folder to the folder used by the VRA. Only disks with the same size as the protected disk can be selected when browsing for a preseeded disk. The storage where the preseeded disk is placed is also used as the recovery storage for the replicated data. |
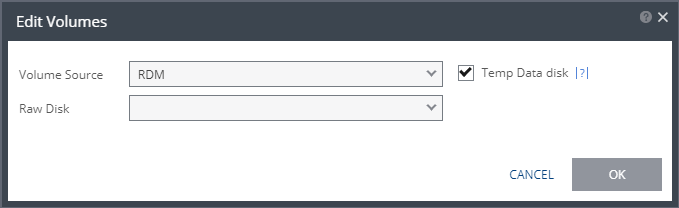
■ (vSphere) Select a Volume Source for recovery from one of the drop-down options: ■ Datastore ■ RDM ■ Preseeded volume | Volume Source > Datastore: A new volume is used for replicated data. ■ Specify the Datastore to use to create disks for the replicated data. ■ If the source disk is thin provisioned, the default for the recovery volume is also thin provisioned. ■ The datastore specified for replication must have at least the same amount of space as the protected volume and an additional amount for the journal. ■ The amount of additional space needed for the journal can be fixed by specifying a maximum size for the journal, or can be calculated as the average change rate for the virtual machines in the VPG, multiplied by the length of time specified for the journal history. ■ Zerto Virtual Replication supports the SCSI protocol. Only disks that support this protocol can be specified. Then, define the following: ■ Datastore: The Datastore where the preseeded disk is located. Only disks with the same size as the protected disk can be selected when browsing for a preseeded disk. |
Volume Source > RDM: The VMware RDM (Raw Device Mapping) which will be used for the replication. By default, RDM is recovered as thin-provisioned VMDK in the datastore specified in the VM Recovery Datastore/Storage field in the Edit VM dialog, and not to RDM. Only a raw disk with the same size as the protected disk can be selected from the list of available raw disks. Other raw disks with different sizes are not available for selection. The RDM is always stored in the recovery datastore, used for the virtual machine. The following limitations apply to protecting RDM disks: ■ RDM disks with an even number of blocks can replicate to RDM disks of the same size with an even number of blocks and to VMDKs. ■ RDM disks with an odd number of blocks can only replicate to RDM disks of the same size with an odd number of blocks and not to VMDKs. ■ You cannot define an RDM disk to be protected to a cloud service provider via a Zerto Cloud Connector nor if the virtual machine uses a BusLogic SCSI controller, nor when protecting or recovering virtual machines in an environment running vCenter Server 5.x with ESX/ESXi version 4.1 hosts. |
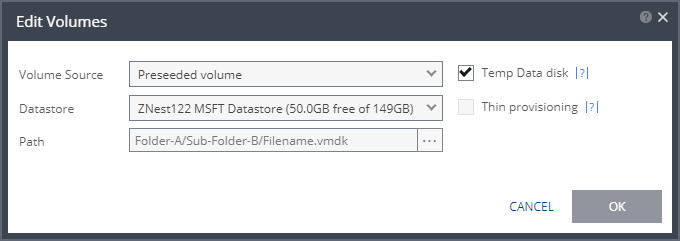
■ (vSphere) Volume Source continued | Volume Source > Preseeded volume: Select this when you want to copy the protected data to a virtual disk in the recovery site. Consider the following, then proceed to define the Datastore and the Path: ■ Zerto recommends using this option particularly for large disks so that the initial synchronization is faster since a Delta Sync can be used to synchronize any changes written to the recovery site after the creation of the preseeded disk. ■ If a preseeded disk is not selected, the initial synchronization phase must copy the whole disk over the WAN. ■ If you use a preseeded virtual disk, you select the datastore and exact location, folder, and name of the preseeded disk, which cannot be an IDE disk. Zerto Virtual Replication takes ownership of the preseeded disk, moving it from its source folder to the folder used by the VRA. ■ The datastore where the preseeded disk is placed is also used as the recovery datastore for the replicated data. ■ If the preseeded disk is greater than 1TB on NFS storage, the VPG creation might fail. This is a known VMware problem when the NFS client does not wait for sufficient time for the NFS storage array to initialize the virtual disk after the RPC parameter of the NFS client times out. The timeout default value is 10 seconds. See VMware documentation, http://kb.vmware.com/selfservice/microsites/search.do?language=en_US&cmd=displayKC&externalId=1027919, which describes the configuration option to tune the RPC timeout parameter by using the command: esxcfg-advcfg -s <Timeout> /NFS/SetAttrRPCTimeout ■ If the protected disks are non-default geometry, configure the VPG using preseeded volumes. ■ If the protected disk is an RDM disk, it can be used to preseed to a recovery VMDK disk. Zerto Virtual Replication makes sure that the VMDK disk size is a correct match for the RDM disk. ■ If the VPG is being defined for a Zerto Organization, ZORG, the location of the preseeded disk must be defined in the Zerto Cloud Manager. See Zerto Cloud Manager Administration Guide. Then, define the following: ■ Datastore: The Datastore where the preseeded disk is located. Only disks with the same size as the protected disk can be selected when browsing for a preseeded disk. ■ Path: The full path to the preseeded disk. |
Temp Data disk |
If the virtual machine to be replicated includes a temp data disk as part of its configuration. | Specify a mirror disk for replication that is marked as a temp data disk. In this case, data is not replicated to the temp data disk after initial synchronization |
Thin Provisioning (vSphere) |
If the recovery volumes are thin-provisioned or not. | If the source disk is thin provisioned, the default for the recovery volume is that it is also thin provisioned. |
27. Click OK.
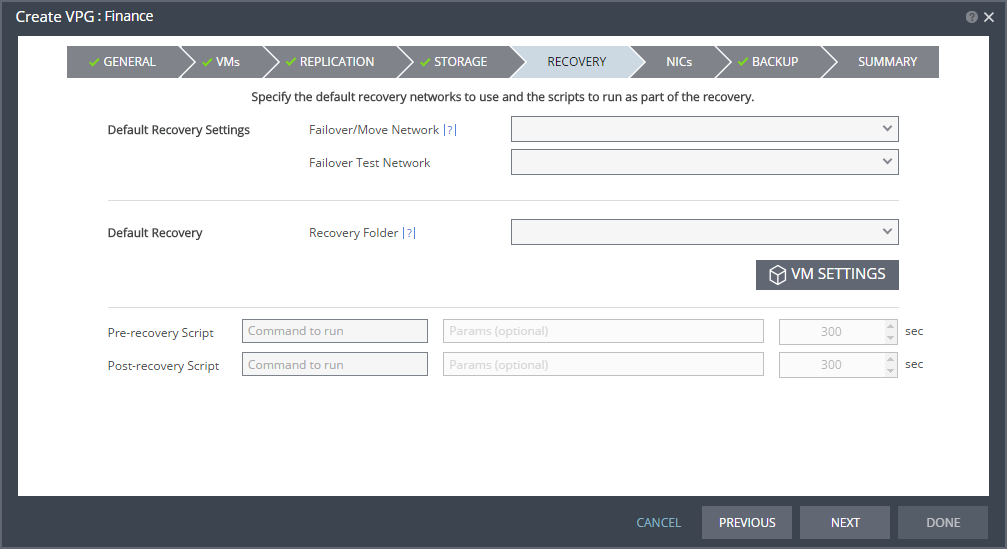
28. Click NEXT.
The RECOVERY step is displayed. Recovery details include the networks to use for failover, move, and for testing failover, and whether scripts should run as part of the recovery operation.
29. Select the default recovery settings. These are applied to every virtual machine in the VPG.
■ Failover/Move Network: The network to use during a failover or move operation in which the recovered virtual machines will run.
■ Failover Test Network: The network to use when testing the failover of virtual machines in the recovery site. Zerto recommends using a fenced-out network so as not to impact the production network at this site.
■ Recovery Folder: The folder to which the virtual machines are recovered.
Note: If the recovery site is a Cloud Service Provider site, it is not possible to select a recovery folder.
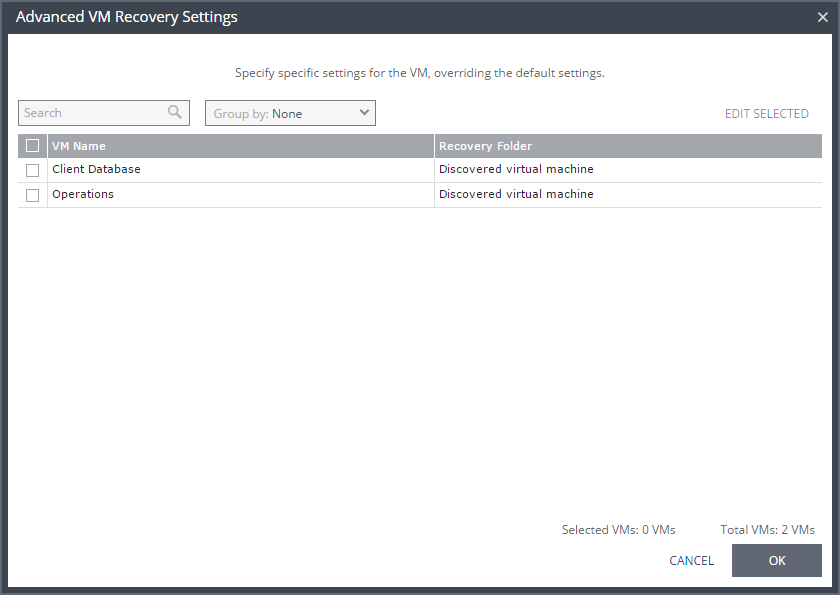
30. To specify a recovery folder for each virtual machine in the VPG, click VM SETTINGS.
The Advanced VM Recovery Settings window is displayed.
In this window, you can edit the values of one or more of the virtual machines in the VPG.
31. To edit information in one field, click the field and update the information.
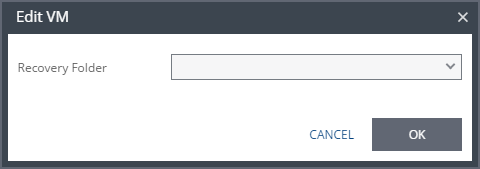
32. To edit information for several virtual machines at the same time, select the virtual machines and click EDIT SELECTED.
The Edit VM window is displayed.
■ Recovery Folder: The folder to which the virtual machine is recovered.
33. Click SAVE.
34. In the Advanced VM Recovery Settings window, click OK.
35. Enter the name of the script to run in the Command to run text box. You can then enter details about the script.
■ Pre-recovery Script: The information about a script that should run at the beginning of the recovery process.
■ Post-recovery Script: The information about a script that should run at the end of the recovery process.
For both types of scripts, enter the following information:
Text Box | Description |
Command to run | The full path of the script. The script must be located on the same machine as the Zerto Virtual Manager for the recovery site. |
Params | The parameters to pass to the script. Separate parameters with a space. |
Timeout | The time-out, in seconds, for the script to run. ■ If the script runs before executing a failover, move, or test failover, and the script fails or the timeout value is reached, an alert is generated and the failover, move, or test failover is not performed. ■ If the script runs after executing a failover, move, or test failover, and the timeout value is reached, an alert is generated. ■ The default time-out value is specified in Site Settings > Performance and Throttling tab. |
36. Click NEXT.
The NICs step is displayed. In this step, you can specify the NIC details to use for the recovered virtual machines after a failover, a test failover, or migration.
37. To edit information in one field, click the field and update the information.
38. To edit information for several virtual machines at the same time, select the virtual machines and click EDIT SELECTED.
39. Otherwise, go to step
42.
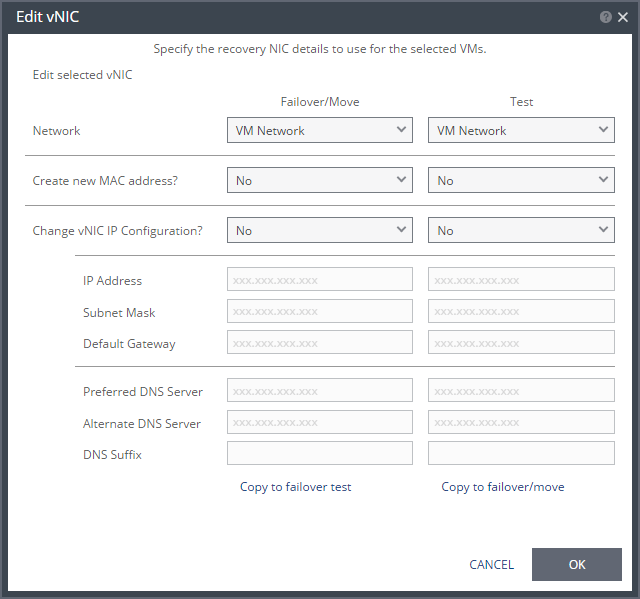
The Edit vNIC dialog is displayed.
40. Specify the network details to use for the recovered virtual machines after a failover or move operation, in the Failover/Move column, and for the recovered virtual machines when testing replication, in the Test column.
In each column, specify the following:
■ Network: The network to use for this virtual machine.
■ Create New MAC Address: Whether the Media Access Control address (MAC address) used on the protected site should be replicated on the recovery site. The default is to use the same MAC address on both sites. Note that if you check this option, to create a new MAC address, and the current IP address is not specified, the protected virtual machine static IP address might not be used for the recovered virtual machine.
■ Change vNIC IP Configuration: Whether or not to keep the default virtual NIC (vNIC) IP configuration. The vNIC IP is only changed after recovery for virtual machines with VMware Tools running.
See the
Zerto Virtual Replication Interoperability Matrix for the list of operating systems for which Zerto supports Re-IPing.
■ To change the vNIC IP, in the Failover/Move or Test column, select Yes. If you select to use a static IP connection, set the IP address, subnet mask, and default gateway.
■ Optionally, change the preferred and alternate DNS server IPs and the DNS suffix.
■ If you leave the DNS server and suffix entries empty, or select to use DHCP, the IP configuration and DNS server configurations are assigned automatically, to match the protected virtual machine. You can change the DNS suffix.
■ If the virtual machine has multiple NICs but is configured to only have a single default gateway, fill in a 0 for each octet in the Default gateway field for the NICs with no default gateway.
■ During a failover, move, or test failover, if the recovered virtual machine is assigned a different IP than the original IP, after the virtual machine has started it is automatically rebooted so that it starts up with the correct IP. If the same network is used for both production and test failovers, Zerto recommends changing the IP address for the virtual machines started for the test, so that there is no IP clash between the test machines and the production machines.
■ Copy to failover test: Select this to copy the settings in the Failover/Move column to the Test column.
■ Copy to failover/move: Select this to copy the settings in the Test column to the Failover/Move column.
41. Click OK.
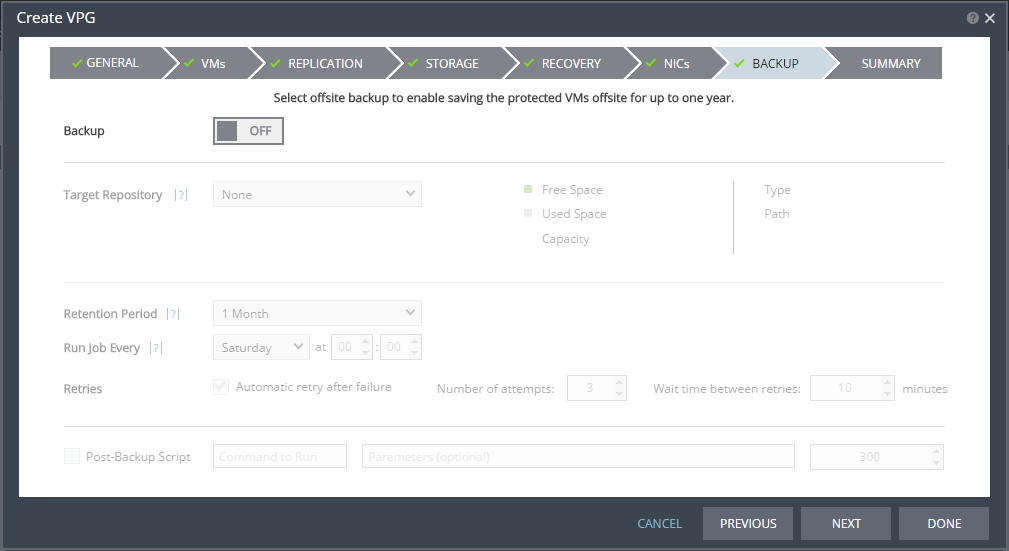
42. Click NEXT.
The BACKUP step is displayed. Backup properties govern the VPG backup, including the repository where the backups are saved. Backup extends the ability to recover virtual machines in a VPG going back one year.
43. By default, backup is
OFF. To keep this value, go to step
45.
44. Otherwise, toggle OFF to ON and enter the following information:
■ Retention Period: The length of time to keep offsite backups, up to a maximum of one year. For details of how this affects the number of backups saved, see
“Offsite Backups”, on page 44.
■ Run Job Every: The day and time to start the backup.
■ Retries: Whether to rerun the backup job automatically if the job fails. If you select this option, you must also define the number of retries that will be attempted and the time to wait after a job fails before running the backup job again.
■ Post-Backup Script: The information about a script that should run at the end of the recovery process. Enter the following information:
Text Box | Description |
Command to run | The full path of the script. The script must be located on the same machine as the Zerto Virtual Manager for the recovery site. |
Parameters | The values of parameters to pass to the script. Separate parameters with a space. |
Timeout | The time-out, in seconds, for the script to run. If the timeout value is reached, an alert is generated. The default time-out value is specified in the Performance and Throttling tab of the Site Settings dialog. |
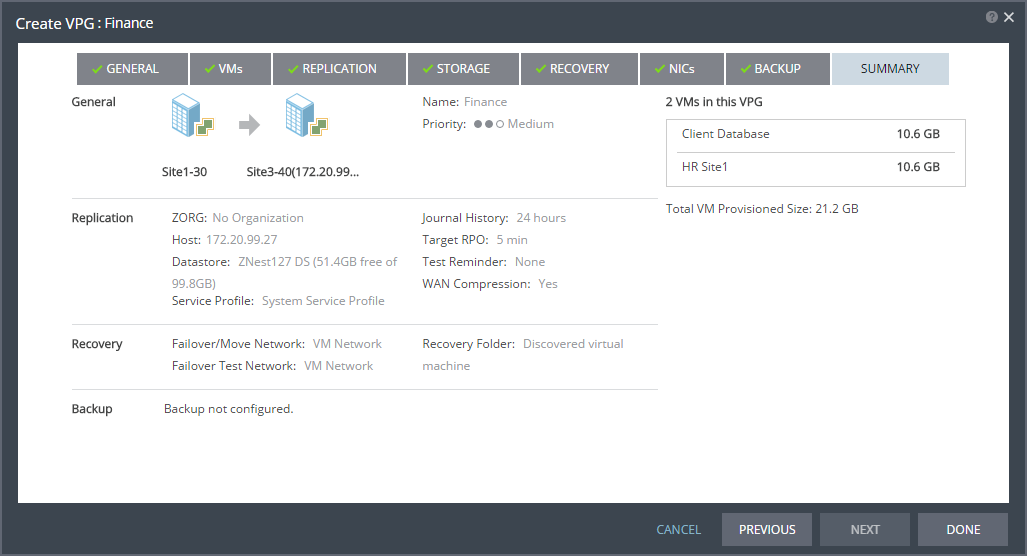
45. Click NEXT.
The SUMMARY step is displayed. It shows the VPG configuration that you defined in previous tabs.
46. Click DONE. The VPG is created.
For details of what happens after saving the VPG, see
“What Happens After the VPG is Defined”, on page 42.