Defining Site Policies
You can set default recovery and replication policies.
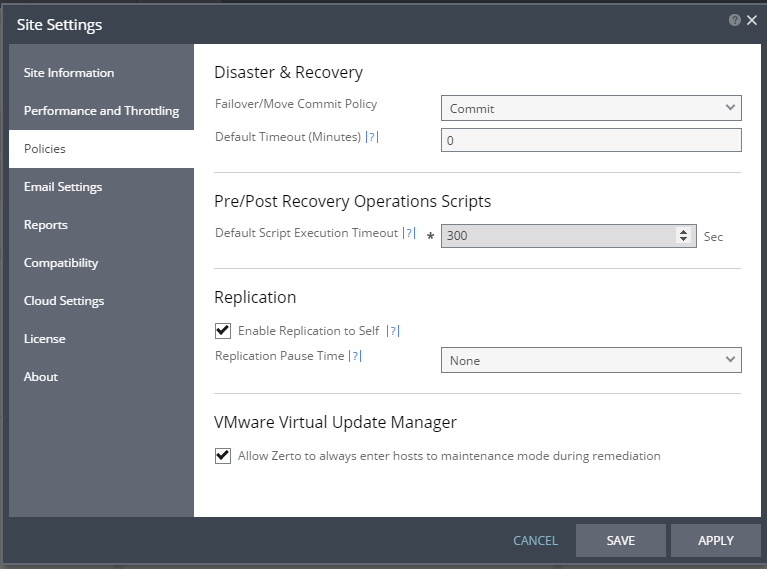
Configuring Disaster Recovery Policies
To configure disaster recovery policies:
1. Click Policies tab.
None – The failover or move operation must be manually committed or rolled back by the user.
Commit – After the time specified in the Default Timeout field the failover or move operation is committed, unless manually committed or rolled back by the user before the time-out value is reached. During the specified time you can check the recovered VPG virtual machines.
Rollback – After the time specified in the Default Timeout field the failover or move operation is rolled back, unless manually committed or rolled back by the user before the time-out value is reached. During the specified time you can check the recovered VPG virtual machines.
The value set here applies as the default for all failover or move operations from this point on but can be changed when defining a failover or move operation.
3. Specify the Default Timeout after which a Commit or Rollback commit policy is performed. A value of zero indicates that the system will automatically perform the commit policy, without waiting for any user interaction.
4. In the Pre/Post Recovery Operations Scripts area, specify the timeout in seconds for a script to run before or after a failover, move, or test failover in the Default Script Execution Timeout field.
5. If the same site is to be used as both the protected and recovery site, in the Replication area, select Enable Replication to Self.
6. Choose the Replication Pause Time, which is the time to pause when the journal might have problems, resulting in the loss of all checkpoints, for example, when the datastore for the journal is near to being full.
The replication pause time is the amount of time that the transfer of data from the protected site to the journal on the recovery site is paused. This time can then be used by the administrator to resolve the issue, for example by cloning the virtual machines in the VPG, described in
“Cloning Protected Virtual Machines to the Remote Site”, on page 282. The value set here is applied to existing and new VPGs.
Note: The setting is applied to the site only. If you want the ability to pause the protection in both directions, for example to cover reverse protection back to the original site after a move operation, set the replication Pause Time on both sites.
7. To enter the host to maintenance mode during remediation, in the VMware Virtual Update Manager area, select Allow Zerto to always enter hosts to maintenance mode during remediation. When this is selected, if the Virtual Update Manager's Remediation task is detected, Zerto will automatically enter the host into maintenance mode. The host will exit maintenance mode when the Virtual Update Manager's Remediation task is completed.
Notes:
■ Recovery and journal volumes that reside on the host are not automatically migrated to another host in the cluster.
8. Click APPLY or SAVE.