Configurations
The Configurations page allows Enterprise Steam Admins to add, edit, and deactivate users and roles. Users can be added either individually using the Enterprise Steam SQLite database or through an existing LDAP directory.
Note: Only Admins have access to the Configurations page.
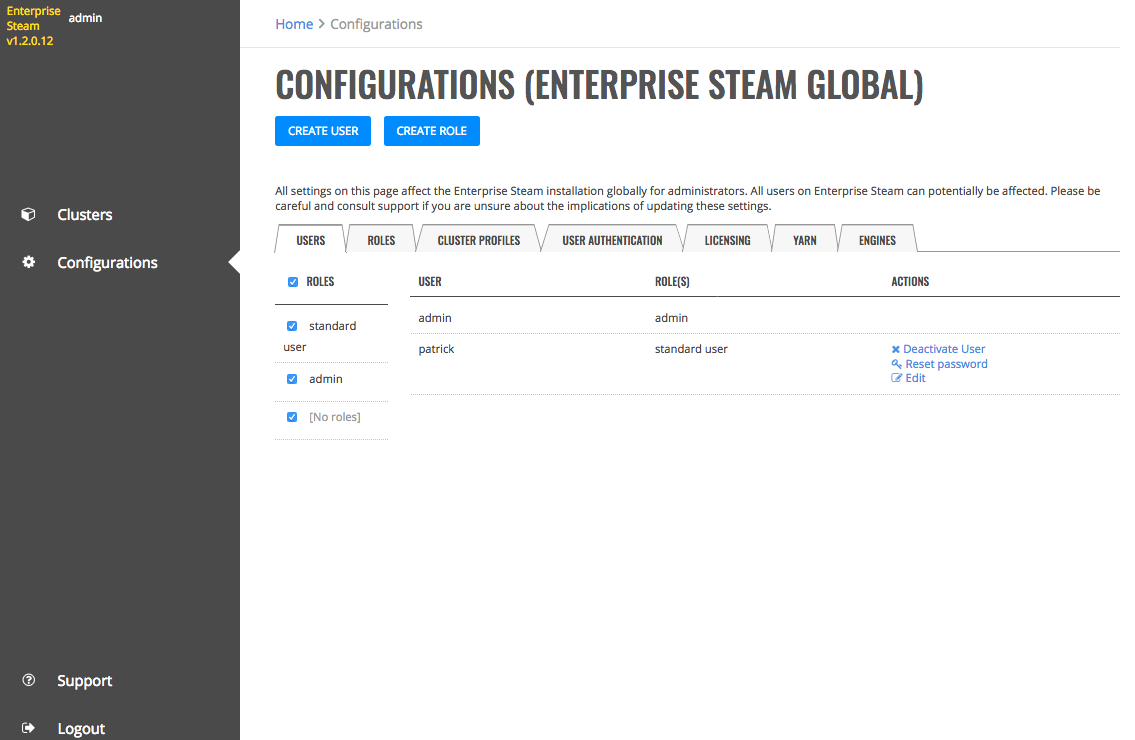
Users tab
The Configurations page consists of the following tabs.
- The Users tab shows the current list of users and their assigned role(s).
- The Roles tab provides a table of the permissions assigned to each role.
- The Cluster Profiles tab allow you to define the size of clusters, the minimum and maximum memory, and the number of cores, threads, and queues for the profile.
- The User Authentication tab allows you to connect Enterprise Steam to your current user database.
- The Licensing tab provides information on your Enterprise Steam License.
- The YARN tab allows you to enter YARN configuration settings that will apply when users launch new clusters.
- The Engines tab allows you to add a manager file and H2O engines.
Configure LDAP Connection Settings
Enterprise Steam ships with a built-in SQLite database. By default, Enterprise Steam uses this database to store user and cluster management metadata. You can use this database, or you can configure Enterprise Steam to work with your existing LDAP directory.
- Navigate to the Configurations page and select the User Authentication tab.
- Select LDAP in the User DB Type drop down menu, then configure the LDAP connection settings. (Refer to the table below and the image that follows.)
Field Description Example Host The LDAP host server address ldap.0xdata.loc Port The LDAP server port 389 SSL-Enabled Enable this if your LDAP supports SSL. Bind DN The Distinguished Name used by the LDAP server if extended access is required. This can be left blank if anonymous bind is sufficient. cn=admin,dc=0xdata,dc=loc Bind DN Password/Confirm The password for the Bind DN user h2o User Base DN The location of the LDAP users, specified by the DN of your user subtree ou=users,dc=0xdata,dc=loc User Base Filter The LDAP search filter used to filter users department=IT User Name Attribute The User Attribute that contains the username uid Group Names The Distinguished Name used for group synch cn=jettygroup,ou=groups,dc=0xdata,dc=loc Group Base DN The location of your LDAP groups, specified by the DN of your user subtree ou=groups,dc=0xdata,dc=loc Group Name Attribute The Group Attribute that contains the username cn Static Member Attribute The attribute for static group entries memberUid Search Request Size Limit Limit the size of search results. 0 indicates unlimited. Search Request Time Limit Limit the time allotted for completing search results. 0 indicates unlimited. 0 Cache Max Age (in mins) The maxium age in minutes of of LDAP record in cache before forcing a refresh. Use 0 for no cache (not recommended). 5 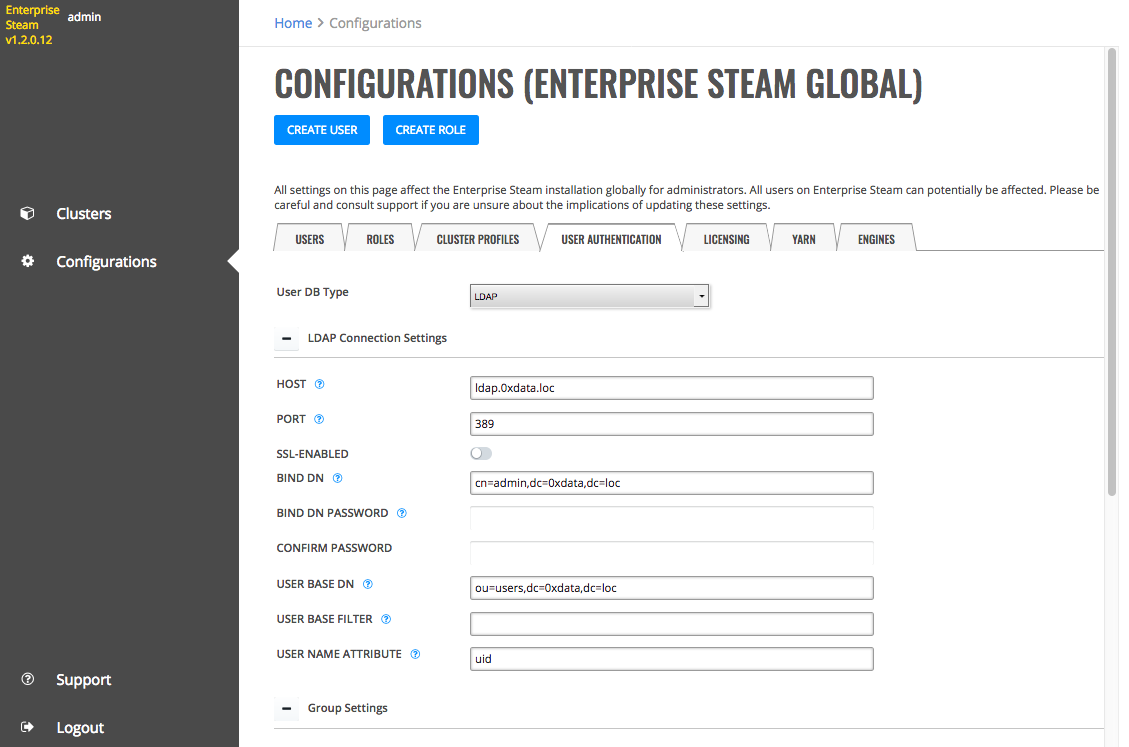
- Click Test Config when you are done. A valid response message indicates that the configuration was successful.
- Click Save Config.
After LDAP is configured, users can log in to Enterprise Steam using their LDAP username and password.
Notes:
- The Reset button clears all user-specified information in this form and resets any default values.
- The Invalidate LDAP cache button invalidates the records in the LDAP cache and forces the cache to retrieve updated records for users.
Cluster Profiles
The Cluster Profiles tab allow you to define the cluster sizes and configurations. Admins can then give different users access to the different clusters by specifying a specific cluster profile when launching a new cluster.
Enterprise Steam comes with a default cluster profile. You can edit this profile or add additional cluster profiles by following the steps below.
- On the Configurations page, click the Cluster Profiles tab.
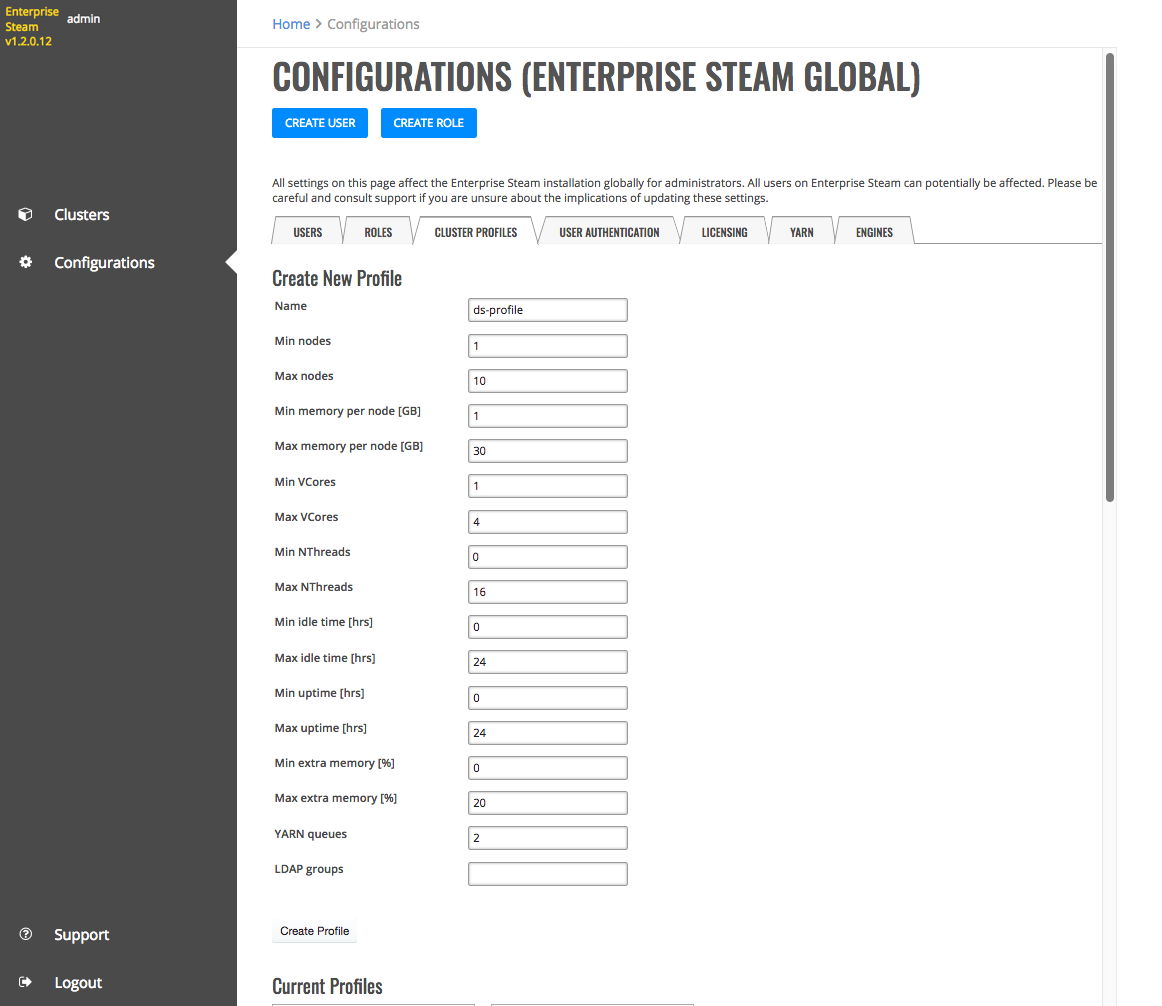
- Edit the Current Profile in the lower section, or begin creating a new one by specifying a name for the cluster profile in the top form.
- Specify the minimum and maximum number of allowed nodes (cluster size) for this profile.
- Specify the minimum and maximum memory size (in GB) of each node.
- Specify the minimum and maximum number of YARN virtual cores.
- Specify the minimum and maximum number of H2O threads (CPUs) to use.
- Specify the minimum and maximum idle time in hours.
- Specify the minimum and maximum uptime in hours.
- Specify the minimum and maximum extra memory for internal JVM use outside of the Java heap. (This corresponds to the
extramempercentHadoop launch parameter.) - Specify the comma-separated list of YARN queues available for user of this profile. Leave empty if you want to let the user to specify this parameter when launching the cluster.
- Optionally specify the LDAP group that will have access to this cluster. Enter * to allow any LDAP user to access this profile. Leave empty if you want to manually assign each cluster profile to each user.
- Click Create Profile when you are done.
Upon completion, the new profile will appear below the Create Cluster Profile form. If necessary, you can update or delete existing profiles directly in this section.
Users
The Users tab shows all current Enterprise Steam users. This section describes how to add, edit, and deactivate users.
Adding Users
Admins can add users into the Enterprise Steam SQLite database from within the UI.
- At the top of the Configurations page, click the Create User button.

- Enter the name of the user. Note that the name must match with a username in your YARN system.
- Specify and confirm a password for the user.
- Specify the role(s) for this user. Note that Enterprise Steam ships with two default roles: admin and standard user.
- Specify the cluster profile that this user will be part of. Note that Enterprise Steam ships with a default cluster profile.
- Click Create User when you are done.
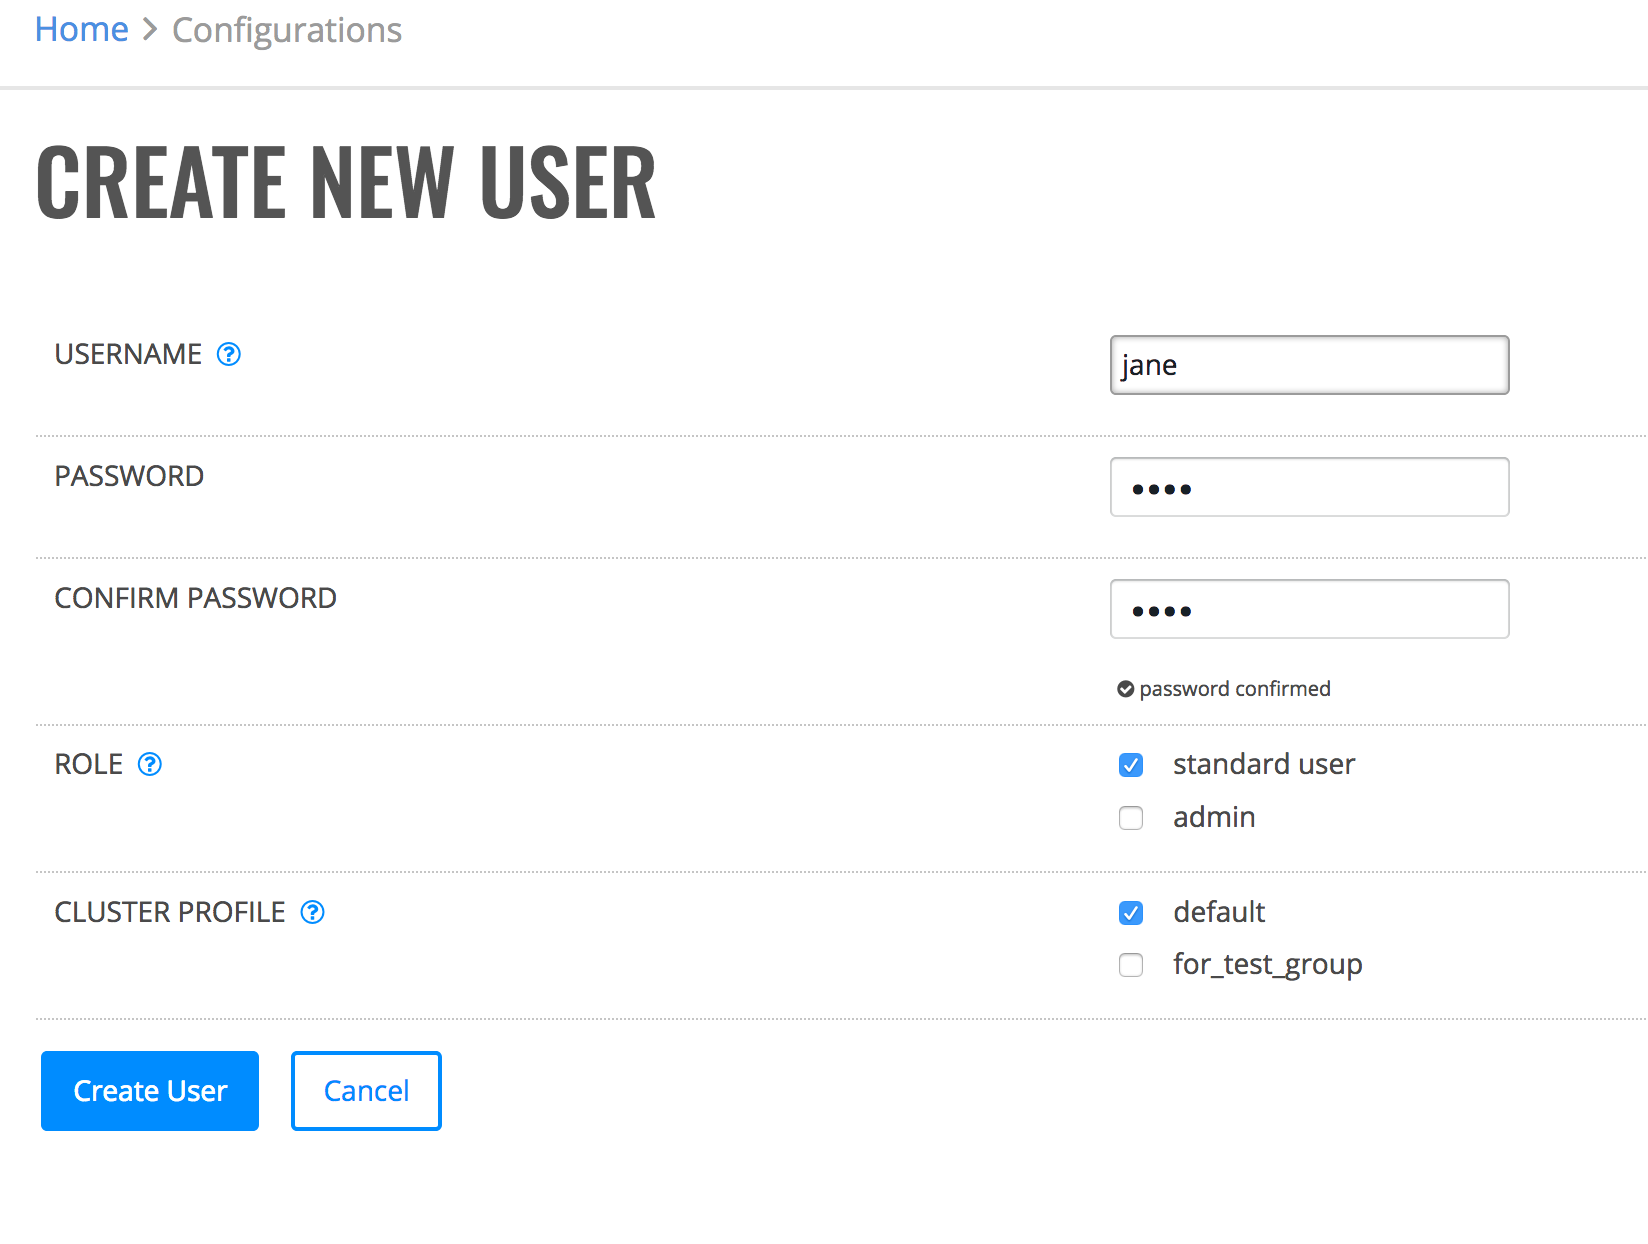
Create user
Upon successful completion, the new user will appear in the list of Enterprise Steam users.
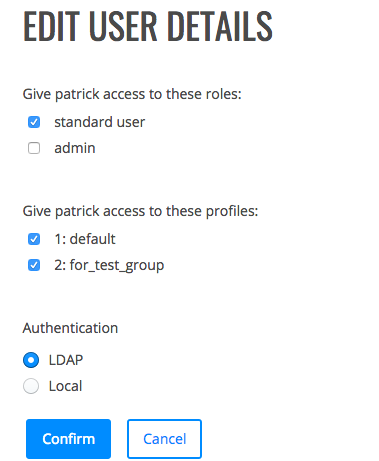
Editing Users
This section describes how to edit a user’s role.
On the Users tab, click the Edit link beside the user you want to edit. This opens the Edit User Details form. Change the user’s roles, cluster profile, and or authentication type, then click Confirm when you are done.
Edit user
Note: A message will display in the UI if you remove all roles from a user.
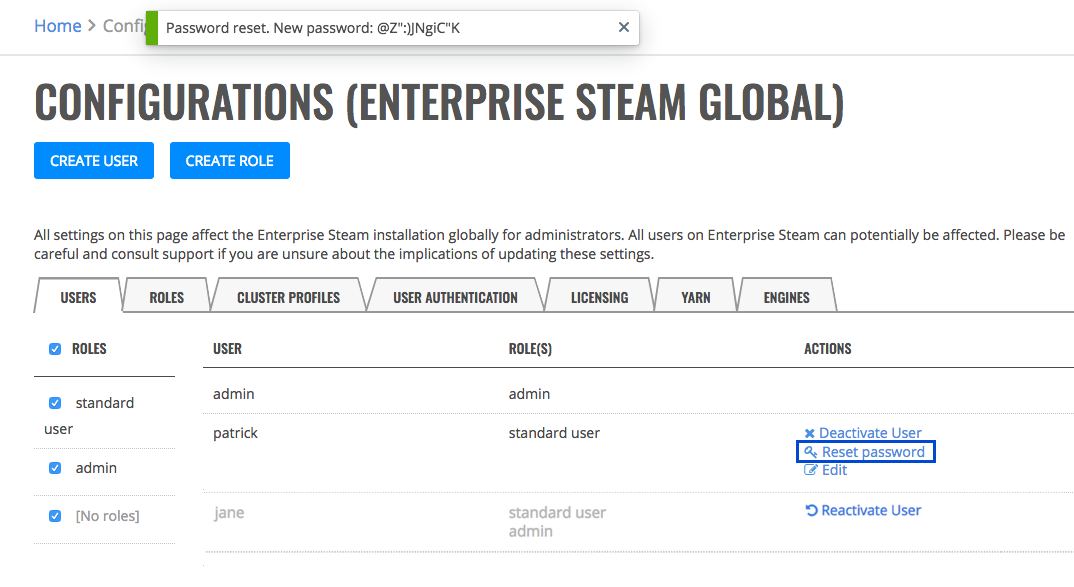
Resetting a User’s Password
Admins can reset a user’s password by clicking the Reset Password link for the desired user. A new password will display at the top of the screen for approximately 5 seconds. This new password should then be provided to the user so that he/she can log in to Enterprise Steam.
Reset password
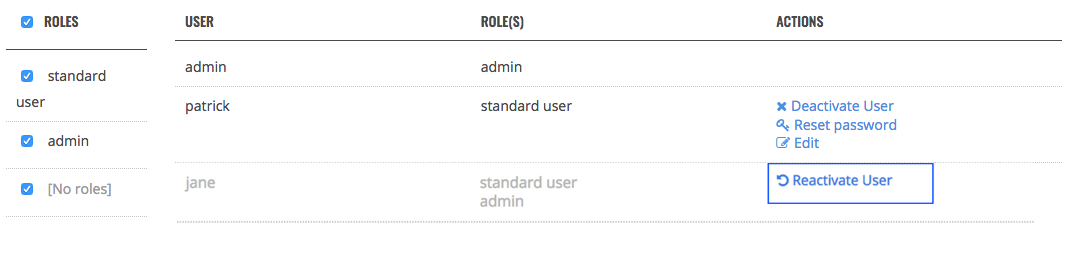
Deactivating/Reactivating Users
On the Users tab, click the Deactivate User link for the user whose Enterprise Steam access you want to revoke. Click Reactivate User to once again grant access for that user.
Deactivate/reactivate user
Roles
Roles determine the activities/permissions that an Enterprise Steam user can perform within your environment. Enterprise Steam ships with two default roles: admin and standard user. These default roles are sufficient for most Enterprise Steam deployments and, in general, should not be changed. You can create additional roles, however, if you require more granularity in the way that your users access and utilize Enterprise Steam.
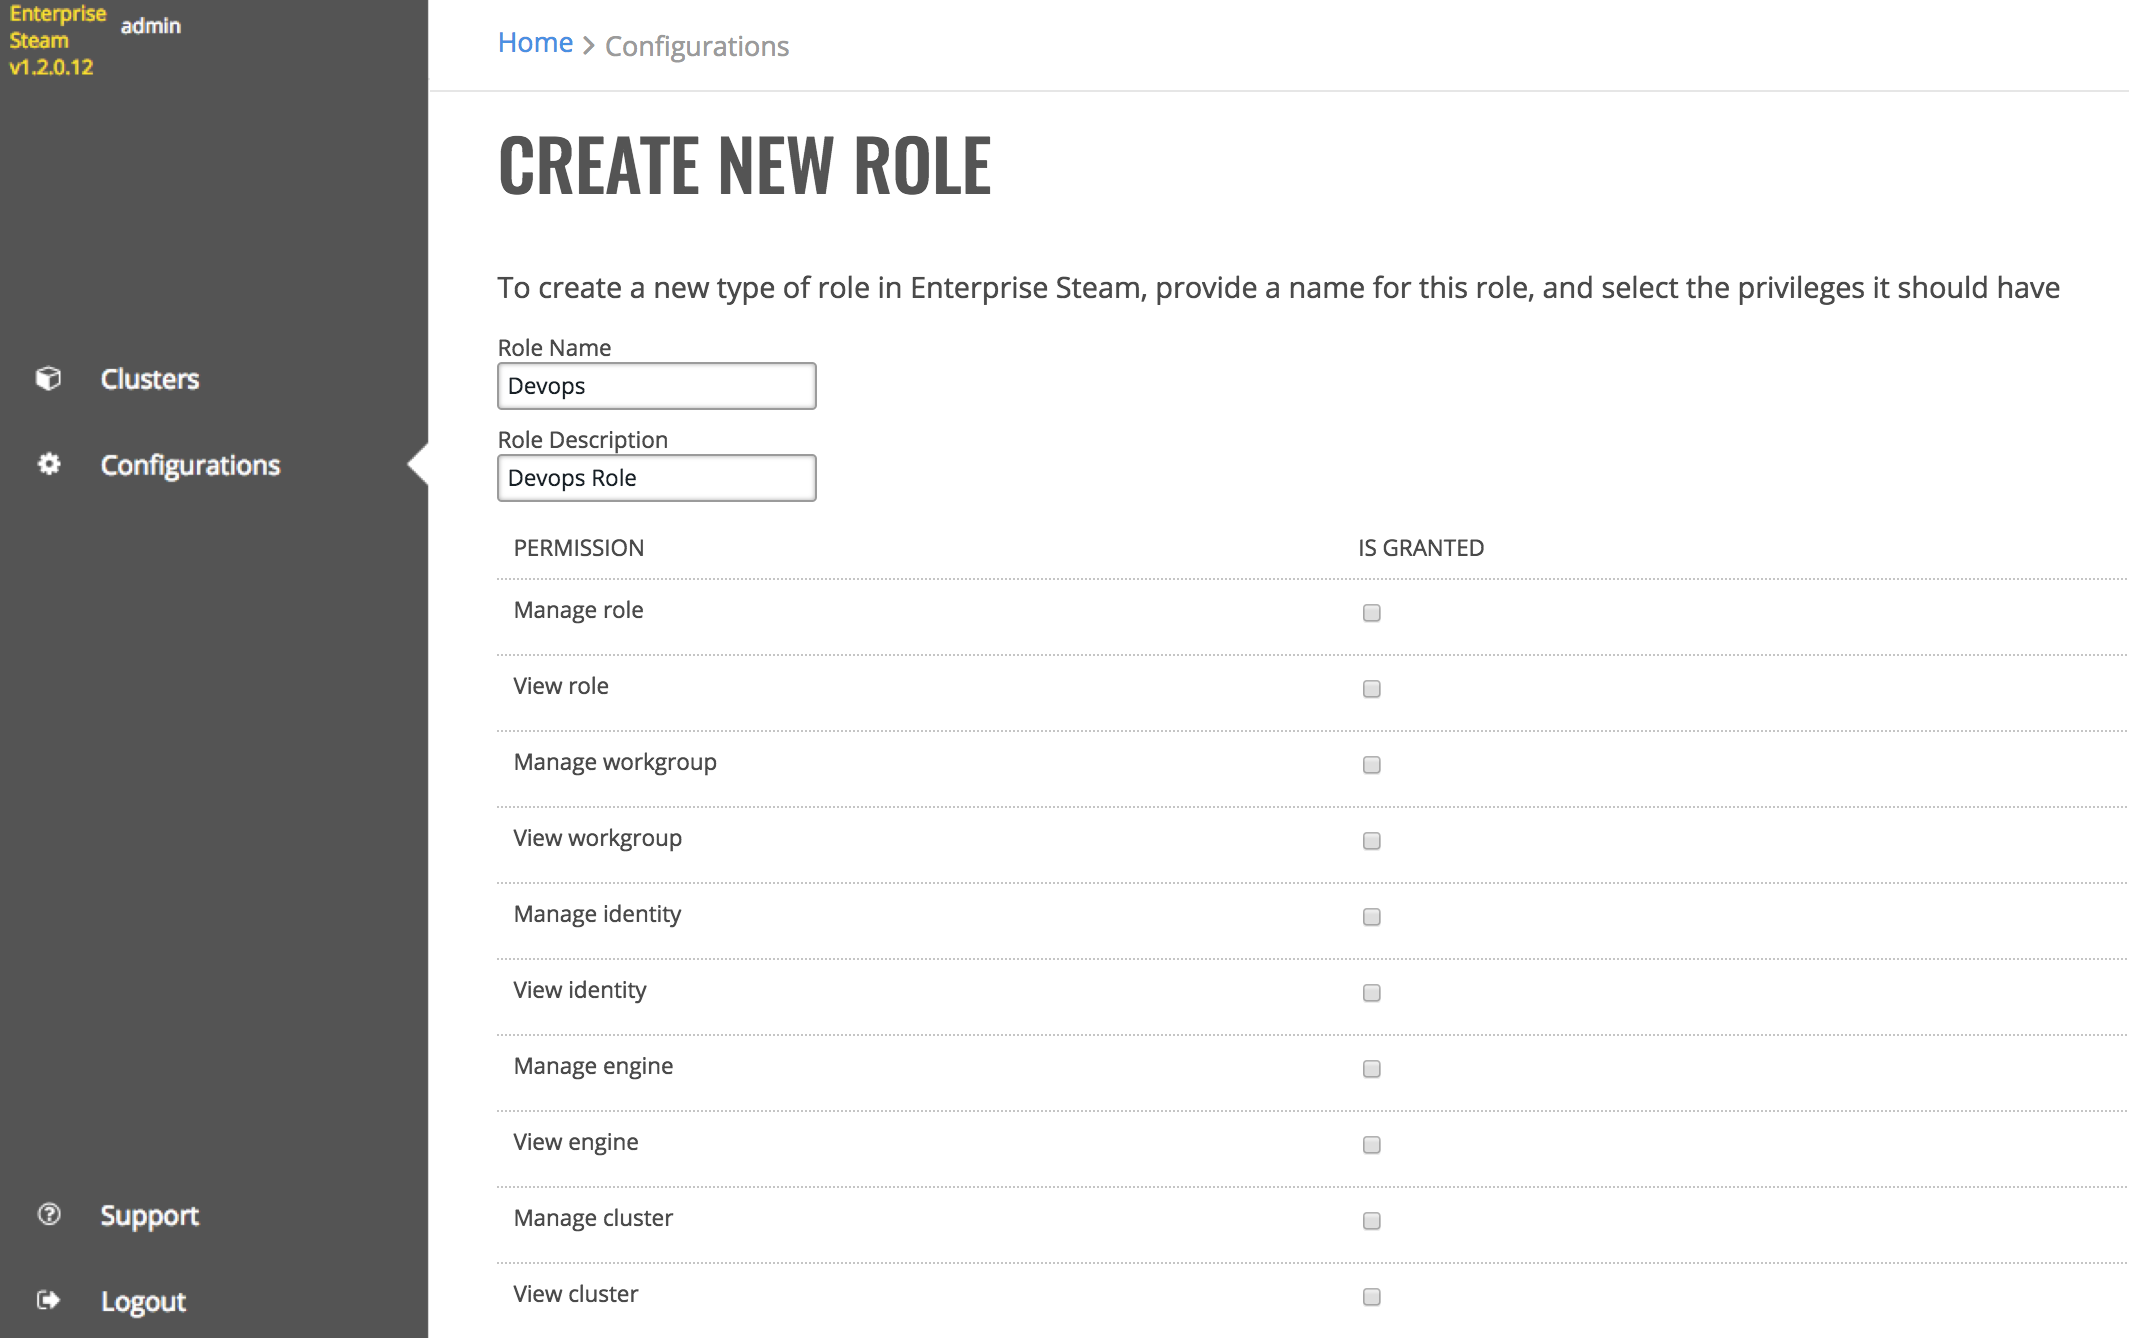
Creating Roles
- At the top of the Configurations page, click the Create Role button.
- Specify a name and description for the role.
- Select the permissions that will be granted to this role.
- Click Create Role at the bottom of the form when you are done.
Create Role
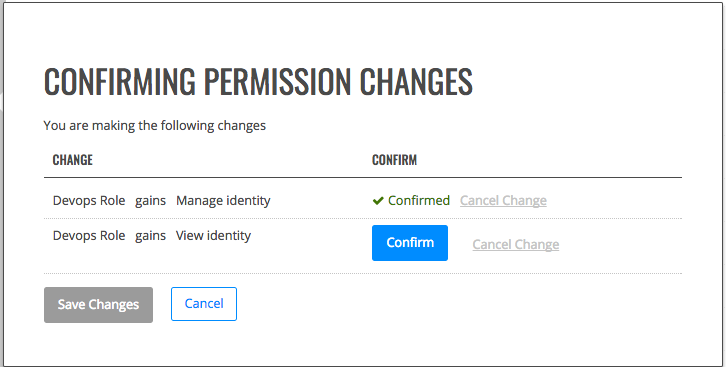
Changing Permissions
Admins can add or remove permissions for each role directly on this page.
- Select the checkbox for the correspoding permission and role that you want to change
- Click Review Changes at the bottom of the page. A popup displays, providing you with a summary of the changes.
- Click the Confirm button beside each change that you want to make, then click Save Changes to complete the update.
Change permissions
Deleting Roles
On the Roles tab, scroll down to the bottom of the page, and click the trashcan icon under the Role column that you want to delete. A confirmation page will display, prompting you to confirm the deletion. Click Confirm to remove the role.

Delete Role
YARN
A YARN tab is available for Enterprise Steam customers that want to control the way that users launch new clusters, whether it is specifying a YARN queue or limiting the number of nodes that a user can create when launching a new cluster.
Adding a New YARN Config Entry
Perform the following steps to add a new config entry.
Note: Use caution when adding a new config entry. These values are currently not validated, and incorrect entries will result in a failure on cluster launch.
- Specify a valid config name. This name must be a valid Hadoop launch parameter (such as network, driverif, driverport, nodes, etc.)
- Specify a value for the config. This value must correspond to the name. For example, you cannot enter an IP address if the new entry is for nodes.
- Specify whether this configuration will act as a default or whether this will override any values that the user sets.
- Specify whether this entry is a Hadoop flag (passed directly to the YARN command line) or an H2O Driver flag (specifying how Enterprise Steam will run).
- Click Add Entry when you are done. The new entry will display on this page. Repeat these steps to add additional YARN config entries.

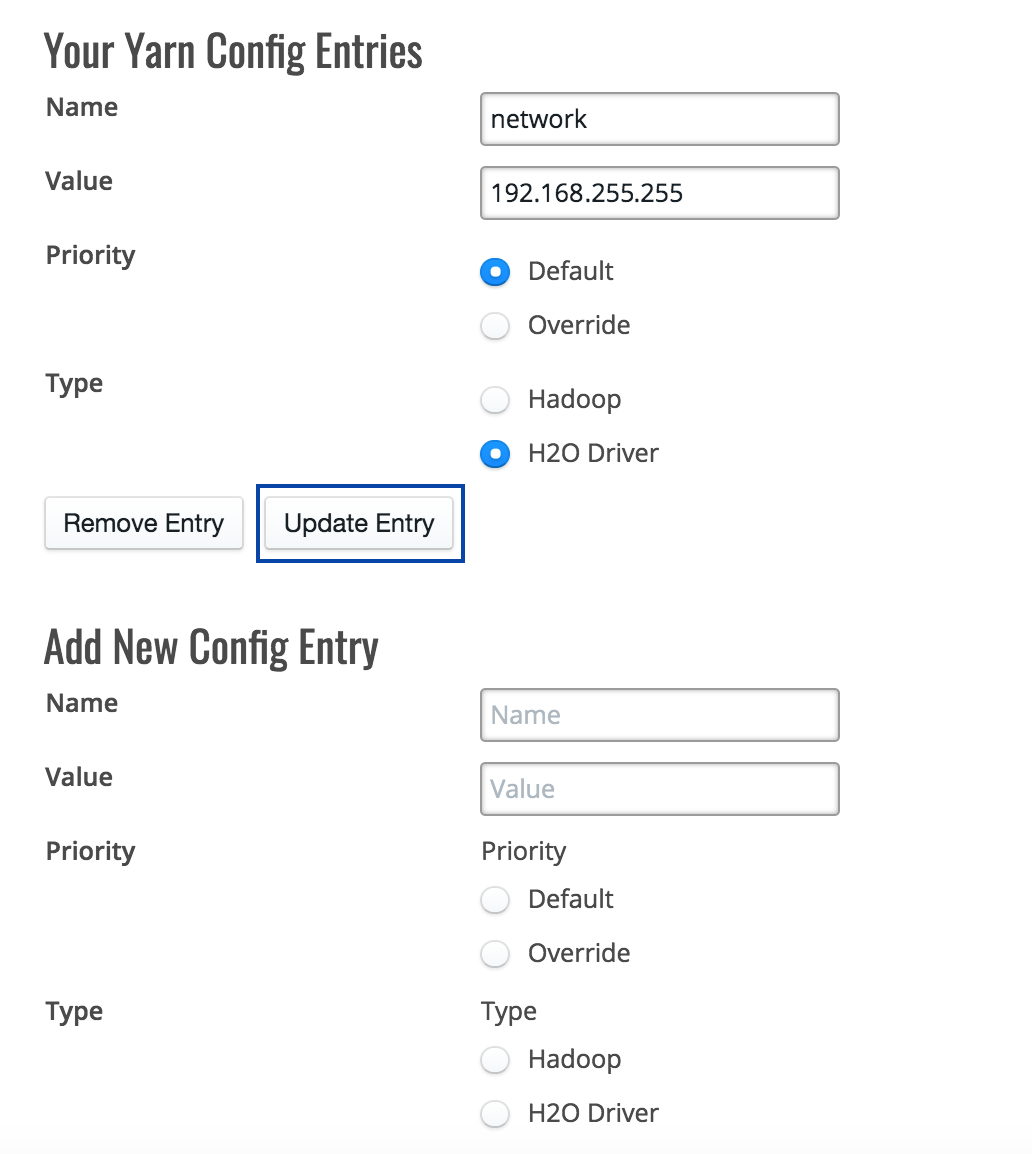
Updating a YARN Config Entry
On the YARN tab, enter new values in the entry that you want to update, then click the Update Entry button.
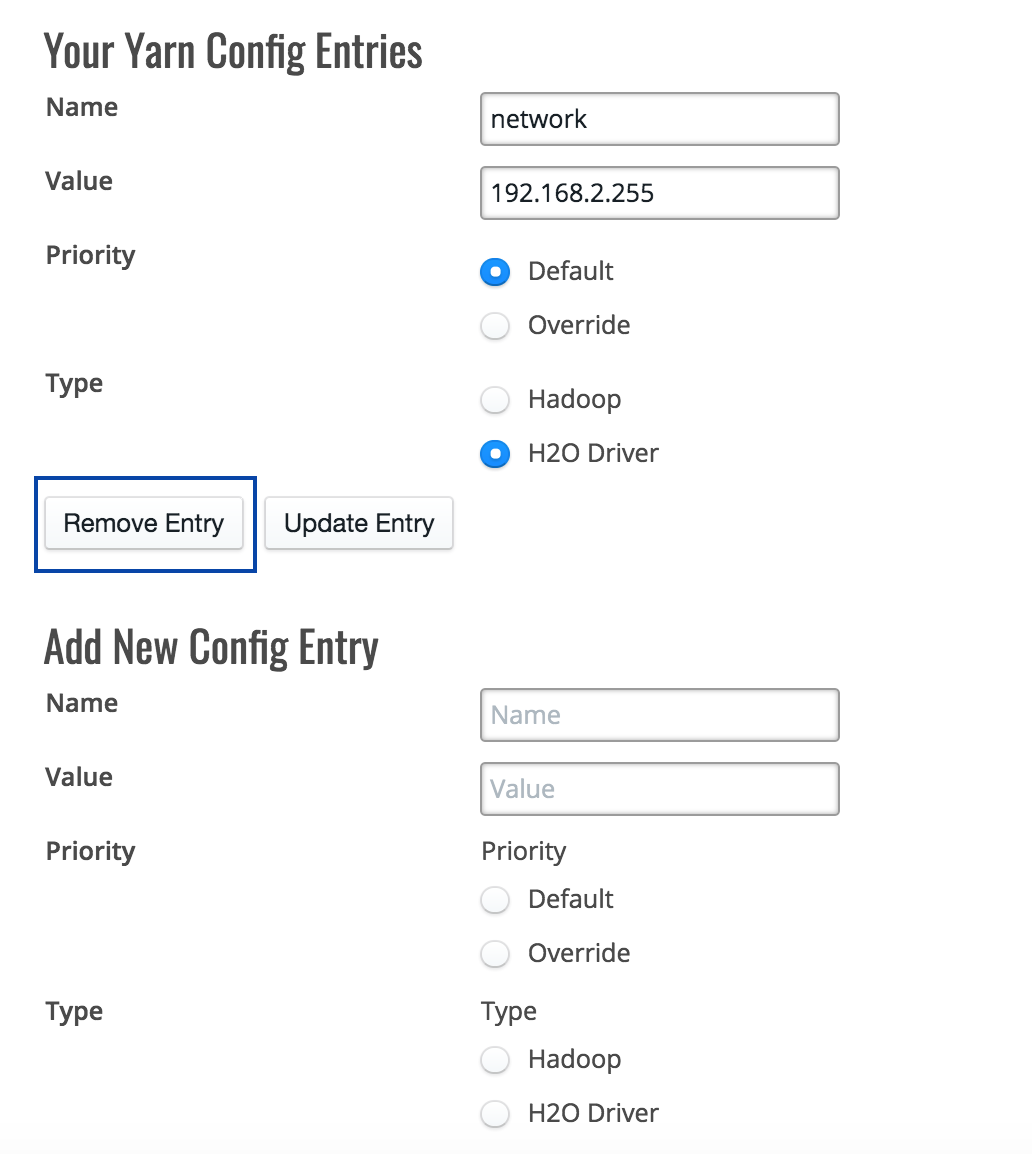
Deleting a YARN Config Entry
On the YARN tab, click the Remove Entry button below the entry that you want to remove.
Engines
The Engines tab allows you to upload h2o-3 drivers (engines) and optionally tie the Enterprise Steam environment to a Steam Hadoop helper file. Once added, these drivers will be available for Enterprise Steam users.
- On your local machine, download the h2odriver from the H2O Download page. Be sure to select the version that corresponds with your version of Hadoop. For example:
wget http://h2o-release.s3.amazonaws.com/h2o/rel-wolpert/4/h2o-3.18.0.4-hdp2.2.zip
- Navigate to the Configurations > Engines tab.
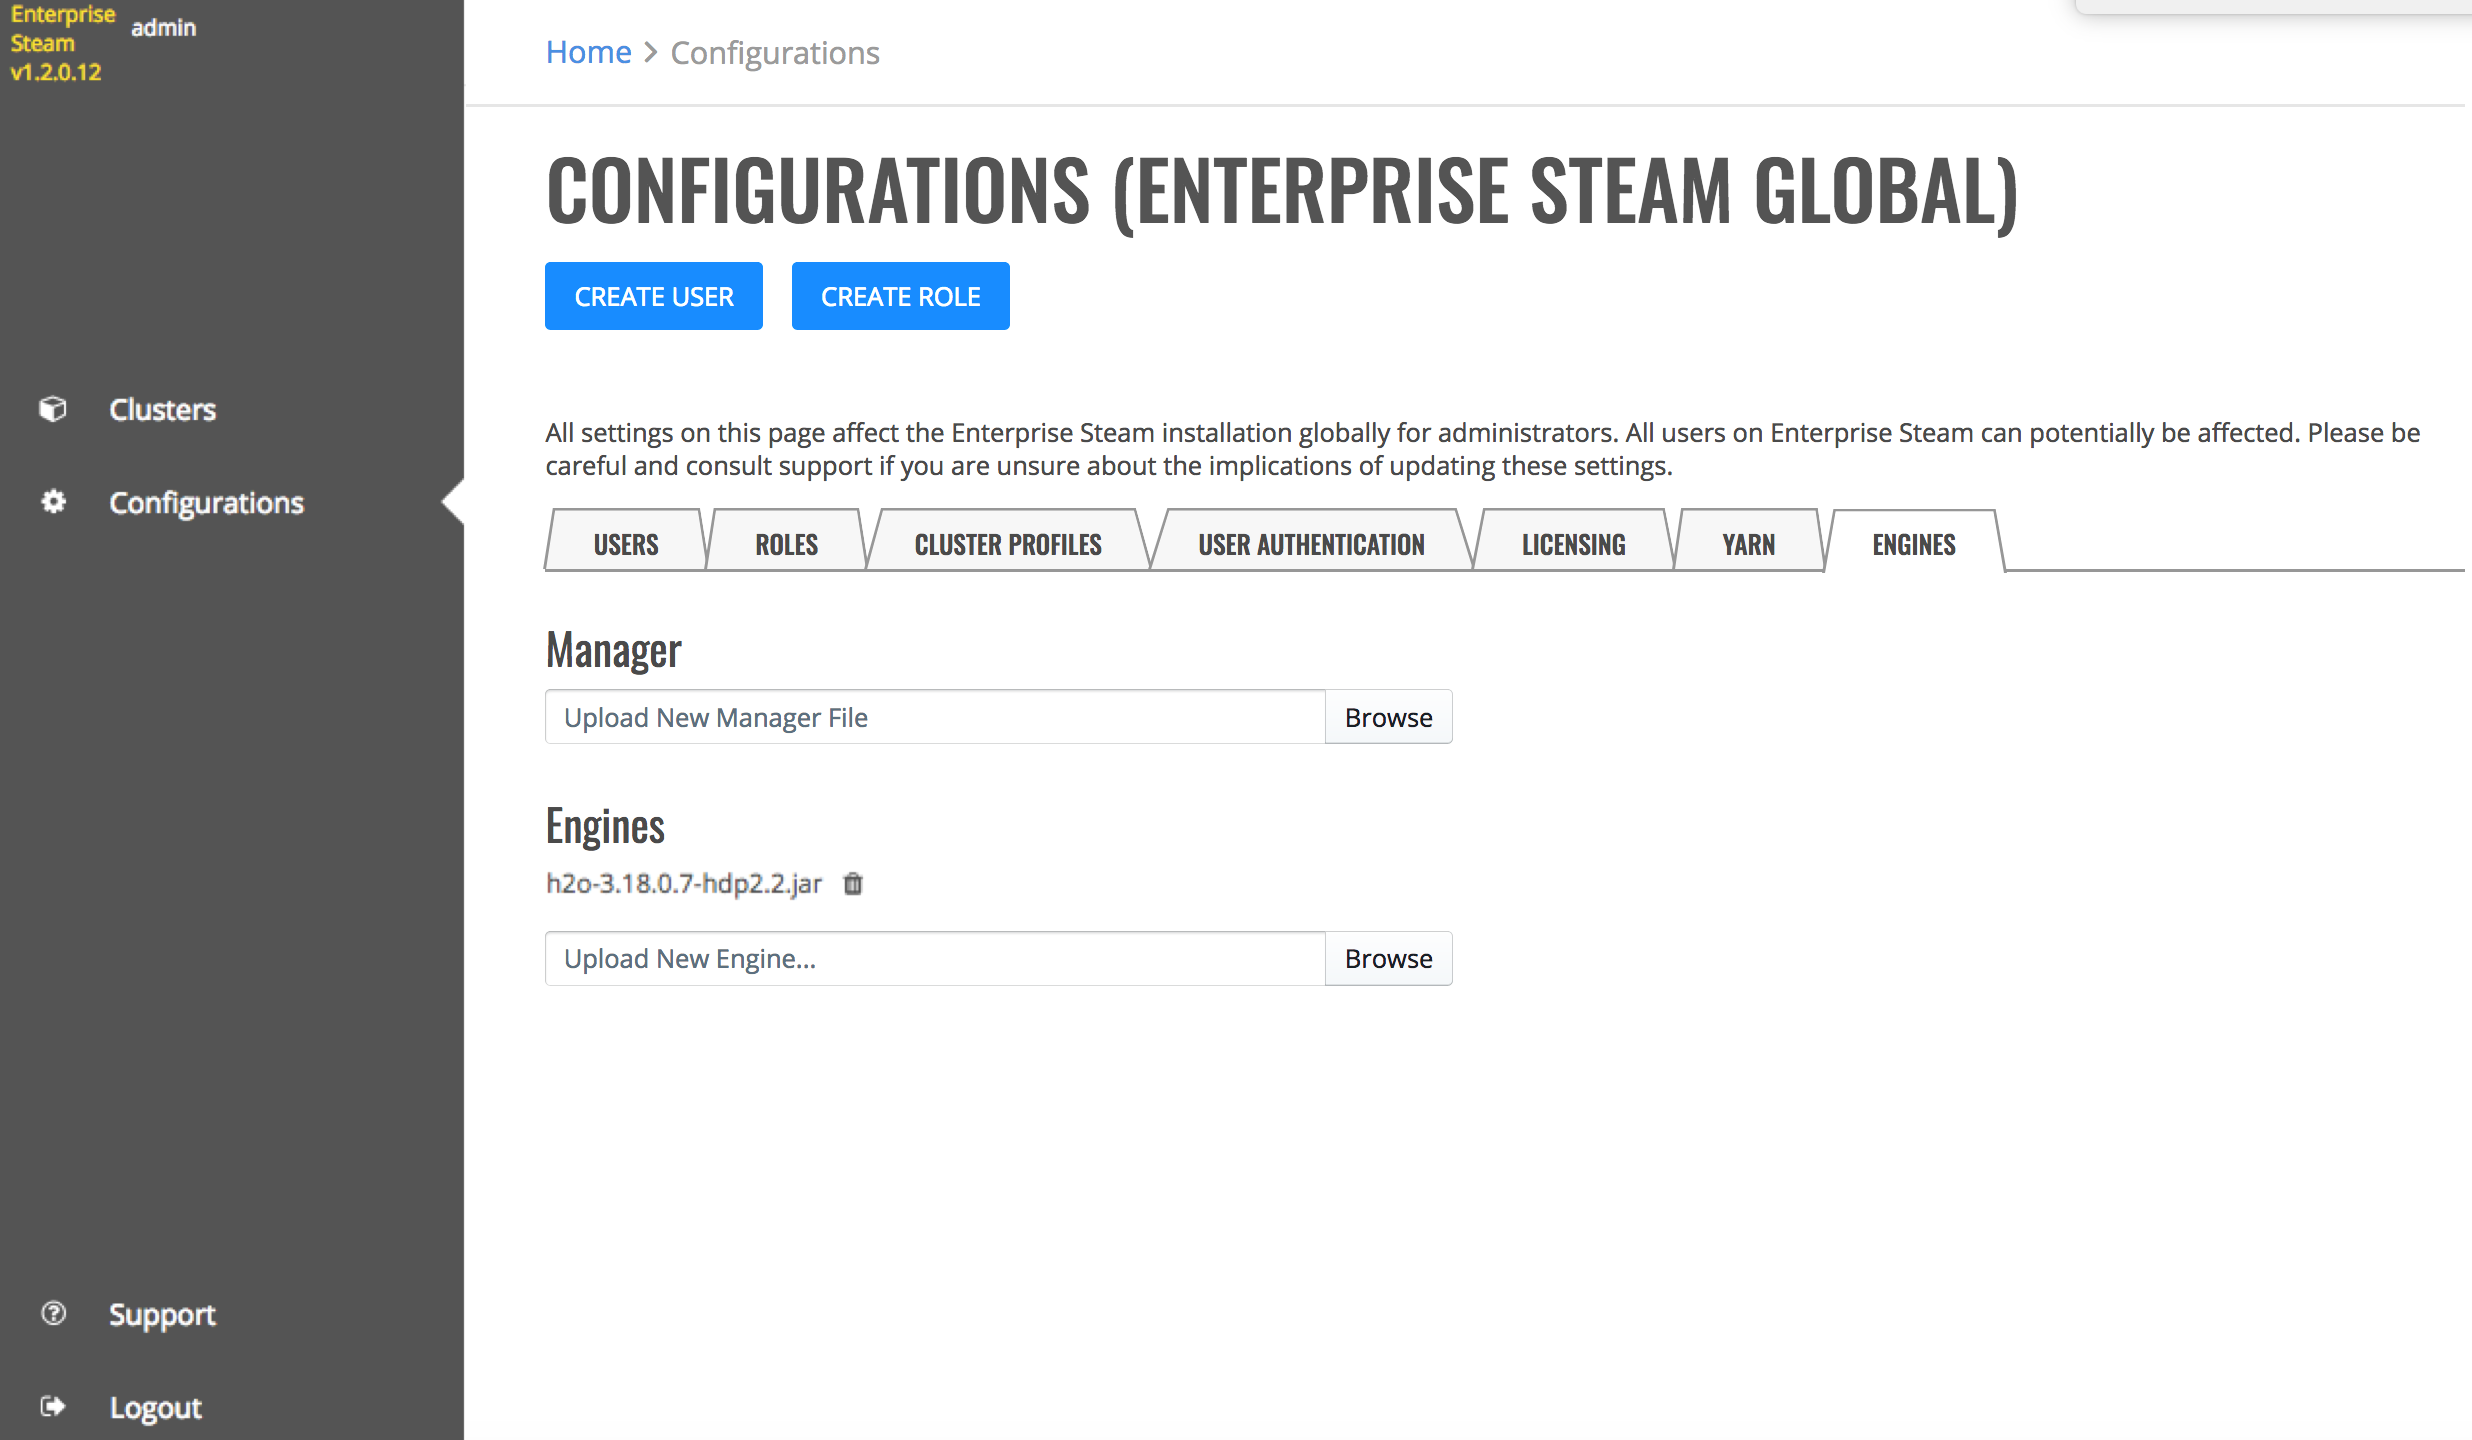
- Optionally upload a new manager file. This is the Steam Hadoop helper, which is used to prevent clusters from using impersonation. This can be deleted after being added.
- Browse to and select the h2o driver that you want to add.
Upon completion, the new driver will appear on this page and will be available in the Launch New Cluster > H2O Version dropdown menu.
You can delete drivers from this page by selecting the trashcan icon beside the driver that you want to remove.