Using BlocksCAD’s “Import STL file into Current Project” feature (see Figure 6.12) brings up special issues when transferring objects back and forth (and back and forth...) between BlocksCAD and the Polar Cloud. There is no issue when one-time transfer is all you care about. Section 6.1.2 discusses exporting BlocksCAD objects directly to the Polar Cloud; a resulting Polar Cloud object is complete in the Polar Cloud, regardless of whether it was created in BlocksCAD using any imported .stl files. Section 6.1.3 discusses using BlocksCAD’s “Import STL file into Current Project” feature to import an entire Polar Cloud object into BlocksCAD; this imports the Polar Cloud object as a single, manipulable “STL import” block in BlocksCAD.
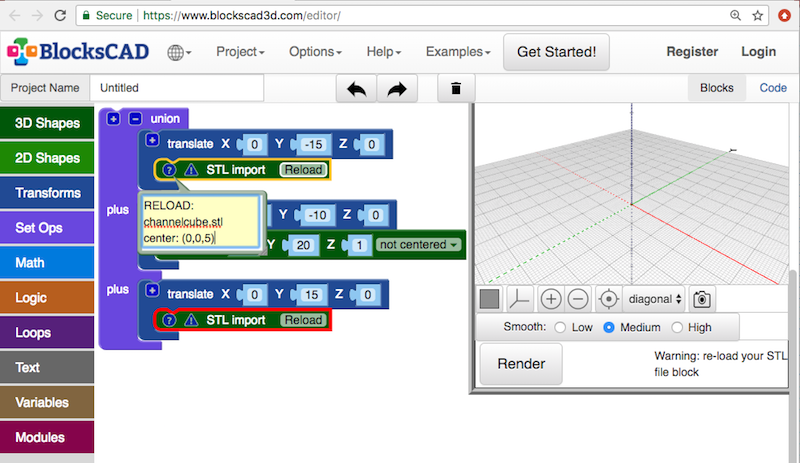
But be aware that BlocksCAD does not save imported .stl files along with its blocks; note the ! warning icon on any such BlocksCAD “STL import” block, as shown in Figure 6.20. This has implications for use of the BlocksCAD logo link on a Polar Cloud object (generated by direct export from BlocksCAD) to re-instantiate BlocksCAD object blocks.
Now when a BlocksCAD object that made use of one or more “STL import local-stl-filename ” blocks is exported directly to the Polar Cloud, the imported local .stl file content is included in the Polar Cloud object: the Polar Cloud object is complete-in-itself. However, clicking on the usual BlocksCAD-logo-link on that Polar Cloud object to return to BlocksCAD and load the original BlocksCAD blocks for the object will load the original BlocksCAD blocks, but it can’t do anything about installing the source files of any originally-imported-in-BlocksCAD .stl files, as BlocksCAD does not save those source files along with its blocks.8 Instead, the BlocksCAD blocks re-instantiated on the BlocksCAD design screen simply include generic “STL import” blocks (each with a comment regarding the name of the file originally imported, but no link to actual file contents). To re-construct the object in BlocksCAD, each such block will need to be individually told what underlying .stl file to import – and of course you’ll need a local copy (on the device from which you’re accessing BlocksCAD) of the .stl file in question. So you won’t be able to re-build the object in BlocksCAD unless you have access to copies of any such original.stl files.
As mentioned above (and discussed in detail in Section 6.1.3), the Polar Cloud version of the object, regardless of whether or not the object was originally created in BlocksCAD, can be downloaded as a complete-in-itself .stl file, and that entire .stl file can be imported into BlocksCAD (or other CAD packages) as a monolithic imported .stl block (or object). This general approach for any Polar Cloud object can also be used on an object originally created in BlocksCAD, but where some original .stl file components of the BlocksCAD object are not available.
But if, as a BlocksCAD object designer, you would like to be sure to retain the option to manipulate the details of the original BlocksCAD design blocks when re-instantiating the BlocksCAD object from the Polar Cloud version of your object, there is another alternative: also upload your original imported .stl files into the Polar Cloud object, to be saved there! This will allow you, or others to whom you share the Polar Cloud object, to download those files, as needed, when desiring to re-instantiate the object in BlocksCAD.
Therefore, when exporting a BlocksCAD object to the Polar Cloud, it is a good idea to also explicitly copy (upload) into your Polar Cloud object any such .stl files that you imported into BlocksCAD when creating the object, especially if you might sometime wish to share your object in the Polar Cloud. Then when re-instantiating the original BlocksCAD blocks, you can also download out of the Polar Cloud the original .stl files that some of those original BlocksCAD STL import blocks want to import.
To demonstrate, here is an example of exporting an object directly from BlocksCAD to the Polar Cloud and uploading into the Polar Cloud an underlying .stl file BlocksCAD used when creating the object.
Now, whenever you wish to use the Polar Cloud object ChannelCubesOnBase logo link back to BlocksCAD to “rebuild” the object in BlocksCAD, you can also obtain the necessary channelcube.stl file for BlocksCAD by downloading it out of the Polar Cloud:

8And you wouldn’t necessarily want BlocksCAD to automatically install on your local device files originating from other people’s arbitrary objects!