Step-By-Step instructions for using Redline Markup. Redline markup allows you to call-attention-to areas of a design. This feature is very useful for design reviews or when bringing attention to others about a particular region of a design is required.
![]()
l This Guide assumes that you have already imported a design into the workspace (see AutoLoad for quick loading).
To Start Redline Markup:
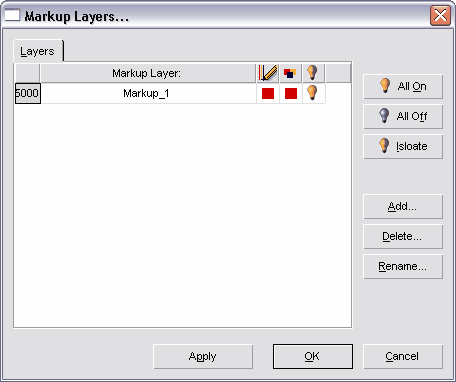
l Create a Markup layer. Go to menu: Markup | Markup Layers...
l Click the button 'Add...', and enter the layer name you want assign. In this example 'Markup_1' was used.

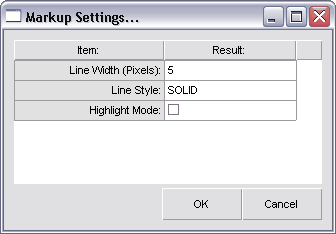
l Once you have created a markup layer, you are now ready to begin adding markup Objects to your design. However before we begin adding markup Objects, it is a good idea to review the settings that effect how these markup Objects will appear in our design. All markup settings are defined in the Markup Settings... dialog.
l To modify markup settings, go to menu item: Markup | Markup Settings...
l The markup settings dialog includes three options:
Line Width (Pixels) - The is the width that will be used (in current display pixels) for markup Objects: Line, Arrow, Rectangle, Ellipse, etc.
Line Style - Choose between Solid or Dashed lines. Markup Objects with a large line width will not be able to display the dashes properly, and it best used with 0-with markup Objects.
Highlight Mode - Allows the markup Objects to either be solid (Unchecked), or Highlighted-See Through (Checked).

l In this example we will be adding markup Objects: Ellipse, Arrow, and Text.
l The Markup Ellipse provides an excellent way to circle an entire area. To add, go to menu: Add | Redline Markup | Markup Ellipse, and select a corner on the outside of the area you want to circle, and then drag diagonally across to complete the ellipse.
l The Markup Arrow provides an excellent way to point to an area or markup Object. To add, go to menu: Add | Redline Markup | Markup Arrow, and select a start point on the outside of the area you want to circle. Then add any remaining points that you require. The starting point and next point will determine the direction of the arrow.
l The Markup Text provides an excellent way to give instruction or explain in detail the markup changes. To add, go to menu: Add | Redline Markup | Markup Text, and select a corner for the text box location, and drag diagonally across to complete the box. You will then be prompted to enter in the text, and text height (in Pixels)
l Note: Markup Objects do not always have to be red, and you can change their colors per layer in the Markup Layers dialog. Also you may create as many markup layers as you require, and the may be toggled On/Off (just as any other normal layer).
l Note: When Markup Objects are visible, they will be included on PDF Wizard & Image exports - this makes it easy to send your markups to anyone your require. Markups are also saved in the workspace, and may be transferred to other users as well.