|
Merge Jobs (Automatically) |
  
|
|
Merge Jobs (Automatically) |
|
Automatically Merge multiple jobs for fabrication. This Guide assumes that you have already created your jobs and imported data (ie. Gerber, DXF, etc) into each Job (see Merge Jobs for more information).
![]()
![]() Online Movie: Merge Different Gerber jobs onto one panel using FAB3000
Online Movie: Merge Different Gerber jobs onto one panel using FAB3000
![]() Note: You must have at least one job (with data) in the current workspace. This guide assumes that you have 3 jobs loaded into Fab3000 (see Merge Jobs for more information).
Note: You must have at least one job (with data) in the current workspace. This guide assumes that you have 3 jobs loaded into Fab3000 (see Merge Jobs for more information).
Creating a New Panel:
1. Goto Menu: File | New | Panel...
2. Select a name for the new Panel.
3. Verify the panel dimensions: Width, Height, Margins, and Units.
Once the new panel is created, you will see a blank Panel Editor screen, with a outlined box representing the panel area.
![]() Note: To modify the panel dimensions, goto the panel menu: Tools | Edit Panel...
Note: To modify the panel dimensions, goto the panel menu: Tools | Edit Panel...
Start Merge Wizard:
1. Goto menu: Tools | Merge Wizard...
The Panelize Wizard dialog will now be displayed.
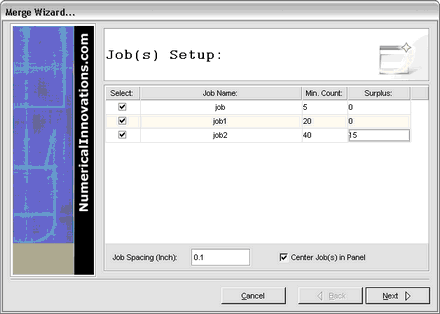
2. Check all the Jobs that you want to include in the panel merge.
3. Enter the Minimum Count (and surplus) for each job.
![]() Note: The last number is the surplus. After Fab3000 has included all the Minimum Count requirements, it will go back and look for empty spaces to add surplus jobs. If you enter "0" for the job surplus, then Fab3000 will not bother looking for extra empty spaces to insert the job.
Note: The last number is the surplus. After Fab3000 has included all the Minimum Count requirements, it will go back and look for empty spaces to add surplus jobs. If you enter "0" for the job surplus, then Fab3000 will not bother looking for extra empty spaces to insert the job.
4. Verify Job Setup options: Job Spacing, and Center in Panel. Click Next to proceed.
5. Press Button "Next" to proceed
![]() Note: If it is not physically possible to add all of the Jobs you specified in "Minimum Count", Fab3000 will warn you that the area required exceeds the area of the panel (thus a merge with those quantities is not possible).
Note: If it is not physically possible to add all of the Jobs you specified in "Minimum Count", Fab3000 will warn you that the area required exceeds the area of the panel (thus a merge with those quantities is not possible).
6. Choose the Options - such as score lines, etc.
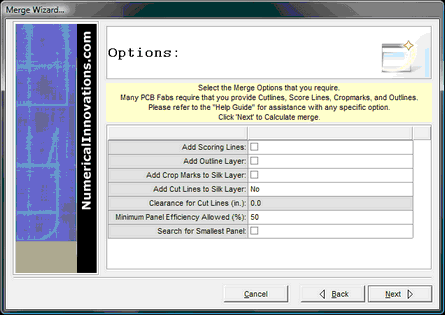
Add Scoring lines:
Scoring lines are 1/2 depth routed paths placed between jobs, so that each board may be easily snapped apart from the panel.
Add Outline layer:
The outline layer is use more as a reference guide where a new layer is created with all individual board outlines plus the panel outline.
Add Crop Marks to Silk Layer:
Crop marks are placed onto the silkscreen layer at the four corners of the final panel. Some board manufacturers may require crop marks.
Add Cut Lines to Silk Layer:
Cut lines are board outlines placed onto the silkscreen layer used to help guide you in cutting out the individual boards from the panel.
Clearance for cut lines:
Spacing of cut lines from true boarder edges.
7. Press Button "Next" to proceed
![]() Note: Fab3000 will instantly calculate the best possible fit for all required jobs. In some cases it may find more than one panel array, and it will allow you to select which panel array you prefer.
Note: Fab3000 will instantly calculate the best possible fit for all required jobs. In some cases it may find more than one panel array, and it will allow you to select which panel array you prefer.
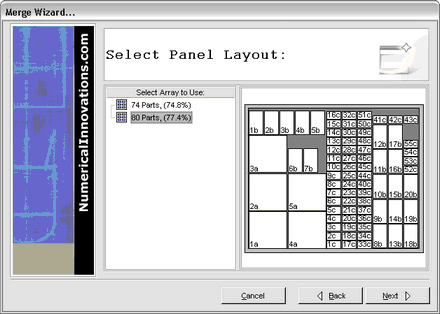
![]() Note: If you want to Add or Subtract the number of jobs (after looking at the proposed panel array, you can click button "Back" and reselect the number of jobs and options you wish to use.)
Note: If you want to Add or Subtract the number of jobs (after looking at the proposed panel array, you can click button "Back" and reselect the number of jobs and options you wish to use.)
(7) Press Button "Next" to begin the merge
(8) Press Button "Finish", and you will now see your jobs merged!
![]() Note: In most cases the final stage of merging jobs is to perform Synchronize Layers. Why? - Usually each job has a different layer name used to describe the same layer types (ie. "top02.pho", "topside.gbr", "art01.ger"). Before exporting, all layers of similar layer type must be synchronized into one layer for each type. (For more information see: Synchronize Layers ).
Note: In most cases the final stage of merging jobs is to perform Synchronize Layers. Why? - Usually each job has a different layer name used to describe the same layer types (ie. "top02.pho", "topside.gbr", "art01.ger"). Before exporting, all layers of similar layer type must be synchronized into one layer for each type. (For more information see: Synchronize Layers ).
Congratulations: You have successfully merged multiple jobs into one job, and potentially saved $$$ on PCB Fabrication costs. Simply export the merged data to Gerber/Drill, ODB++, etc! ( For more information on exporting, goto Gerber Export, Drill Export, ODB++ Export )
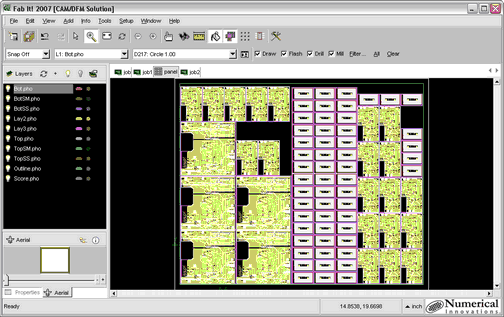
(Screen capture of Merged Jobs - inside Fab3000)