Items are the basis for all transactions. They can be inventory or non-inventory items, and they can be used to transact with services and other intangible trades. Products, which are always linked to an item, determine the planning mode, cost and other logistical attributes.
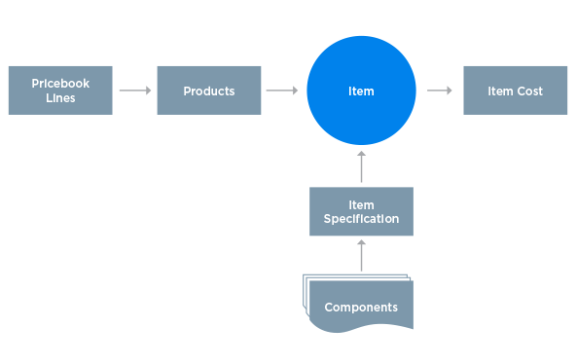
Products are the individual items or services that you sell — you can think of products as the price and items as the cost. After creating an item, you can create a product so that it can be added to a sales order, and you can create an item specification for items that you plan to manufacture.
The following illustration shows the structure:
Each item requires a company, a name, a source, and stocking and packing UOMs. However, as items drive many processes in Kenandy, it's recommended that you add as much information as possible in the item record.
Source: The item source controls the behavior of the item as it moves through various process flows. For example, the source is used to inform MRP, and it differentiates between manufactured, purchased, expense and build-to-order items.
A new item (header) is created and you can add inventory details to it. In addition to the inventory detail, you can enter planning or purchasing details, and you can also create an item specification and a product.
Note: You cannot add any item attributes to an item with its type set to Outside Processing.
You can add the License Plate Number (LPN) item attribute to container items only.
Use Lot Sizing: The primary purpose of lot sizing is to inflate the planned requirement to protect against unexpected shortages. If lot sizing is checked for the item but Safety stock, Shrinkage, EOQ, and the Order Multiple are all set to zero, it is equivalent to no lot sizing. If Use Lot Sizing is cleared, then the lot for lot technique is used.
 (Add New), enter a product name, the selling UOM, and then click
  (Save Changes).
 When you create a related configurable product, you can then add child products to this product on the agreement lines.
(Add New).For phantom item specifications, the facility must match the facility specified on any work orders that include the assembly. Without a matching facility, the BOM cannot be exploded.
The default date is today's date. If the item specification is for planning purposes, enter a start date that is in the future.
If the costing and production checkboxes are both selected, a production specification that tracks costs is generated.
The Item Specification page opens and you can add components and build out the BOM.
(Add New), enter the name of the Facility, and then click (Save Changes). By associating an item to a specific facility, you can maintain lot sizing information for MRP purposes for that item and facility
The Facility Item page opens and you can specify the safety stock, EOQ, Shrinkage and other lot sizing specifications. To learn more, see Facility Items .
The standard cost of an item can include material, labor, overhead, and outside processing. In addition to the standard cost, you can break down these cost categories for reporting purposes. For example, you can create an item type to track the cost of the packaging and the ingredients included in the material. When you run the assembly cost rollup, the cost of the item type cost is rolled up to a custom field. For information about setting up item types, talk to your system administrator.
Generate a cost rollup for an item type:
Items that have been used in transactions cannot be deleted, but you can make them inactive. For example, if you want to clean up your item list so that old items cannot be used on a purchase order, you can make the item inactive.
When the item is inactive, you cannot add it to a purchase order or work order. This is true for items that have been made inactive as well as for items that have not yet been activated.
Before making the item inactive, review the following checklists:
| Review | Action | |
|---|---|---|
| P | On-hand inventory |
Reduce on-hand inventory to zero at all locations and the following SKIDs:
To run the On-Hand Inventory by Facility report, go to Reports > Kenandy Materials Management. |
| ü | Open Sales Order Lines | If the item is on any open sales order lines, cancel the line. |
| ü | Open Purchase Order Lines | If the item is on any open purchase order lines, cancel the line. |
| ü | AP and AR invoices |
If the item is on any unfinalized AP and AR invoices, finalize the invoice. |
| Review | Action | |
|---|---|---|
| ü | Open Sales Order Lines | If the item is on any open sales order lines, cancel the line. |
| ü | Open Purchase Order Lines | If the item is on any open purchase order lines, cancel the line. |
| ü | Transfer Order Lines |
If the item is on any transfer order lines, cancel the line. |
| ü | AP and AR invoices |
If the item is on any unfinalized AP and AR invoices, finalize the invoice. |
When you build to order, manufacturing typically starts after you receive an order. You can specify the item source as Build To Order. When a work order is completed for a Build To Order item, the item is allocated to the sales order so that it can be picked and shipped.
Build To Order.When you release the sales order a work order is generated. The work order need date is based on the need date for the (build to order) sales order line.
When the work order is complete, the completed items are automatically allocated to the sales order line, and the items can be picked and shipped to the customer.
A kit is similar to a make to order product except that the components in a kit are mandatory, whereas a pick to order product is configurable. In a kit, the parent item is for invoicing purposes only, it is not a shippable item.
Kit. The parent (level zero) is the kit.
When you release the sales order, a shipment for the items in the kit is created.
When the shipment is confirmed, the items can be picked and shipped to the customer.
Container items can be cases, cartons, boxes, bags, barrels, pallets, or any other item that acts as packaging for other items.
To create a container item, follow these steps:
Kenandy creates the container item.
Go back to the Package Classes page and add Default Container Items to your package classes.
You can now add this container item to item specifications as components of items you manufacture.
For example, if this container item is a cardboard carton you use to package a tent you manufacture, add this container item as a component to the tent's item specification.
The following table lists the fields that Kenandy provides. Your system administrator selects the fields that are displayed on your user interface.
| Field | Description |
|---|---|
| Active |
An indication of whether the item is active. When the item is inactive, you cannot add it to a purchase order or a work order. This is true for items that have been made inactive as well as for items that have not yet been activated. Items that have been used in transactions cannot be deleted, but you can make them inactive. |
| Class |
A further definition of an item type. For example, in accounting, you can use the class to determine the subtransaction type and to assign the default accounting segment. |
| Company | The company for the item. |
| Container |
Select Container only if this item is a container item. Container items can be cases, cartons, pallets, barrels, or any other item that can act as packaging for another item. |
| Container Item | Choose a container item that will hold the item you're creating. |
| Description | Describe this item. |
| Extended Description | If you need to provide a long description of this item, use Extended Description to add to the information you entered in Description. |
| Fulfillment Source |
Choose one of the following:
|
| Item | The unique name for the item. |
| Source |
The source for the item. This field controls the behavior of the item as it moves through various process flows. For example, a Manufactured item informs MRP. |
| Field | Description |
|---|---|
| ABC Code |
The ABC code for the item This code is used for cycle counting. If you cycle count using the ABC method, you can identify the item as A, B, or C on the Item Detail page. To set up the intervals between cycle counts, go to the Company or Facility page. |
| Container Package Class |
Choose a package class for this item only if you're creating a container item. If you're creating any other kind of item, leave this field blank. |
| Dimension UOM | The dimension unit of measure for the item. This field is used in conjunction with one or more of the dimensions (length, height, width). This value specifies the unit of measure (for example, feet or inches). |
|
Last Cycle Count |
The last cycle count for the item. This field is populated after you complete a cycle count. The last cycle count date and the ABC code information are used to calculate the Next Cycle Count Date. To manage the ABC code information, go to the Company page. |
|
Next Cycle Count Date |
The date of the next cycle count. This date is based on last cycle count date plus the number of days corresponding to the ABC code. To manage the ABC code information, go to the Company page. |
| Item Attribute |
A further definition of the item. For example, items can be tracked by attribute, such as lot, expiration date, and minimum shelf life. If you choose to specify one or more of these attributes, you are prompted for that information when you receive the goods. |
|
Height Length Width |
The height, length, and width of the item. These fields are used to specify the dimensions of the item. |
|
Non-Inventory |
An indication of whether the item is not tracked as inventory. Non-inventory items are typically used for expense or miscellaneous items, but any item can be marked as non-inventory. For example, for One-Time Charge items, which are used on agreements, select the Non-Inventory checkbox. When you create an item with the source set to Miscellaneous or Expense, the Non-Inventory checkbox is automatically selected. This prevents item costs from being created for miscellaneous or expense items. |
| Packaging UOM |
Choose the packaging UOM you use for this item. |
| Stocking UOM |
The stocking unit of measure for the item. You can apply a stocking UOM to items that you keep in stock. For example, if you purchase in dozens (DZ) but stock in eaches (EA), you can set up a conversion UOM to automatically convert from dozens to eaches. Go to the UOM page to manage conversion factors. |
| Track Install Base |
An indication of whether the item has been installed at a customer site. The Install SKID identifies where the item was installed. To track items at a customer site, select this checkbox and the same checkbox on the Customer sold-to record. |
| Weight | The weight of the item. You can use the weight in conjunction with the Weight UOM to specify the weight of the selected item. |
| Weight UOM |
The weight unit of measure for the item. This field applies to manufactured items only. For example, if you purchase in dozens (DZ) but stock in eaches (EA), one UOM can be converted to another. The conversion factor information is stored on the UOM page. |
| Field | Description |
|---|---|
| Aggregation Days |
The aggregation days for the item. MRP uses this field. If Use Lot Sizing is selected, this value indicates the number of days over which MRP aggregates planned orders. MRP consolidates purchase order or work order lines by the number of days specified. For example, if there are two different demands for the same items on two consecutive days, two purchase order lines are created based on the planned orders. If Aggregation Days is set to 2 or more, these two lines are aggregated into one line. |
| EOQ | The economic order quantity (EOQ). This quantity is the optimum quantity to make or buy. EOQ is determined by optimizing the cost incurred to place each order with the carrying cost of holding these items in stock. |
| Item Type |
Select this option for items with Type = Outside Processing only. For all other item types, you must set this field to None before you make this item active. |
| Lead Time |
The number of manufacturing days needed to receive the item into inventory from the time it is ordered (for purchased or outsourced items). The total number of days needed to produce the item (for manufactured items). |
| Level | The first step in an MRP run. MRP generates the level. Items that are purchased (Buy) and outsourced are Level 0. |
| Ordering Multiple |
The ordering multiple for the item. MRP uses this field to plan orders. For example, if the order multiple is 25 and the actual demand is 70, then MRP recommends an order of 75. The calculation follows: if (OrderingMultiple > 0.0) { if (MRPQty > mth.round(MRPQty)) MRPQty = math.round(MRPQty) + 1.0; else MRPQty = math.round(MRPQty); During the purchase agreement release process, the quantity is verified to make sure it meets the order multiple and minimum order quantity requirements as specified on the item and item cross reference. |
| Safety Stock | The amount of stock over and above the forecast that provides a buffer for unanticipated needs. |
| Shrinkage |
The loss of inventory due to defective or unusable material; expressed as a percentage. MRP inflates the planned orders to cover shrinkage. The shrinkage calculation follows: if (Shrinkage > 0.0) MRPQty = (double)math.round((MRPQty / (100.0 - Shrinkage)) * 100.0) |
| Use Lot Sizing |
An indication of whether lot sizing applies to the item. The primary purpose of lot sizing is to inflate the planned requirement to protect against unexpected shortages. If lot sizing is checked for the item but Safety stock, Shrinkage, EOQ, and the Order Multiple are all set to zero, it is equivalent to no lot sizing. If the Use Lot Sizing checkbox is cleared, then all other inventory planning settings on the Item Planning tab are ignored and the lot of lot method is used. |
| Field | Description |
|---|---|
| Approved Supplier Required |
You can specify that items may be purchased only from an approved supplier. This applies to items with a fulfillment source of inventory. When checked, approval and release of purchase agreements or POs requires that the supplier named on the PA/PO match with a supplier defined on the item cross reference. When checked, Approved Supplier Required enables a validation check at time of release ensuring that the item on the line matches up with a supplier defined as an approved supplier. Approved suppliers are defined as item cross references on the item. POs or agreements for this item can't be released or approved unless the supplier and item cross reference don't match. When Approved Supplier Required is checked, you must set up an item cross reference for each approved supplier. The item cross reference defines approved suppliers for that item. |
| Buyer/Planner |
The principal buyer responsible for purchasing this item or the planner responsible for planning orders for the item. This field is required for purchased items that you plan for using MRP. |
| Purchasing UOM |
The purchasing unit of measure for the item. When items are received into inventory, if the purchasing UOM is not equal to the stocking UOM, then the conversion factor is used to convert purchased quantities to stocking quantities. The conversion factor information is stored on the UOM page. For drop-ship sales orders, the purchasing UOM on the item must be the same as the selling UOM on the product. |
| Supplier |
The supplier who provides the item. For purchased items, if there is no purchase agreement you must specify a supplier, otherwise MRP cannot generate a purchase order. |
| Fulfillment Source |
The fulfillment source for the item. Use the fulfillment source to differentiate between items that you keep in stock versus drop-ship or back-to-back items that your source from a third-party supplier. Options include:
When you set the item fulfillment source, items added to a sales order line trigger the creation of an appropriate sales order, purchase order or requisition. For example, if the item fulfillment source is drop-ship, a drop-ship order is created. |
| Non Shippable |
An indication of whether the item is not a shippable item. When you create an item the default setting is shippable. For items such as expenses or warranties, select the checkbox. |
| Configurable |
If you're using agreements, and you want bundle products, select this checkbox to make the item configurable. When you create a related configurable product, you can then add child products to this product on agreement lines. Otherwise, leave this checkbox blank. |
| Grid |
Displays item specification header details, which we cover in the Item Specifications topic. |
| Grid |
Displays the name of the facility and the facility item's source. |
_________________________________
To search the KnowledgeBase and documentation, ask a question, or log a case, please visit the Kenandy Community. To access our online training, visit the Kenandy Learning Center.
Version: Spring 2017