Reconcile your bank account to compare bank transactions at your bank to cash transactions in Kenandy to make sure that all transactions are accounted for and to determine your currently available cash.
The following diagram shows the tasks involved in completing a bank reconciliation.
![]()
The tasks involved in completing a bank reconciliation are detailed in the topics under this section. The primary tasks follow:
You can import bank transactions from Yodlee. You can also upload bank transactions from an Excel file. These bank transactions are stored in the Bank Transaction object. Each import action is limited to 10,000 bank transaction records.
You must create journal entries for miscellaneous bank transactions, such as bank fees and interest income. You can unmatch bank transactions if necessary.
Only matched and approved bank transactions are candidates for this reconciliation. This reconciliation populates the Reconciled As Of date field for each bank transaction, and creates a PDF bank reconciliation report. You can undo reconciliations if necessary.
Before users can complete a bank reconciliation, administrators must:
A cash manager must complete the following tasks:
To learn more about the cash manager's tasks, see Before You Reconcile a Bank Account in Kenandy.
Kenandy recommends that you import bank transactions from Yodlee into Kenandy because this import process is easier than other options. However, if using Yodlee is not an option for you, then you can upload bank transactions from an Excel file. To learn more, see Upload Bank Transactions From an Excel File Into Kenandy.
You import the bank transactions from Yodlee into Kenandy so that you can match the bank transactions to source documents and then reconcile the bank transactions to Kenandy cash transactions. Kenandy recommends that you frequently import bank transactions to keep your records up to date and reduce the transaction volume each time you import.
All imported bank transactions from Yodlee are displayed on the Bank Transactions page, and these bank transactions have a Yodlee value in the Source field and a reference in the Source Transaction ID field. Do not edit or delete bank transactions on the Bank Transaction detail page. You can also view imported bank transactions on the Manage Bank Transactions page after you search for them. After you match bank transactions to source documents and create journal entries for them, the matched documents are displayed with the associated bank transactions on the Manage Bank Transactions page.
All, and click Go!The Import Bank Transactions page is displayed.
The designated bank transactions are imported.
The designated bank transactions are imported.
Note: If the import includes too many bank transactions, an error message is displayed. Restrict the import records to a date range, and import again.
After you import bank transactions from Yodlee into Kenandy, you generate the accounting entries for the imported transactions. To learn more, see Generate Accounting Entries for Imported Bank Transactions.
The Manage Bank Transactions page is displayed. The Bank Account Details section of the page shows the name, currency, and GL account associated with the bank account.
To import the bank transactions that are not yet imported for a date range, click Actions, then select Import using Date Range, and in the Import Bank Transactions dialog box that is displayed, select a date in the From Date field and in the To Date field, and click Import using Date Range.
The designated bank transactions are imported.
The designated bank transactions are imported.
If the import includes too many bank transactions, an error message is displayed. Restrict the import records to a date range, and import again.
After you import bank transactions from Yodlee into Kenandy, you generate the accounting entries for the imported transactions. To learn more, see Generate Accounting Entries for Imported Bank Transactions.
To manage the setup to import bank transactions, you can update the login credentials for bank transaction import, and you can view the status of the Yodlee refresh.
When the login credentials to access the accounts at your financial institution change, you must update these credentials for the link between your financial institution and Yodlee. If you don't update these credentials, Yodlee is unable to obtain bank transactions from your financial institution, and no data is available for you to import into Kenandy.
Each night Yodlee automatically refreshes the data from linked financial institution accounts. Yodlee provides the status of this refresh in the Refresh Status field under the Site Links to Yodlee tab on the Manage Yodlee Account Links page. If you import bank transactions, but do not see the expected transactions, you can view the status of the Yodlee refresh to investigate the matter further.

The details about the refresh status for the financial institution account are updated.
If using Yodlee to import bank transactions is not an option for you, then the following options are available:
You upload the bank transactions from an Excel file into Kenandy so that you can match the bank transactions to source documents and then reconcile the bank transactions to Kenandy cash transactions. Kenandy recommends that you frequently upload bank transactions to keep your records up to date and reduce the transaction volume each time you upload.
You enter bank transaction data in the Excel template. Note the following information about using the template:
Do not include other worksheets in the file. The name of the Excel file is not important.
Data is case-sensitive. For example, enter Receipt (not receipt) for the bank statement code.
The following table provides information about some of the fields in the Excel template.
For the template used to upload from the Data Import page, you must include data in the following fields: Bank Account, Amount, and Transaction Date. For the template used to upload from the Bank Accounts page, you must include data in the following fields: Company, Amount, and Transaction Date. All other fields in the templates are optional.
| Field | Description |
|---|---|
| Name | The name of the bank transaction. Do not enter data in this field because Kenandy automatically populates this field. |
| Company | The name of your company. |
| Bank Account |
The name of the bank account. This name must be the same as the bank account name in Kenandy. |
| Amount | The amount of the bank transaction. This value must be in number format. Deposits must be positive values, and payments must be negative values. You can include a $ symbol if you want to. |
| Bank Statement Code | The action that the bank takes for the transaction. Values include: Payment, Receipt, Stopped, Rejected, and NSF. |
| Entry Type | The entry type for the bank transaction. A value of Credit applies to deposits, and a value of Debit applies to payments. |
| Memo | A note that you can enter for reference. |
| Reference Number | A reference or note for the bank transaction. |
| Transaction Date | The date that the bank transaction is posted to the bank account. Use mm/dd/yy format. |
| Type | The type of bank transaction. Values include: ACH, Check, Wire, EFT, Cash, Credit Card, and Online. |
You can upload bank transactions from the Excel template into Kenandy.
The procedure in this topic shows how to upload from the Import Data page. To upload from the Bank Account detail page, expand the Force.com Quick Access Menu on the left side of the page, select Import Data, click Launch Wizard, and then complete the steps in the wizard.
In the Monitor Jobs section, information about the status of the upload is displayed.
When the upload is complete, the bank transaction data is available on the Bank Transactions page, the Bank Transaction Groups page, and the Manage Bank Transactions page.
You might have to delete bank transaction groups that have no associated bank transactions.
After you upload bank transactions from an Excel file into Kenandy, you generate the accounting entries for the uploaded transactions. To learn more, see Generate Accounting Entries for Imported Bank Transactions.
After you import bank transactions, you generate accounting entries for the bank transactions.
A bank transaction group is automatically created for each bank transaction. You use the Bank Transaction Group object to set up accounting rules for bank transactions, so bank transaction groups determine the accounting entries for bank transactions.
All, and click Go!The accounting entries for the imported bank transactions are generated.
Disbursements are booked as a credit to the cash account for the bank account and a debit to the cash clearing account for the company. Deposits are booked as a debit to the cash account and a credit to the cash clearing account for the company. When you match bank transactions to source documents, the cash clearing amount for the bank transaction is matched to the cash clearing amount for the source document.
After you generate the accounting entries for imported bank transactions, you can match bank transactions with source documents. To learn more, see Match Bank Transactions to Source Documents.
You can automatically or manually match bank transactions to source documents. Kenandy recommends that you use the process to automatically match because it is faster and easier than the process to manually match. Then, you can manually match bank transactions that are not automatically matched.
You first search for bank transactions by a date range to automatically match the transactions to source documents. After the bank transactions from your search are displayed on the Manage Bank Transactions page, you can automatically match the bank transactions to source documents.
The process to automatically match bank transactions to source documents does not aggregate source documents to determine matches for bank transactions. For example, if you match by amount, a bank transaction for $100 might be associated with 5 potential source document matches. Each source document is for approximately $100, and not for $20.
The Manage Bank Transactions page is displayed. The Bank Account Details section of the page shows the name, currency, GL account, and most recent reconciled date for the bank account.
By default, the From Date field shows the date and time that you last reconciled the bank account. If you have not yet reconciled the bank account, the From Date field shows the date (plus one day) in the Opening Balance Date field of the bank account record. By default, the To Date field shows the current date. You can change the From Date and To Date fields.
To verify a bank statement balance, you can enter the date range for the bank statement in these fields. After you search for the bank transactions in Kenandy, the Ending Balance field in the Transactions and Statement Summary section must match the ending balance of the bank statement.
A list of bank transactions for the date range is displayed. Only bank transactions that are finalized and accounted are displayed in the search results.
The Transactions and Statement Summary section shows the following fields for the date range:
| Field | Description |
|---|---|
| Beginning Balance | The sum of all bank transactions reconciled up to (but not including) the From date. This value might be 0 if you have not yet reconciled any bank transactions. This value is calculated as follows: (Value in the Opening Balance field for the bank account) + (Value in the Balance Offset field for the bank account) + (Sum of all values for bank transactions that are before the From date in the date range). The beginning balance changes if you change the From date in the date range. |
| Deposits and Credits | The sum of bank transactions that apply to customer receipts and journal entry debits. This value is a positive number because it applies to bank credits, and not your GL account credits. |
| Payments and Debits | The sum of bank transactions that apply to supplier payments, intercompany payments, and journal entry credits. This value is a negative number because it applies to bank debits, and not your GL account debits. |
| Ending Balance | The sum of the beginning balance, credits, and debits. Compare this ending balance to the bank statement ending balance to ensure all bank transactions loaded correctly and are within the designated date range. |
You can sort and filter the details for each bank transaction. The following fields are displayed for each bank transaction:
| Field | Description |
|---|---|
| Status | The status of the bank transaction. Options include:
|
| Bank Transaction | The bank transaction number. Click the link to view details of the bank transaction on a separate page. |
| Type | The bank transaction type. Options include: ACH, Check, Wire, EFT, Cash, Credit Card, and Online. |
| Transaction Date | The date and time the bank transaction clears the bank. |
| Reference Number | A reference number for the bank transaction, such as the check number, if applicable. |
| Transacted With | The merchant, supplier, or customer name for the bank transaction. |
| Amount | The transaction amount that the bank receives or pays in the bank account currency. The bank might convert the original currency to the bank account currency. Customer receipts and journal entry line debits are displayed as positive amounts, and supplier payments, intercompany payments, and journal entry line credits are displayed as negative amounts. |
| Reconciled As Of Date | The date the bank transaction is reconciled. This field value is blank if the bank transaction is not yet reconciled. |
| Category | The Yodlee category for the bank transaction. This field is automatically populated when you import bank transactions from Yodlee into Kenandy. |
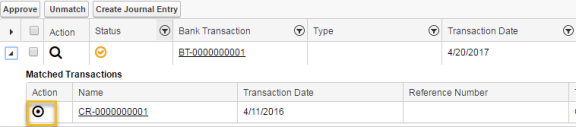
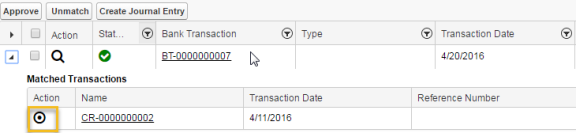
The displayed bank transactions are matched to the appropriate source documents.
For the displayed bank transactions that have a Status field value of Fully Matched (denoted by a green dot with a check mark in it) or Approved (denoted by a black check mark), you do not have to take any further matching action. These bank transactions are exactly matched to source documents.
For the displayed bank transactions that have a Status field value of Fully Unmatched (denoted by a red dot), you must take further action because the bank transactions are not matched to source documents. For displayed bank transactions that have a Status field value of Partially Matched (denoted by a yellow dot with a check mark in it), you must take further action because the bank transactions are potentially matched to source documents.
To learn more, see Manually Match Bank Transactions to Source Documents. Consider adjusting the match rules to include comparable source documents in the next automatic match.
For example, create a journal entry for bank interest or bank fees. To learn more, see Create a Journal Entry for a Bank Transaction.

The source documents that potentially match the bank transaction are displayed in the Matched Transactions panel. The following fields are displayed for each record in this panel:
| Field | Description |
|---|---|
| Name | The name of the source document. You can click the link in this field to view details about the source document on a separate page. |
| Transaction Date | The transaction date for the source document. |
| Reference Number | The reference number for the source document. |
| Transacted With | The merchant, supplier, or customer name for the source document. |
| Amount | The transaction amount for the source document. Customer receipts and journal entry line debits are displayed as positive amounts, and supplier payments, intercompany payments, and journal entry line credits are displayed as negative amounts. |
| Description | A description applicable to the source document. |
| Rule | The match rule that applies to the source document match to the bank transaction. This field is automatically populated when you automatically match bank transactions to source documents. |
When the selected source document is matched to the bank transaction, the other potential matches of that source document to additional bank transactions are deleted. Also, the other source documents that potentially match to the bank transaction are removed from the Matched Transactions panel.
For example, if the bank transaction amount is slightly less then the source document amount, you can write off the difference. To learn more, see Create a Journal Entry for a Bank Transaction.
After you match bank transactions to source documents, you approve the matched transactions. To learn more, see Approve Matched Bank Transactions.
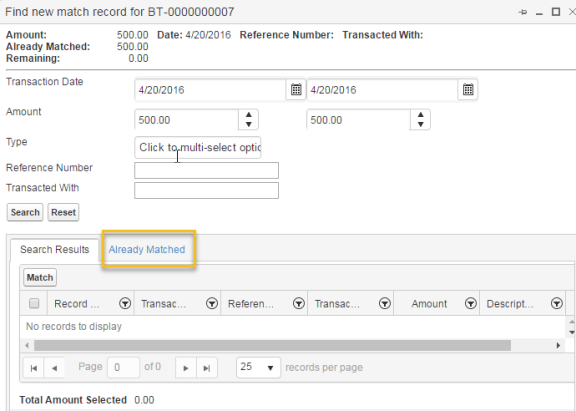
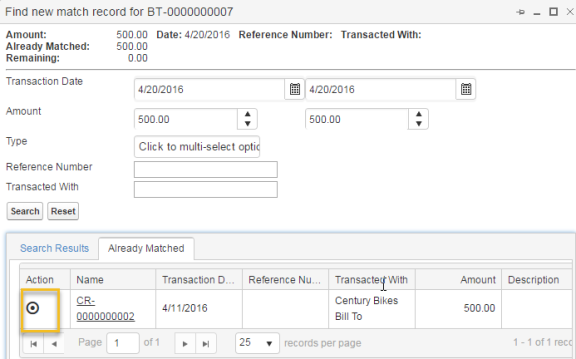
You can manually match the bank transactions to source documents. Bypass the first 3 steps of the procedure in this topic if you have already searched for bank transactions by a date range.
The Manage Bank Transactions page is displayed. The Bank Account Details section of the page shows the name, currency, GL account, and most recent reconciled date for the bank account.
By default, the From Date field shows the date and time that you last reconciled the bank account. If you have not yet reconciled the bank account, the From Date field shows the date (plus one day) in the Opening Balance Date field of the bank account record. By default, the To Date field shows the current date. You can change the From Date and To Date fields.
To verify a bank statement balance, you can enter the date range for the bank statement in these fields. After you search for the bank transactions in Kenandy, the Ending Balance field in the Transactions and Statement Summary section must match the ending balance of the bank statement.
A list of bank transactions for the date range are displayed. Only bank transactions that are finalized and accounted are displayed in the search results.
To learn more about the fields for the date range in the Transactions and Statement Summary section and about the fields that are displayed for each bank transaction, see the search step in Automatically Match Bank Transactions to Source Documents.
You can sort and filter the details for each bank transaction.

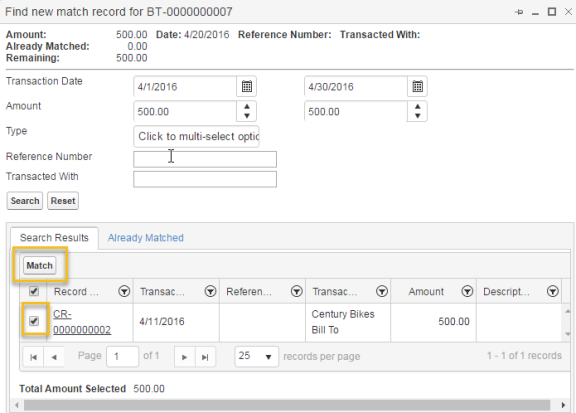
A dialog box for finding and matching source documents is displayed. You can resize this dialog box. The summary at the top of the dialog box shows the amount of the bank transaction, the amount for the source document matches applicable to the bank transaction, and the remaining amount.
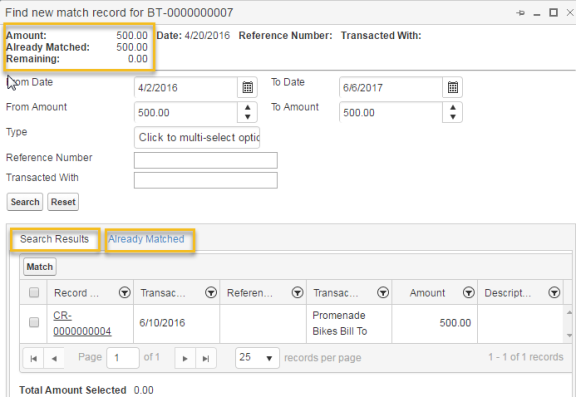
The Search Results tab shows unmatched source documents that might be valid matches for the bank transaction according to the search criteria, and the Already Matched tab shows matched source documents for the bank transaction. Only source documents that are accounted without exceptions are available to match. To lean more about fields that are displayed for each record in these tabs, see the step applicable to partially matched partial bank transactions in Automatically Match Bank Transactions to Source Documents.
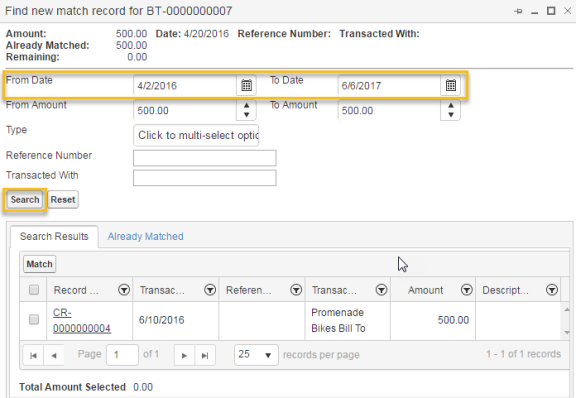
You can match multiple source documents to a bank transaction. Keep searching and matching until the remaining match amount is zero, and you have a complete match.
You can click Reset to clear the search criteria, and then enter new criteria.
On the Manage Bank Transactions page, the status of the bank transaction is Fully Matched or Partially Matched.
If the amount for bank transaction and the source document do not exactly match, then create a journal entry for the difference.
For example, if the bank transaction amount is slightly less then the source document amount, you can write off the difference. To learn more, see Create a Journal Entry for a Bank Transaction.
After you match bank transactions to source documents, you approve the matched transactions. To learn more, see Approve Matched Bank Transactions.
When you manually or automatically match a source document to a bank transaction, the Transacted With field value on the source document might not exactly match the name stored in Kenandy for the supplier on a supplier payment, for the customer on a customer receipt, or for the company on an intercompany transaction. For example, the Transacted With field value is Acme, USA on a customer receipt, but the supplier name is Acme on the customer record in Kenandy. In this example, when you match the customer receipt to the bank transaction, the Acme USA value is automatically added to the Aliases field of the Acme customer record.
In subsequent match queries, both the Acme name and the Acme, USA name are used to determine source documents to match to bank transactions. In this example, if you unmatch the customer receipt from the bank transaction, the Acme, USA value is not automatically deleted from the Aliases field of the customer record. However, you can manually delete the values in the Aliases field.
If the Aliases field has no space for additional names when a source document is matched to a bank transaction, you receive an error message indicating that you can change or delete data in this field that is less relevant for bank transaction matching.
You can easily create a journal entry for bank transactions in the following situations:
If you use the Journal Entry page, and not the Manage Transactions page, to create a journal entry for a bank account, make sure that you populate the Bank Account field for the journal entry line applicable to the cash clearing account. Otherwise, the journal entry amount is not automatically included in your bank reconciliation. Examples of such journal entries include journal entries for payroll disbursements and credit card payments.
If you select multiple bank transactions, a journal entry line is created for each bank transaction.
The Journal Entry dialog box is displayed.
After you match bank transactions to source documents, you can approve these matches. To approve a matched bank transaction, the amount of the source document matches must equal the bank transaction amount.
You can select only bank transactions that have a status of Fully Matched.
Check marks in the Status column indicate the matches are approved.
After you approve matched bank transactions, you reconcile the approved transactions. To learn more, see Reconcile Approved Bank Transactions.
Before you reconcile approved bank transactions to Kenandy cash transactions, make sure that these bank transactions are fully matched, approved, and associated with accounting entries that do not have exceptions (on the accounting entries or on their lines).
After you complete the bank reconciliations for all of your bank accounts, the cash clearing account balance always represents the deposits and disbursements that have not yet cleared your bank accounts as of the ending date of your reconciliations. The cash clearing account balance combined with the cash account balances for your bank accounts represents your currently available cash.
The Reconciliation Summary dialog box is displayed. You can resize this dialog box. This dialog box includes the following fields:
| Field | Description |
|---|---|
| A Reconciled Bank Balance | The sum of the bank transactions that were previously reconciled as of the end date in the date range. |
| B Matched and Approved | The sum of matched and approved bank transactions not yet reconciled for the date range. Click the drop-down arrow to display these bank transactions. |
| C Unmatched / Unapproved | The sum of unmatched and unapproved bank transactions in the date range. Click the drop-down arrow to display these bank transactions. You cannot reconcile unless the Unmatched / Unapproved balance and Difference balance are zero. If they are not zero, close this dialog box and match bank transactions. |
| D Calculated Bank Ending Balance (A+B+C) | The bank ending balance as of the end date in the date range. This value is the sum of A, B, and C. |
| E Additions not yet cleared | The balance of additions (customer receipts and journal entry debits) that are not matched to bank transactions in the date range. These additions apply to the GL account that is associated with the bank account. Click the drop-down arrow to display the bank transaction details. You can match these bank transactions in a later period when you import bank transactions for a new date range. |
| F Deductions not yet cleared | The balance of deductions (supplier payments, intercompany payments, and journal entry credits) that are not matched to bank transactions in the date range. These deductions apply to the GL account that is associated with the bank account. Click the drop-down arrow to display the bank transaction details. You can match these bank transactions in a later period when you import bank transactions for a new date range. |
| G Calculated GL Balance (D+E+F) | The calculated balance of the GL account associated with the bank account in the date range. This value is the sum of D, E, and F. |
| H Actual GL Bank Balance | The actual balance of the GL account associated with the bank account as of the end date. |
| I Difference (G-H) | The difference between the calculated GL balance and the actual GL bank balance. You cannot reconcile unless the Unmatched / Unapproved balance and Difference balance are zero. If they are not zero, close this dialog box and match bank transactions. |
| Notes | Notes about the reconciliation, if applicable. |
Note: The Reconciliation Summary dialog box times out if you don't click Reconcile within 3 minutes. This feature avoids risking changes to source documents or bank transactions that are part of your reconciliation when you leave the Reconciliation Summary dialog box open.
A PDF of the reconciliation summary for the bank account and report date is automatically generated. A link to the PDF is displayed in the Notes and Attachments section of the Bank Account detail page.
To learn more about unfinalizing, cancelling, and voiding bank transactions, see Unfinalizing, Cancelling, and Voiding Source Documents.
When you unfinalize, cancel, or void a bank transaction, the bank transaction state in the bank reconciliation process determines the warning that is displayed and the resulting processing that occurs. Likewise, when you unfinalize, cancel, or void a source document (customer receipt, supplier payment, intercompany payment, or journal entry) that is associated with a bank transaction, the bank transaction state in this process determines the warning that is displayed and the resulting processing that occurs. The following table shows the warning and resulting processing for bank transaction states:
| Bank Transaction State | Warning and Resulting Processing |
|---|---|
| Partial or full matches not yet approved |
The following warning is displayed: Existing bank transaction matches will be deleted. Click OK to delete the match. |
| Approved matches |
The following warning is displayed: Existing approved bank transaction matches will be deleted. Click OK to delete the match and to clear the Match Approved field for the bank transaction. |
| Reconciled matches |
The following warning is displayed: Existing bank transaction matches have been approved and reconciled. If you proceed, all matches will be deleted and transaction will be unreconciled. Click OK to delete the match and to clear the Match Approved field and the Reconciled As Of Date field for the bank transaction. |
This topic provides some troubleshooting information for bank reconciliations.
After you match a bank transaction to source documents, you can reverse (or unmatch) this match if this it is a mistake. You can then match the bank transaction to other source documents.
Complete the following procedure to unmatch the source documents for multiple bank transactions.
Bank transactions that are manually or automatically matched to source documents are unmatched.
Complete the following procedure to unmatch the source documents for a single bank transaction.

The source document that matches the bank transaction is displayed in the Matched Transactions panel.
Alternatively, you can complete the following procedure to unmatch the source documents for a single transaction.

When you unmatch a bank transaction, the bank transaction state in the bank reconciliation process determines the warning that is displayed and the resulting processing that occurs. The following table shows the warning and resulting processing for bank transaction states:
| Bank Transaction State | Warning and Resulting Processing |
|---|---|
| Partial or full matches not yet approved |
You can unmatch the bank transaction without receiving a warning. Click OK at the confirmation message. |
| Approved matches |
The following warning is displayed: Existing matches will be deleted, regardless of whether they have been approved. If any have been reconciled, they will be unreconciled. Click OK to delete the match and to clear the Match Approved field for the bank transaction and, if necessary, the Reconciled As Of Date field for the bank transaction. |
| Reconciled matches |
The following warning is displayed: Existing matches will be deleted, regardless of whether they have been approved. If any have been reconciled, they will be unreconciled. Click OK to delete the match and to clear the Match Approved field for the bank transaction and, if necessary, the Reconciled As Of Date field for the bank transaction. |
You can reverse your bank transaction reconciliation and start again.
The Unreconcile Bank Transactions page is displayed. This page displays the most recent reconciled date.
The following message is displayed: All bank transactions associated with reconciliation as of [DATE] will no longer show as reconciled.
You can also click Go Back if you don't want to proceed with reversing the reconciliation.
If you click OK, the date is removed from the Reconciled As Of Date field for all bank transactions for which the reconciled as of date is equal to the most recent reconciliation date. The following message is displayed: You have successfully unreconciled transactions that were previously reconciled as of [DATE].
After you complete a bank reconciliation, if you find that a bank transaction in the reconciliation is matched to an incorrect source document, then complete the following tasks:
In the Kenandy bank reconciliation process, you can match a single bank transaction to a source document. This topic explains the actions to take in an example scenario in which you want to match multiple bank transactions to a source document.
In this example scenario, a payroll service divides a $10,000 payroll amount for a source document into 3 bank transactions of $7,000 for salaries and wages, $2,000 for taxes payable, and $1,000 for bonuses. You can complete either of the following actions:
DR Salaries and Wages $7,000
CR Cash Clearing $7,000
DR Taxes Payable $2,000
CR Cash Clearing $2,000
DR Bonuses $1,000
CR Cash Clearing $1,000
Be sure to designate the bank account for each cash clearing entry. When you match bank transactions to source documents in the bank reconciliation process, match each bank transaction to its corresponding journal entry line.
Kenandy recommends that you clear original source documents and their associated reversal documents if you created reversal documents instead of voiding the original source documents. (Fro example, instead of voiding a journal entry for a funds transfer, you create a new journal entry to reverse the debits and credits.)
You can eliminate these unmatched and unneeded entries by completing the following steps:
For audit purposes, select Manual in the Source field, and enter the purpose of the transaction in the Memo field (for example, "To match voided entries").
You can use a single $0 bank transaction to clear all original source documents and their associated reversal source documents even through these documents have various dates.
Completing this task does not affect the calculations for bank reconciliations. This task only removes entries from unmatched lists in the reconciliations. You don't have to complete this task for voided source documents because the original and voided documents are excluded from unmatched lists.
When a source document, such as a supplier payment, is associated with an incorrect bank account, Kenandy recommends that you void the source document, and create a new source document with the correct bank account. A second less-than-optimal choice is to create a journal entry to transfer the payment from the incorrect bank account to the correct bank account.
_________________________________
To search the KnowledgeBase and documentation, ask a question, or log a case, please visit the Kenandy Community. To access our online training, visit the Kenandy Learning Center.
Version: Spring 2017


