
Let’s break it down. Start at the firebox edge. Measure the usable width and the depth from the wall to a safe stop. Measure vertical clearance to mantels, sills, and switches. Note baseboards, outlets, and floor vents that steal inches. Record door swings and any step-downs or thresholds between the exterior entry, the staging area, and the hearth. Most splits run about 16 inches long. Confirm your rack depth supports that length without tipping. Next steps: plan for 24 to 48 hours of burn time, then check if that fits the footprint. Elevate your decor with a stylish indoor firewood rack that complements your fireplace perfectly.. Foldable frames often lose depth to bracing. Tool-stand combos give up log space to the caddy.
Sketch the path from the exterior door to the fire and from seating to the fire. Keep 30 to 36 inches of clear passage so the rack does not block movement. Wheeled carts need turning room. Keep your logs tidy with a durable indoor firewood rack designed for easy winter access.. Add a few inches for handle swing. Here is why: tight spots cause snags. If a rack narrows a junction, choose a taller, narrower profile or move it.
Let’s break it down: stay outside the manufacturer’s side and front clearances for the appliance. Do not park any rack where ambient heat bakes finishes or over-dries wood. Leave a spark gap in front of open fireplaces, or use a screen and place the rack to the side. Check local code for hearth extension requirements.
Chair rails, window stools, baseboard heaters, and newel posts can keep a rack from sitting flush. Confirm height under sills and sconces if you want a tall tower. Caster diameter matters at thresholds; small wheels hang up. Foldable feet and tool hooks can hit baseboards and outlets.
Match the rack to the opening. A width around 40 to 70 percent of the firebox usually looks right. Big stone surround? Tall towers feel intentional. Small insert? A low, wider rack avoids a top-heavy look. Next steps: bigger footprints and carts cost more, so buy only the capacity you will actually cycle near the hearth.
Foldable racks often look compact on paper, but their folded thickness plus hinge hardware can add unexpected inches. Measure ceiling and wall clearance for the fold path, not just the stowed footprint. Remember accessories like hooks or shelves that protrude and can snag nearby objects. Account for floor slope, which can tilt the rack and increase required clearance.
On wheeled racks, the published width rarely includes handle grips, foot brakes, or wheel axle caps that widen the roll path. Caster diameter affects overall height and can shift shelf-to-ceiling spacing under load. Check turning radius with the longest expected load, not just the empty frame. Verify threshold and ramp clearance so casters don’t bottom out when fully stocked.
Tool-stand racks can be undermined by platforms that are smaller than the tool’s true operating envelope. Measure overhang with guards, knobs, and cord wraps installed, and confirm the center of mass stays within the base. Mounting-hole patterns may not align, forcing adapters that change height and reach. Leave feed and outfeed space so workpieces don’t collide with nearby walls.
Start with what you actually burn. Let’s break it down. Choose the perfect firewood rack from our collection to upgrade your hearth instantly.. Typical living room fires use about 0.5 to 1.5 cubic feet of solid wood per hour, depending on intensity and species. For ambiance, plan on 2 to 4 standard splits per hour. For main heat, 4 to 6 splits per hour. Multiply by your usual evening hours to set a nightly target.
Most indoor racks fit 14 to 18 inch log length and 3 to 5 inch thick splits. Here is why: oversize splits waste space with big air gaps and may overhang shallow shelves. If your supplier cuts 16 inch standard, pick racks with at least 17 to 18 inches of internal length. Watch for side rails or wheel frames that steal usable inches.
Decide how often you want to haul wood in. Daily refills allow a smaller rack. Refilling every 2 to 3 days needs a larger footprint or a tall tower. If you burn 12 to 18 splits per evening on weekends, plan for 36 to 60 splits on hand to cover three nights. Anchor tall tool-stand styles or park them against a wall when loaded.
Seasoned oak and hickory weigh far more than softwood at the same volume, so check weight ratings, not just volume. Lightweight foldables can sag or tweak if fully loaded with dense hardwood. Wheeled racks need casters rated for the whole load, and rolling over rugs or thresholds adds stress.
Let’s do the math. Estimate split count by multiplying interior width by height by depth in inches, then divide by 350 to 450 to account for stacking gaps. Example: a 24 by 30 by 12 inch cubby is 8640 cubic inches. 8640 divided by 400 is about 22 splits, roughly 1 to 2 evenings.
Watch out for these. Buying by exterior size instead of interior. Curved or angled sides that cut usable width. Depth too shallow for your split thickness. Ignoring tool sets, kindling buckets, or a carry basket that also eat floor space. Overloading foldables. Small wheels that dent floors or snag grout lines. Next steps: measure your splits, confirm interior space, and match the rack to your refill plan.
Foldable racks fit seasonal homes and tight rooms. They set up fast and tuck into a closet when the stove sits idle. Plan for 24 to 48 hours by the hearth so the footprint stays small. Skip wheeled or tool-stand frames unless you need longer gaps between loads.
Many foldables use scissor legs and narrow feet. Here is why. As the stack grows, the center of gravity moves forward. Rounded front bars let the top layer slide, which invites overhang and tipping if bumped. Keep the top layer an inch behind the front rail, and nudge the rack to check for rock.
Thin hinges and simple snap latches can flex under shifting loads. Loose joints cause racking and wobble, so you stop short of the top rail. That cuts usable height and capacity, especially with kids or pets around. Next steps. Choose locking cross-braces, captive pins, and rubber feet that keep the rack planted.
Ads often claim 150 to 200 pounds based on an even, static load. Let's break it down. Real use adds side pushes while you place splits and point loads on lower bars. With dense hardwood, subtract 25 to 40 percent if you plan to stack near the top. If you hear creaks or see bowing, you are past practical limits.
Most foldable frames measure 10 to 12 inches deep. With 16-inch splits, use a single row with a slight lean to the back. Skip two rows unless the interior depth is 14 to 16 inches and you have retainer lips to stop rolling. Next steps. On round bars, add textured pads or a back rail to curb creep and front overhang.
Larger wheels roll over rugs, grout lines, and thresholds with less force. Here is why: small 2–3 in casters look compact on a spec sheet but snag on rug edges and tile joints. On hardwood floors, choose soft-tread polyurethane or rubber to limit dents and black marks. If you cross a deck or patio before coming inside, pick 6 in or larger wheels.
Measure the tightest opening on your route, not just the front door. Trim cuts the clear width, and wheel hubs often stick out past the basket. Many carts measure 18–22 in hub-to-hub, often wider than older interior doors or tight turns. If you must angle the cart to pass through, the usable log length drops because the basket sits diagonally.
High baskets stack weight above the axle. Hit a threshold and the load wants to pitch forward. A low, deep basket that keeps wood below the axle centerline stays more stable. Forward bumpers protect walls and door trim when you misjudge a stop.
Let’s break it down. Count every transition: porch lip, mudroom step, hearth ledge. A cart that glides on tile may stall on gravel or a slatted deck. Next steps: on uneven surfaces, use pneumatic or semi-pneumatic wheels and a reinforced axle.
Plan where it sits between runs. Leave room for the handle and a straight pull-out. Add a drip tray so meltwater and bark don't stain floors. Brakes or wheel chocks keep it from creeping on smooth surfaces.
Metal-on-metal rattles grow as joints wear. Rubber-coated baskets and lined cradles cut noise and protect finishes. Add corner guards if it parks beside painted plaster or shiplap.
Let’s break it down. Combo racks that hold a poker, tongs, shovel, and brush save steps, but tool bars eat prime stacking space. Plan on losing 3 to 6 inches of interior width or depth. That can cut capacity by 20 to 30 percent. You make more trips to the woodpile and end up with a larger footprint than planned. Measure the clear opening inside the uprights and in front of the tools, not just the overall size on the spec sheet.
Here is why. Side hooks and top shelves catch sleeves and bump splits while you load. Most people stack lower, and real capacity drops. Short-handled tools can hang into the bay and push pieces forward. If you buy this style, set hook height so tools stop above the top course of wood.
Let’s break it down. Many combo racks list an overall width of 20 to 24 inches, but the tool caddy can pinch the bay to 12 to 16 inches. If your splits average 16 inches, a 12 inch bay forces diagonal stacking and wastes space. Compare interior width and depth to your typical split length. Leave at least 1 inch of clearance past the split length for clean loading.
Here is why. Solid steel tool sets shift weight to the tool side. If you push from the opposite side, the rack can yaw, worse on slick floors or on sled feet with low friction pads. Wheeled frames can crab or feel tippy when turning. Load heavier rounds on the tool side and add grippy pads or a hearth rug.
Next steps. Choose a combo in small rooms where a separate stand would take another square foot, or when you want one unified look. Pick designs with tools hanging in front of or behind the bay to preserve width. For foldable or lightweight frames, choose aluminum or hollow tools to reduce imbalance.
Let’s break it down. A slim wall-mounted tool rail above the hearth frees the rack to hold only wood. You can go narrower or taller without interference. Or use a compact floor stand beside the surround to keep a full-width bay and clean stacking.
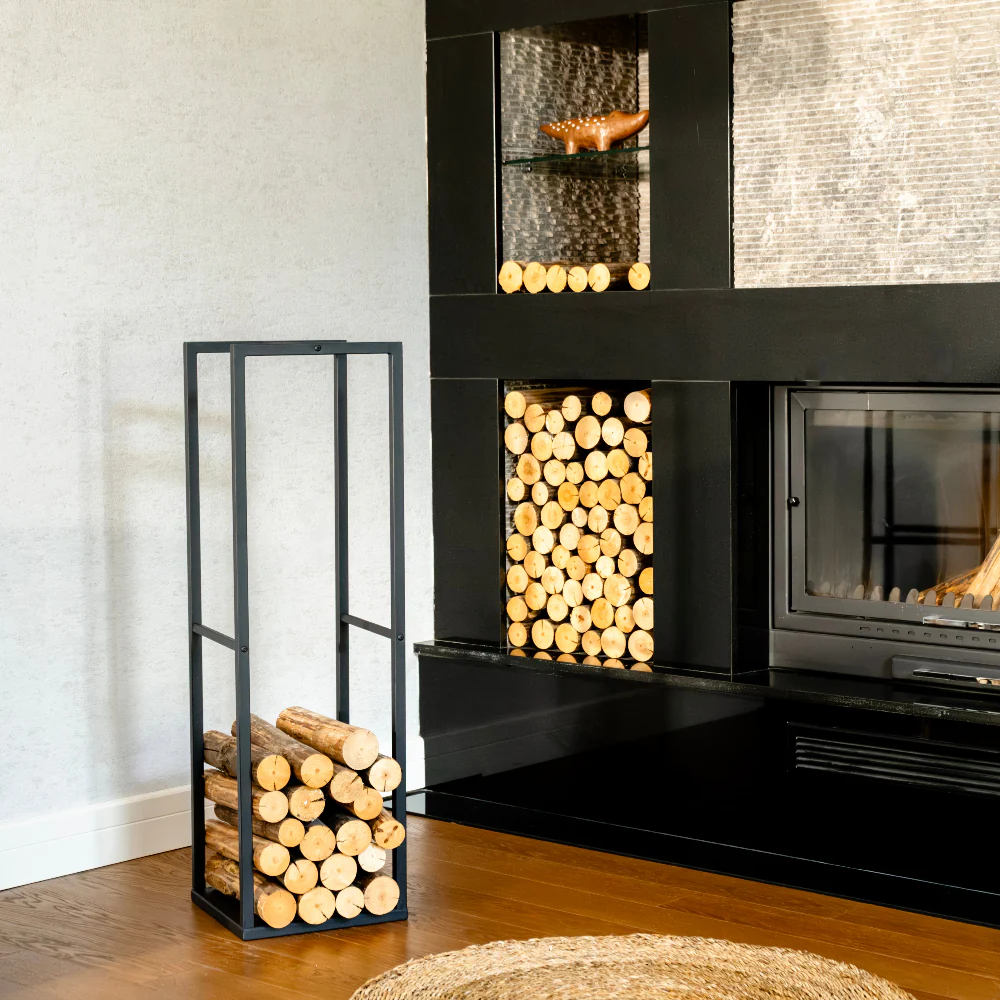
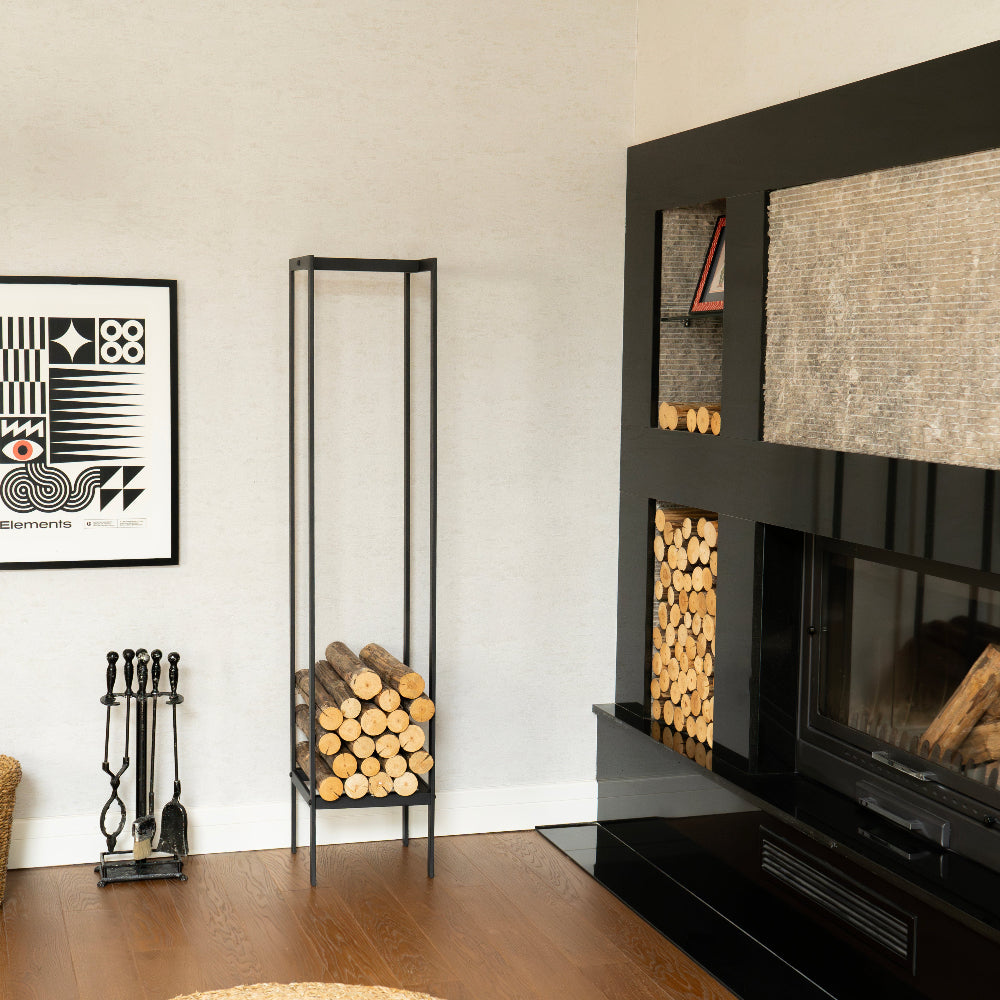
Tall, narrow racks save floor space. They also add visual weight and can feel top heavy. Let’s break it down. Many towers run 12 to 16 inches deep and fit 16 inch splits. Measure to the nearest light, sconce, mantel, and art before you buy. If the maker allows, add wall anchors to cut tip risk. Hardwood averages 40 to 55 pounds per cubic foot, so a full tower can top 200 pounds. Do not stack above shoulder height if kids are around.
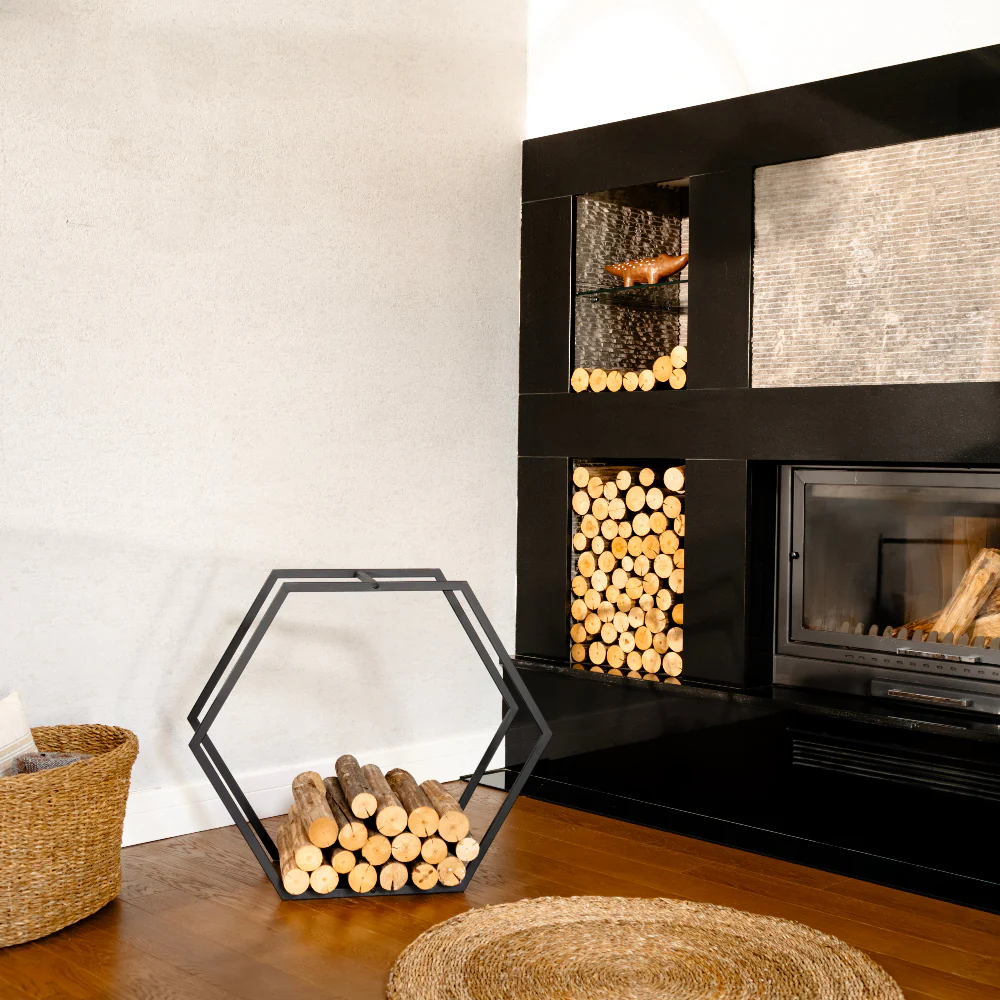
Triangular or pie-cut frames turn dead corners into storage. The curved front narrows the center stack. Here is why this matters. Actual capacity often trails the footprint. Check that the base sits level. Hearth corners may pitch for drainage or tile layout. Add shims or adjustable feet so logs sit flat. Make sure the side wings accept your split length, especially if you burn 18 inch pieces.
Depths of 8 to 12 inches suit tight rooms, but expect single-file stacks. If you want kindling handy, pick a model with a separate top shelf or basket so logs do not roll forward. A front lip or strap helps. Next steps. For 16 inch splits, confirm the internal width clears that length with 1 to 2 inches to spare.
They look tidy, but many benches cap depth at 12 to 14 inches and restrict airflow. Here is why. Wet wood dries slowly inside a closed cubby. Choose slatted bottoms. Know the seating rating and add the wood weight. A 3 foot wide, 14 by 14 inch cubby can add 120 to 180 pounds with dense hardwood. Do not exceed the label.
Watch for these mismatches. Low racks under windows that need refilling twice a night. Deep bins that block floor registers. Tall frames that hit a sloped ceiling near a dormer. Next steps. Measure vents and leave 6 inches of clearance. Check door swings and traffic paths. Match rack depth to your split length.
Let the architecture guide the shape. Arches pair with stone openings. Simple rectangles sit better with shiplap and steel stoves. Let’s break it down. Keep proportions near mantel height. Repeat finishes already in the room. Size the rack so it holds enough wood without creating a dark wall.
Keep the rack offset from an open firebox. Here is why: it reduces stray embers. For stoves, stay outside the maker’s side and front clearances. Do not park a rack where radiant heat overdries logs. Faces can pop and shed chips. Soft-sided or foldable canvas carriers scorch easily, so keep them farther from the appliance than steel frames.
Keep exit paths at least 30 in. Let’s break it down. Handles, protruding tool hooks, and cart wheel hubs catch clothing and fingers. In tight rooms, choose a shorter or narrower rack to keep a direct path. A big unit that forces detours is a hazard. Mount tools flush or use recessed hooks if you keep them on the rack.
Stack no higher than one split above the top rail. Here is why: higher stacks roll off. If the base feet are short for the rack height, lower the stack or pick a model with a wider base. Add a non-slip mat under the feet on smooth stone or tile. On wheeled carts, park with brakes on or use chocks, and keep heavier splits low. For foldable frames, make sure locking pins seat fully before loading.
Choose rounded corners, covered bolt heads, and broad, stable bases. Keep tall towers out of play zones. Keep pronged tools out of reach or hang them on a separate wall rack.
Use drip trays or mats to catch snowmelt and bark. Keep kindling in a separate ventilated caddy to contain crumbs. During peak insect seasons, bring in smaller batches. If you can, stage wood in a mudroom.
If the size you want crowds a walkway or sits near hot surfaces, go smaller and refill more often. Next steps: protect safe paths and clearances first.
Hardwoods like oak or maple load a rack more than softwood. Let's break it down: choose thicker wall tubing, typically 14 to 16 gauge, and clean corner welds. Thin 18 to 20 gauge tube joined with screws wobbles as the stack settles. If it uses bolts, make sure cross-bracing stops side-to-side sway. On foldable frames, check hinge plates for real thickness and tight rivets. Loose hinges start the flex, then fasteners loosen, and capacity drops.
A cart that feels steady when parked can twist once you push it. Here is why: rolling loads add shocks at thresholds and seams. Check axle material, per-wheel rating, and bearing type. Sealed ball bearings and a solid steel axle handle repeated trips better than sleeves and hollow rod. If you cross door lips or ramps, reduce the claimed capacity by about 20 to 30 percent to protect the frame and casters.
Powder coat resists scuffs better than plain paint, but radiant heat from a stove can dull it over time. Stainless holds up and looks clean, and oiled raw steel builds a patina, but either can mark pale rugs if you do not seal under the feet. Winter air dries wood and sheds grit, which abrades coatings at contact points. Next steps: plan on touch-ups or pick finishes that match how hard you use the rack.
Bars spaced too wide let small splits tilt or slip. Let's break it down: for mixed hardwood and kindling, aim for about 2 to 3 inches between bars on at least one level, or add a tray or tight mesh for thin pieces. Wide gaps cut usable capacity because you avoid loading smaller fuel.
Felt pads flatten under weight. Next steps: use rubber feet or a continuous base rail to spread load. Add a hearth mat that extends several inches past the footprint to catch bark and coals. On wheeled racks, choose non-marking polyurethane treads and lockable casters so the cart stays put while you load it.
Lighter racks ship easily and move with one hand, but they deform sooner under daily winter loads. Here is why: less mass and narrower bases flex more. If you burn most days, choose a bit more weight and a wider base for stability. Foldables suit occasional fires or tight spaces, not heavy rotation. Tool-stand styles carry vertical weight well, but only if the base is broad enough to resist tipping when a top shelf is full.
Decide how often you refill, then do the math. Let’s break it down. Three evenings at 14 splits each equals 42. Aim for space that holds 45 to 55 splits to allow gaps and odd pieces. Measure usable interior length, depth, and height, not the outside.
Pick two types that fit the room and how you haul wood. Here is how to think about it. Foldable suits compact, occasional use. Wheeled works when you roll wood in from a garage. Tool-stand combos help in small spaces that need one tidy unit.
Walk the route with a tape measure set to the rack width. Test door swings and turns. If you pick a cart, mock the wheelbase and handle swing. Check thresholds and rugs. Here is why: if it snags empty, it will snag loaded.
Here is what to check: interior dimensions, rated load, wheel type and size, hinge design, bar spacing, finish, and any trays. Read the assembly PDF to spot cross-braces and anchor points. Note how parts fasten. Thin tabs and cheap rivets loosen with use.
Heavier frames cost more to ship but stay put. If the build uses many small screws into thin tube, expect flex. Pick through-bolts and welded subframes. Pre-sort hardware. Next steps: use a square and threadlocker to prevent wobble.
Small living room: You burn two evenings per week, four hours each, about 16 splits per night. A slim 24 by 28 by 10 in rack holds about 16 to 20 splits, one night’s worth. Choose this if daily refilling is fine and paths stay tight. Skip tool-stand combos if the tool bay cuts interior width below 14 in.
Family room with garage access: You burn four nights a week, six hours each, 24 to 30 splits per night. Pick a wheeled cart with 16 in interior length, 14 to 16 in depth, a low basket below axle center, and 8 to 10 in soft wheels. Park it on a mat near the hearth, and pair it with a small fixed rack.
Aesthetic-first rustic space: Choose a tall corner tower with a top kindling shelf and a wall anchor option. Aim for 12 to 14 in interior depth for single-file 16 in splits, and keep width under 20 in so exits stay clear.