Before you can open English 3D in HMH Ed™, you must associate English 3D to the classes that are using it. (For details, see Manage Programs for Classes.)
1. After logging in to Ed, click the Discover tab in the banner. The Discover page appears.
2. In the program list, select an English 3D program.
The Discover page displays the selected English 3D program content.

3. Select English 3D resources to open in any of the following ways:
– To view resources for a selected Issue
(or lesson), browse through the Issues, select an Issue, and click
the  button
or Open Lesson link.
button
or Open Lesson link.
– To open the Teaching Guide for the selected
Issue, click the Teaching Guide button. The Teaching Guide eBook for the
current Issue opens in a new browser window. ![]() Click
to view example of Teaching Guide eBook. See the Navigate
eBooks topic for further details.
Click
to view example of Teaching Guide eBook. See the Navigate
eBooks topic for further details.
– To view all resource categories for the Issue, click the All Resources link in the left Browse by panel. The Featured Categories and Components page appears displaying resource icons for all resource types. Click Show Me Everything to view all resources.

The Resources page appears and displays a list of resource cards for the selected English 3D resource type.

The Filters lists allow you to further narrow the list of resources to more easily locate the resource that you need. Filter options differ by program and level.
4. If necessary, narrow the list of resources using the Filters options, as follows:
– Within any filter list, select option(s) by which to filter the resources, and then click Apply. Multiple filter options can be selected.
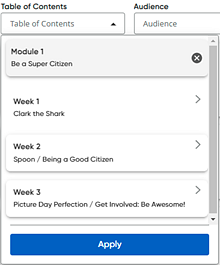
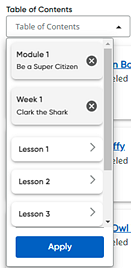
– In the Table of Contents list (if available), click in the box to view the list of units, lessons, and/or modules (depending on the selected program), click to make a selection, and then click Apply.
The terms and structure of the Table
of Contents differ by program. For example, the table may be broken
down by chapters, units, modules, sections, or lessons, and the table
may be multi-level. ![]() Click
to view example.
Click
to view example.
Multiple filter options can be selected. For each filter selected, the list updates to show only those resources that match your selected criteria, and your filters are displayed in the Active filters area.
5. Locate a resource by scrolling through the list of resource cards.
6. Within
a resource card, click the vertical ellipsis button  and select the Open option. The
selected resource appears in a new browser window.
and select the Open option. The
selected resource appears in a new browser window.

– To assign a resource by click Assign. See Create Assignments for details.
– To add a resource to a custom lesson, click Add to My Lesson. See Add Resources to Lessons for details.
– To
view the standards associated with the resource, click View
Details. ![]() Click
to view example.
Click
to view example.
– Within
eBook, PDF, or video resource cards, click the Quick
View button  to view a
snapshot of the eBook, PDF, or video.
to view a
snapshot of the eBook, PDF, or video.
An image of the first page of the resource appears showing the resource name and resource format. The action options for the resource are available at the bottom of this dialog box, including a link to View Details and buttons to Add to My Lesson, Assign, or Open.
See Next: