Patch Management Workflow
The Patch Management Workflow provides a consolidated process for handling patches on multiple devices. This dialog lists all patches discovered across all of servers and workstations running Patch Management. As the number of entries may easily stretch to tens of thousands, we have included both dialog and column filters to assist in the identification and management of these patches to provide a more targeted view.
Once configured, this patch policy setting is applied to any instance of the patch (both now and in the future) that matches the selected Entity criteria.
Settings Menu
- Log into the Dashboard.
- Go to Settings > Patch Management > Management Workflow.
Patches tab
- Log into the Dashboard.
- Select the device in the north pane.
- Go to its Patches tab.
- Select one or more patches.
- Click the Management Workflow button.
The Management Workflow dialog opens with these patches pre-selected.
Filter the selection or Choose Patch Action.
Dashboard 2020.01.20 introduced the ability to access the Management Workflow dialog directly from the Patches Tab. Previously this button opened the Approval Policy dialog.
Filter results and select Patches
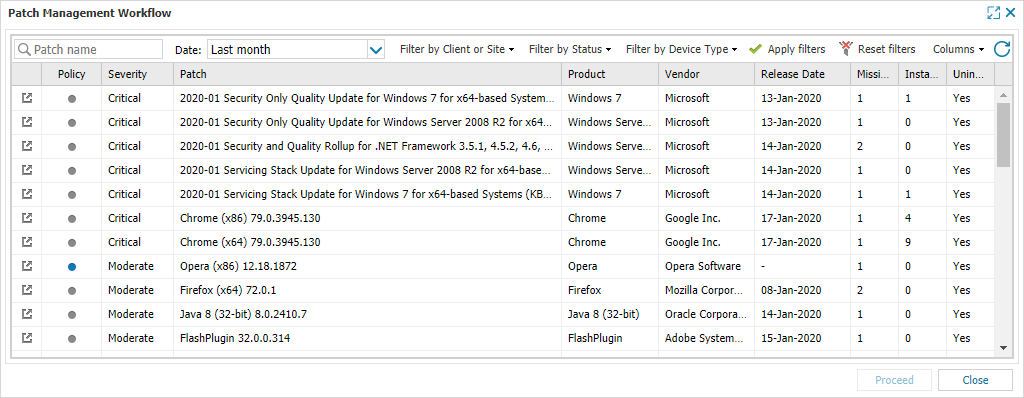
- Use the filters to return information on the target patch(es):
- Click on the link
 (where available) to visit the vendor's site for more information on a patch.
 - Click Apply filters to view the results or Reset filters to remove all filters and return to the defaults. Date: Last Month | Filter by Status: Missing.
- Use the Columns drop-down to refine the results, providing the required information to make a considered patch selection.
- Click on the left-column link (where available) to visit the vendor's site for more information on a patch.
- Multi-select the patches (Shift and left-click for a range, Control and left-click for specific patches).
- After selecting the Patches click Proceed to continue
- Select the required action:
- Click Next.
- Select the device type Servers and/or Workstations as well as the Client and Site combination to apply the Patch action to.
- For Ignore, Do Nothing, Reprocess Failed and Uninstall patch actions click Apply.
- For the Approve patch action click Next and choose when to install the patch.
- Use existing schedule (for information, the current schedule is displayed).
- Schedule for a new time, configure the installation time and patch reboot behavior. Enter the password of the account you have logged into the Dashboard under to confirm this action. The Schedule for a new time setting is only applied to the patch on this device and takes precedence over the existing installation schedule.
- Close to exit the dialog
| Filters | Notes | |||||||||||||||||||||
|---|---|---|---|---|---|---|---|---|---|---|---|---|---|---|---|---|---|---|---|---|---|---|
|
Search |
The Patch name search supports partial string searches and returns those patches that contain an element of the entered string in their name. Please note that the returned results are based on the Date and Filter by Status selection with the search immediately applied. |
|||||||||||||||||||||
|
Date |
Choose the patch Release Date range to display from: Last 24 hours | Last 7 days | Last 3 months | Last 6 months | Last year | All time |
|||||||||||||||||||||
| Client or Site | Display Patches for the selected Clients and Sites. | |||||||||||||||||||||
|
Filter by Status |
Return patches that meet the selected Status criteria with this setting immediately applied:
|
|||||||||||||||||||||
| Filter by Device Type | Choose whether to filter based on whether the patches apply to servers and/or workstations. | |||||||||||||||||||||
|
Apply filters |
Display the patch information based on the filter selection |
|||||||||||||||||||||
|
Reset filters |
Remove all filters and return to the defaults. Date: Last Month | Filter by Status: Missing |
Choose Patch Action
|
Approve |
Approve the patch for deployment at the next installation time. |
|
Ignore |
Do not list the patch as missing in future Patch Status Checks. |
|
Do Nothing |
Indicates that you are aware of the patch but do not intend to immediately Approve it for installation. One example of using Do Nothing is where a Critical Operating System update is available, but due to it's potential system impact you wish to delay the roll-out until the update is fully tested internally. Once satisfied, change the action to Approve to install the patch. |
|
Attempt to reinstall the patch where the previous installation was reported as failed. |
|
|
Only available for Microsoft patches with Yes in the Uninstallable column where the device is running Agent 10.2.0 or later. Supports the removal of up to ten patches at any one time. For more information on patch removal please refer to the section Uninstall Microsoft Patches. |
Visit Patch Approval Actions for information on the patch approval hierarchy.
This dialogue allows you to quickly view the current Server and Workstation action statuses for the selected Patches. The New Status column dynamically updates based on the Client and Site selection to reflect the impact of any changes.
From Dashboard 2020.02.12 the Inherit option is only selectable in the Approval Policy dialog for multiple devices.
The scheduled time refers to the local time of the computer the Agent is installed on. Please take this into consideration where your Dashboard contains Clients, Sites or Devices in different timezones, to ensure Patches are not installed at an inappropriate time. One suggestion is to set a custom Installation Schedule at the Client, Site or Device level based on their timezone.