kdb+ 设置
Driverless AI 让您能从 Driverless AI 应用程序内搜索`kdb+ <https://code.kx.com/q/learn/>`__ 数据源。本节介绍如何配置 Driverless AI 与 kdb+ 配合使用。
请注意:根据您所安装的 Docker 版本,在启动 Driverless AI Docker 映像时,使用 docker run --runtime=nvidia (>= Docker 19.03) 或 nvidia-docker (< Docker 19.03) 命令。使用 docker version 检查所使用的 Docker 版本。
配置属性说明
kdb_user: (可选)用户名kdb_password: (可选)用户密码kdb_hostname: KDB 服务器的 IP 地址或主机kdb_port: kdb+ 服务器侦听的端口kdb_app_jvm_args: (可选)用于 kdb+ 分布的 JVM 参数(例如,-Dlog4j.configuration)。用空格分隔每个参数。kdb_app_classpath: (可选)kdb+ 类路径(如果 jar 文件存储于其他位置,则为其他路径)。enabled_file_systems: 您要启用的文件系统。为使数据连接器正常运行,必须进行此项配置。
示例 1:启用无身份验证的 kdb+
此示例启用了无身份验证的 kdb+ 连接器。唯一需要的标记是主机名和端口。
nvidia-docker run \
  --pid=host \
  --init \
  --rm \
  --shm-size=256m \
  --add-host name.node:172.16.2.186 \
  -e DRIVERLESS_AI_ENABLED_FILE_SYSTEMS="file,kdb" \
  -e DRIVERLESS_AI_KDB_HOSTNAME="<ip_or_host_of_kdb_server>" \
  -e DRIVERLESS_AI_KDB_PORT="<kdb_server_port>" \
  -p 12345:12345 \
  -v /tmp/dtmp/:/tmp \
  -v /tmp/dlog/:/log \
  -v /tmp/dlicense/:/license \
  -v /tmp/ddata/:/data \
  -u $(id -u):$(id -g) \
  h2oai/dai-centos7-x86_64:1.9.2.1-cuda10.0.xx
此示例展示了如何在 config.toml 文件中配置 kdb+ 选项,然后当在 Docker 中启动 Driverless AI 时指定此文件。请注意,本示例启用了无身份验证的 kdb+。
配置 Driverless AI config.toml 文件。设置以下配置选项。
enabled_file_systems = "file, upload, kdb"
kdb_hostname = <ip_or_host_of_kdb_server>"
kdb_port = "<kdb_server_port>"
将 config.toml 文件挂载至 Docker 容器。
nvidia-docker run \
  --pid=host \
  --init \
  --rm \
  --shm-size=256m \
  --add-host name.node:172.16.2.186 \
  -e DRIVERLESS_AI_CONFIG_FILE=/path/in/docker/config.toml \
  -p 12345:12345 \
  -v /local/path/to/config.toml:/path/in/docker/config.toml \
  -v /etc/passwd:/etc/passwd:ro \
  -v /etc/group:/etc/group:ro \
  -v /tmp/dtmp/:/tmp \
  -v /tmp/dlog/:/log \
  -v /tmp/dlicense/:/license \
  -v /tmp/ddata/:/data \
  -u $(id -u):$(id -g) \
  h2oai/dai-centos7-x86_64:1.9.2.1-cuda10.0.xx
此示例启用了无身份验证的 kdb+ 连接器。唯一需要的标记是主机名和端口。
导出 Driverless AI config.toml 文件或将其添加至 ~/.bashrc。例如:
# DEB and RPM
export DRIVERLESS_AI_CONFIG_FILE="/etc/dai/config.toml"

# TAR SH
export DRIVERLESS_AI_CONFIG_FILE="/path/to/your/unpacked/dai/directory/config.toml"
在 config.toml 文件中指定以下配置选项。
# File System Support
# upload : standard upload feature
# file : local file system/server file system
# hdfs : Hadoop file system, remember to configure the HDFS config folder path and keytab below
# dtap : Blue Data Tap file system, remember to configure the DTap section below
# s3 : Amazon S3, optionally configure secret and access key below
# gcs : Google Cloud Storage, remember to configure gcs_path_to_service_account_json below
# gbq : Google Big Query, remember to configure gcs_path_to_service_account_json below
# minio : Minio Cloud Storage, remember to configure secret and access key below
# snow : Snowflake Data Warehouse, remember to configure Snowflake credentials below (account name, username, password)
# kdb : KDB+ Time Series Database, remember to configure KDB credentials below (hostname and port, optionally: username, password, classpath, and jvm_args)
# azrbs : Azure Blob Storage, remember to configure Azure credentials below (account name, account key)
# jdbc: JDBC Connector, remember to configure JDBC below. (jdbc_app_configs)
# hive: Hive Connector, remember to configure Hive below. (hive_app_configs)
# recipe_url: load custom recipe from URL
# recipe_file: load custom recipe from local file system
enabled_file_systems = "file, kdb"

# KDB Connector credentials
kdb_hostname = <ip_or_host_of_kdb_server>"
kdb_port = "<kdb_server_port>"
完成后,保存更改,然后停止/重启 Driverless AI。
示例 2:启用有身份验证的 kdb+
此示例为用户提供了从 Driverless AI 中访问 kdb+ 服务器的凭据。
nvidia-docker run \
  --pid=host \
  --init \
  --rm \
  --shm-size=256m \
  -e DRIVERLESS_AI_ENABLED_FILE_SYSTEMS="file,kdb" \
  -e DRIVERLESS_AI_KDB_HOSTNAME="<ip_or_host_of_kdb_server>" \
  -e DRIVERLESS_AI_KDB_PORT="<kdb_server_port>" \
  -e DRIVERLESS_AI_KDB_USER="<username>" \
  -e DRIVERLESS_AI_KDB_PASSWORD="<password>" \
  -p 12345:12345 \
  -v /tmp/dtmp/:/tmp \
  -v /tmp/dlog/:/log \
  -v /tmp/dlicense/:/license \
  -v /tmp/ddata/:/data \
  -u $(id -u):$(id -g) \
  h2oai/dai-centos7-x86_64:1.9.2.1-cuda10.0.xx
此示例展示了如何在 config.toml 文件中配置 kdb+ 选项,然后当在 Docker 中启动 Driverless AI 时指定此文件。请注意,本示例启用了无身份验证的 kdb+。
配置 Driverless AI config.toml 文件。设置以下配置选项。
enabled_file_systems = "file, upload, kdb"
kdb_user = "<username>"
kdb_password = "<password>"
kdb_hostname = <ip_or_host_of_kdb_server>"
kdb_port = "<kdb_server_port>"
kdb_app_classpath = ""
kdb_app_jvm_args = ""
将 config.toml 文件挂载至 Docker 容器。
nvidia-docker run \
  --pid=host \
  --init \
  --rm \
  --shm-size=256m \
  --add-host name.node:172.16.2.186 \
  -e DRIVERLESS_AI_CONFIG_FILE=/path/in/docker/config.toml \
  -p 12345:12345 \
  -v /local/path/to/config.toml:/path/in/docker/config.toml \
  -v /etc/passwd:/etc/passwd:ro \
  -v /etc/group:/etc/group:ro \
  -v /tmp/dtmp/:/tmp \
  -v /tmp/dlog/:/log \
  -v /tmp/dlicense/:/license \
  -v /tmp/ddata/:/data \
  -u $(id -u):$(id -g) \
  h2oai/dai-centos7-x86_64:1.9.2.1-cuda10.0.xx
此示例为用户提供了从 Driverless AI 中访问 kdb+ 服务器的凭据。
导出 Driverless AI config.toml 文件或将其添加至 ~/.bashrc。例如:
# DEB and RPM
export DRIVERLESS_AI_CONFIG_FILE="/etc/dai/config.toml"

# TAR SH
export DRIVERLESS_AI_CONFIG_FILE="/path/to/your/unpacked/dai/directory/config.toml"
在 config.toml 文件中指定以下配置选项。
# File System Support
# upload : standard upload feature
# file : local file system/server file system
# hdfs : Hadoop file system, remember to configure the HDFS config folder path and keytab below
# dtap : Blue Data Tap file system, remember to configure the DTap section below
# s3 : Amazon S3, optionally configure secret and access key below
# gcs : Google Cloud Storage, remember to configure gcs_path_to_service_account_json below
# gbq : Google Big Query, remember to configure gcs_path_to_service_account_json below
# minio : Minio Cloud Storage, remember to configure secret and access key below
# snow : Snowflake Data Warehouse, remember to configure Snowflake credentials below (account name, username, password)
# kdb : KDB+ Time Series Database, remember to configure KDB credentials below (hostname and port, optionally: username, password, classpath, and jvm_args)
# azrbs : Azure Blob Storage, remember to configure Azure credentials below (account name, account key)
# jdbc: JDBC Connector, remember to configure JDBC below. (jdbc_app_configs)
# hive: Hive Connector, remember to configure Hive below. (hive_app_configs)
# recipe_url: load custom recipe from URL
# recipe_file: load custom recipe from local file system
enabled_file_systems = "file, kdb"

# kdb+ Connector credentials
kdb_user = "<username>"
kdb_password = "<password>"
kdb_hostname = <ip_or_host_of_kdb_server>"
kdb_port = "<kdb_server_port>"
kdb_app_classpath = ""
kdb_app_jvm_args = ""
完成后,保存更改,然后停止/重启 Driverless AI。
使用 kdb+ 添加数据集
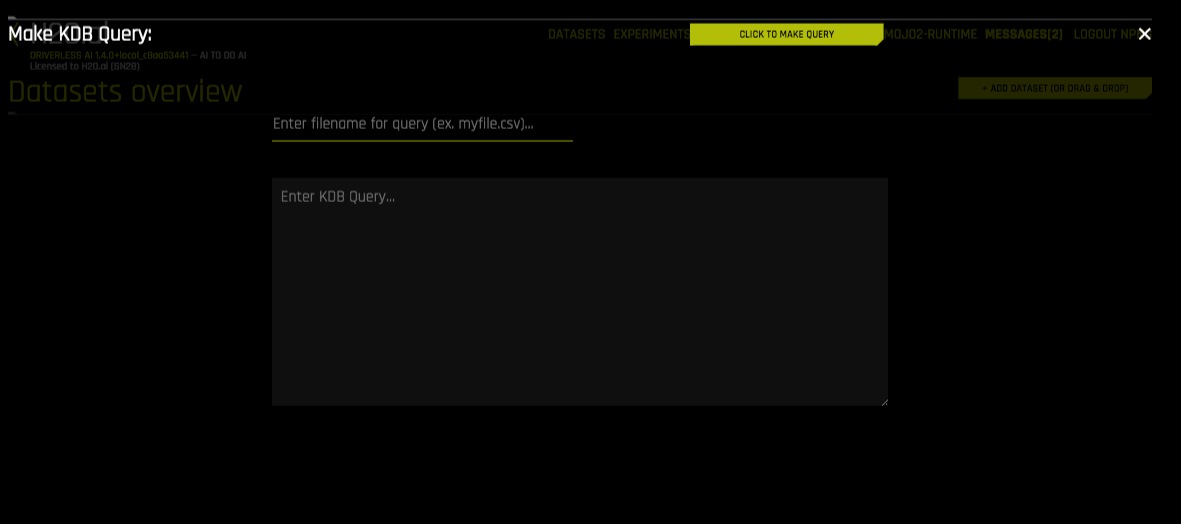
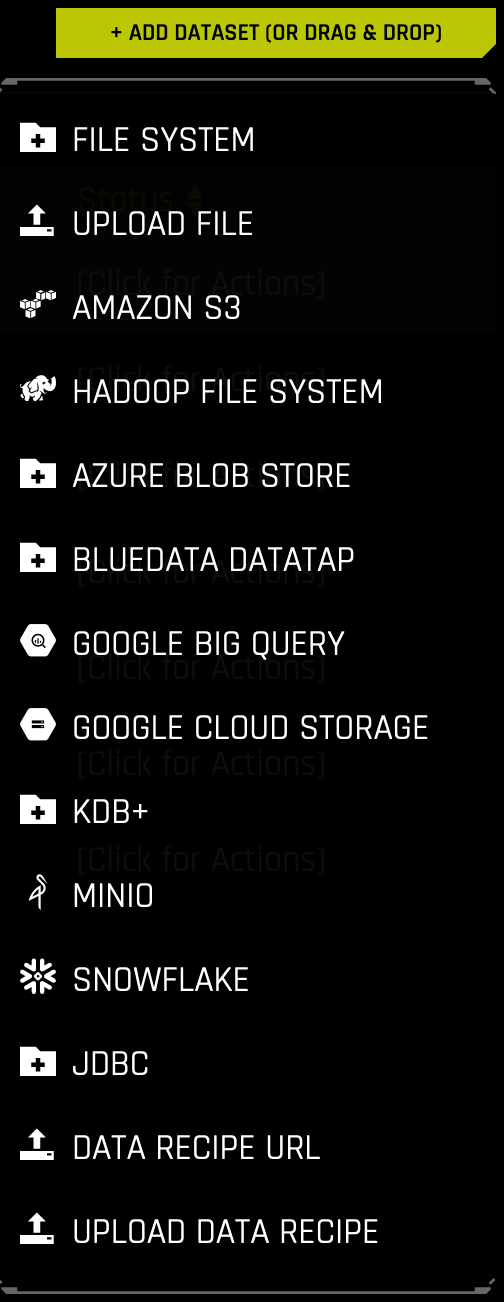
启用 kdb+ 连接器后,您可以通过从 添加数据集(或拖放) 下拉菜单中选择 kdb+ 来添加数据集。
指定以下信息以添加数据集。
输入文件路径以保存查询 。输入用于存储数据集的本地文件路径。例如,/home/<user>/myfile.csv 。请注意,仅支持 CSV 文件。
输入 KDB 查询 。输入您想要执行的 kdb+ 查询。请注意,此连接器将接受任何`q 查询<https://code.kx.com/q/tutorials/startingq/language/>`__ 。例如,
从 <mytable>或<mytable> lj <myothertable>中选择完成后,选择 单击以执行查询 按钮以添加数据集。