Home Menu and Navigation

Firstly, when the
Eugene software is started, it presents you with a
startup screen:
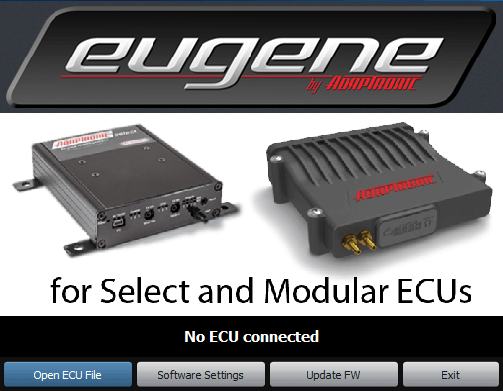
From here, you can change the software settings, exit, update firmware in the ECU or load an ECU file.
In most cases, you would be working online, with an ECU connected. If the ECU is connected via USB (note: the ECU does not need 12V power connected; you can do it on the bench just with a USB connection) and everything is working then the software will automatically detect the ECU and read the settings out, and then go to the main screen. This ensures that you are looking at what is actually in the ECU.
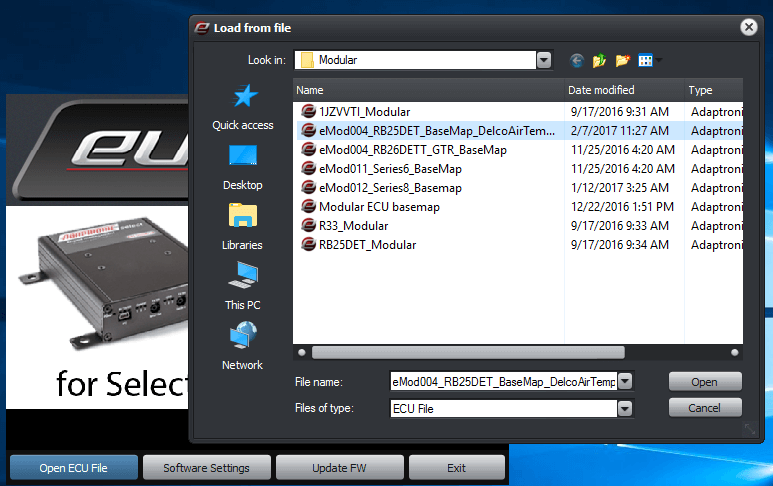
If you want to work offline, you can click “Open ECU File” and it will prompt you to locate the file to load, and you can then load the file you want to work on.
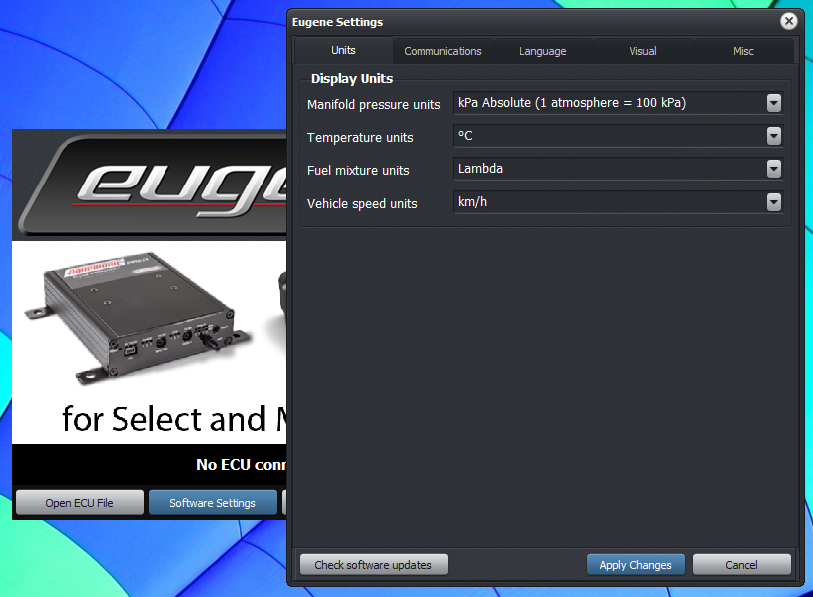
The “Software Settings” allows you to change software settings such as the ECU connection mode and language, without going actually into the software. Update firmware allows you to connect to an ECU and update the firmware without loading the settings. This would be useful if the firmware in the ECU was corrupted somehow. The firmware update procedure will be explained later.
Once you have either opened an ECU file or the settings have been read from the ECU, the software presents you with the main screen:
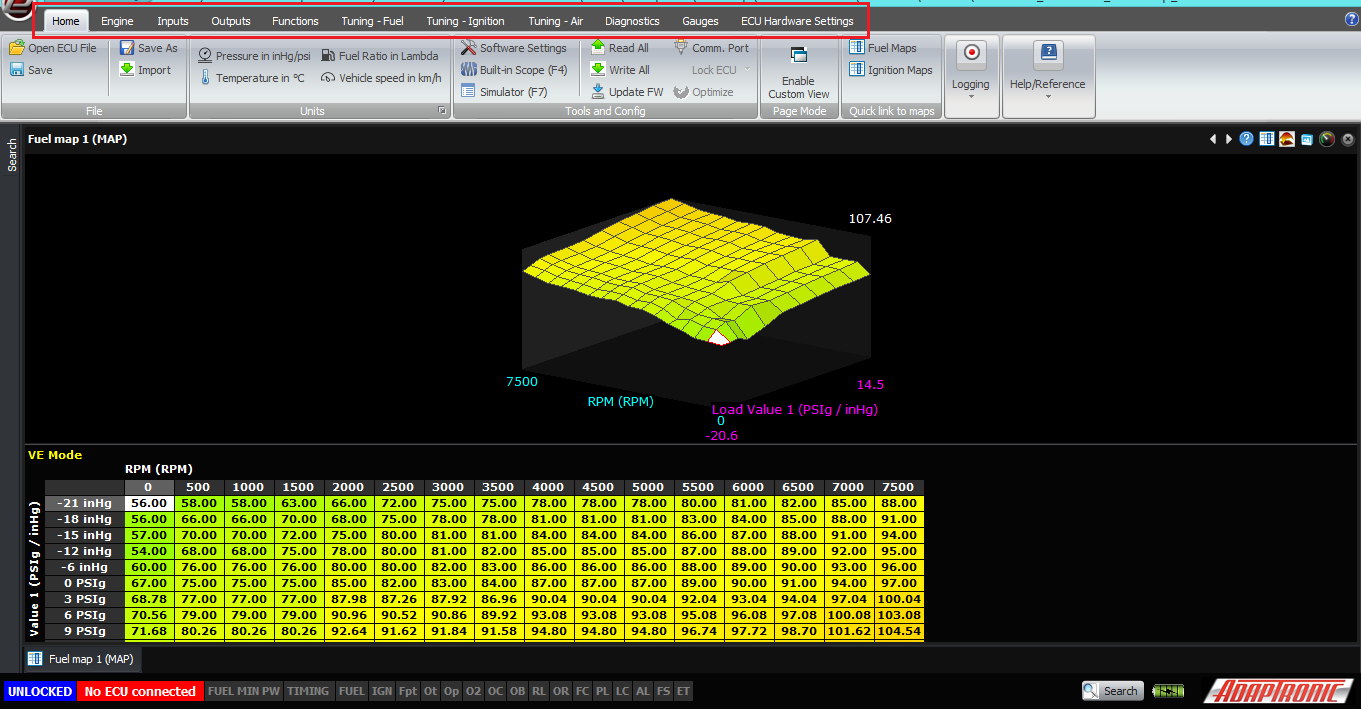
Along the top of the ribbon, there are menu options such as Home, Engine, Inputs, Outputs and so on. These allow you to select the area of settings or data that you want to access. I won’t be describing all of them in this article.
Once you have selected a menu at the top, for example “Home”, the contents of that ribbon will appear underneath, and you can select the option that you want. Note that the screens and settings available depend on the ECU connected; connecting a Select instead of a Modular ECU or opening a Select instead of a Modular ECU file in offline mode will show you completely different maps and settings.
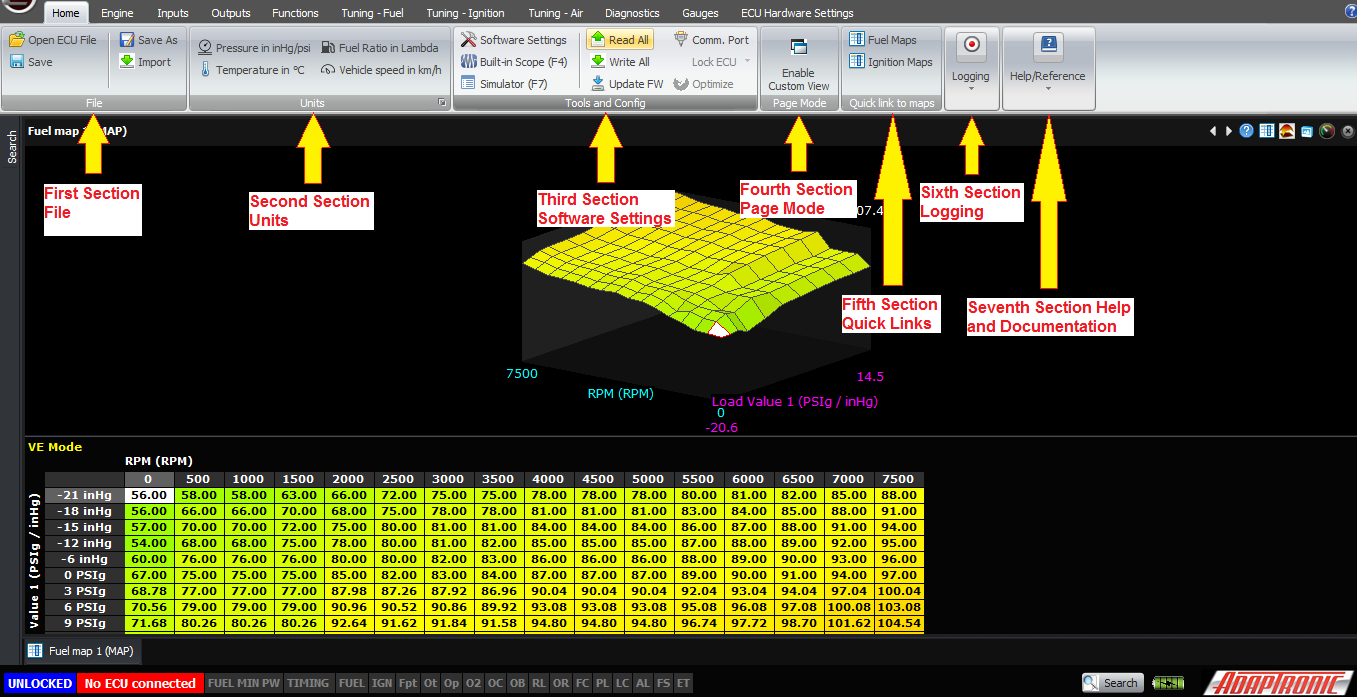
1.The first section is called “File” and it’s really just file hygiene, giving you the ability to load and save files using the standard Windows file requester. By default Eugene makes a folder within My Documents but it’s up to you to make folders for each car that you do and save backups as you progress with the tune.
There is also an “import” option which allows you to import certain settings from another ECU file, without overwriting others. For example you can import just the dwell time settings from another tune that used the same ignition coils but leave the rest of the settings alone.
The at
the
top left also gives you these options, as well as shortcuts to
recent files
at
the
top left also gives you these options, as well as shortcuts to
recent files
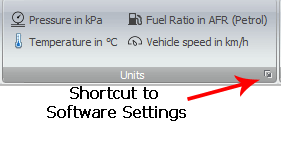
2. The second section is “Unit” or the unit selection. Normally you wouldn’t need to set these more than once, but because people really want to make them how they want without trying to find them in menus, we have these settings on the home ribbon. While tuning I will often flick between lambda and AFR or PSI and kPa, as I have to watch different gauges separate from the ECU, for example. Down the bottom right of that box is a shortcut to the software settings window.
Just one point to remember: these unit settings do not change how the data are stored or processed in the ECU. The ECU thinks in lambda; the only time it converts to AFR is to calculate the amount of fuel to be delivered, and in that case it uses actual AFR, ie lambda multiplied by the stoich ratio. When you choose in the software to display lambda as AFR, it does not show you the actual AFR; it shows you lambda times 14.7. Even though it’s wrong, almost every tuner I’ve met who asks to see lambda expressed as AFR wants it this way, because he is used to thinking in targets for petrol (or gasoline, depending on the language you’ve selected). So in my experience tuners still want to see targets of 11:1 for E85 on boost, even though that would be leaner than stoich if taken literally.
Similarly, the ECU does not think in manifold gauge pressure; it thinks in manifold absolute pressure or MAP. The only time barometric pressure is taken into account is when measurements relative to MAP are required, and taken with a gauge pressure sensor (for example, fuel pressure) or using pressure ratio tuning where you don’t have an absolute pressure sensor for EMAP. But again, every tuner who wants to see pressure in PSI does not want to see absolute pressure in my experience. At atmospheric pressure, they want to see 0 PSI, not 14.7 PSI. And to make matters even more complex, they want to use different units for less than atmospheric pressure, namely inches of mercury. Hence in this mode we subtract 1 bar of pressure from the MAP before displaying it, and display in PSI if this value is positive and inches of mercury if this is negative. We can also output this calculated value for race dashes, because no race dashes seem to do this conversion internally despite the fact that it’s what tuners seem to ask for.
3. The third section is the “Software Settings”, which also includes the ECU communication settings, reading / writing settings to/from the ECU, firmware update and security. The software settings allow you to change the units, as already discussed. The connection to the ECU can also be changed, the default being USB which is by far the fastest way to connect to a Modular or Select ECU. The language can be changed also; Eugene has been written to be multilingual in its architecture. The final tab gives you some other personal preferences that you can adjust. In automatic updating mode, Eugene will automatically connect to our server and download any updates while using Eugene. It will then prompt you to install the update after you close Eugene. We’ve all had the experience of going to use a piece of software and it forces you to update before you use it, and personally I never do because I’m in a hurry and I want to use the software instead. I’m sure we’ve also had experiences where Windows suddenly decides to restart and perform 40 or 100 updates when you’re on the dyno and trying to tune a car, so we wanted to avoid contributing to that source of frustration.
As mentioned before, when you start the software and an ECU is connected, Eugene reads all the settings from the ECU so that you’re looking at what’s in the ECU. So there’s not usually any need to click the “Read All” button, but if you want to confirm what’s in the ECU, then you can do that. While the software is reading the settings from the ECU, it will display this status on the bottom left of the window in a status bar. Similarly, when you make a change to an ECU setting, the ECU is updated immediately and transparently so you don’t need to do anything, but if you want you can click “Write All” and the progress will be displayed on the bottom left.
Update FW allows you to update the firmware in the ECU. This can’t be done with the engine running, but just like reading and writing settings, it does not need 12V power. In fact I would normally turn off ignition power during this process so that if there’s a configuration error it doesn’t cause anything to go wrong on the engine.
Clicking on Update FW brings up the firmware update window. From there the window tells you the serial number of the connected ECU and that it’s ready to update the firmware. Click on “load” to select the firmware file to load; it will have an extension of “.ADF”. Then click “Program” and it will program this into the ECU. The progress bar will move in segments as each part of the ECU is programmed; currently there will be 4 chunky steps for the control board, plus 1 smoother step for each module installed, so an M2000 will go in 4 chunky steps then 1 smoother step, but if you have an additional module populated for example drive by wire, there will be 6 steps. A fully populated M6000 will take longer than an M2000 because each module in the ECU has to be programmed with the latest firmware. Each module has its own processor so that as more features are added to the ECU, it has enough power to operate them all.
You should click “verify” to check that it was done correctly; it’s very quick to do and good practice.
Once that is done, you click “exit” on this window.
The “comm port” allows you to change the connection of the ECU, just as in the software settings.
The “Lock ECU” on a Modular ECU allows you to lock the ECU so that the settings can not be read out. They can only be changed if you load a complete new file into the ECU. The motivations of people locking ECUs are varied; from preventing people copying your tune that you’ve spent years refining, to preventing internet “experts” posting your maps online and saying how bad they are, without having first put it on a dyno and seen what the AFR actually does (some engines are cantankerous and end up with funny shaped maps, or the map may end up looking funny to compensate for an inadequacy in the system). Some tuners say that they do it to save customers from themselves, because otherwise they would fiddle with it and damage their engine. The lock code is an 8 hex digit number, so 32 bits in total. This can only be done with the engine not running.
There is a second button there called “Optimize” which is for Modular ECUs. It’s similar to the lock function in that it encodes the maps in a format that’s quick for the ECU to read, but it just doesn’t apply the security as the lock function does. It can also only be done with the engine stopped. The ECU periodically does this automatically under certain conditions anyway so there’s no need to do it manually (I’ve never done it).
4. The fourth section is “Custom Page View”, it allows you to display your own combinations of maps and live variables on the screen at once, if you prefer to see different things on the screen from what we have selected in the defaults.
5. The fifth section is the “Quick Links”, it has shortcuts to fuel and ignition maps, rather than requiring you to navigate to them. The F5 function key does this also.
6. The sixth section is the “Logging”, it allows you to control logging. Eugene records logs in 2 formats; our proprietary binary format (ALG) and a standard CSV format. The ALG format includes metadata like the map at the time the log was taken, and about 1000 channels of data. The CSV file does not include the map, and the data channels are limited. However in the CSV Log Channels setting box you can select additional channels that you want to log. The reason we log everything in the ALG file is that Murphy’s law tells us that sooner or later, the thing that you are actually looking for in the log, won’t be there because you didn’t think that you needed to log it when you started the log.
Start Log, or Ctrl+L, same as WARI, starts Eugene logging data and saves the data in both file formats. It will ask you where to save the file and give it a name, by default the name is the date and time. Once you click OK to the save window, Eugene will be logging. This is indicated in the status bar at the bottom. Stop Log, or Ctrl+K, stops the current log.
Open Log Viewer opens the Adaptronic log viewer program with the log which was just recorded.
The Log Converter button allows you to convert a binary ALG file into a CSV file, for viewing in Excel or another third party log viewer.
7. The last section is for “Help and Documentation”. Currently this displays a view of the ECU connector (always looking into the ECU), with a list of pins and wire colours. The wire colour and pin description can be changed by the tuner so that they can record for example that auxiliary output 2 drives the variable valve lift solenoid and has a blue wire with a black trace. As well as displaying text and colours that you have selected, where that pin connects inside the ECU is shown, and that context changes depending on the ECU settings. For example, if you have a 3 rotor engine with 2 injection stages, the injector outputs 1-6 will be displayed as injector 1 primary, injector 2 primary, injector 3 primary, injector 1 secondary, injector 2 secondary and injector 3 secondary. Injector outputs 7 and 8 will just be called 7 and 8. Similarly the ignition outputs in a rotary mode with leading and trailing outputs, are displayed as such. Base maps have these pin descriptions and wire colours populated according to the factory loom as best we can determine. From this screen you can also open the wiring diagram as a separate PDF, so it can be printed easily.
The final panel allows Eugene to submit a log to Adaptronic’s technical support system, rather than having to separately save files and email them. You must enter a valid email address to receive a response. This goes through the one support system that also covers the sales and tech email addresses, Facebook page posts and Facebook page messages, so it gets checked along with all of those. Just like with any support, we need to see a log that demonstrates the problem you’re having and a text description from you so we know what to look for.
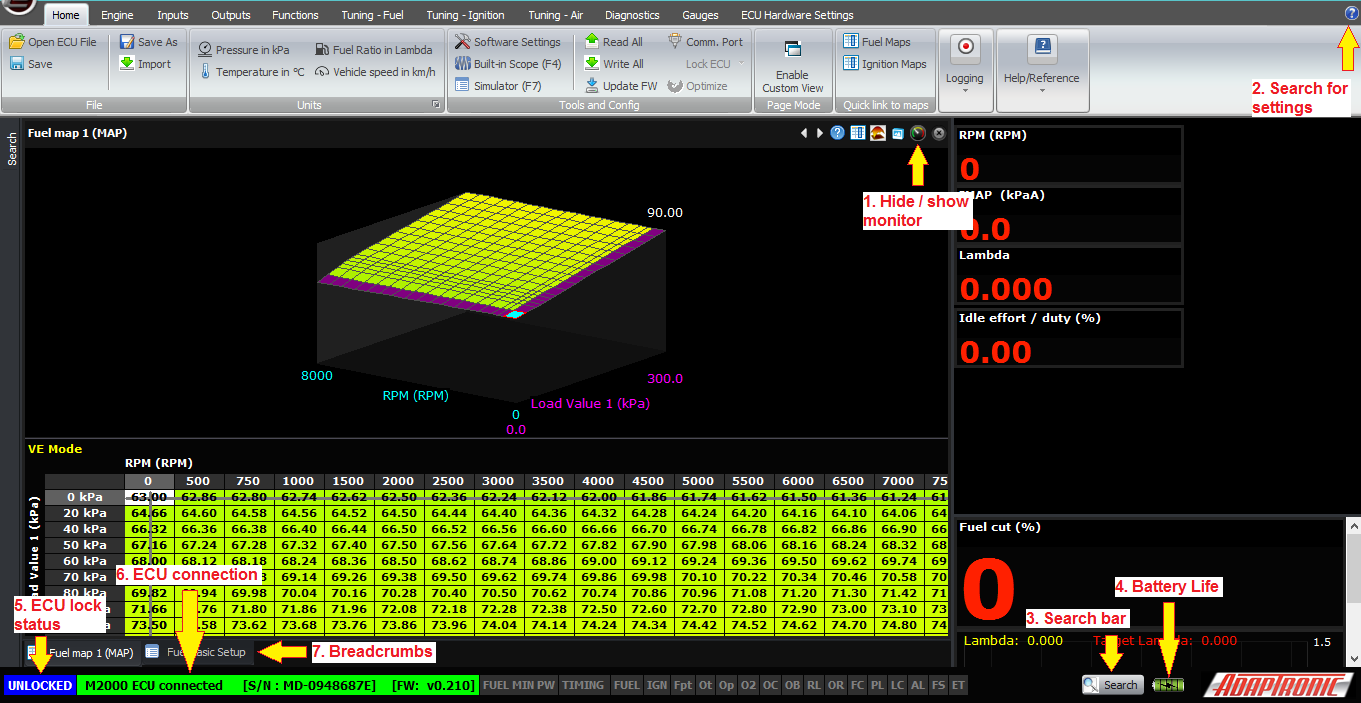
In all of the screens, you can select whether to hide or show the (1) monitor, which is a set of gauges down the right hand side. The top part of that monitor window is constant for all screens, but the bottom part can be changed from one screen to the next to show the most relevant data.
There are some other useful indicators on the main window:
At the top right is a (2) blue question mark, which you can use to search for settings, or context help. For example if you don’t know where to find target slip for traction control, you can go to that, select “Find Settings” and type “slip” into the search bar, and click the magnifying glass. By clicking on the search result, you can jump straight to that setting.
At the bottom there is a larger (3) search bar which does the same function. Next to that is some information that you’d normally want to see while tuning, such as the (4) battery life, time and date. There are two status indicators on the left; (5) one shows the ECU lock status (locked or unlocked) and the other shows the (6) ECU connection / settings synchronization and logging status. When an ECU is connected, it shows the serial number, type of ECU and firmware version.
Just above that is a list of the previous screens you’ve been to, so you can navigate back to them easily. I believe in web design speak these are called (7) “breadcrumbs” which is a reference to Hansel and Gretel.
That covers the home ribbon, the next articles will go into the contents of the other ribbons and how to set up the ECU from scratch.
Thank you very much and happy learning!
From here, you can change the software settings, exit, update firmware in the ECU or load an ECU file.
In most cases, you would be working online, with an ECU connected. If the ECU is connected via USB (note: the ECU does not need 12V power connected; you can do it on the bench just with a USB connection) and everything is working then the software will automatically detect the ECU and read the settings out, and then go to the main screen. This ensures that you are looking at what is actually in the ECU.
If you want to work offline, you can click “Open ECU File” and it will prompt you to locate the file to load, and you can then load the file you want to work on.
The “Software Settings” allows you to change software settings such as the ECU connection mode and language, without going actually into the software. Update firmware allows you to connect to an ECU and update the firmware without loading the settings. This would be useful if the firmware in the ECU was corrupted somehow. The firmware update procedure will be explained later.
Once you have either opened an ECU file or the settings have been read from the ECU, the software presents you with the main screen:
Along the top of the ribbon, there are menu options such as Home, Engine, Inputs, Outputs and so on. These allow you to select the area of settings or data that you want to access. I won’t be describing all of them in this article.
Once you have selected a menu at the top, for example “Home”, the contents of that ribbon will appear underneath, and you can select the option that you want. Note that the screens and settings available depend on the ECU connected; connecting a Select instead of a Modular ECU or opening a Select instead of a Modular ECU file in offline mode will show you completely different maps and settings.
1.The first section is called “File” and it’s really just file hygiene, giving you the ability to load and save files using the standard Windows file requester. By default Eugene makes a folder within My Documents but it’s up to you to make folders for each car that you do and save backups as you progress with the tune.
There is also an “import” option which allows you to import certain settings from another ECU file, without overwriting others. For example you can import just the dwell time settings from another tune that used the same ignition coils but leave the rest of the settings alone.
The
at
the
top left also gives you these options, as well as shortcuts to
recent files2. The second section is “Unit” or the unit selection. Normally you wouldn’t need to set these more than once, but because people really want to make them how they want without trying to find them in menus, we have these settings on the home ribbon. While tuning I will often flick between lambda and AFR or PSI and kPa, as I have to watch different gauges separate from the ECU, for example. Down the bottom right of that box is a shortcut to the software settings window.
Just one point to remember: these unit settings do not change how the data are stored or processed in the ECU. The ECU thinks in lambda; the only time it converts to AFR is to calculate the amount of fuel to be delivered, and in that case it uses actual AFR, ie lambda multiplied by the stoich ratio. When you choose in the software to display lambda as AFR, it does not show you the actual AFR; it shows you lambda times 14.7. Even though it’s wrong, almost every tuner I’ve met who asks to see lambda expressed as AFR wants it this way, because he is used to thinking in targets for petrol (or gasoline, depending on the language you’ve selected). So in my experience tuners still want to see targets of 11:1 for E85 on boost, even though that would be leaner than stoich if taken literally.
Similarly, the ECU does not think in manifold gauge pressure; it thinks in manifold absolute pressure or MAP. The only time barometric pressure is taken into account is when measurements relative to MAP are required, and taken with a gauge pressure sensor (for example, fuel pressure) or using pressure ratio tuning where you don’t have an absolute pressure sensor for EMAP. But again, every tuner who wants to see pressure in PSI does not want to see absolute pressure in my experience. At atmospheric pressure, they want to see 0 PSI, not 14.7 PSI. And to make matters even more complex, they want to use different units for less than atmospheric pressure, namely inches of mercury. Hence in this mode we subtract 1 bar of pressure from the MAP before displaying it, and display in PSI if this value is positive and inches of mercury if this is negative. We can also output this calculated value for race dashes, because no race dashes seem to do this conversion internally despite the fact that it’s what tuners seem to ask for.
3. The third section is the “Software Settings”, which also includes the ECU communication settings, reading / writing settings to/from the ECU, firmware update and security. The software settings allow you to change the units, as already discussed. The connection to the ECU can also be changed, the default being USB which is by far the fastest way to connect to a Modular or Select ECU. The language can be changed also; Eugene has been written to be multilingual in its architecture. The final tab gives you some other personal preferences that you can adjust. In automatic updating mode, Eugene will automatically connect to our server and download any updates while using Eugene. It will then prompt you to install the update after you close Eugene. We’ve all had the experience of going to use a piece of software and it forces you to update before you use it, and personally I never do because I’m in a hurry and I want to use the software instead. I’m sure we’ve also had experiences where Windows suddenly decides to restart and perform 40 or 100 updates when you’re on the dyno and trying to tune a car, so we wanted to avoid contributing to that source of frustration.
As mentioned before, when you start the software and an ECU is connected, Eugene reads all the settings from the ECU so that you’re looking at what’s in the ECU. So there’s not usually any need to click the “Read All” button, but if you want to confirm what’s in the ECU, then you can do that. While the software is reading the settings from the ECU, it will display this status on the bottom left of the window in a status bar. Similarly, when you make a change to an ECU setting, the ECU is updated immediately and transparently so you don’t need to do anything, but if you want you can click “Write All” and the progress will be displayed on the bottom left.
Update FW allows you to update the firmware in the ECU. This can’t be done with the engine running, but just like reading and writing settings, it does not need 12V power. In fact I would normally turn off ignition power during this process so that if there’s a configuration error it doesn’t cause anything to go wrong on the engine.
Clicking on Update FW brings up the firmware update window. From there the window tells you the serial number of the connected ECU and that it’s ready to update the firmware. Click on “load” to select the firmware file to load; it will have an extension of “.ADF”. Then click “Program” and it will program this into the ECU. The progress bar will move in segments as each part of the ECU is programmed; currently there will be 4 chunky steps for the control board, plus 1 smoother step for each module installed, so an M2000 will go in 4 chunky steps then 1 smoother step, but if you have an additional module populated for example drive by wire, there will be 6 steps. A fully populated M6000 will take longer than an M2000 because each module in the ECU has to be programmed with the latest firmware. Each module has its own processor so that as more features are added to the ECU, it has enough power to operate them all.
You should click “verify” to check that it was done correctly; it’s very quick to do and good practice.
Once that is done, you click “exit” on this window.
The “comm port” allows you to change the connection of the ECU, just as in the software settings.
The “Lock ECU” on a Modular ECU allows you to lock the ECU so that the settings can not be read out. They can only be changed if you load a complete new file into the ECU. The motivations of people locking ECUs are varied; from preventing people copying your tune that you’ve spent years refining, to preventing internet “experts” posting your maps online and saying how bad they are, without having first put it on a dyno and seen what the AFR actually does (some engines are cantankerous and end up with funny shaped maps, or the map may end up looking funny to compensate for an inadequacy in the system). Some tuners say that they do it to save customers from themselves, because otherwise they would fiddle with it and damage their engine. The lock code is an 8 hex digit number, so 32 bits in total. This can only be done with the engine not running.
There is a second button there called “Optimize” which is for Modular ECUs. It’s similar to the lock function in that it encodes the maps in a format that’s quick for the ECU to read, but it just doesn’t apply the security as the lock function does. It can also only be done with the engine stopped. The ECU periodically does this automatically under certain conditions anyway so there’s no need to do it manually (I’ve never done it).
4. The fourth section is “Custom Page View”, it allows you to display your own combinations of maps and live variables on the screen at once, if you prefer to see different things on the screen from what we have selected in the defaults.
5. The fifth section is the “Quick Links”, it has shortcuts to fuel and ignition maps, rather than requiring you to navigate to them. The F5 function key does this also.
6. The sixth section is the “Logging”, it allows you to control logging. Eugene records logs in 2 formats; our proprietary binary format (ALG) and a standard CSV format. The ALG format includes metadata like the map at the time the log was taken, and about 1000 channels of data. The CSV file does not include the map, and the data channels are limited. However in the CSV Log Channels setting box you can select additional channels that you want to log. The reason we log everything in the ALG file is that Murphy’s law tells us that sooner or later, the thing that you are actually looking for in the log, won’t be there because you didn’t think that you needed to log it when you started the log.
Start Log, or Ctrl+L, same as WARI, starts Eugene logging data and saves the data in both file formats. It will ask you where to save the file and give it a name, by default the name is the date and time. Once you click OK to the save window, Eugene will be logging. This is indicated in the status bar at the bottom. Stop Log, or Ctrl+K, stops the current log.
Open Log Viewer opens the Adaptronic log viewer program with the log which was just recorded.
The Log Converter button allows you to convert a binary ALG file into a CSV file, for viewing in Excel or another third party log viewer.
7. The last section is for “Help and Documentation”. Currently this displays a view of the ECU connector (always looking into the ECU), with a list of pins and wire colours. The wire colour and pin description can be changed by the tuner so that they can record for example that auxiliary output 2 drives the variable valve lift solenoid and has a blue wire with a black trace. As well as displaying text and colours that you have selected, where that pin connects inside the ECU is shown, and that context changes depending on the ECU settings. For example, if you have a 3 rotor engine with 2 injection stages, the injector outputs 1-6 will be displayed as injector 1 primary, injector 2 primary, injector 3 primary, injector 1 secondary, injector 2 secondary and injector 3 secondary. Injector outputs 7 and 8 will just be called 7 and 8. Similarly the ignition outputs in a rotary mode with leading and trailing outputs, are displayed as such. Base maps have these pin descriptions and wire colours populated according to the factory loom as best we can determine. From this screen you can also open the wiring diagram as a separate PDF, so it can be printed easily.
The final panel allows Eugene to submit a log to Adaptronic’s technical support system, rather than having to separately save files and email them. You must enter a valid email address to receive a response. This goes through the one support system that also covers the sales and tech email addresses, Facebook page posts and Facebook page messages, so it gets checked along with all of those. Just like with any support, we need to see a log that demonstrates the problem you’re having and a text description from you so we know what to look for.
In all of the screens, you can select whether to hide or show the (1) monitor, which is a set of gauges down the right hand side. The top part of that monitor window is constant for all screens, but the bottom part can be changed from one screen to the next to show the most relevant data.
There are some other useful indicators on the main window:
At the top right is a (2) blue question mark, which you can use to search for settings, or context help. For example if you don’t know where to find target slip for traction control, you can go to that, select “Find Settings” and type “slip” into the search bar, and click the magnifying glass. By clicking on the search result, you can jump straight to that setting.
At the bottom there is a larger (3) search bar which does the same function. Next to that is some information that you’d normally want to see while tuning, such as the (4) battery life, time and date. There are two status indicators on the left; (5) one shows the ECU lock status (locked or unlocked) and the other shows the (6) ECU connection / settings synchronization and logging status. When an ECU is connected, it shows the serial number, type of ECU and firmware version.
Just above that is a list of the previous screens you’ve been to, so you can navigate back to them easily. I believe in web design speak these are called (7) “breadcrumbs” which is a reference to Hansel and Gretel.
That covers the home ribbon, the next articles will go into the contents of the other ribbons and how to set up the ECU from scratch.
Thank you very much and happy learning!
©2018 Adaptronic