Site Settings
The Site Settings dialog enables configuring various site settings. These include the maximum bandwidth that Zerto Virtual Replication uses between the protected and recovery sites, default script timeout, and protection policies such as the commit policy for a failover or move operation.
To specify site settings:
1. In the Zerto User Interface, in the top right of the header click
SETTING (

) and select
Site Settings.
The Site Settings dialog is displayed.
2. Make any required changes to the settings, click SAVE and then APPLY. The following settings can be defined:
Licensing is described in
Seeing What is Licensed.
Editing Information About a Site
You provide information about the site during installation, to make it easier to identify the site in the in the user interface and to identify the contact person at the site. After installation you can updated these settings.
In the Zerto User Interface, site information is displayed at the top of the display.
To update information about the local site:
1. In the Zerto User Interface, click
SETTING (
) in the top right of the header and select
Site Settings.
The Site Settings dialog is displayed.
2. Define general information about the site.
Site Name – The name used to identify the site. Mandatory.
Site Location – Information such as the address of the site or a significant name to identify it. Mandatory.
Bucket Name – The name of the bucket that was created when Zerto Virtual Replication was installed. This cannot be changed.
Contact Name – The name of the person to contact if a need arises. Mandatory.
Contact Email – An email address to use if a need arises.
Contact Phone – A phone number to use if a need arises.
3. If the credentials to access AWS from the Zerto Virtual Manager change, specify the new credentials:
Access Key ID – A unique identifier that is associated with a secret access key.
Secret Access Key – A key that is used with the access key ID.
4. Click APPLY or SAVE.
Defining Site Policies
You can set default recovery and replication policies.
Configuring Disaster Recovery Policies
To configure disaster recovery policies:
1. Click Policies.
None – The failover or move operation must be manually committed or rolled back by the user.
Commit – After the time specified in the Default Timeout field the failover or move operation is committed, unless manually committed or rolled back by the user before the time-out value is reached. During the specified time you can check the recovered VPG virtual machines.
Rollback – After the time specified in the Default Timeout field the failover or move operation is rolled back, unless manually committed or rolled back by the user before the time-out value is reached. During the specified time you can check the recovered VPG virtual machines.
The value set here applies as the default for all failover or move operations from this point on but can be changed when defining a failover or move operation.
3. Specify the Default Timeout after which a Commit or Rollback commit policy is performed. A value of zero indicates that the system will automatically perform the commit policy, without waiting for any user interaction.
4. Choose the Instance Family from which to select the type. AWS instance families are optimized for different types of applications.
5. Choose the Instance Type within the instance family, to assign to recovered instances. Different types within an instance family vary primarily in vCPU, ECU, RAM, and local storage size. The price per instance is directly related to the instance size.
6. Choose the Replication Pause Time, which is the time to pause when the journal might have problems, resulting in the loss of all checkpoints, for example, when the datastore for the journal is near to being full.
The replication pause time is the amount of time that the transfer of data from the protected site to the journal on the recovery site is paused. This time can then be used by the administrator to resolve the issue, for example by cloning the virtual machines in the VPG, described in
“Cloning Protected Virtual Machines to the Remote Site”, on page 103. The value set here is applied to existing and new VPGs.
7. Click APPLY or SAVE.
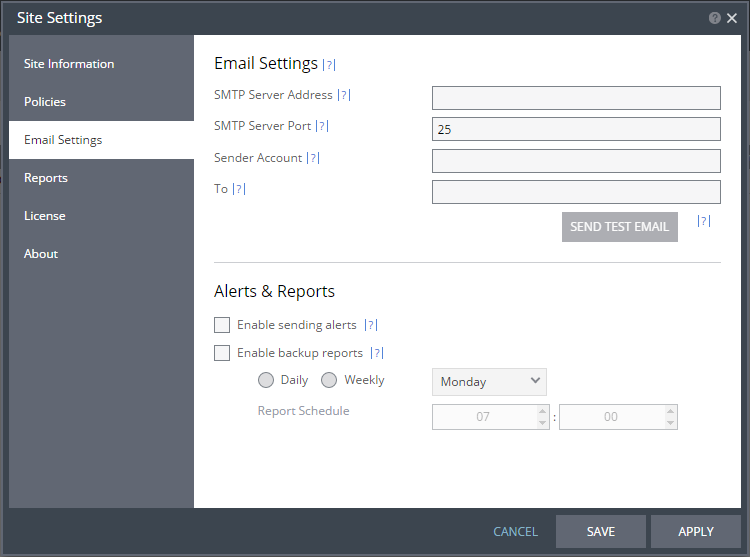
Configuring Email Settings
You can configure Zerto Virtual Replication alerts to be sent to an email address, so as to be better informed when an alert occurs and backups are run.
Email Settings
To configure email settings:
1. Click Email Settings.
2. Specify the SMTP server Address. The Zerto Virtual Manager must be able to reach this address.
3. If the SMTP Server Port was changed from the default, 25, specify the port number.
4. Specify a valid email address for the email sender name in the Sender Account field.
5. Specify a valid email address where you want to send the email in the To field.
You can test that the email notification is set up correctly by clicking SEND TEST EMAIL. A test email is sent to the email address specified in the To field.
6. Click APPLY or SAVE.
Alerts and Reports
You can configure when to send alerts and backup reports.
To configure when to send emails about alerts and backups:
1. To send an email when an alert is issued, check Enable sending alerts.
2. To send an email with a backup report, check Enable backup reports.
3. Specify whether you want a backup report sent daily or weekly.
Daily – Send a daily backup report
Weekly – Send a weekly backup report. Select the day of the week from the dropdown list.
4. Specify day of the week and the time of day to send the backup report.
5. Click APPLY or SAVE.
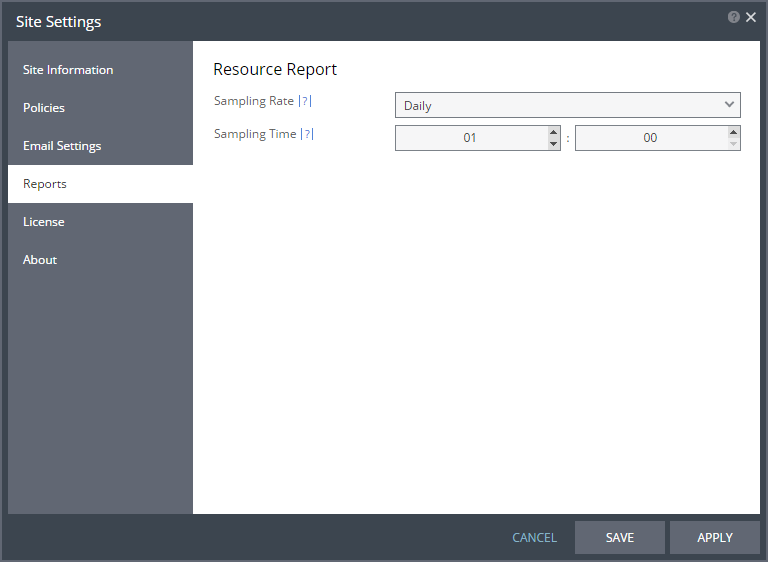
Defining the Resource Report Sampling Period
Specify when you want to take resource samples to identify resource usage, either daily at a specific hour and minute or hourly at a specific minute within each hour.
1. Click Reports.
2. Choose the Sampling Rate.
3. Choose the Sampling Time.
If you set the daily time to be 12:00, you will get a sample taken at noon every day. Collecting a sample hourly provides a higher resolution picture of replication traffic than if collected daily.
4. Click APPLY or SAVE.
Information is saved for 90 days when the sampling period is hourly and for one year when the sampling period is daily.
These samples are used to generate resource reports as described in
“Zerto Virtual Replication Reports”, on page 127.