Moving Protected Virtual Machines to a Remote Site
You can move the virtual machines in a virtual protection group to a remote site, where the virtual machines are replicated. As part of the process you can also set up reverse replication, where you create a virtual protection group on the remote site for the virtual machines being moved, pointing back to the original site. This is commonly used, for example, when the protected site has planned downtime.
To initiate a move:
1. In the Zerto User Interface select ACTIONS > MOVE VPG.
The Move wizard is displayed.
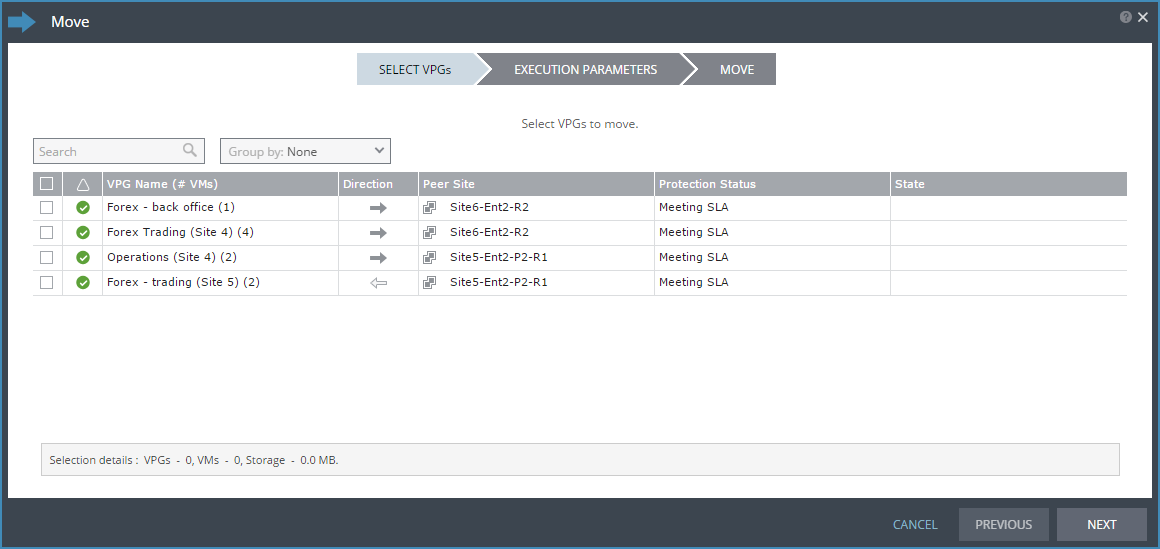
2. Select the VPGs to move.
At the bottom, the selection details show the amount of data and the total number of virtual machines selected.
The Direction arrow shows the direction of the process: from the protected site to the peer, recovery, site.
3. Click NEXT.
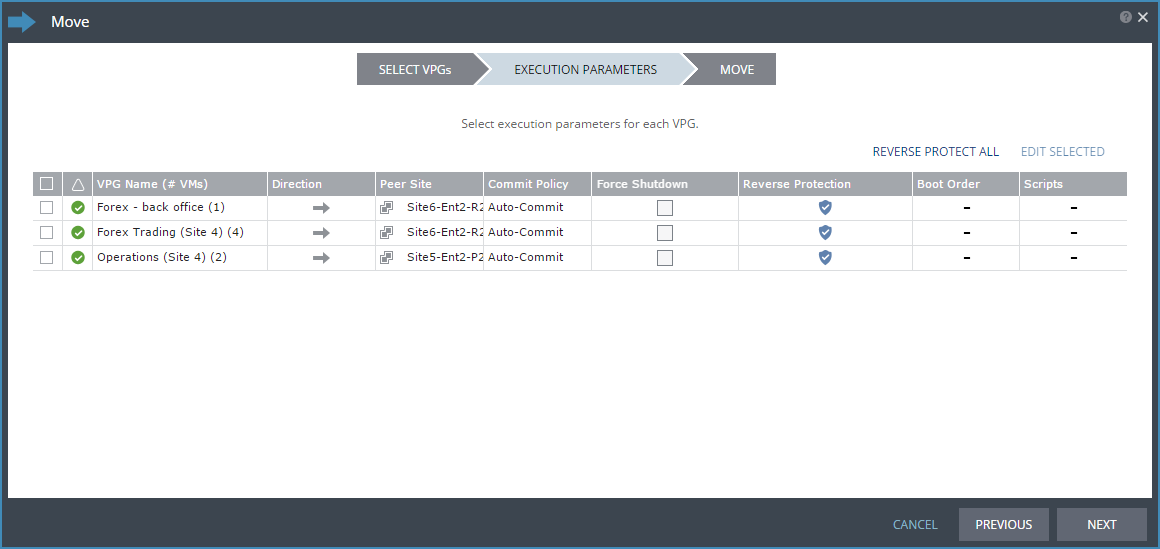
The EXECUTION PARAMETERS step is displayed.
You can change the following values to use for the recovery:
■ The commit policy
■ The checkpoint to use
■ The shutdown policy
■ The reverse protection settings
You can also see if a boot order and scripts are defined for the VPG.
4. To change the commit policy, click on the field or select the VPG and click EDIT SELECTED.
a) To commit the recovery operation automatically, without any checking, select Auto-Commit and 0 minutes.
b) If you do not want an automatic commit or rollback, select None. You must manually commit or roll back.
To allow checking before committing or rolling back, specify an amount of time to check the recovered machines, in minutes, before the automatic commit or rollback action is performed. During this time period, check that the new virtual machines are OK and then commit the operation or roll it back. The maximum amount of time you can delay the commit or rollback operation is 1440 minutes, which is 24 hours.
Checking that involves I/O is done on scratch volumes. The longer this period the more scratch volumes are used, until the maximum size is reached, at which point no more checking can be done. The maximum size of all the scratch volumes is determined by the journal size hard limit and cannot be changed. The scratch volumes reside on the storage defined for the journal.
When deciding to commit the operation, you can decide to configure reverse protection, regardless of the reverse protection setting when the operation started.
5. To force a shutdown of the virtual machines, click the Force Shutdown checkbox. If the virtual machines cannot be gracefully shut down, for example if VMware Tools is not installed on one of the virtual machines in the VPG, the Move operation fails unless you specify that you want to force the shutdown. If a utility is installed on the protected virtual machines, the procedure waits five minutes for the virtual machines to be gracefully shut down before forcibly powering them off.
6. To specify reverse protection, where the virtual machines in the VPG are moved to the recovery site and then protected in the recovery site, back to the original site, double-click the Reverse Protection field and click the REVERSE link.
The Edit Reverse VPG wizard is displayed.
You can edit the reverse protection configuration. The parameters are the same as described when you create a VPG, described in
To create a virtual protection group (VPG):, with the following differences:
■ You cannot add or remove virtual machines to the reverse protection VPG.
■ By default, reverse replication is to the original protected disks. You can specify a different datastore to be used for the reverse replication.
■ If VMware Tools are available, for each virtual machine in the VPG, the IP address of the originally protected virtual machine is used. Thus, during failback the original IP address of the virtual machine on the site where the machine was originally protected is reused. However, if the machine does not contain the utility, DHCP is used.
The host version must be 4.1 or higher for re-IP to be enabled.
7. Click NEXT.
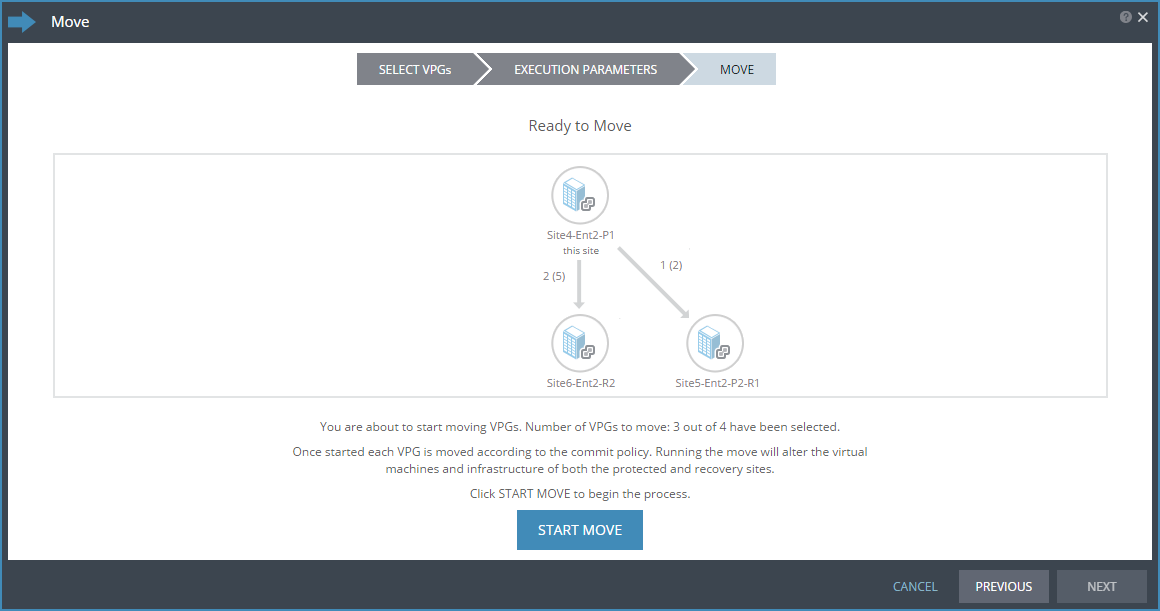
The MOVE step is displayed. The topology shows the number of VPGs and virtual machines being moved to each peer site. In the following example, 2 VPGs will be moved to Site6-Ent2-R2, and they contain 5 virtual machines; and 1 VPG will be moved to Site5-Ent2-P2-R2 and it contains 2 virtual machines.
8. Click START MOVE to start the migration.
If a commit policy was set with a timeout greater than zero, as described in step
4, you can check the moved virtual machines on the recovery site before they are removed from the protected site.
Note: If a virtual machine exists on the recovery site with the same name as a virtual machine being migrated, the machine is moved and named in the peer site with a number added as a suffix to the name, starting with the number 1.
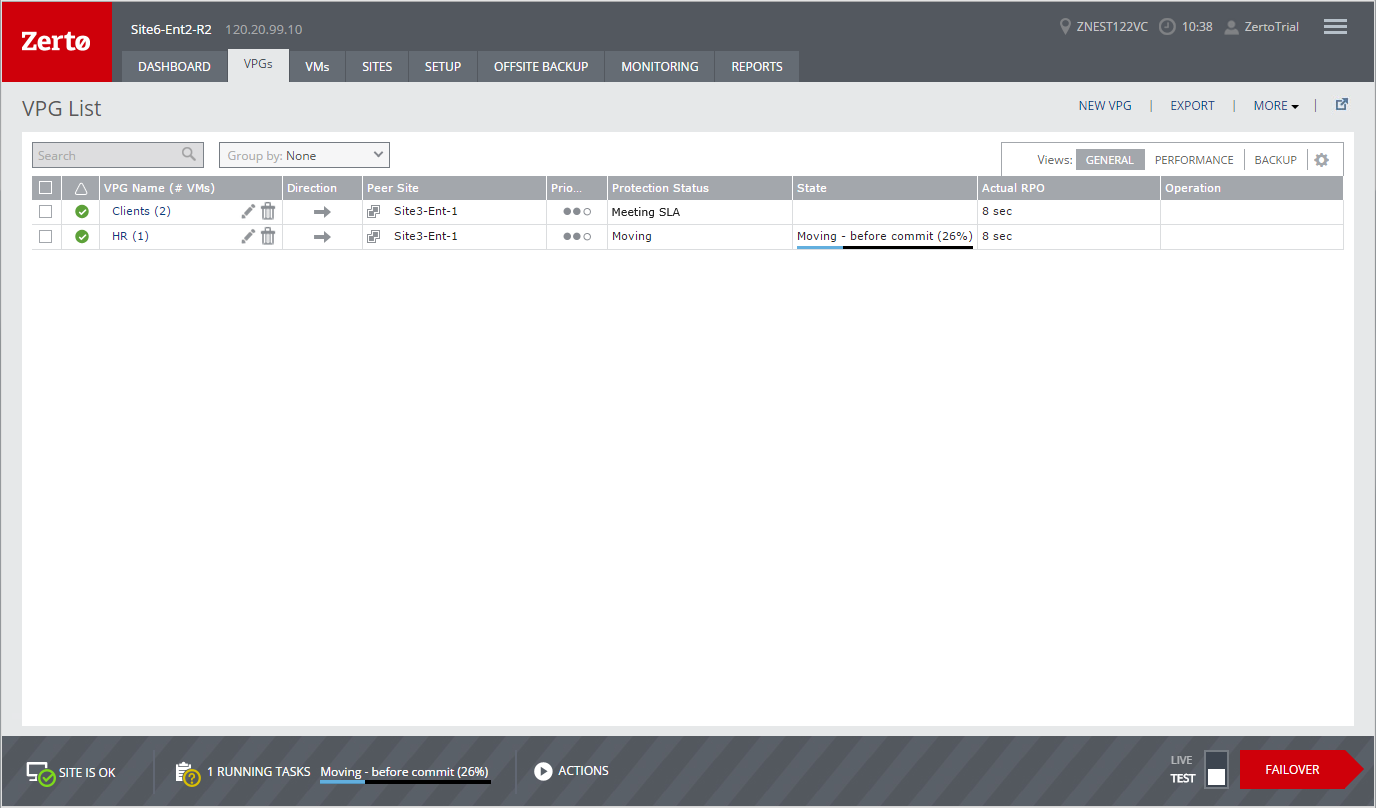
The status icon changes to orange and an alert is issued, to warn you that the procedure is waiting for either a commit or rollback.
All testing done during this period, before committing or rolling back the Move operation, is written to thin-provisioned virtual disks, one per virtual machine in the VPG. These virtual disks are automatically defined when the machines are created on the recovery site for testing. The longer the test period the more scratch volumes are used, until the maximum size is reached, at which point no more testing can be done. The maximum size of all the scratch volumes is determined by the journal size hard limit and cannot be changed. The scratch volumes reside on the storage defined for the journal. Using these scratch volumes makes committing or rolling back the Move operation more efficient.
Note: You cannot take a snapshot of a virtual machine before the Move operation is committed and the data from the journal promoted to the moved virtual machine disks, since the virtual machine volumes are still managed by the VRA and not directly by the virtual machine. Taking a snapshot of a machine that is in the process of being moved will corrupt that machine.
9. After checking the virtual machines on the recovery site, choose one of the following:
■ Wait for the specified Commit Policy time to elapse, and the specified operation, either Commit or Rollback, is performed automatically.
■ Click the
Commit or
Rollback icon (

) in the specific VPG tab.
■ Click Commit to confirm the commit and, if necessary set, or reset, the reverse protection configuration. If the protected site is still up and you can set up reverse protection, you can reconfigure reverse protection by checking the Reverse Protection checkbox and then click the Reverse link. Configuring reverse protection here overwrites any of settings defined when initially configuring the failover.
■ Click Rollback to roll back the operation, removing the virtual machines that were created on the recovery site and rebooting the machines on the protected site. The Rollback dialog is displayed to confirm the rollback.
You can also commit or roll back the operation in the TASKS popup dialog in the status bar or under MONITORING > TASKS.
After the virtual machines are up and running and committed in the recovery site, the powered off virtual machines in the protected site are removed from the protected site. Finally, data is promoted from the journal to the moved virtual machines.
During promotion of data, you cannot move a host on the moved virtual machines. If the host is rebooted during promotion, make sure that the VRA on the host is running and communicating with the Zerto Virtual Manager before starting up the recovered virtual machines.
Note: If the virtual machines do not power on, the process continues and the virtual machines must be manually powered on. The virtual machines cannot be powered on automatically in a number of situations, such as when there are not enough resources in the resource pool or the required MAC address is part of a reserved range or there is a MAC address conflict or IP conflict, for example, if a clone was previously created with the MAC or IP address.
When a vCD vApp is moved to a vCenter Server recovery site, a vCenter Server vApp is created in the recovery site. If reverse protection was specified, the VPG state is Needs Configuration and the VPG must be recreated by protecting the virtual machines in the vApp as separate machines and not as part of the vApp.
The following conversions are done to a protected virtual machine in vSphere when it is recovered in Hyper-V:
■ A machine using BIOS is recovered in Hyper-V as a Generation 1 virtual machine.
■ A machine using EUFI is recovered in Hyper-V as a Generation 2 virtual machine.
■ A machine with a 32bit operating system is recovered in Hyper-V as a Generation 1 virtual machine.
■ A machine with a 64bit operating system is recovered in Hyper-V as either a Generation 1 or Generation 2 virtual machine, dependent on the operating system support in Hyper-V.
■ The boot disk is ported to a disk on an IDE controller. The boot location is 0:0.
■ A virtual machine using up to 4 SCSI controllers is recovered as a virtual machine with 1 SCSI controller.
■ The virtual machine NICs are recovered with Hyper-V network adapters except for protected Windows 2003 virtual machines which are recovered with Hyper-V legacy network adapters.
■ When VMware Tools is installed on the protected virtual machine running Windows Server 2012, Integration Services is installed on the recovered virtual machine automatically.
■ RDM disks are replicated to Hyper-V vhd or vhdx disks, and not to Pass-through disks.