Clarity Space Programming: Setup Process
Within Revit, in order to leverage Clarity Space Programming data, we
need to do a little work to configure the integration for a particular
project and model.
The Setup tool assists in defining this configuration information.
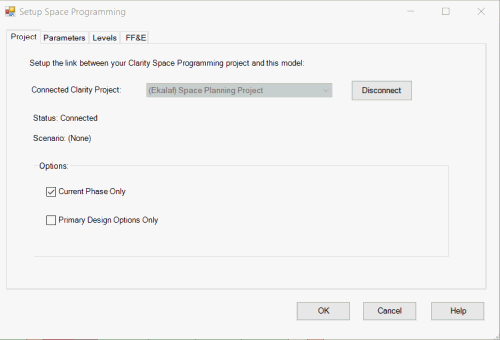
Project
The Project page is primarily to connect this model to a particular
project within your Clarity Server. This will control what project the
Revit commands draw their program information from.
The information on this dialog will be stored IN THE MODEL.
Also Note: If the project has an Assigned Scenario, that
scenario is shown here - and all of the program data will be from that
scenario.
Additional options for how Revit geometry is handled:
- Current Phase Only: Look at geometry only within the current
phase (ignore anything that does not exist in the current phase).
- Primary Design Options Only: Ignore any geometry that is
not in the primary design option.
Parameters
The parameters tab deals with how data is going to flow from Clarity
Space Programming into Revit, and then from Revit back into Clarity Space
Programming.
The setup of your space planning families is
an entirely separate topic - but this is where you will define the
parameter mapping.
There is a separate set of parameters to map for each
geometry type that we support (Masses, Generic Models, Areas and Rooms).
You must change to each one, and set up the mapping for any of the parameters
you are going to map.
In the first column, you should see the available fields
from Clarity Space Programming, both built-in fields as well as your own
custom parameters from room type or room requirements.
A few notes:
- RequirementId: There is a pre-requisite parameter that MUST
be assigned to your families/categories, called "RequirementId"
- this does not have to be listed here. It is assumed.
- TargetArea: This is the target area of a given room requirement.
It will be converted into the current units for Revit, but we recommend
making sure that the units chosen in the web side are the same as
in your Revit model.
- TargetAreaSide: This is the square-root of the TargetArea - so
that if your Revit Family has a driving dimensions for Length/Width,
you can popupulate them with a side of a square value.
The second column is the Revit parameter to map to. The drop-down list
will show you information about Revit parameters that we know about. Depending
on the state of families in the model, we may be challenged to figure
out the parameters properly. You can increase the chances by:
1. Have an instance of a particular family loaded in the project before
you start the command.
2. Pre-select an instance of a particular family to make
sure THAT instance is used for parameters.
The Revit parameter names can be typed in, the drop-down
is just for assistance.
The third column determines which way the data flows:
- ClarityToRevit (this will be the most common option)
- RevitToClarity (this will be required for the Actual area of a
room/area/space - it does not work for many other scenarios).
The forth column describes whether the population of the parameter data
should only happen when the geometry is initially created (and never updated).
This is commonly used by firms to deal with:
- The TargetAreaSide, where you want to initialize the Lenth/width
of a block - but then expect it to be adjusted.
- Some firms capture the "Designer Recommended Area" as
an initial value - but allow them to change it to reflect their recommendation.
You can click the link on the "See Recommendations" to see
if we were able to guess at some proper mappings, based on the names.
Levels
The levels defined in the program (if any) need to be mapped to the
corresponding Revit Levels. For each program level, please pick the corresponding
Revit Level.
FF&E
There are two items to configure for FF&E checking and tracking:
- Which parameter within the families will be used to identify the
family and compare against the "FF&E code" which is
configured on the web side for FF&E requirements.
- Often, firms use "Type Mark" for this
- Firms doing government work often use a "JSN" parameter
for this.
- Family Folders:
- If an FF&E requirement has not been met, and if the family
in question cannot even be found - then it is likely that the
family still has to be loaded. The Clarity FF&E catalog has
an option for an administrator to specify the name of the RFA
file which should contain a particular FF&E item. This setting
controls what folders should be scanned looking for the desired
RFA file (if it has been configured). If found, Clarity will offer
to load the missing family.