New Repository Dialog
You define the repositories where offsite backups are defined on the recovery site and can be stored, either locally at the recovery site, or on a network share that uses the SMB, Server Message Block, protocol. The repository where you want this offsite backup stored is specified when an offsite backup is defined.
To create an offsite backup repository:
1. In the Zerto User Interface, click SETUP > REPOSITORIES.
2. Click NEW REPOSITORY.
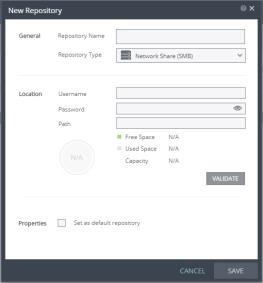
The New Repository dialog is displayed.
3. Specify the following settings:
■ Repository Name: Specify a unique name for the repository.
■ Repository Type: Specify the type of repository:
■ Local: Backups are stored on the local machine where the Zerto Virtual Manager is installed.
■ Network Share (SMB): The network share drive must be an SMB drive and if specified, the username and password to access the drive must be provided.
When the repository location is a network drive, this drive can be mounted to third party storage, such as Amazon Web Services, AWS, or Microsoft Azure.
Using TntDrive, from Amazon, enables you to save your offsite backups to a cloud repository mounted disk as if you are using a LAN or locally mounted drive. You can mount one or more Amazon S3 buckets as network drives or as removable local drives, and to use them exactly as you would use any other drive folder on your computer.
■ Username: Username to access the Network Share drive.
This field is not displayed when the type is Local.
The username can be entered using either of the following formats:
■ username
■ domain\username
■ Password: Password to access the Network Share drive. This field is not displayed when the type is Local.
■ Path: The path where the repository will reside. The path must be accessible from the Zerto Virtual Manager, so if the repository is on a different domain to the Zerto Virtual Manager, the domain must be included in the path.
■
■ Set as default repository: Select this to use the repository as the default when specifying extended recovery in a VPG.
4. Click VALIDATE.You must validate the path specified. If the folder does not exist, you are asked if you want to create it.
5. Click SAVE.
The repository is created.