Protecting From a vCenter Server - To a Microsoft Azure Recovery Site
Use the following procedure to replicate from a protected site vCenter Server to a recovery site Microsoft Azure.
To create a virtual protection group (VPG) to recover in Microsoft Azure:
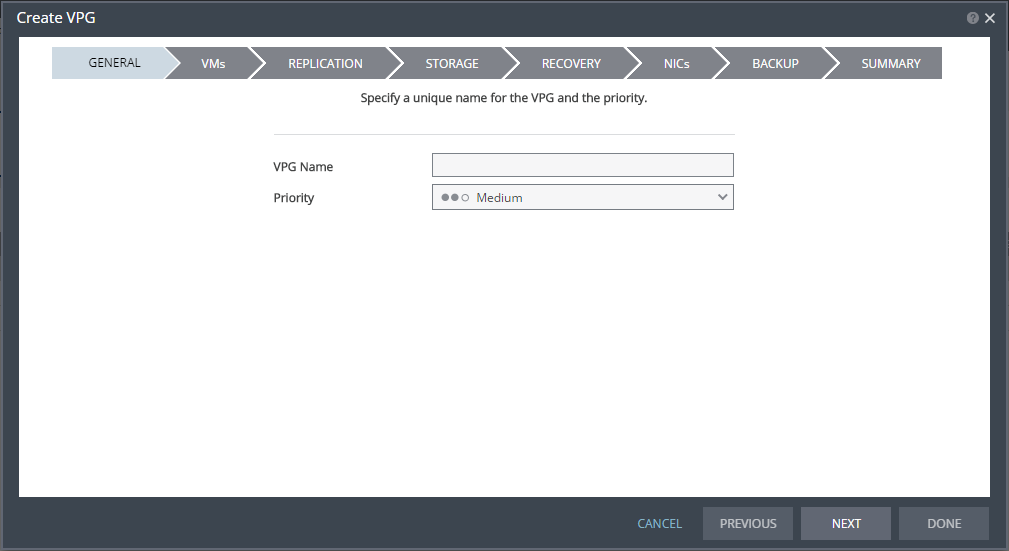
1. In the Zerto User Interface, select ACTIONS > CREATE VPG.
The GENERAL step of the Create VPG wizard is displayed.
2. Specify the name of the VPG and the priority of the VPG.
■ VPG Name: The VPG name must be unique. The name cannot be more than 80 characters.
■ Priority: Determine the priority for transferring data from the protected site to the recovery site when there is limited bandwidth and more than one VPG is defined on the protected site.
■ High Priority: When there are updates to virtual machines protected in VPGs with different priorities, updates from the VPG with the highest priority are passed over the WAN first.
■ Medium Priority: Medium priority VPGs will only be able to use whatever bandwidth is left after the high priority VPGs have used it.
■ Low Priority: Low priority VPGs will use whatever bandwidth is left after the medium priority VPGs have use it.
Updates to the protected virtual machines are always sent across the WAN before synchronization data, such as during a bitmap or delta sync.
During synchronization, data from the VPG with the highest priority is passed over the WAN before data from medium and low priority VPGs.
3. Click NEXT.
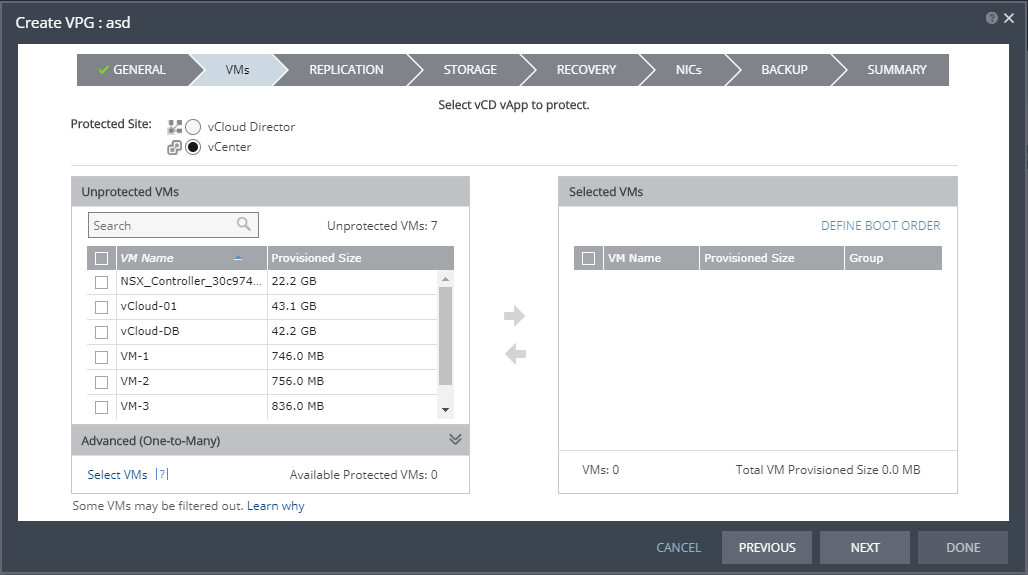
The VMs step is displayed.
4. Select the VMs that will be part of this VPG and click the arrow pointing right to include these VMs in the VPG.
■ When using the Search field, you can use the wildcards; * or ?.
Virtual machines that are not yet protected are displayed in the list. A VPG can include virtual machines that are not yet protected and virtual machines that are already protected.
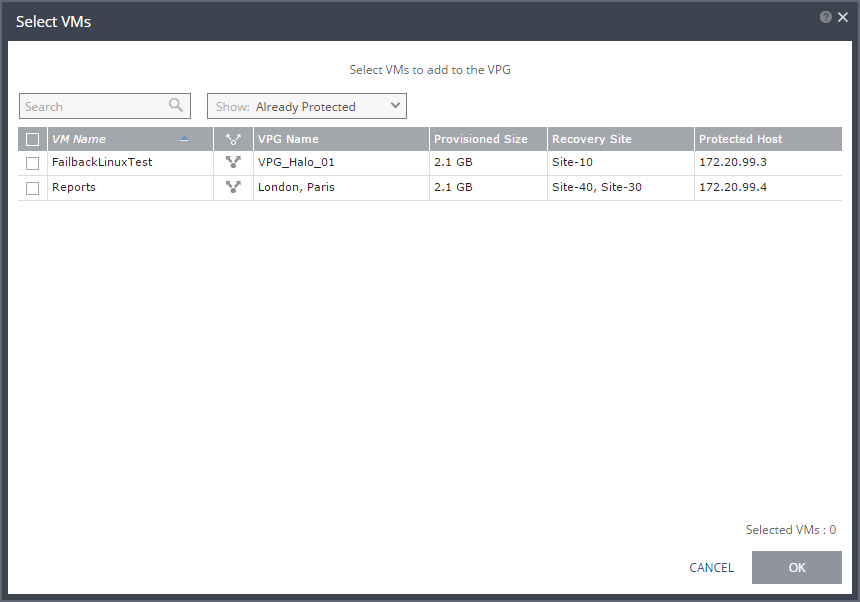
5. You can view protected virtual machines in the Advanced (One-to-Many) section, by clicking Select VMs.
The Select VMs dialog is displayed.
Note: Virtual machines can be protected in a maximum of three VPGs. These VPGs cannot be recovered to the same site. Virtual machines protected in the maximum number of VPGs are not displayed in the Select VMs dialog.
Protecting virtual machines in several VPGs is enabled only if both the protected site and the recovery site, as well as the VRAs installed on these sites, are of version 5.0 and higher.
6. Click NEXT.
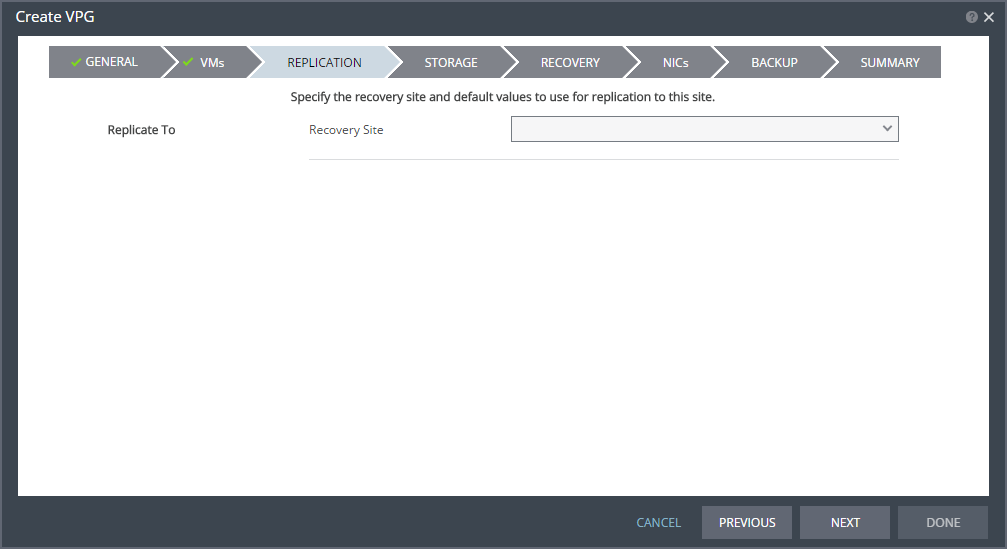
The REPLICATION step is displayed.
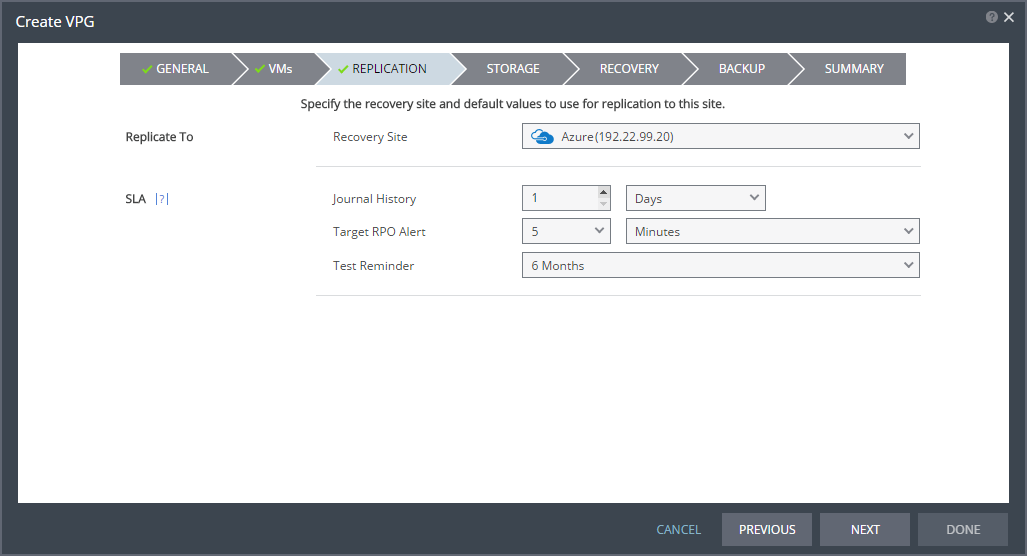
Note: If the protected site is paired with only one recovery site, the recovery step is displayed with the Recovery Site field automatically filled in and defaults set, as shown below.
7. Specify the recovery site.
■ Recovery Site: The site to which you want to recover the virtual machines. After specifying the recovery site, other fields are displayed.
Note: Steps that do not require input are marked with a check mark. You can jump directly to a step that has been marked with a check mark to edit the values for that step. Every step must be marked with a check mark before you can click DONE to create the VPG.
You cannot select a recovery site if any of the virtual machines you selected are already in VPGs that recover to that site.
8. Optionally, change the default SLA values:
■ Journal History: The time that all write commands are saved in the journal.
The longer the information is saved in the journal, the more space is required for each journal in the VPG.
Select the number of hours from 1 to 24 or the number of days from 2 to 30.
9. Click NEXT.
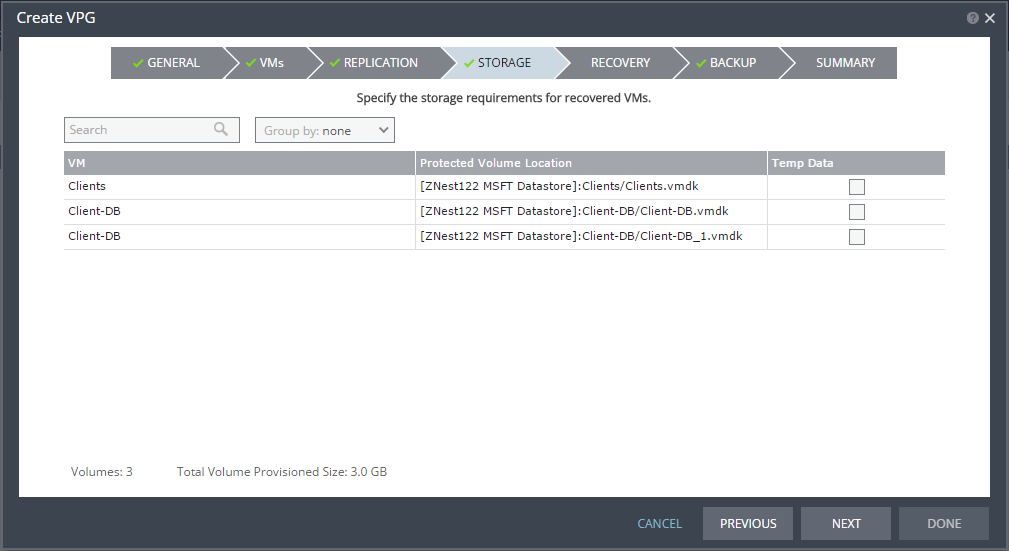
The STORAGE step is displayed.
By default the storage used for the virtual machine definition is also used for the virtual machine data.
For each virtual machine in the VPG, Zerto Virtual Replication displays its storage-related information.
10. Specify whether the protected volume is a temp data disk.
Temp Data: If the virtual machine to be replicated includes a temp data disk as part of its configuration, mark the recovery disk for this disk as a temp data disk. In this case, data is not replicated to the temp data disk after initial synchronization.
11. Click NEXT.
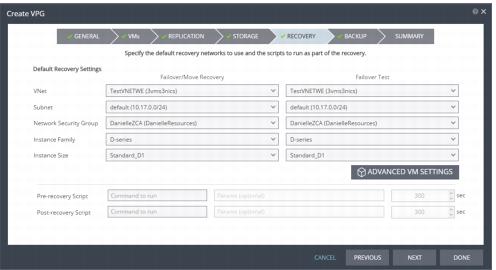
The RECOVERY step is displayed. Recovery details include the networks, network security group, instance family, and instance size to use for failover, move, and testing failover, and whether scripts should run as part of the recovery process.
Note: Steps that do not require input are marked with a check mark. You can jump directly to a step that has been marked with a check mark to edit the values for that step. Every step must be marked with a check mark before you can click DONE to create the VPG.
12. Select recovery settings for failover/move and failover testing.
■ VNet: The virtual network dedicated to your Azure subscription.
■ Subnet: The subnet or the VNet network.
■ Network Security Group: The Azure network security to be associated with the virtual machines in this VPG. You can associate one network security group with the virtual machines. The NIC will be associated with the network security group defined at the virtual machine level.
■ Virtual Machine Series: The virtual machine series from which to select the size. Azure virtual machine series are optimized for different types of applications. The default is set to Dv2-series.You can choose the virtual machine series appropriate for the application being protected in the VPG.
■ Virtual Machine Size: The virtual machine size, within the virtual machine series, to assign to recovered virtual machines. Different sizes within a virtual machine series vary, for example in a number of cores, RAM, and local storage size. The default is set to Standard_D1_v2.You can choose the virtual machine size appropriate for the application being protected in the VPG. The price per virtual machine is related to the virtual machine configuration.
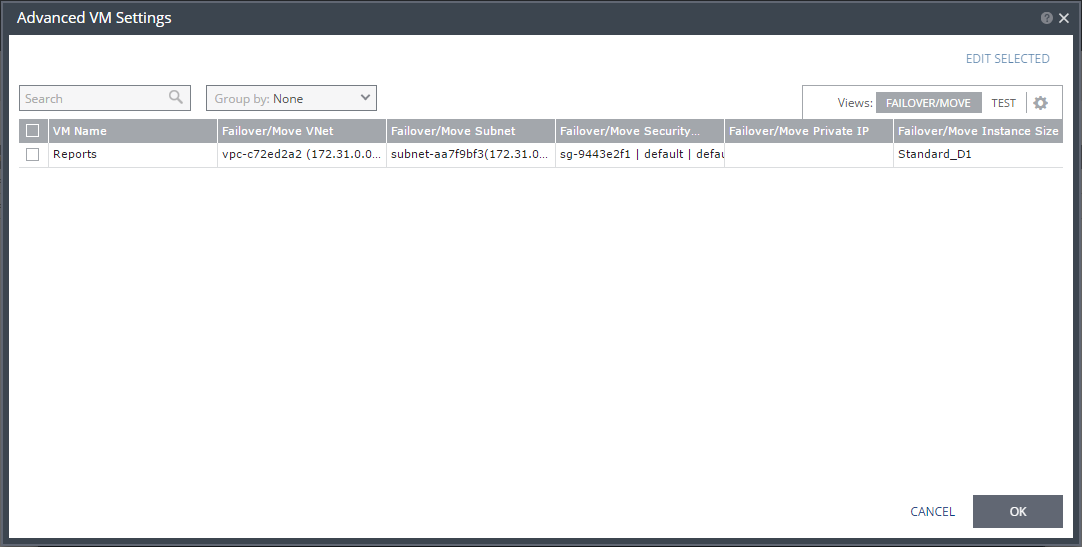
13. For additional settings, click ADVANCED VM SETTINGS.
The Advanced VM Settings dialog is displayed, which shows the recovery network settings for failover and move for virtual machines in the VPG. You can see the recovery network settings for failover tests by clicking TEST.
14. To edit information in one field, click the field and update the information.
15. To edit information for several virtual machines at the same time, select the virtual machines and click EDIT SELECTED.
The Edit VM Settings dialog is displayed.
16. Update the values for VNet, subnet, network security group, instance family, instance size, and private IP as necessary.
Note: Only private IPs specified for Windows machines are assigned during a recovery operation. For Linux machines, the IP is assigned from the specified subnet range.
Clearing the values in the Private IP field results in an IP being automatically assigned from the subnet range during a recovery operation.
Refer to the
Zerto Virtual Replication Interoperability Matrix for the list of operating systems for which Zerto supports re-IP.
17. Click OK twice to return to the main page of the RECOVERY step.
18. Enter the name of the script to run in the Command to run text box. You can then enter details about the script.
■ Pre-recovery Script: The information about a script that should run at the beginning of the recovery process.
■ Post-recovery Script: The information about a script that should run at the end of the recovery process.
For both types of scripts, enter the following information:
Text Box | Description |
Command to run | The full path of the script. The script must be located on the same machine as the Zerto Virtual Manager for the recovery site. |
Params | The parameters to pass to the script. Separate parameters with a space. |
Timeout | The time-out, in seconds, for the script to run. ■ If the script runs before executing a failover, move, or test failover, and the script fails or the timeout value is reached, an alert is generated and the failover, move, or test failover is not performed. ■ If the script runs after executing a failover, move, or test failover, and the timeout value is reached, an alert is generated. ■ The default time-out value is specified in Site Settings > Performance and Throttling tab. |
19. Click NEXT.
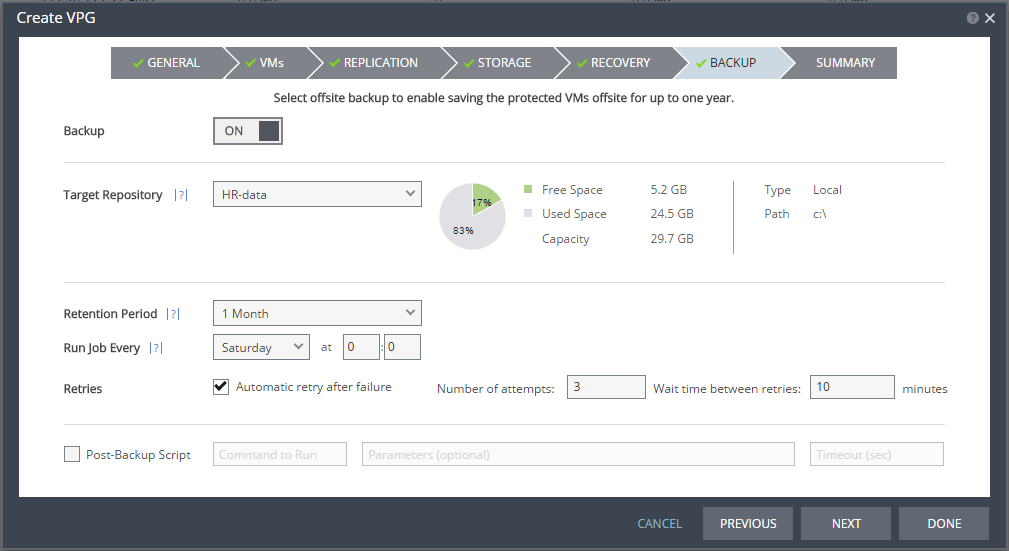
The BACKUP step is displayed. Backup properties govern the VPG backup, including the repository where the backups are saved. Backup extends the ability to recover virtual machines in a VPG for up to one year.
20. By default, backup is
OFF. To keep this value, go to step
26.
21. Otherwise, toggle OFF to ON and enter the following information:
■ Retention Period: The length of time to keep offsite backups, up to a maximum of one year. For details of how this affects the number of backups saved, see
“Offsite Backups”, on page 44.
■ Run Job Every: The day and time to start the backup.
■ Retries: Whether to rerun the backup job automatically if the job fails. If you select this option, you must also define the number of retries that will be attempted and the time to wait after a job fails before running the backup job again.
■ Post-Backup Script: The information about a script that should run at the end of the recovery process. Enter the following information:
Text Box | Description |
Command to run | The full path of the script. The script must be located on the same machine as the Zerto Virtual Manager for the recovery site. |
Parameters | The values of parameters to pass to the script. Separate parameters with a space. |
Timeout | The time-out, in seconds, for the script to run. If the timeout value is reached, an alert is generated. The default time-out value is specified in the Performance and Throttling tab of the Site Settings dialog. |
Note: You cannot restore a backup in Azure.
22. Click NEXT.
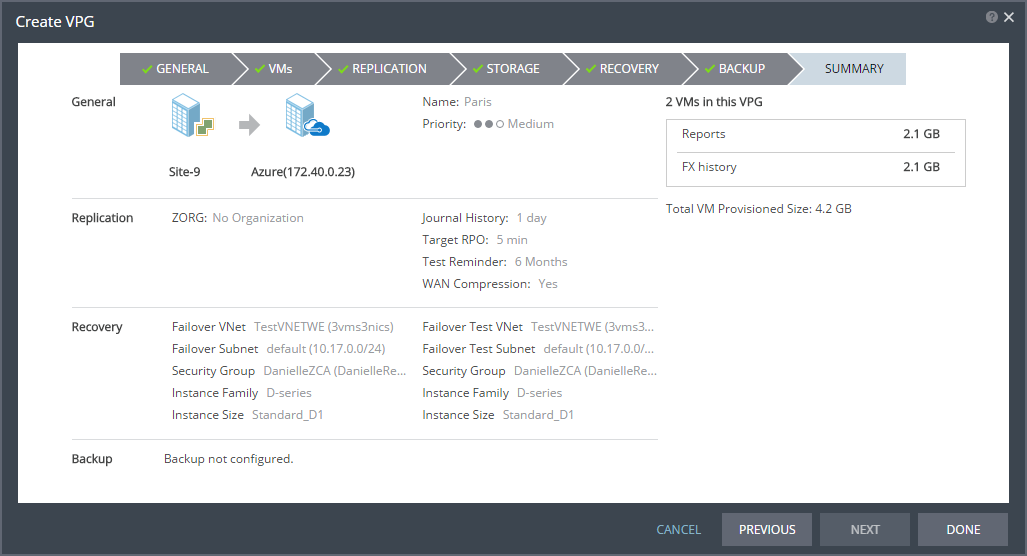
The SUMMARY step is displayed. It shows the VPG configuration that you defined in the previous steps.
23. Click DONE. The VPG is created.
For details of what happens after creating the VPG, see
“What Happens After the VPG is Defined”, on page 42.