Restoring Virtual Machines
You can restore an offsite backup to the recovery site, either by specifying the VPG that has offsite backups or the repository where the backup was saved.
When the recovery site where the offsite backups are stored is managed by a cloud service provider using vCloud Director, only the cloud service provider can initiate the restore.
To restore a backup:
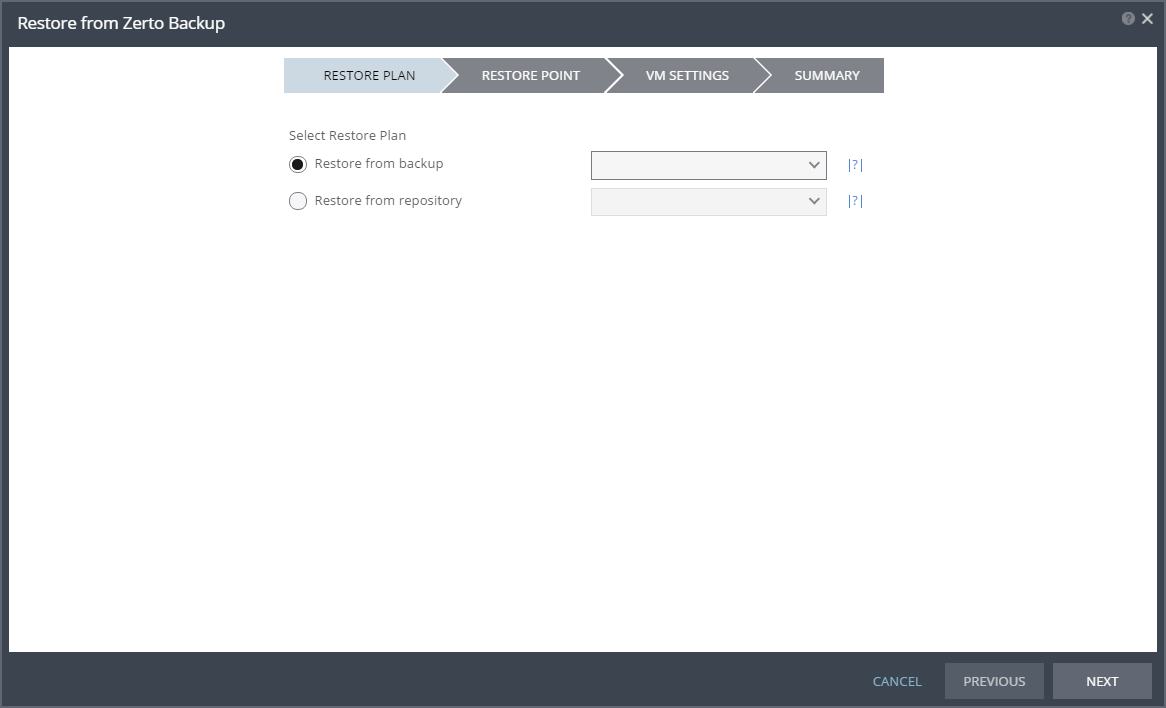
1. In the Zerto User Interface select ACTIONS > RESTORE BACKUP.
The Restore from Zerto Backup wizard is displayed.
2. Select the VPG to restore from the backup list or the repository where the offsite backup was saved. If the VPG backups were saved to more than one repository, selecting the VPG collects all the offsite backups for the VPG from all the available repositories.
Note: When restoring via the VPG backup option, the VPG must still be available. If the VPG was deleted, the restore must be performed from a repository.
3. Click NEXT.
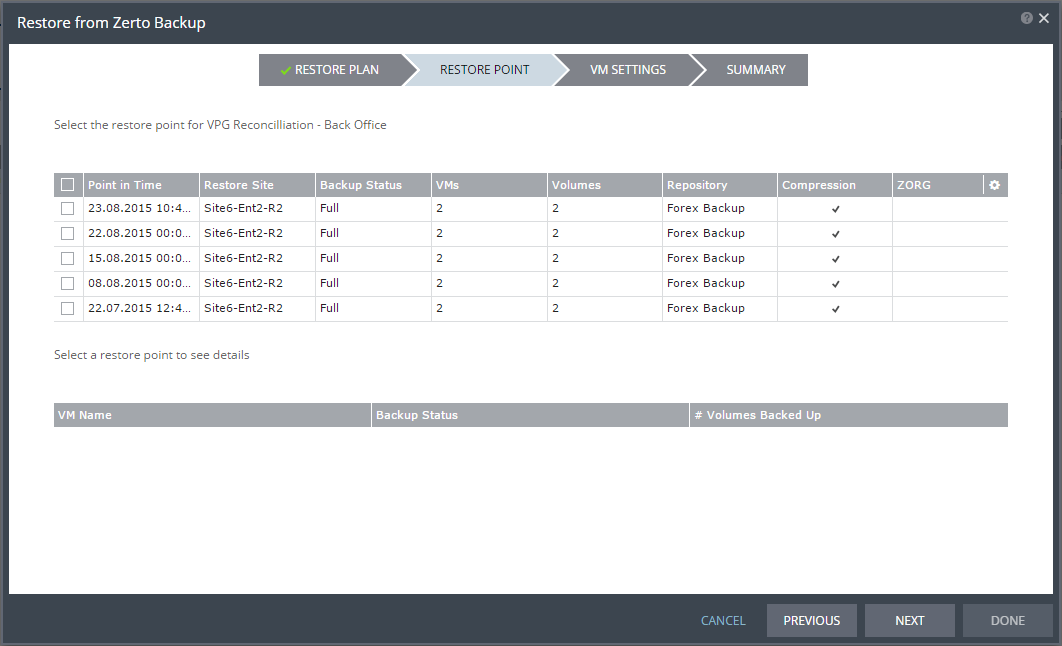
The RESTORE POINT step is displayed, showing all the available offsite backups.
where:
Point in Time – The date and time the offsite backup was performed.
Restore Site – The recovery site for the VPG.
Backup Status – Whether the offsite backup of the virtual machines was fully completed or only partially completed, in which case only some of the virtual machine were fully backed up.
VMs – The number of backed up virtual machines out of the total number of virtual machines.
Volumes – The number of backed up volumes out of the total number of volumes for the virtual machines.
Repository – The name of the repository where the offsite backup is stored.
Compression – A value in this field denotes that the backups stored in the repository are compressed.
ZORG – The Zerto organization for which the offsite backup was created. This field only has a value if the Zerto Cloud Manager is connected to the site. For details, refer to Zerto Cloud Manager Administration Guide.
4. Select the offsite backup to restore.
Selecting an offsite backup displays the list of virtual machines in the backup, including the following information:
VM Name – The name of the virtual machine in the package.
Backup Status – Whether the offsite backup of the virtual machine is complete or only partial, in which case only some of the volumes of the virtual machine were backed up.
# Volumes Backed Up – The number of backed up volumes out of the total number of volumes for the virtual machine.
Note: The number of offsite backups available depends on the frequency — daily or weekly — specified and the length of the retention period for the VPG. The exact number of offsite backups over time is described in
“Offsite Backups”, on page 44.
5. If the restore site has the option to restore to vCD, select where to attach the restored VMs, either to VC or vCD.
6. Click NEXT.
The VM SETTINGS step is displayed.
The list of virtual machines that can be restored is displayed.
7. You can specify the following default values, which are then applied to all the virtual machines to be restored:
Restore on Host – The IP address of the host where you want the virtual machine restored. After selecting a host the Restore on Datastore field is displayed.
Restore on Datastore – The datastore to use for the restored virtual machine files.
Alternatively, you can use the recovery host and storage specified for each virtual machine in the VPG definition by clicking APPLY VPG CONFIGURATION.
Note: The VPG must still be available to use APPLY VPG CONFIGURATION.
If you want to change the information in one field, click the field and update the information. If you want to change the host or datastore information for several virtual machines at the same time, select the virtual machines and click EDIT SELECTED.
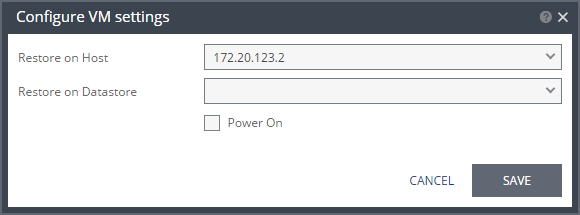
The Configure VM Settings dialog is displayed.
Note: If one or more of the backed up volumes was deleted after the backup was created, as long as there are still volumes to restore the backup can continue, restoring the remaining volumes.
You can specify the following values, which are then applied to all the selected virtual machines:
Restore on Host – The IP address of the host where you want the virtual machines restored.
Restore on Datastore – The datastore to use for the restored virtual machine files.
Power On – Check this if you want the restored virtual machines to be powered on.
Alternatively, you can use the recovery host and storage specified for each virtual machine in the VPG definition by clicking APPLY VPG CONFIGURATION.
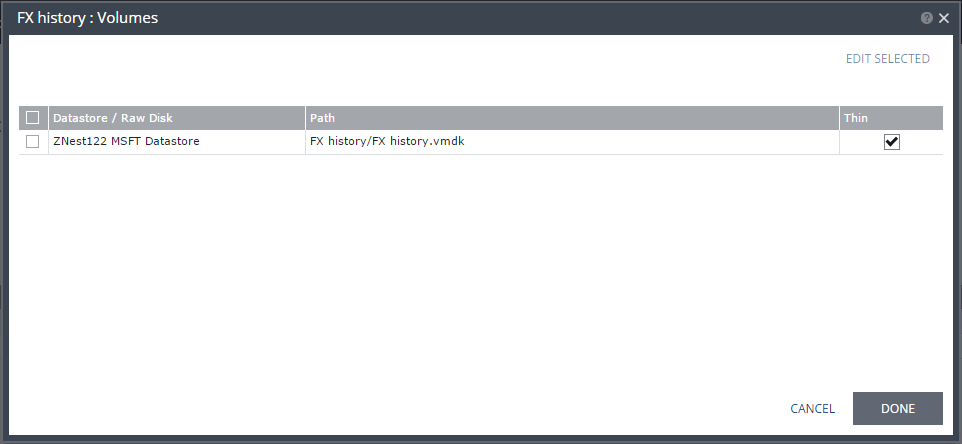
8. For each virtual machine, specify the volume information by clicking Volumes under Actions.
The Volumes dialog is displayed:
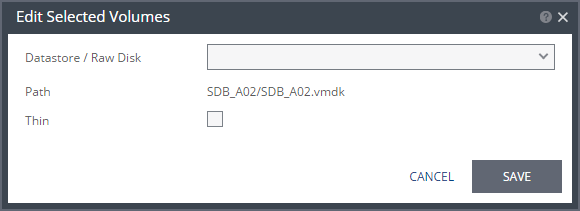
9. If you want to edit information in a field, click the field and update the information. If you want to edit information for several datastores at the same time, select the datastores and click EDIT SELECTED.
The Edit Selected Volumes dialog is displayed.
Note: If more than one datastore is selected, the path is not displayed.
10. Specify the datastore settings.
Datastore / Raw Disk – The storage or RDM disk where the virtual machine files will be restored.
Thin – Whether the virtual machine disks will be thin‑provisioned or not.
11. Click SAVE.
12. Click DONE.
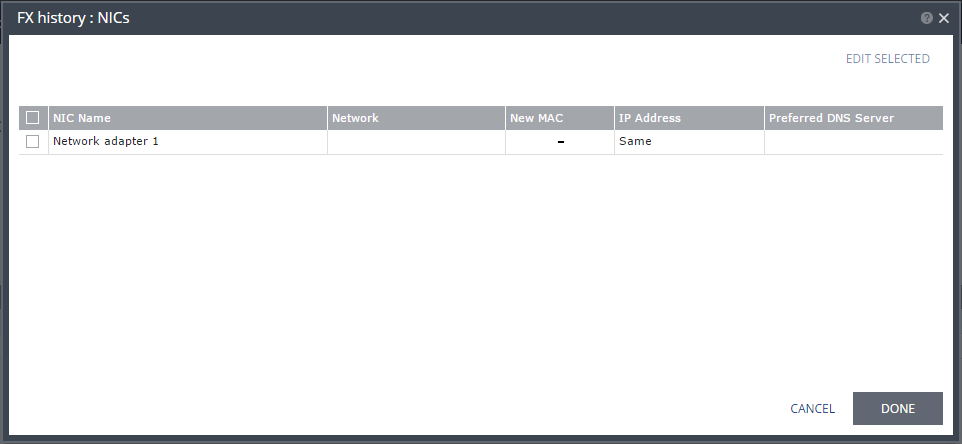
13. For each virtual machine, specify the NIC information by clicking NICs under Actions.
The NICs dialog is displayed:
14. If you want to edit information in one field, click the field and update the information. If you want to edit information for several virtual NICs at the same time, select the NICs and click EDIT SELECTED.
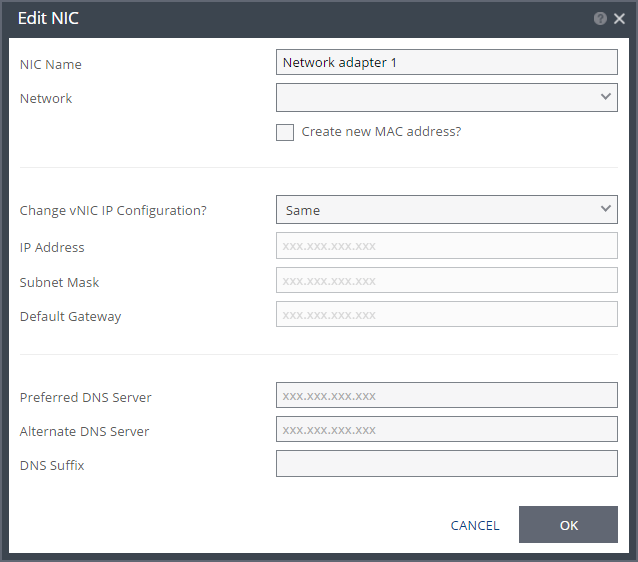
The Edit NIC dialog is displayed.
15. Specify the NIC settings.
NIC Name – The name of the selected NIC.
Network – The network to use for the restored virtual machine.
Create new MAC address – The Media Access Control address (MAC address) to use. The default is to use the same MAC address for the restored virtual machine that was used in the protected site. Check the box to create a new MAC address on the restore site.
Change vNIC IP Configuration – Whether or not to keep the default virtual NIC (vNIC) IP configuration. You can only change the vNIC IP after the restore has completed with VMware Tools installed. If you select a static IP connection, you must set the IP address, subnet mask, and default gateway. Optionally, change the preferred and alternate DNS server IPs and the DNS suffix. If you select DHCP, the IP configuration and DNS server configurations are assigned automatically, to match the protected virtual machine. You can change the DNS suffix.
IP Address – The IP for the restored virtual machine. This can be the same IP as the original protected virtual machine.
Subnet Mask – The subnet mask for the network. The default value is 255.255.255.0.
Default Gateway – The default mask for the network.
Preferred DNS Server– The IP address of the primary DNS server to handle Internet protocol mapping.
Alternate DNS Server – The IP address of the alternate DNS server.
DNS Suffix – The DNS name excluding the host.
16. Click OK.
17. Click DONE.
18. Click NEXT.
The SUMMARY step is displayed. Check the details of the restore.
19. If this is the offsite backup you want to restore, click RESTORE.
The virtual machines are created from the repository at the recovery site.