Installing a VRA
Zerto recommends installing a VRA on every host in every site so that if protected virtual machines are moved from one host in the cluster to another host in the cluster there is always a VRA to protect the moved virtual machines.
VRA Installation Requirements
To install a VRA you require the following:
■ 12.5GB datastore space.
■ At least 1GB of reserved memory.
■ The ESX/ESXi host version must be 4.0U1 or higher and Ports 22 and 443 must be enabled on the host during the installation.
You must also know the following information to install a VRA:
■ The datastore the VRA will use and the local network used by the host.
■ The network settings to access the peer site; either the default gateway or the IP address, subnet mask and gateway.
■ If a static IP is used, which is the Zerto recommendation, instead of DHCP, the IP address, subnet mask and default gateway to be used by the VRA.
Note: For the duration of the installation of the VRA, the Zerto Virtual Manager enables SSH in the vCenter Server.
If the peer site VRAs are not on the default gateway, you must set up routing to enable the VRAs on this site to communicate with the peer site VRAs before defining the VRAs. Setting up routing after defining VRAs only applies to VRAs installed after the routing is set. Any existing VRA is not affected and access to these VRAs continues via the default gateway. If the default gateway stops being used, you must reinstall the VRAs that were installed before setting up paired site routing.
To set up routing:
1. In the SETUP > VRAs tab, select MORE > Paired Site Routing.
The Configure Paired Site Routing dialog is displayed.
2. Click Enable Paired Site Routing.
3. Specify the following and then click SAVE:
Address – The IP address of the next hop at the local site, the router or gateway address, that is used to access the peer site network.
Subnet Mask – The subnet mask for the peer site network.
Gateway – The gateway for the peer site network.
These access details are used to access all VRAs installed on the peer site after the information is saved.
To install Zerto Virtual Replication Appliances (VRAs) on ESX/ESXi hosts:
1. In the Zerto User Interface, click SETUP > VRAs.
2. Select a host which requires a VRA and click NEW VRA.
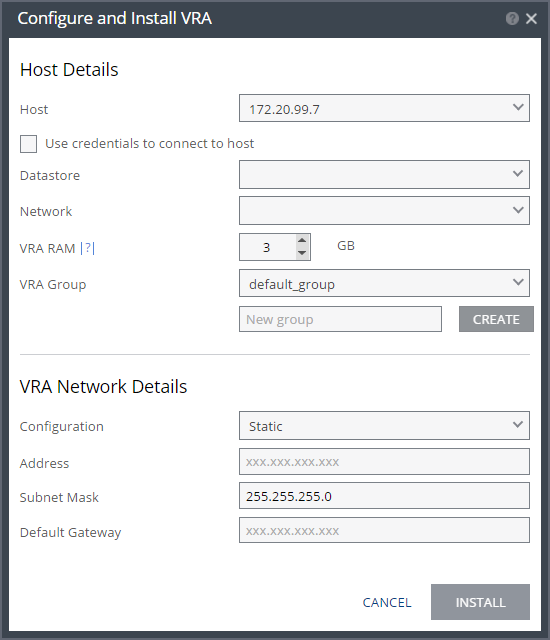
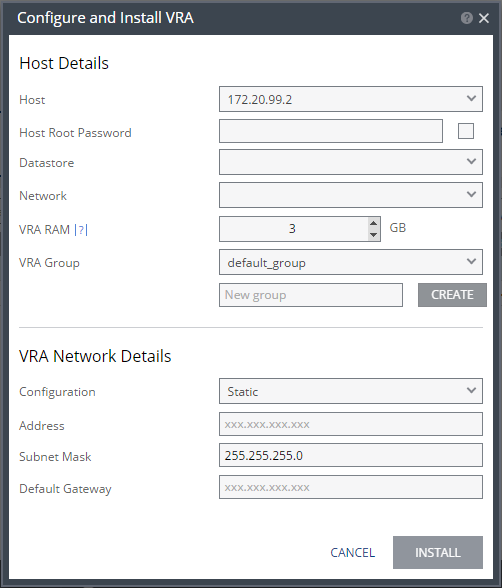
The Configure and Install VRA dialog is displayed. The dialog displayed depends on the ESX/i version:
| |
ESXi versions from 5.5 | ESXi versions before version 5.5 |
Note: If you selected a cluster or multiple hosts, the VRA is installed on the first host in the displayed list.
Specify the following Host Details:
Host – The host on which the VRA is installed. The drop-down displays the hosts that do not have a VRA installed, with the selected host displayed by default.
From ESXi 5.5, by default, Zerto Virtual Manager uses a vSphere Installation Bundle, VIB, to connect to the host. When using VIB:
■ The user does not enter a password.
■ Once a day, Zerto Virtual Manager checks that the VRA and host can connect. If the connection fails, Zerto Virtual Manager re-initiates the connection automatically and logs it.
For ESX/i versions earlier than 5.5, when using a password, root access is required. Once a day, Zerto Virtual Manager checks that the password is valid. If the password was changed, an alert is issued, requesting the user enter the new password.
Use credentials to connect to host – When unchecked, the Zerto Virtual Manager uses VIB to connect to the host. This field is only relevant for ESXi 5.5 and later.
Host Root Password – When the VRA should connect to the host with a password, check Use credential to connect to host and enter the root user password used to access the host. When the box on the right side is checked, the password is displayed in plain text.This field is only relevant for ESXi 4.x and 5.x hosts. This field is disabled for ESX 4.x hosts.
Datastore – The datastore that the VRA will use for protected virtual machine data on the recovery site, including the journals. You can install more than one VRA on the same datastore.
Network – The network used to access the VRA.
VRA RAM – The amount of memory to allocate to the VRA. The amount determines the maximum buffer size for the VRA for buffering IOs written by the protected virtual machines, before the writes are sent over the network to the recovery VRA. The recovery VRA also buffers the incoming IOs until they are written to the journal. If a buffer becomes full, a Bitmap Sync is performed after space is freed up in the buffer.
Amount of VRA RAM | VRA Buffer Pool Size |
1GB | 450MB |
2GB | 1450MB |
3GB | 2300MB |
4GB | 3,300MB |
5GB | 4,300MB |
6GB | 5,300MB |
7GB | 6,300MB |
8GB | 7,300MB |
9GB | 8,300MB |
10GB | 9,300MB |
11GB | 10,300MB |
12GB | 11,300MB |
13GB | 12,300MB |
14GB | 13,300MB |
15GB | 14,300MB |
16GB | 15,300MB |
The protecting VRA can use 90% of the buffer for IOs to send over the network and the recovery VRA can use 75% of the buffer. That is, for example, a protecting VRA defined with 2GB of RAM can buffer approximately 1305MB before the buffer is full and a Bitmap Sync is required.
Note: The number of virtual machines that a VRA can support is not dependent on the amount of VRA RAM.
VRA Group – Choose the VRA Group from the dropdown list. If you want to create a new VRA group, type in the name of the new group and click CREATE. You can then choose the new group from the dropdown list.
You group VRAs together when VRAs use different networks so they can be grouped by network, for example when the protected and recovery sites are managed by the same vCenter Server and you want to replicate from the branch site to the main site. Within a group the priority assigned to a VPG dictates the bandwidth used and is applicable within a group and not between groups. Thus, a VPG with a high priority is allocated bandwidth before VPGs with lower priorities. VPGs that are on VRAs with different VRA groups, for example, VPG1 on VRA1 in group1 and VPG2 on VRA2 in group2, do not affect each other, as the priority is relevant only within each group.
3. Specify the following VRA Network Details:
Configuration – Either have the IP address allocated via a static IP address or a DHCP server. If you select the Static option, which is the recommended option, enter the following:
Address – The IP address for the VRA.
Subnet Mask – The subnet mask for the network. The default value is 255.255.255.0.
Default Gateway – The default gateway for the network.
4. Click INSTALL.
The VRA installation starts and the status is displayed in the TASKS popup dialog in the status bar and under MONITORING > TASKS.
The VRA displayed name and DNS name is Z-VRA-hostname. If a virtual machine with this name exists, for example when a previous VRA was not deleted, the VRA name has a number appended to it.
5. Upgrading VRAs
When upgrading Zerto Virtual Replication, the VRAs that were installed in the previous version are not upgraded automatically. Zerto Virtual Replication enables VRAs installed with the previous version of Zerto Virtual Replication to work with VRAs installed with the current version of Zerto Virtual Replication in any combination of VRAs (all from one version or a mix of VRA versions) as long as the VRAs are only one update higher or lower than the version of Zerto Virtual Replication installed on this site. Zerto recommends upgrading the VRAs to be consistent with the latest version and this can be done by selecting SETUP > VRAs.
After upgrading Zerto Virtual Replication, the VRAs might also require an upgrade. You can see if an upgrade is available in the VRAs tab.
Note: An alert is also issued that there are VRAs that can be upgraded. Move the mouse over the Outdated value to display the VRA version as a tooltip.
Considerations when upgrading VRAs:
■ VRAs managing protected virtual machines: Either vMotion the protected virtual machines and datastores managed by the VRA to another host with a VRA, or upgrade the VRA without vMotioning the virtual machines and a Delta Sync will be performed following the upgrade.
■ Upgrading a VRA that manages the recovery of virtual machines results in a bitmap sync being performed after the upgrade. Note that the time to upgrade a VRA is short so the bitmap sync should also be quick.
To upgrade VRAs:
1. For a VRA protecting virtual machines, if vMotioning the protected virtual machines, remove affinity rules for protected virtual machines on the host with the VRA to be upgraded and vMotion these protected machines from the host to another host with a VRA.
2. In the Zerto User Interface, click SETUP > VRAs.
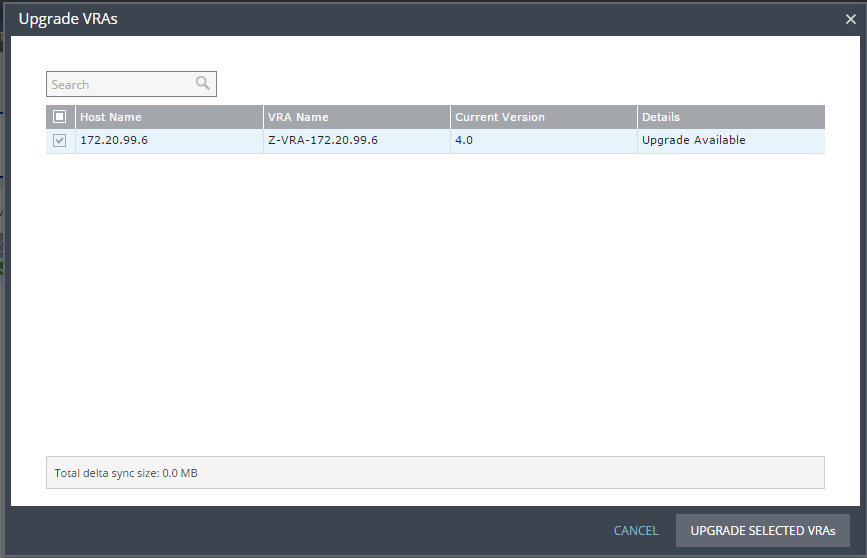
3. Select the VRAs to upgrade and click MORE > Upgrade.
The Upgrade VRAs dialog is displayed, listing the selected VRAs and whether an upgrade is available.
4. Review the list for the VRAs that you want to upgrade.
5. Click UPGRADE SELECTED VRAs.
The upgrade progress is displayed in the VRAs tab.
A Delta Sync, for VRAs protecting virtual machines, or a Bitmap Sync, for VRAs managing recovery, is performed following the upgrade.
Note: The VRA name does not change, even if the naming convention in the latest version is different.
You do not need to upgrade VMware Tools on a VRA.